
1. Introdución
This manual provides essential information for the proper installation, operation, and maintenance of your SUNMI T2s Lite 15.6-inch Android Point of Sale (POS) system. Please read this manual thoroughly before using the device to ensure optimal performance and safety. Keep this manual for future reference.
2. Información de seguridade
- Non expoña o dispositivo a temperaturas extremas, humidade ou luz solar directa.
- Evite deixar caer ou someter o dispositivo a fortes impactos.
- Use only the power adapter supplied with the device. Using an incorrect adapter may cause damage or fire.
- Non intente desmontar nin reparar o dispositivo vostede mesmo. Consulte persoal de servizo cualificado.
- Manteña o dispositivo lonxe da auga ou doutros líquidos.
- Asegúrese de que haxa unha ventilación axeitada arredor do dispositivo durante o seu funcionamento.
3. Contido do paquete
Verifica que todos os elementos estean presentes no paquete:
- SUNMI T2s Lite POS Terminal
- Adaptador de alimentación
- Cable de alimentación
- Guía de inicio rápido (se corresponde)
- Tarxeta de garantía (se procede)
Se falta algún elemento ou está danado, póñase en contacto co seu provedor inmediatamente.
4. Produto rematadoview
The SUNMI T2s Lite is an integrated Android-based POS system designed for retail environments. It features a 15.6-inch capacitive touchscreen display and various connectivity options.
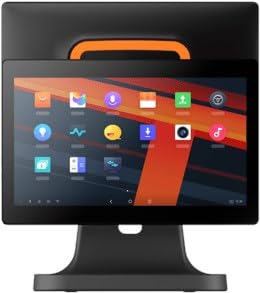
Figura 4.1: Fronte view of the SUNMI T2s Lite POS system. This image displays the main 15.6-inch touchscreen, which is the primary interface for operating the device. The design is compact and suitable for various retail settings.
4.1 Compoñentes clave
- Pantalla táctil de 15.6 polgadas: High-resolution (1920x1080) capacitive touch interface.
- Botón de encendido: Located typically on the side or rear for turning the device on/off.
- Portos USB: For connecting peripherals such as barcode scanners, external printers, or cash drawers.
- Porto Ethernet: Para conectividade de rede con fíos.
- Entrada de enerxía: Para conectar o adaptador de alimentación.
- Cámara frontal: For specific applications requiring image capture.
5. Configuración
5.1 Desembalaxe e colocación
- Carefully remove the device and all accessories from the packaging.
- Place the POS terminal on a stable, flat surface in a well-ventilated area.
- Ensure there is sufficient space around the device for cable connections and heat dissipation.
5.2 Conexión de enerxía
- Conecte o cable de alimentación ao adaptador de alimentación.
- Plug the power adapter into the power input port on the back of the SUNMI T2s Lite.
- Conecte o outro extremo do cable de alimentación a unha toma de corrente con conexión a terra.
5.3 Initial Boot and Network Connection
- Press and hold the power button until the screen lights up. The device will boot into the Android operating system.
- Siga as instrucións en pantalla para a configuración inicial, incluídas a selección do idioma e a zona horaria.
- Conexión Wi-Fi: Ir a Configuración > Rede e internet > Wi-Fi, selecciona a túa rede e introduce o contrasinal.
- Conexión Ethernet: Connect an Ethernet cable from your router/switch to the Ethernet port on the device. The device should automatically connect to the wired network.
5.4 Conexión de periféricos
- Dispositivos USB: Plug USB peripherals (e.g., barcode scanner, external printer, cash drawer) into the available USB ports. The system will typically recognize them automatically.
- Dispositivos Bluetooth: Ir a Configuración > Dispositivos conectados > Bluetooth, enable Bluetooth, and pair with your desired device.
6. Instrucións de funcionamento
6.1 Acendido/Apagado
- Para acender: Manteña premido o botón de acendido ata que a pantalla se ilumine.
- Para apagar: Press and hold the power button until a power menu appears. Select "Power off" and confirm. Alternatively, a short press of the power button will put the device to sleep.
6.2 Uso da pantalla táctil
- Toca: To select an item or activate a button.
- Mantén premido: To open context menus or drag items.
- Pasar o dedo: To scroll through lists or navigate between screens.
- Pinch-to-Zoom: Para ampliar ou reducir imaxes ou web páxinas.
6.3 Navegación do sistema operativo Android
- Pantalla de inicio: The central hub for your applications and widgets.
- Caixón de aplicacións: Access all installed applications.
- Panel de notificacións: Pasa o dedo cara abaixo desde a parte superior da pantalla ata view notificacións e configuracións rápidas.
- Configuración: Configure Wi-Fi, Bluetooth, display, sound, and other system options.
6.4 Basic POS Functions
The specific POS functions will depend on the software application installed on your device. Refer to the documentation provided with your POS software for detailed instructions. Generally, you will:
- Launch your POS application from the home screen or app drawer.
- Inicia sesión coas túas credenciais de usuario.
- Process transactions using the touchscreen and connected peripherals (e.g., scanning items, accepting payments).
- Print receipts if an external or integrated printer is configured.
7. Mantemento
7.1 Limpeza do dispositivo
- Apague e desconecte sempre o dispositivo antes de limpalo.
- Use un pano suave e sen pelusa lixeiramente dampened with water or a mild, non-abrasive cleaner to wipe the screen and exterior surfaces.
- Non pulverice líquidos directamente sobre o dispositivo.
- Evite o uso de produtos químicos agresivos, solventes ou materiais abrasivos.
7.2 Actualizacións de software
Regularly check for and install system and application updates to ensure optimal performance, security, and access to new features. You can usually find system updates in Configuración > Sistema > Actualización do sistema.
7.3 Almacenamento
When not in use for extended periods, store the device in a cool, dry place, away from direct sunlight and extreme temperatures. If storing for a long time, ensure the battery is charged to about 50% to prolong its lifespan.
8 Solución de problemas
Esta sección aborda problemas comúns cos que podes atoparte. Para problemas máis complexos, ponte en contacto co servizo de atención ao cliente.
- O dispositivo non se acende:
- Asegúrate de que o adaptador de corrente estea conectado correctamente ao dispositivo e a unha toma de corrente que funcione.
- Verifique que a toma de corrente funcione.
- Try holding the power button for 10-15 seconds to force a restart.
- Touchscreen is unresponsive:
- Reinicie o dispositivo.
- Ensure the screen is clean and free of debris or liquids.
- Network connection issues (Wi-Fi/Ethernet):
- Check if the Wi-Fi is enabled and you are connected to the correct network with the right password.
- For Ethernet, ensure the cable is properly connected and your router/switch is working.
- Reinicia o teu router/módem.
- Peripherals (e.g., printer, scanner) not working:
- Ensure the peripheral is properly connected to the correct port.
- Check if the peripheral has its own power supply and is turned on.
- Verify that the necessary drivers or software for the peripheral are installed and configured within your POS application.
9. Especificacións
The following are key technical specifications for the SUNMI T2s Lite:
| Característica | Especificación |
|---|---|
| Marca | SUNMI |
| Fabricante | Sunmi |
| Resolución de visualización nativa | 1920 x 1080 píxeles |
| Tecnoloxía de conectividade | Bluetooth, Ethernet, USB, WLAN |
| Descrición da cámara | Frontal |
| ASIN | B0B53FLFT8 |
10. Garantía e soporte
The SUNMI T2s Lite POS system comes with a standard manufacturer's warranty. Please refer to the warranty card included in your package for specific terms and conditions, including warranty period and coverage details.
For technical support, service, or warranty claims, please contact your authorized SUNMI dealer or the customer support channel specified in your purchase documentation. Ensure you have your product model number (T2s Lite) and ASIN (B0B53FLFT8) ready when contacting support.