
1. Introdución
This manual provides detailed instructions for the installation, operation, and maintenance of your Fractal Design Define 7 Nano Black Solid Mini ITX PC Case. Please read this manual thoroughly before beginning assembly to ensure proper installation and to maximize the performance and longevity of your system.
The Define 7 Nano is a compact Mini ITX case designed for silent operation and flexible component support, offering a balance of size and functionality for small form factor builds.

Figura 1: Parte frontal view of the Fractal Design Define 7 Nano Black Solid Mini ITX PC Case.
2. Información de seguridade
Observe as seguintes precaucións de seguridade durante a instalación e o funcionamento:
- Desconecte sempre a fonte de alimentación da toma de corrente antes de instalar ou retirar calquera compoñente.
- Use unha pulseira antiestática para evitar danos por descarga electrostática (ESD) en compoñentes sensibles.
- Manexa os compoñentes con coidado para evitar danos físicos.
- Asegúrate de que haxa unha ventilación axeitada arredor da carcasa do PC para evitar o sobrequecemento.
- Keep the case away from liquids and excessive humidity.
- Do not attempt to modify the case structure, as this may void your warranty and pose safety risks.
3. Contido do paquete
Verifica que todos os compoñentes estean presentes no paquete:
- Fractal Design Define 7 Nano PC Case
- Accessory Box (screws, zip ties, standoffs, cleaning cloth)
- Manual de usuario (este documento)
- Pre-installed fans (Dynamic X2 GP-12/GP-14, quantity may vary)

Figura 2: Explotado view showing the various removable components of the Define 7 Nano case.
4. Configuración e instalación de compoñentes
4.1. Preparación
- Desembalar a caixa: Retire con coidado a caixa da súa embalaxe.
- Eliminar os paneis laterais: The side panels are secured with captive thumbscrews. Loosen the thumbscrews and slide the panels backward to remove them.
- Remove Top Panel (Optional): The top panel can be removed for easier access during installation or for enhanced airflow. Press the release button at the rear of the top panel and lift it off.
- Remove Front Panel (Optional): The front panel can be carefully pulled off from the bottom for access to front fan mounts and dust filters.
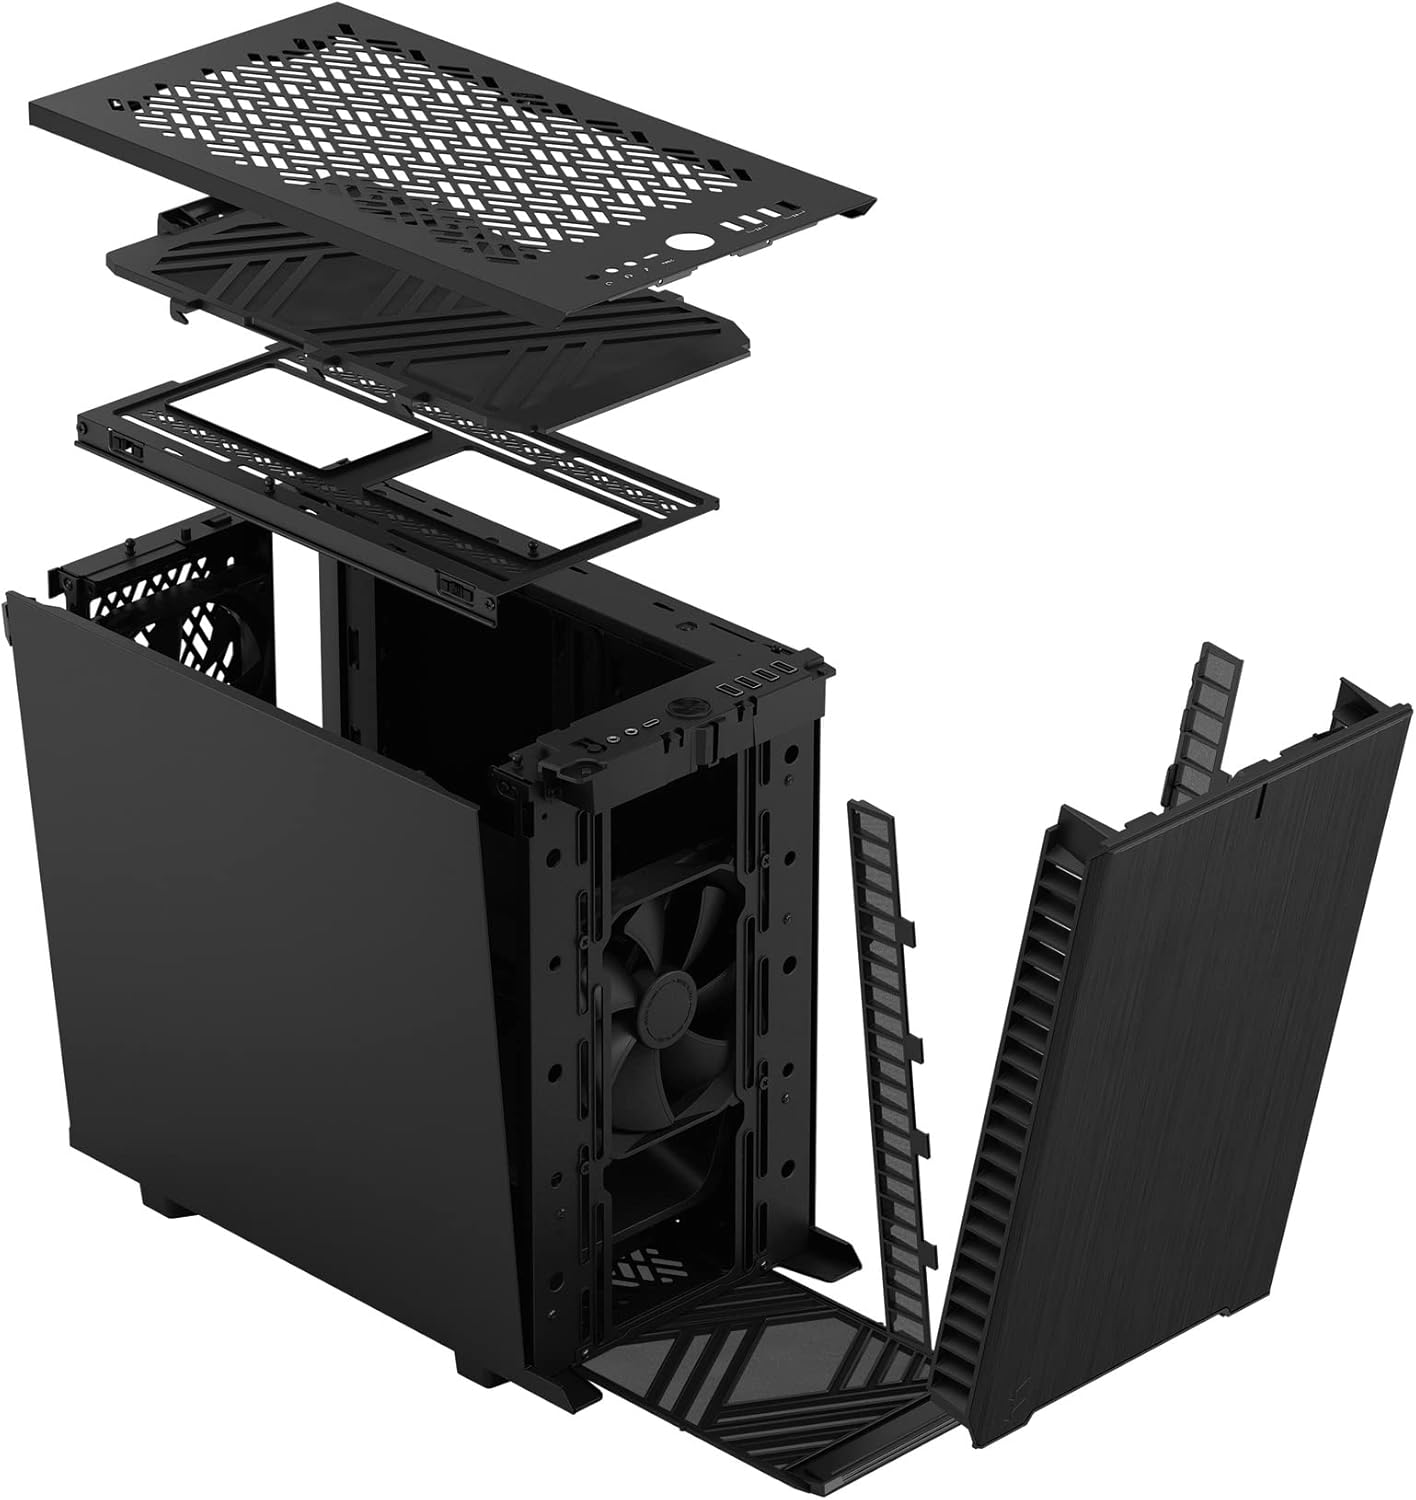
Figura 3: Explotado view illustrating the removal process for the front and top panels.
4.2. Instalación da placa base
The Define 7 Nano supports Mini ITX motherboards.
- Instalar o protector de E/S: If your motherboard requires an I/O shield, install it into the rear opening of the case before mounting the motherboard.
- Posición da placa base: Align your Mini ITX motherboard with the pre-installed standoffs inside the case.
- Placa base segura: Use the provided screws from the accessory box to secure the motherboard to the standoffs.
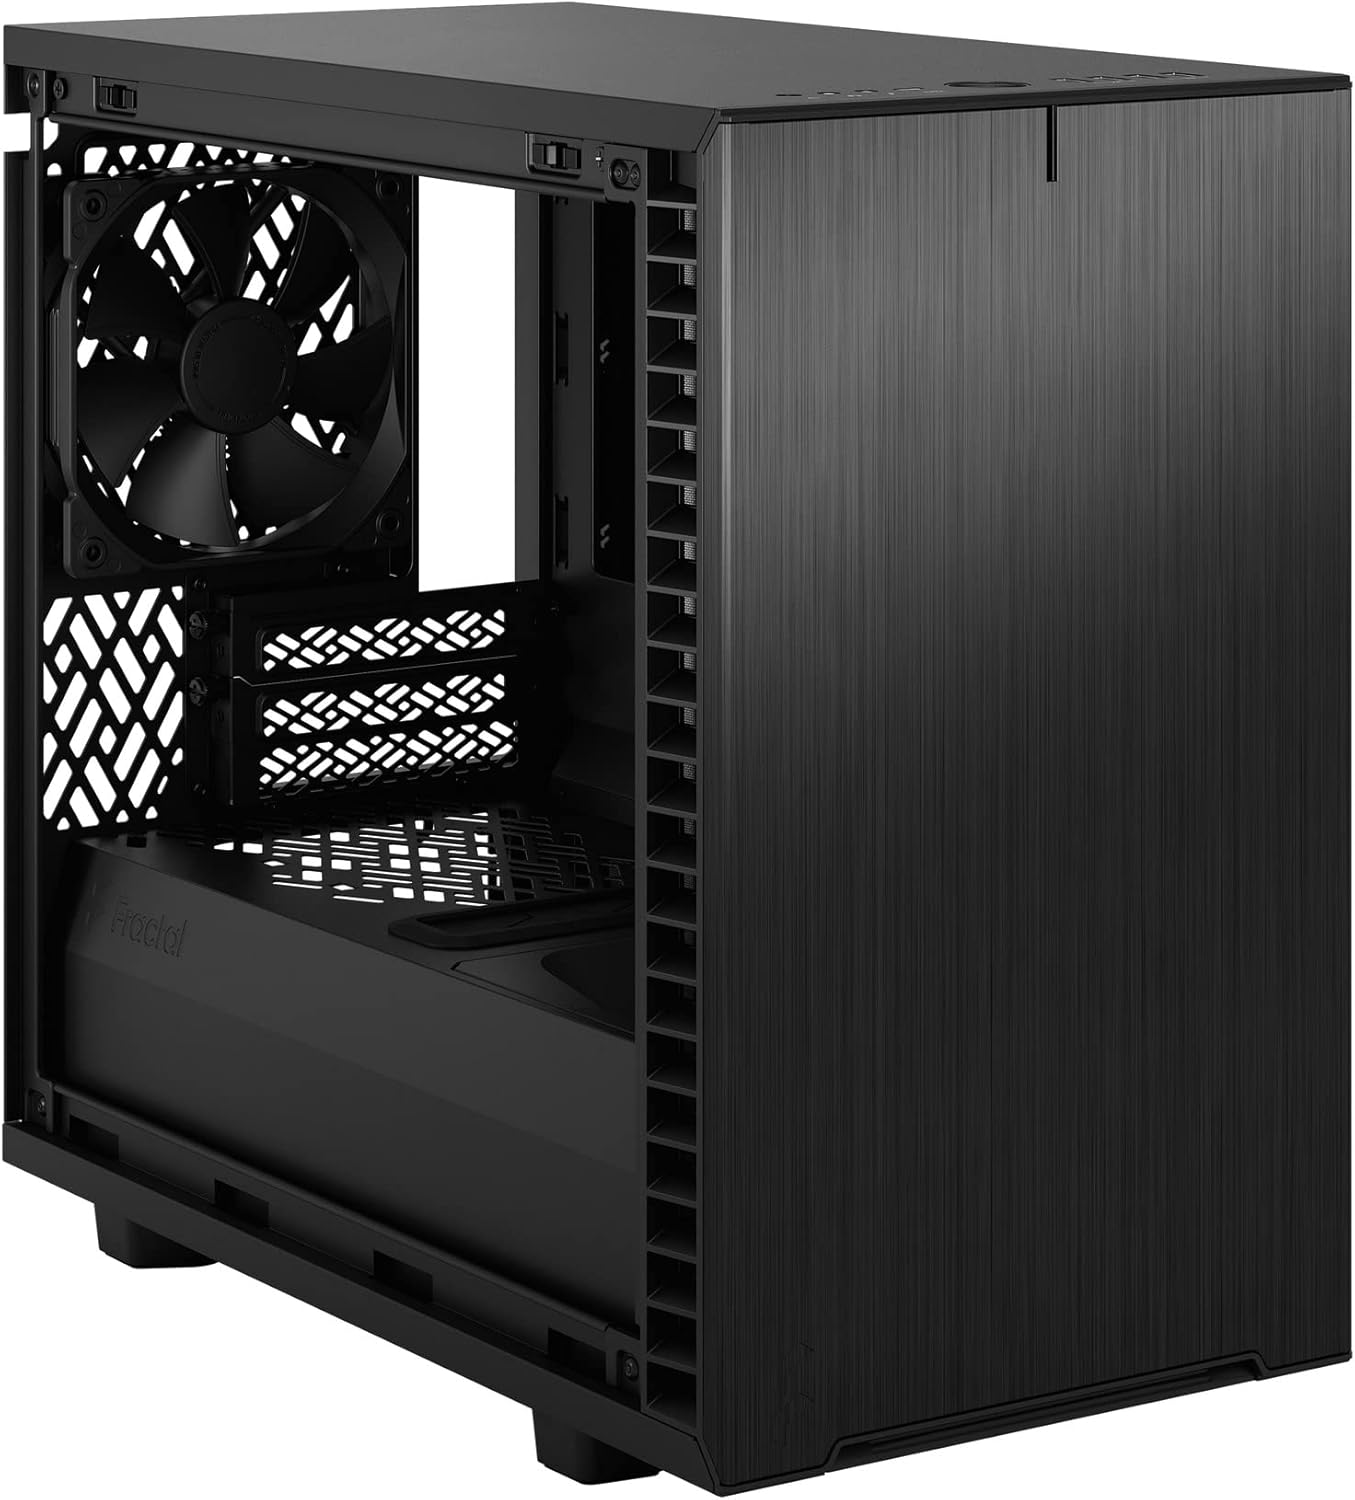
Figura 4: Interior view of the case, highlighting the motherboard mounting area and fan locations.
4.3. Instalación da fonte de alimentación (PSU)
The Define 7 Nano supports ATX PSUs.
- Mount PSU Bracket: Attach the PSU mounting bracket to your power supply using the screws provided with the PSU.
- Slide PSU into Case: Slide the PSU with the attached bracket into the rear of the case.
- Fonte de alimentación segura: Secure the PSU bracket to the case using the thumbscrews.
4.4. Instalación da unidade de almacenamento
A caixa admite SSD de 2.5" e HDD de 3.5".
- 2.5" Drives: Mount 2.5" drives to the dedicated SSD brackets located behind the motherboard tray or on the PSU shroud. Secure with screws.
- 3.5" Drives: Install 3.5" drives into the drive cage located beneath the PSU shroud. Secure with screws.
4.5. Instalación da tarxeta gráfica (GPU)
- Retirar as cubertas das ranuras PCIe: Retire as tapas das ranuras PCIe necesarias da parte traseira da caixa.
- Insert GPU: Carefully insert your graphics card into the primary PCIe slot on the motherboard.
- GPU segura: Secure the graphics card to the case using the thumbscrews or standard screws.
4.6. Cooling System Installation (Fans/Radiators)
The Define 7 Nano offers flexible cooling options.
- Ventiladores frontales: Up to two 120/140mm fans or a 240/280mm radiator can be installed at the front.
- Principais fans: Up to two 120/140mm fans or a 240mm radiator can be installed at the top (requires removing the solid top panel and installing the ventilated top panel).
- Ventilador traseiro: One 120mm fan can be installed at the rear.
- Bottom Fan: One 120mm fan can be installed at the bottom.
Asegúrate de que os ventiladores estean orientados correctamente para un fluxo de aire óptimo (admisión ou escape).
4.7. Xestión de cables
The case features routing channels and Velcro straps behind the motherboard tray for organized cable management.
- Cables de ruta: Pass power and data cables through the rubber grommets to the back of the motherboard tray.
- Cables seguros: Use the pre-installed Velcro straps and included zip ties to bundle and secure cables.

Figura 5: Interior traseiro view demonstrating the cable management system with Velcro straps.
4.8. Conexións do panel frontal
Connect the front panel cables to the corresponding headers on your motherboard:
- Power Button (PWR SW)
- Reset Button (RESET SW)
- Power LED (PWR LED)
- HDD Activity LED (HDD LED)
- Cabeceira USB 3.0
- USB Type-C Header (if applicable)
- Cabeceira de audio HD
Consulta o manual da placa base para coñecer a localización exacta dos cabeceiras.
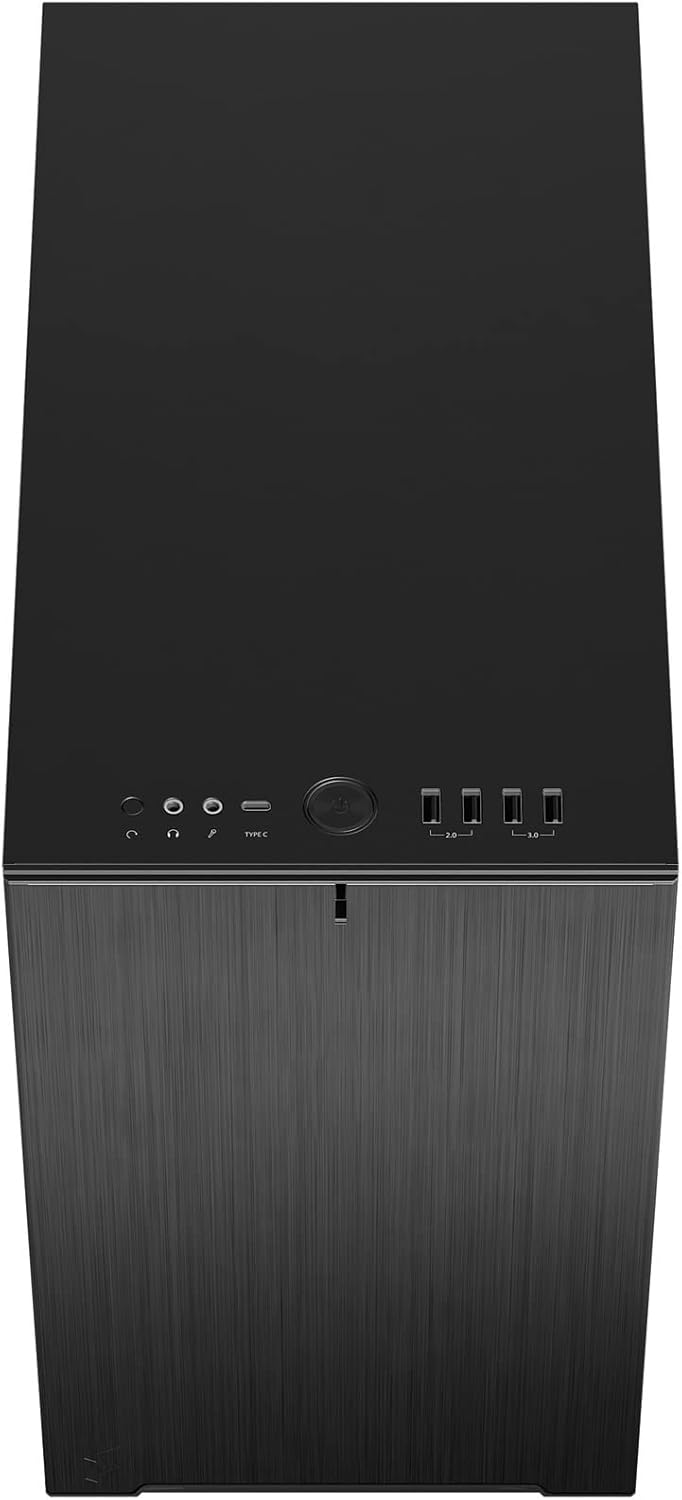
Figura 6: Parte superior frontal view displaying the front I/O panel with USB ports, audio jacks, and power button.
5. Instrucións de funcionamento
5.1. Acendido/apagado
- Encendido: Press the power button located on the front I/O panel.
- Apagado: Initiate a shutdown from your operating system. Alternatively, press and hold the power button for 5 seconds for a forced shutdown.
5.2. Using Front Panel Ports
O panel de E/S frontal proporciona un acceso cómodo a:
- Portos USB 3.0: Para a transferencia de datos de alta velocidade con dispositivos compatibles.
- Porto USB tipo C: For modern devices requiring a Type-C connection.
- Conectores de son: Para conectar auriculares e micrófonos.
6. Mantemento
Un mantemento regular axuda a garantir un rendemento óptimo e unha maior duración dos compoñentes do teu PC.
6.1. Limpeza do filtro de po
The Define 7 Nano is equipped with easily removable dust filters to prevent dust buildup inside the case.
- Filtro frontal: Can be accessed by removing the front panel.
- Filtro superior: Located beneath the ventilated top panel (if installed).
- Filtro inferior: Slides out from the front of the case.
Clean filters regularly (e.g., monthly) by rinsing them with water and allowing them to dry completely, or by using a soft brush or compressed air.
6.2. Limpeza xeral
- Use un suave, damp cloth to wipe down the exterior surfaces of the case.
- Evite o uso de produtos químicos agresivos ou materiais abrasivos que poidan danar o acabado.
- For interior cleaning, use compressed air to remove dust from components. Ensure the system is powered off and unplugged.
7 Solución de problemas
Esta sección aborda problemas comúns cos que podes atoparte.
7.1. No Power / System Not Starting
- Comproba as conexións de alimentación: Ensure the PSU is properly connected to the wall outlet and the power switch on the PSU is in the 'ON' position. Verify all internal power cables (24-pin ATX, 8-pin CPU, PCIe, SATA) are securely connected.
- Cabeceiras do panel frontal: Double-check that the power button header (PWR SW) is correctly connected to the motherboard.
- Motherboard/CPU: Asegúrate de que a CPU e a RAM estean correctamente instaladas.
7.2. Ruído excesivo
- Ruído do ventilador: Check if any fan cables are obstructing fan blades. Ensure fans are securely mounted. Consider adjusting fan speeds in your motherboard's BIOS/UEFI or operating system.
- Vibración: Ensure all components (PSU, drives, GPU) are securely fastened to prevent rattling.
7.3. Sobrequecemento
- Fluxo de aire: Verify that fans are oriented correctly (intake/exhaust) and that there is adequate airflow.
- Filtros de po: Clean dust filters regularly to prevent restricted airflow.
- Pasta térmica: Ensure CPU cooler has proper thermal paste application.
8. Especificacións
| Característica | Especificación |
|---|---|
| Nome do modelo | Define 7 Nano |
| Número de modelo | FD-C-DEF7N-01 |
| Tipo de caso | Mini-torre |
| Compatibilidade da placa base | Mini ITX |
| Dimensións (L x W x H) | Aprox. 18.74 x 11.38 x 17.91 polgadas (embalaxe) |
| Peso | Aprox. 18.37 libras |
| Material | Aluminio |
| Cor | Sólido negro |
| Portos de E / S dianteiros | 5x USB 3.0, Audio In/Out, Power Button |
| Unidade Bays | 2.5" SSD, 3.5" HDD (specific quantities vary by configuration) |
| Método de arrefriamento | Aire |
| Ventiladores preinstalados | Dynamic X2 GP-12 (rear), Dynamic X2 GP-14 (front) |
9. Garantía e soporte
Fractal Design products are manufactured to the highest quality standards and come with a limited warranty. For detailed warranty information, please refer to the official Fractal Design websitio web ou a tarxeta de garantía incluída co produto.
For technical support, troubleshooting assistance, or to inquire about replacement parts, please visit the official Fractal Design support page:
www.fractal-design.com/support/
Please have your product model number (FD-C-DEF7N-01) and proof of purchase ready when contacting support.


