RHYTHM 8RZ234SR04
RHYTHM D234 8RZ234SR04 Radio Alarm Clock User Manual
Model: 8RZ234SR04
1. Introdución
Grazas pola compraasing the RHYTHM D234 8RZ234SR04 Radio Alarm Clock. This digital alarm clock features a radio-controlled timekeeping function, an electronic sound alarm with snooze, a thermometer, a hygrometer, and a calendar display. Its compact design and clear LCD make it suitable for various indoor environments. Please read this manual thoroughly before use to ensure proper operation and to maximize the clock's features.
2. Información de seguridade
- Non expoña a unidade a temperaturas extremas, luz solar directa ou alta humidade.
- Evite deixar caer a unidade ou sometela a impactos fortes.
- Non intente desmontar nin modificar a unidade. Isto anulará a garantía.
- Manteña as pilas fóra do alcance dos nenos. En caso de ingestión, busque atención médica inmediata.
- Elimina as baterías usadas segundo a normativa local.
- Use only the specified battery type (AA batteries).
3. Contido do paquete
Asegúrate de que todos os elementos estean presentes no paquete:
- RHYTHM D234 8RZ234SR04 Radio Alarm Clock
- Manual de usuario (este documento)
4. Produto rematadoview
The RHYTHM D234 8RZ234SR04 features a clear LCD display and easily accessible front-facing control buttons for intuitive operation.
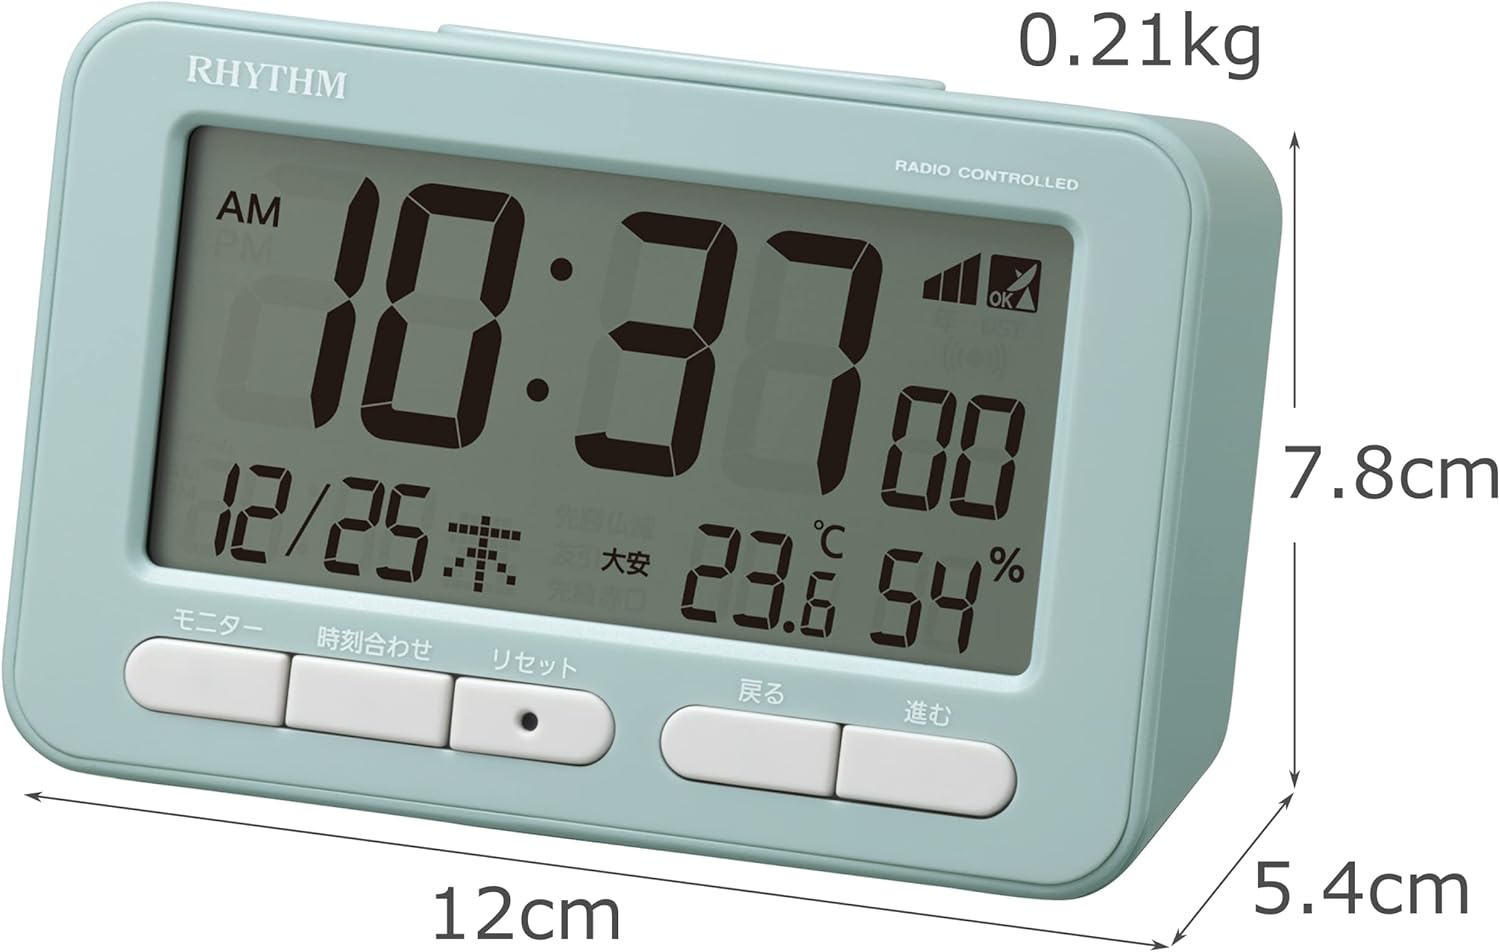
Figura 4.1: Fronte view of the RHYTHM D234 8RZ234SR04 Radio Alarm Clock, showing its dimensions (7.8cm H x 12cm W x 5.4cm D) and weight (0.21kg).

Figura 4.2: Detallado view of the clock's large LCD display and the front control buttons, including 'Monitor', 'Time Set', 'Reset', 'Back', and 'Forward'.
Mostrar información:
- Tempo: Displays current time in AM/PM or 24-hour format.
- Data: Shows month, day, and day of the week.
- Temperatura: Displays current ambient temperature in Celsius.
- Humidade: Shows current ambient humidity percentage.
- Radio Wave Reception Indicator: Indica a intensidade do sinal.
- Alarm ON/OFF Indicator: Mostra se a alarma está activa.
Botóns de control:
- MONITOR: Activates backlight or cycles display modes.
- HORARIO: Enters time/date setting mode.
- RESET: Restablece o reloxo aos valores predeterminados de fábrica.
- BACK (<): Adjusts settings backward.
- FORWARD (>): Adjusts settings forward.
- SNOOZE / LUZ: Activates snooze during alarm or backlight when pressed.
5. Configuración
5.1 Instalación da batería
- Abra a tapa do compartimento da batería situada na parte traseira do reloxo.
- Insira dúas (2) pilas AA (non incluídas) segundo os indicadores de polaridade (+ e -) que aparecen no interior do compartimento.
- Pecha a tapa do compartimento da batería de forma segura.
5.2 Initial Power On and Radio Wave Reception
Upon battery installation, the clock will automatically attempt to receive radio time signals to set the correct time and date. This process may take several minutes.

Figura 5.1: Illustration of radio wave time signal reception from two transmission stations, ensuring accurate timekeeping.
- Coloca o reloxo preto dunha xanela para unha recepción óptima do sinal.
- Avoid placing it near electronic devices that may cause interference (e.g., TVs, computers, mobile phones).
- A signal strength indicator will appear on the display during reception. Once synchronized, the indicator will show a stable signal.
6. Instrucións de funcionamento
6.1 Axuste manual da hora e da data
If radio signal reception is poor or unavailable, you can set the time and date manually:
- Manteña premido o HORARIO botón ata que a pantalla da hora comece a parpadear.
- Usa o BACK (<) e FORWARD (>) botóns para axustar a hora. Prema HORARIO para confirmar e pasar aos minutos.
- Repita o proceso para minutos, ano, mes e día.
- Preme HORARIO unha última vez para saír do modo de configuración.
6.2 Axustar a alarma
- Preme o CONXUNTO DE ALARMA button (usually located on the side or back, if not on front, refer to product diagram). The alarm time will flash.
- Usa o BACK (<) e FORWARD (>) para axustar a hora de alarma desexada. Prema CONXUNTO DE ALARMA para confirmar.
- Axuste os minutos usando o botón BACK (<) e FORWARD (>) botóns. Preme CONXUNTO DE ALARMA para confirmar e saír.
- Para activar/desactivar a alarma, prema o botón ALARMA ON / OFF switch or button. An alarm icon will appear/disappear on the display.
6.3 Uso da función de pospoñer
Cando soe a alarma, prema o botón grande SNOOZE / LUZ button on the top of the clock. The alarm will pause for approximately 5 minutes and then sound again. This can be repeated multiple times.
6.4 Display Modes and Backlight
The clock continuously displays time, date, temperature, and humidity. To temporarily illuminate the display, press the SNOOZE / LUZ button. The backlight will activate for a few seconds.

Figura 6.1: The clock's display illuminated by its backlight, showing time, date, temperature, and humidity clearly in low light conditions.
Formato 6.5 12/24 horas
To switch between 12-hour (AM/PM) and 24-hour formats, locate the 12/24H button (often on the back or side) and press it. The display will change accordingly.
7. Mantemento
7.1 Limpeza
Wipe the clock with a soft, dry cloth. Do not use abrasive cleaners, solvents, or spray directly onto the unit, as this may damage the finish or internal components.
7.2 Substitución da batería
When the display becomes dim or the clock functions irregularly, it is time to replace the batteries. Follow the battery installation steps in Section 5.1. Replace both batteries simultaneously with new ones of the same type.
8 Solución de problemas
| Problema | Causa posible | Solución |
|---|---|---|
| Sen pantalla ou pantalla escura | Pilas gastadas ou inseridas incorrectamente. | Substitúa as pilas por pilas AA novas, asegurándose de manter a polaridade correcta. |
| Hora/data incorrectas | Poor radio signal reception or manual setting error. | Move the clock to a location with better signal. Perform manual time setting if necessary. |
| A alarma non soa | A alarma non está activada ou está configurada incorrectamente. | Ensure the alarm is turned ON and the alarm time is set correctly. |
| Temperature/Humidity readings seem inaccurate | Unit placed near heat/cold sources or in extreme conditions. | Relocate the clock to a stable indoor environment away from direct heat, cold, or moisture. Allow time for readings to stabilize. |
9. Especificacións
- Número de modelo: 8RZ234SR04
- Dimensións: 7.8 cm (alto) x 12 cm (ancho) x 5.4 cm (fondo)
- Peso: Approximately 0.21 kg (7.5 oz)
- Fonte de enerxía: 2 x AA batteries (sold separately)
- Movemento: Radio-controlled (Automatic time synchronization)
- Tipo de visualización: LCD
- Alarma: Electronic sound, 4-level volume change, with Snooze function
- Rango do termómetro: -9.9°C a 50°C
- Hygrometer Range: 20% a 95%
- Calendario: Programs until December 31, 2099
- Material: Plástico
- Tipo de montaxe: Mesa
- Características especiais: Backlight, 12/24-hour display option
10. Garantía e soporte
For warranty information and customer support, please refer to the documentation provided at the time of purchase or contact your local RHYTHM distributor. Keep your purchase receipt as proof of purchase for any warranty claims.
Ask a question about this manual
Ask about setup, troubleshooting, compatibility, parts, safety, or missing instructions. Manuals+ will review the question and use this page’s manual context to help answer it.