1. Rematadoview
The RackChoice 2U Rackmount Server Chassis is designed for high-density storage and server applications, supporting Micro-ATX and Mini-ITX motherboards. It features 12 hot-swap drive bays for 3.5" or 2.5" SATA/SAS 6Gbps drives, a robust cooling system with four 80mm middle fans, and compatibility with standard ATX power supplies. This chassis is ideal for environments requiring efficient space utilization and reliable data storage.
Características principais:
- Motherboard Compatibility: Micro-ATX (9.6" x 9.6") / Mini-ITX (6.7" x 6.7")
- Drive Bays: 12x 3.5" / 2.5" SATA/SAS 6Gbps hot-swap
- Cooling System: 4x 80mm Middle Fans
- Power Supply: Supports standard ATX power supply with top-mounted 120mm fan
- Expansion Slots: 4x Low-Profile
- Rackmount Depth: 545mm (21.5") for 600mm cabinets
- Included Accessories: 1 set of 20" sliding rails, 3x reversed Mini SAS 36pin (SFF-8087) male to 4x SATA 7pin female cables

Figure 1: RackChoice 2U Rackmount Server Chassis with top cover removed.
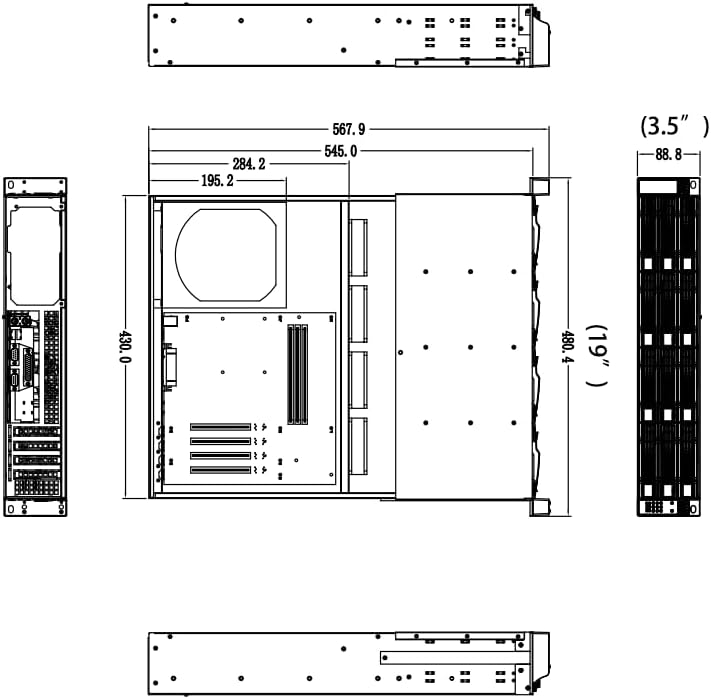
Figure 2: Technical drawing with chassis dimensions.
2. Configuración
2.1. Sliding Rail Installation
The chassis includes a set of 20" sliding rails for easy installation into a 600mm deep rack cabinet. Follow these steps to install the rails:
- Separate the inner rail from the outer rail. The inner rail attaches to the chassis, and the outer rail attaches to the rack.
- Attach the inner rails to the sides of the chassis using the provided short screws. Ensure the holes are aligned and screws are tightened securely.
- Attach the outer rails to the rack cabinet. The rails are designed to be adjustable. Use the longer screws for the cabinet. Ensure both front and back ends of the outer rails are securely fastened to the rack posts.
- Carefully slide the chassis with the inner rails into the outer rails mounted on the rack. Ensure proper alignment and that the locking mechanisms engage.
Video 1: Detailed guide on installing the sliding rails with the chassis and cabinet.
2.2. Instalación do disco duro (SSD/HDD de 2.5")
To install 2.5-inch hard drives or SSDs into the hot-swap trays:
- Pull out an empty hot-swap drive tray from the front of the chassis.
- Place the 2.5" drive into the tray. Align the screw holes on the drive with the corresponding holes on the tray.
- Secure the drive to the tray using the provided screws.
- Slide the populated drive tray back into the chassis until it clicks into place.
Video 2: Instructions for installing a 2.5-inch HDD/SSD into a drive tray using screws.
2.3. Conexións por cable
Proper cable management is crucial for optimal performance and airflow. The chassis includes Mini SAS to SATA cables for connecting the hot-swap backplane to your motherboard or HBA.
- Connect the Mini SAS 36pin (SFF-8087) male end of the provided cables to the backplane connectors within the chassis.
- Connect the 4x SATA 7pin female ends of each cable to the SATA ports on your motherboard or Host Bus Adapter (HBA). Ensure each SATA connector is securely attached to a drive.
- Connect the power supply cables to the motherboard, drives, and fans as required.

Figure 3: Mini SAS to SATA cables and 2.5" bay mounting bracket.
Video 3: Guide on connecting internal cables within the chassis to the motherboard and installing the rail.
3. Instrucións de funcionamento
3.1. Indicadores e controis do panel frontal
The front panel provides essential indicators and controls for monitoring and managing the chassis:
- Botón de encendido: Initiates system power on/off.
- Botón de reinicio: Reinicia o sistema.
- LED de alimentación (verde): Indicates the system is powered on.
- HDD LED (Blue/Green): Flashes to indicate hard drive activity. Green for power, blue for data activity.
- Portos USB: For connecting peripheral devices.
Video 4: Demonstration of the front panel LEDs, showing Green for Power and Blue for Data activity.
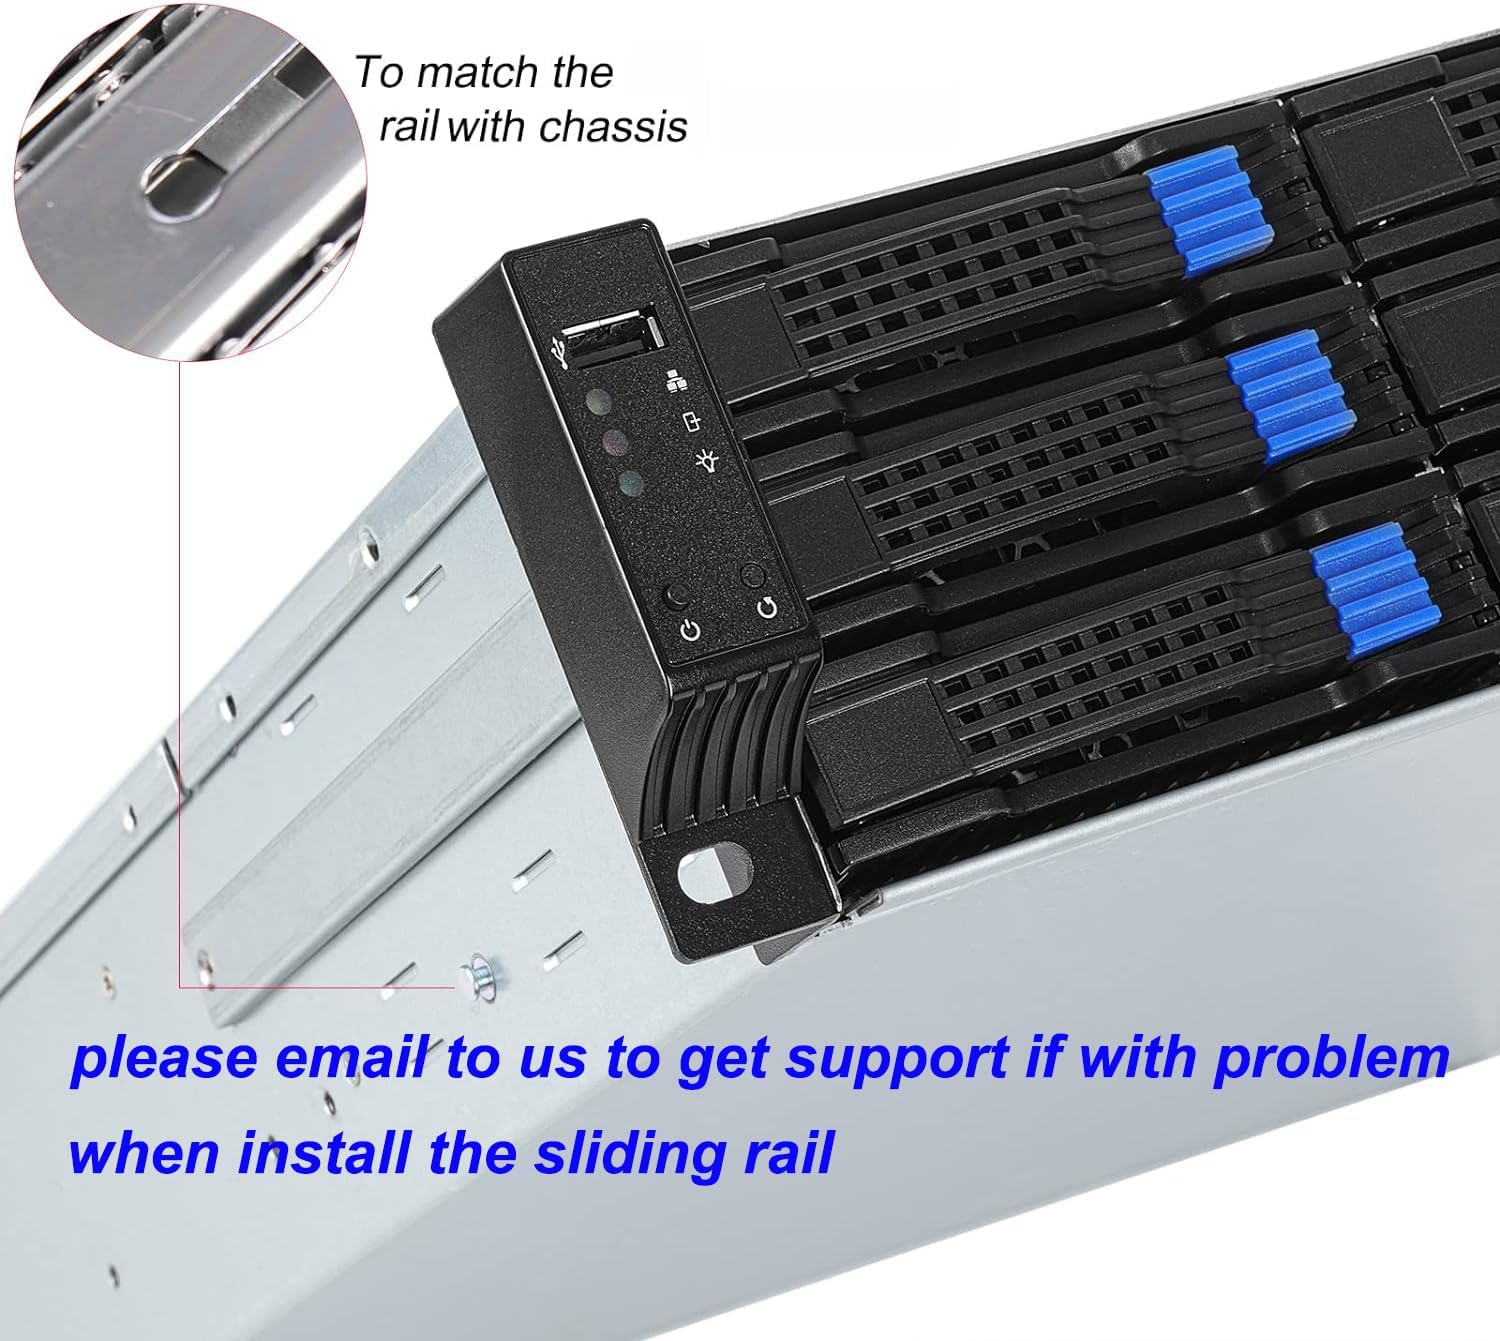
Figura 4: Controis e indicadores do panel frontal.
4. Mantemento
Regular maintenance ensures the longevity and optimal performance of your RackChoice server chassis.
- Eliminación de po: Periodically clean the chassis interior and fan filters (if applicable) to prevent dust buildup, which can impede airflow and cause overheating. Use compressed air or a soft brush.
- Inspección do ventilador: Check the 80mm middle fans for proper operation. Ensure they are spinning freely and quietly. Replace any noisy or malfunctioning fans.
- Xestión de cables Verify that all internal cables (SATA, power, Mini SAS) are securely connected and neatly routed to avoid obstructing airflow or interfering with other components.
- Drive Bay Check: Ensure hot-swap drive trays are fully seated and locked.

Figura 5: Interno view showing cooling fans and backplane.
5 Solución de problemas
This section addresses common issues you might encounter with your RackChoice 2U server chassis.
- Ruído forte do ventilador: The included 80mm fans are designed for high airflow. If noise is excessive, consider replacing them with quieter PWM fans and connecting them to a motherboard with PWM control. Ensure no cables are obstructing fan blades.
- Difficulty with Sliding Rail Installation: Ensure the inner and outer rails are correctly separated and aligned. Refer to Video 1 for detailed installation steps. If the rails bind, check for proper screw placement and ensure they are not overtightened.
- SATA Port Clearance Issues (Micro-ATX Motherboards): Some Micro-ATX motherboards with 90-degree SATA ports may have clearance issues with the chassis's internal structure. Consider using 180-degree SATA male-to-female connectors or alternative SATA cables if this occurs.
- Front Panel Power Button Stuck: If the power button is stuck, gently inspect the plastic cover housing the buttons and USB port. Ensure no debris is causing obstruction. In some cases, minor adjustment or removal of specific screws from the plastic cover might be necessary to free the button.
- No Hard Drive Activity/Detection: Verify that all Mini SAS to SATA cables are securely connected to both the backplane and the motherboard/HBA. Ensure drives are properly seated in their hot-swap trays. Check power connections to the drives.
6. Especificacións
| Característica | Especificación |
|---|---|
| Marca | RackChoice |
| Nome do modelo | RackChoice 2U |
| Compatibilidade da placa base | Micro ATX, Mini ITX |
| Unidade Bays | 12 (3.5" / 2.5" SATA/SAS 6Gbps hot-swap) |
| Sistema de refrixeración | 4x 80mm Middle Fans |
| Soporte de fonte de alimentación | Standard ATX (with top-mounted 120mm fan) |
| Ranuras de expansión | 4x Low-Profile |
| Profundidade de montaxe en rack | 545 mm (21.5") |
| Dimensións do artigo (D x W x H) | 21.5" D x 21.46" W x 3.47" H |
| Peso do elemento | 15.3 libras |
| Material | Metal |
| Cor | Negro |
| UPC | 787996911731 |
7. Garantía e soporte
7.1. Información da garantía
This RackChoice 2U Rackmount Server Chassis comes with a 2 anos de garantía do fabricanteConserva o comprobante de compra para reclamacións de garantía. A garantía cobre defectos de materiais e fabricación en condicións normais de uso.
7.2. Soporte técnico
For technical assistance, troubleshooting, or any questions regarding your RackChoice product, please contact the manufacturer's support team. Refer to the contact information provided with your product packaging or visit the official RackChoice websitio para recursos de apoio.