1. Introdución
This instruction manual provides essential information for the safe and efficient assembly, operation, and maintenance of your Outsunny 13' x 3' x 2.5' Portable Mini Tunnel Greenhouse. Please read this manual thoroughly before use and retain it for future reference.

Image 1.1: The Outsunny Portable Mini Tunnel Greenhouse, designed for extending growing seasons and protecting plants.
1.1 Produto superadoview
The Outsunny Portable Mini Tunnel Greenhouse is designed to create an optimal environment for plant growth, extending your gardening season and protecting plants from adverse weather conditions and pests. Its compact and portable design makes it suitable for various outdoor spaces.
1.2 Características principais
- Year-Round Gardening: Extends growing season and protects plants from pests.
- Solid Durable Design: Features a powder-coated steel frame and transparent plastic cover.
- Supports Plant Growth: Transparent cover ensures adequate sunlight and heat preservation.
- Good Air Ventilation: Double-zippered openings allow for easy access and adjustable ventilation.
- Compacto e portátil: Lightweight design suitable for gardens, backyards, balconies, and patios.
2. Información de seguridade
Lea e comprenda todas as advertencias de seguridade antes de montar ou usar este produto. O incumprimento destas instrucións pode provocar lesións ou danos no produto.
- Avisos xerais de seguridade: Exercise caution when assembling and handling components, especially those with potentially sharp edges.
- Estabilidade: Ensure the greenhouse is properly anchored to the ground to prevent tipping or displacement, especially in windy conditions. The cover has an extra 4-inch edge that can be buried in the soil for increased stability.
- Eliminación: Follow local regulations for the proper disposal of PVC covers and other materials at the end of the product's lifespan.
- Supervisión: Keep children and pets away from the greenhouse during assembly and ensure they do not play inside unattended.
- Condicións meteorolóxicas: While designed for protection, extreme weather conditions (e.g., very strong winds, heavy snow loads) may require additional securing or temporary disassembly.
3. Contido do paquete
Before assembly, verify that all components listed below are present and undamaged. If any parts are missing or damaged, contact customer support.
- Powder-coated steel frame components
- Transparent PVC cover with zippered doors
- Connectors and fasteners
- Manual de instrucións

Imaxe 3.1: Ex.ample of steel frame components and connectors.
4. Instrucións de montaxe
Assembly is designed to be straightforward. It is recommended to assemble the greenhouse with at least two people.
4.1 Montaxe paso a paso
- Desempaquetar compoñentes: Retire con coidado todas as pezas da embalaxe e colóqueas sobre unha superficie limpa e plana. Verifique coa lista de contido da embalaxe.
- Montar a estrutura base: Connect the straight steel tubes using the appropriate connectors to form the rectangular base of the greenhouse. Ensure all connections are secure.
- Install Arch Supports: Attach the curved steel tubes to the base frame using the designated connectors to create the arched structure.
- Adxunta a portada: Carefully drape the transparent PVC cover over the assembled frame. Align the zippered openings with the intended access points.
- Asegure a tapa: Fasten the cover to the frame using any provided ties or straps. Ensure the cover is taut and evenly distributed over the frame.
- Ancorar o invernadoiro: Bury the 4-inch extended edges of the cover into the soil around the perimeter of the greenhouse. This provides additional stability and helps seal the interior. For extra security, consider using ground stakes (not included) through the frame's base.

Image 4.1: Visual representation of the quick assembly process for the frame.
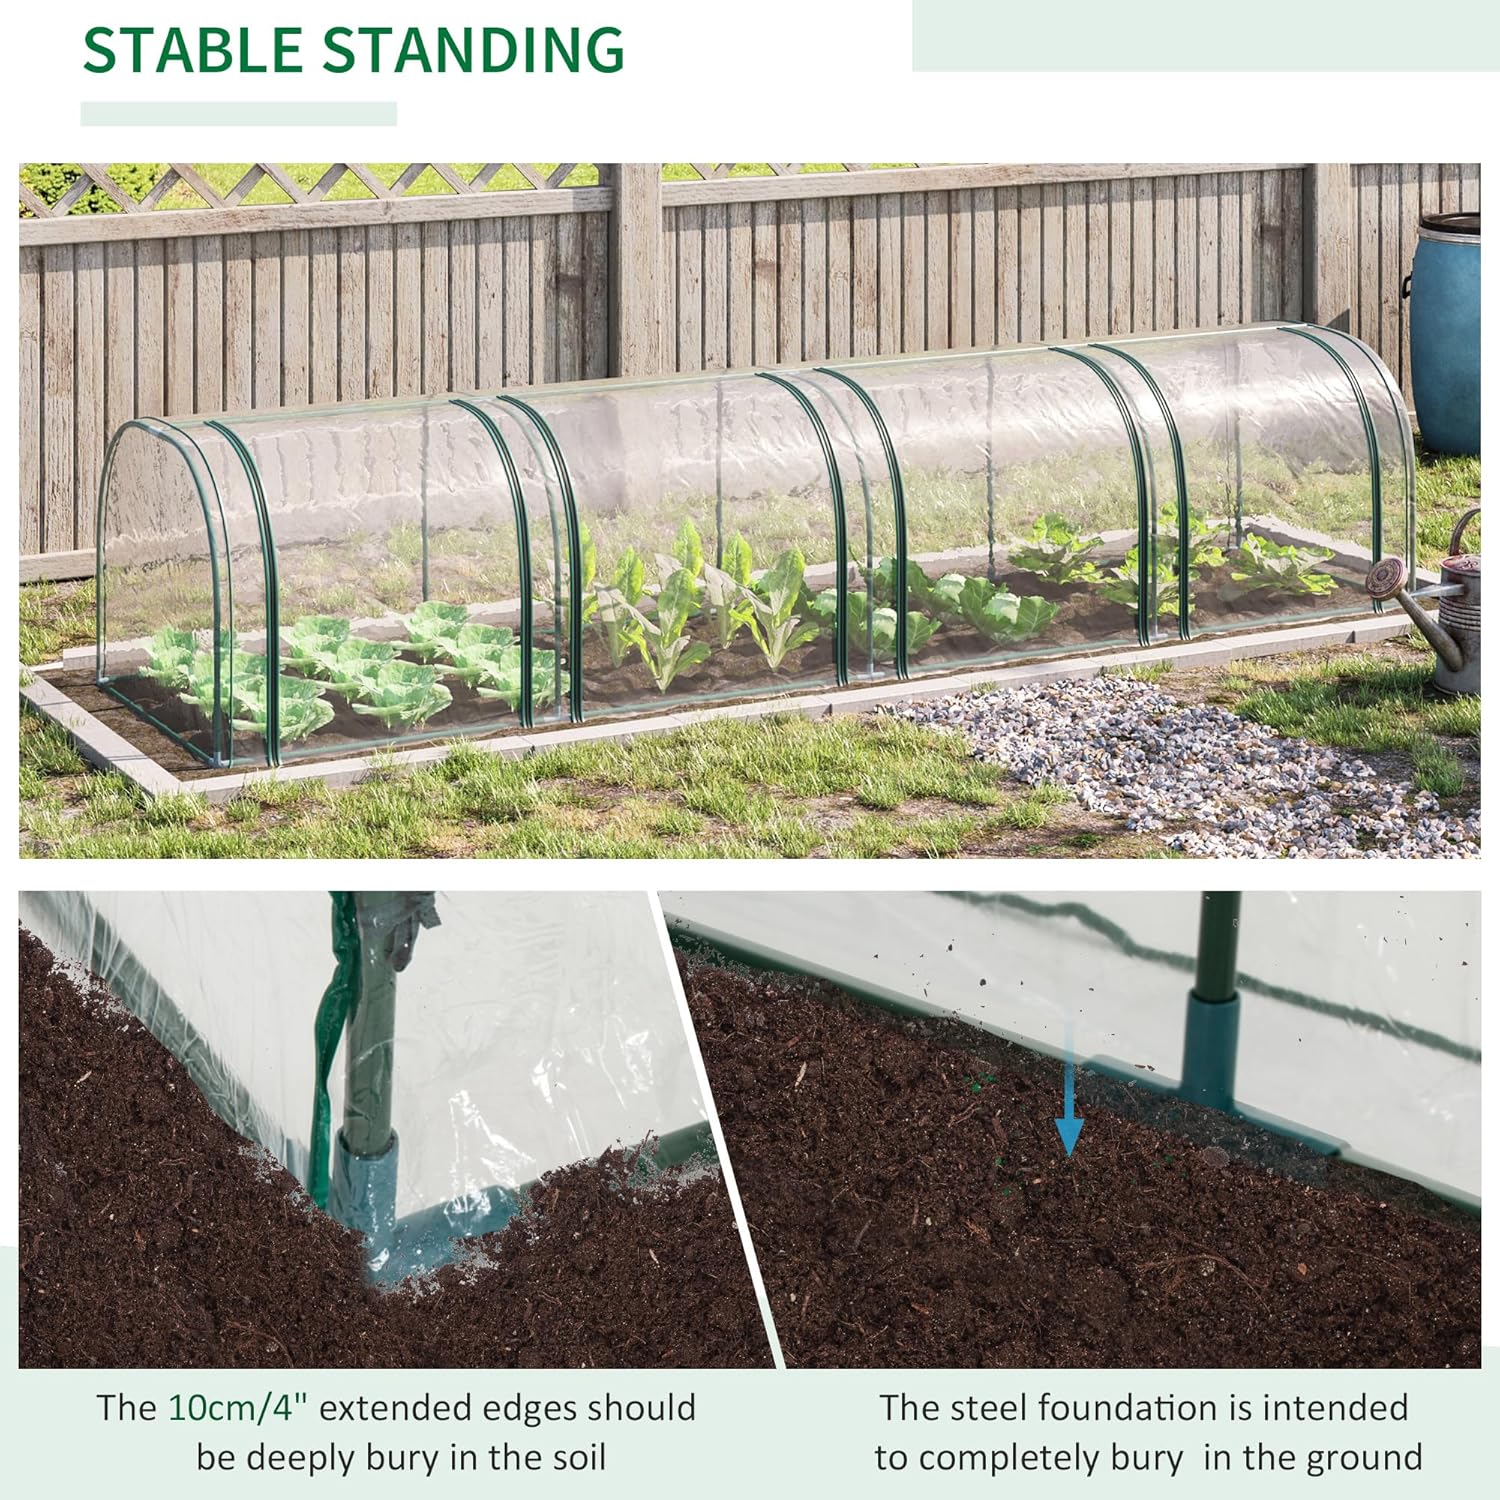
Image 4.2: Illustration of the 4-inch extended edges being buried in the soil for enhanced stability.
5. Instrucións de funcionamento
5.1 Colocación de plantas
Place your plants inside the greenhouse, ensuring adequate spacing for growth. The transparent PVC cover allows for excellent light transmission, providing the necessary sunlight for photosynthesis.

Image 5.1: The greenhouse in use, protecting various plants in a garden.
5.2 Ventilación e acceso
The greenhouse features four double-zippered doors. These can be opened for quick and easy access to your plants. To provide ventilation and regulate internal temperature, roll up the doors completely and secure them using the integrated ties.

Image 5.2: Detail of the rolling doors, illustrating their function for access and ventilation.
5.3 Heat Preservation
When closed, the transparent PVC cover helps to preserve heat, creating a warmer microclimate beneficial for plant growth, especially during cooler periods or in colder climates.
6. Mantemento
- Limpeza da tapa: Periodically clean the PVC cover with a soft cloth and mild soapy water to maintain transparency and light transmission. Avoid abrasive cleaners or brushes that could scratch the material.
- Inspección do cadro: Regularly check the steel frame for any signs of rust, damage, or loose connections. Tighten any loose fasteners as needed.
- Inspección da cuberta: Inspect the PVC cover for tears or damage. Small tears can sometimes be repaired with clear repair tape designed for plastics.
- Ancoraxe: Ensure the greenhouse remains securely anchored, especially after strong winds or heavy rainfall. Re-bury the edges if they become exposed.
- Almacenamento estacional: If storing the greenhouse for an extended period, clean all components, allow them to dry completely, and store them in a cool, dry place away from direct sunlight to prolong the lifespan of the PVC cover.
7 Solución de problemas
| Problema | Causa posible | Solución |
|---|---|---|
| Invernadoiro inestable co vento | Insufficient anchoring; edges not buried | Ensure the 4-inch cover edges are deeply buried in the soil. Consider adding additional ground stakes or weights to the base frame for increased stability. |
| Pobre crecemento das plantas | Lack of ventilation; insufficient light; improper watering | Open zippered doors for ventilation on warm days. Ensure the cover is clean for maximum light. Adjust watering schedule as needed for greenhouse conditions. |
| Cover tearing or damage | Sharp objects; excessive tension; prolonged exposure to extreme weather | Handle with care during assembly and use. Avoid placing sharp objects near the cover. For small tears, use clear repair tape. In extreme weather, consider temporary disassembly or additional protection. |
8. Especificacións
| Característica | Detalle |
|---|---|
| Número de modelo | 845-234V03CR |
| Dimensións (L x W x H) | 13' x 3' x 2.5' (395 x 100 x 80 cm) |
| Peso do elemento | 4.49 kg |
| Material do marco | Powder-coated Alloy Steel |
| Material de cuberta | PVC transparente |
| Número de portas | 4 (zippered, roll-up) |
| Número de ventilacións | 2 |
| Uso interior/exterior | Ao aire libre |
| Marca | soleado |
| Fabricante | Aosom Canadá |

Image 8.1: Detailed dimensions of the Outsunny Mini Tunnel Greenhouse.
9. Garantía e soporte
For warranty information, product support, or to inquire about replacement parts, please contact the manufacturer, Aosom Canada. Refer to your purchase documentation for specific warranty terms and contact details.
Contacto do fabricante: Aosom Canada (Tel. 1-416-792-6088)
Soporte en liña: Visit the official Outsunny website or the Aosom Canada websitio para recursos adicionais e apoio.