Della 1D4-TL+D1224
Manual de instrucións do aire acondicionado mini split de dobre zona DELLA 35K BTU con bomba de calor (modelo 1D4-TL+D1224)
Model: 1D4-TL+D1224 | Brand: Della
1. Introdución
This manual provides comprehensive instructions for the installation, operation, and maintenance of your DELLA 35K BTU Dual Zone Mini Split Air Conditioner Heat Pump. This unit offers energy-efficient cooling and heating for up to 2050 sq. ft., featuring 19 SEER2, Wi-Fi, and Alexa compatibility. Please read this manual thoroughly before installation and operation to ensure proper use and safety.
2. Información de seguridade
Instrucións de seguridade importantes:
- This system mandates professional installation. It is not a DIY mini split AC.
- Ensure all power sources are turned off before connecting any wires or performing maintenance.
- Line-set vacuuming is required during installation. Any alteration of line-set length requires adjusting freon levels.
- Always use appropriate tools and follow local electrical and building codes.
- Do not attempt to repair or service the unit yourself. Contact qualified service personnel.
3. Contido do paquete
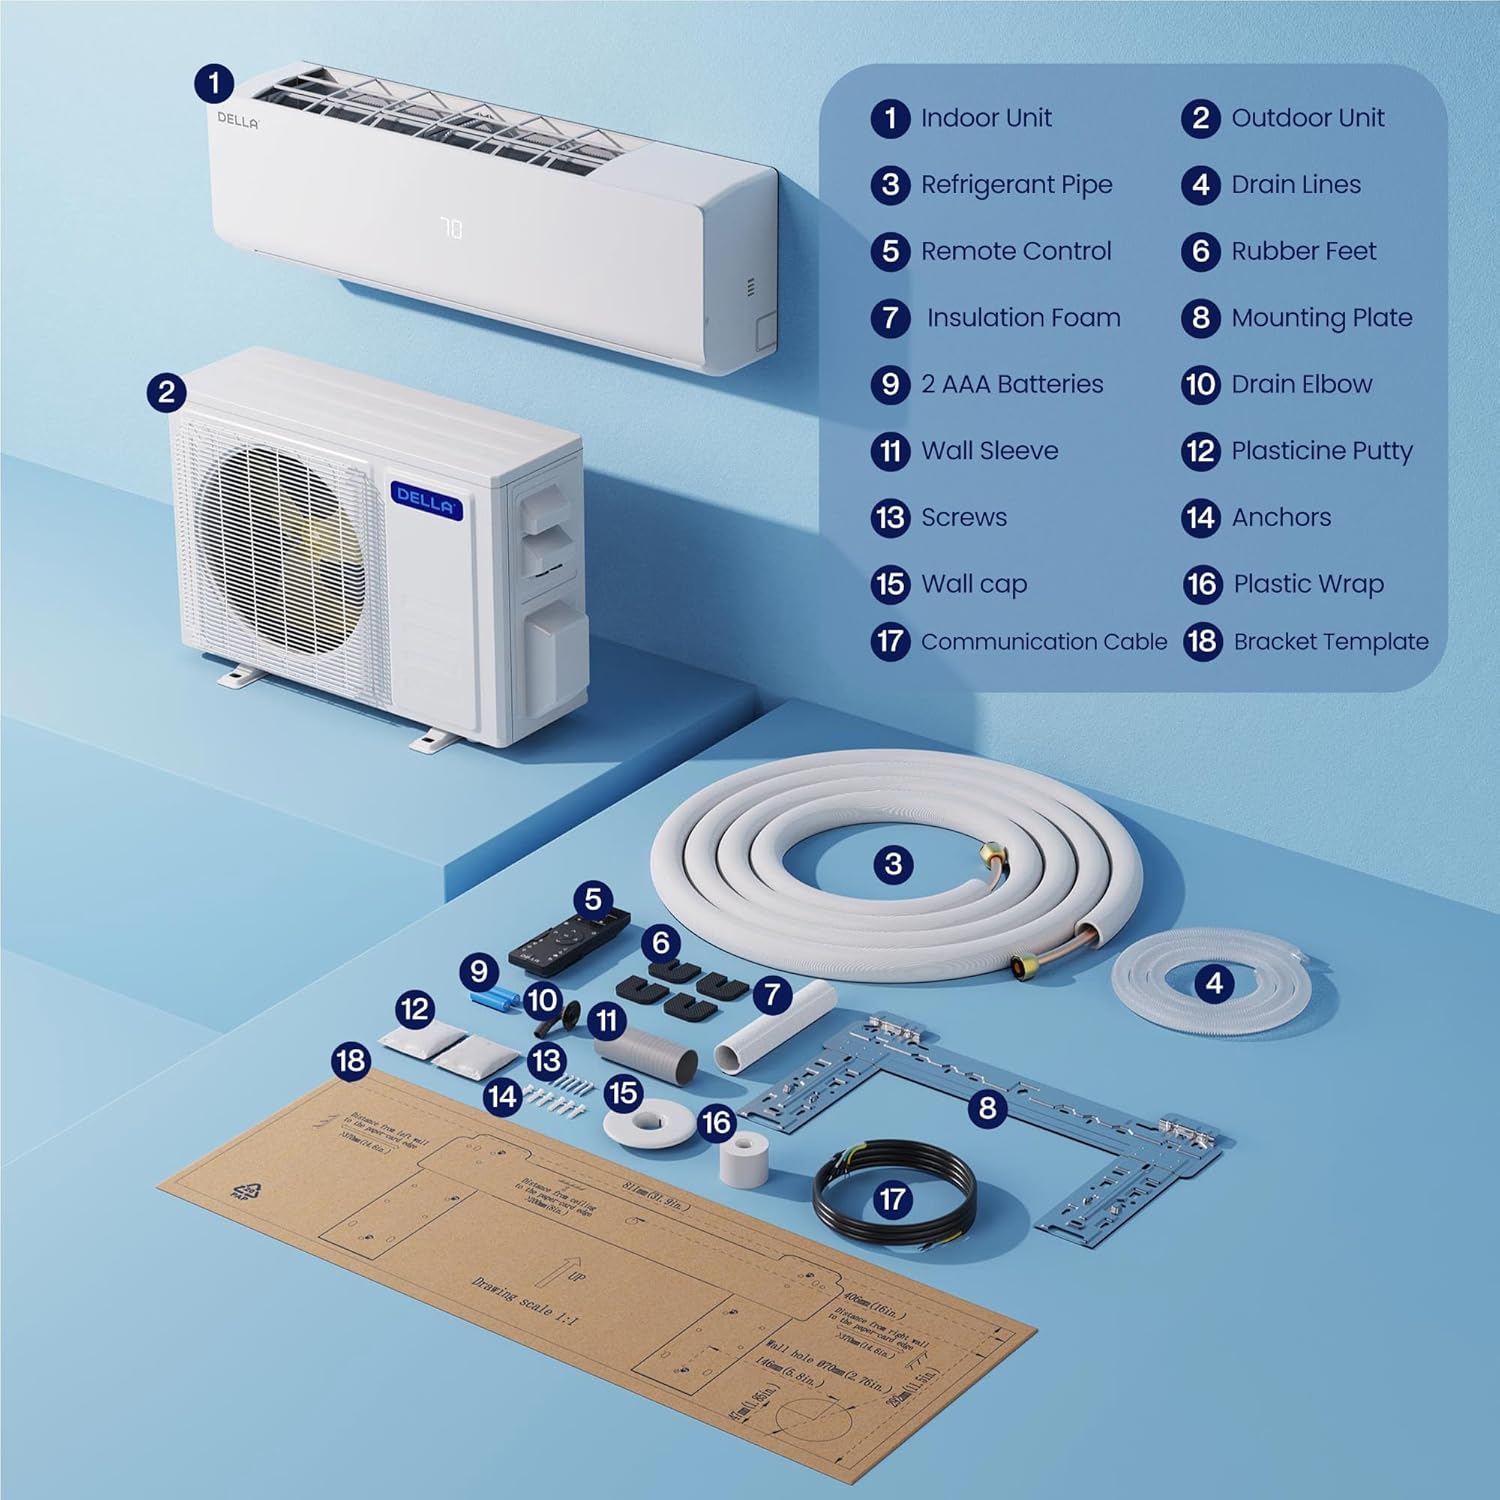
Your DELLA Dual Zone Mini Split Air Conditioner package includes the following components:
- 1 x Outdoor Condenser Unit (35,000 BTU)
- 2 x Indoor Air Handlers (12,000 BTU and 24,000 BTU)
- 2 x Remote Controls (one for each indoor unit)
- 2 x 16ft Copper Pipes (1/4"+1/2" and 1/4"+3/8")
- 2 x Installation Kits
- Drain Pipe (78.7" length)
- Cable de comunicación
- Placa de montaxe
- Pés de goma
- Espuma de illamento
- Funda de parede
- Plasticine Putty
- Parafusos e ancoraxes
- Modelo de soporte

4. Configuración e instalación
Professional installation is mandatory for this system. It is not designed for DIY installation.
- Preparar a localización de montaxe: Use the provided template to mark locations for the lineset wall hole and the mini split bracket.
- Install Indoor Unit Bracket: Securely attach the mini split bracket to the wall using the provided screws. Use a leveler to ensure correct alignment.
- Route Lineset and Electricals: Route the lineset, drain hose, and electrical wiring through the wall opening.
- Montar a unidade interior: Securely mount the indoor mini split unit onto the bracket.
- Organize Linesets: Tape the drain hose and linesets together for a neat and organized installation. Use zip ties to secure electrical wires around the taped linesets and drain hose.
- Position Outdoor Condenser: Place the outdoor condenser unit in its designated location.
- Connect Linesets: Connect the unit lineset to the condenser lineset and tighten firmly. If available, use a digital torque wrench to ensure proper tightening.
- Conexións eléctricas: Ensure all power sources are turned off. Remove the electrical compartment cover. Connect the numbered wires from the indoor unit to the corresponding numbered terminals on the outdoor condenser's electrical block. Connect the ground wire (green to green). Connect the power cables (black to 'N', red to 'L') to the condenser.
- Vacuuming the System: Ensure you have appropriate vacuum equipment. Connect the hose from the outdoor condenser unit to the gauge, and the hose from the vacuum to the gauge. Open valves on the gauge and turn the vacuum on. Monitor the micron reading closely and close valves once it reaches 350. Turn off the vacuum pump.
- Activate Refrigerant Flow: Restore power to the outlet. Turn the mini split unit on and set it to the lowest cold setting. Allow a few minutes for the outdoor condenser fan to start. Use a service wrench to gradually open the high side (top valve). Monitor the gauge as numbers will drop into the negative range. After opening the high side valve, quickly open the low side (bottom valve). The gauge readings will increase, which is expected.
5. Instrucións de funcionamento
Your DELLA Mini Split system offers various modes and features for optimal comfort and energy efficiency.
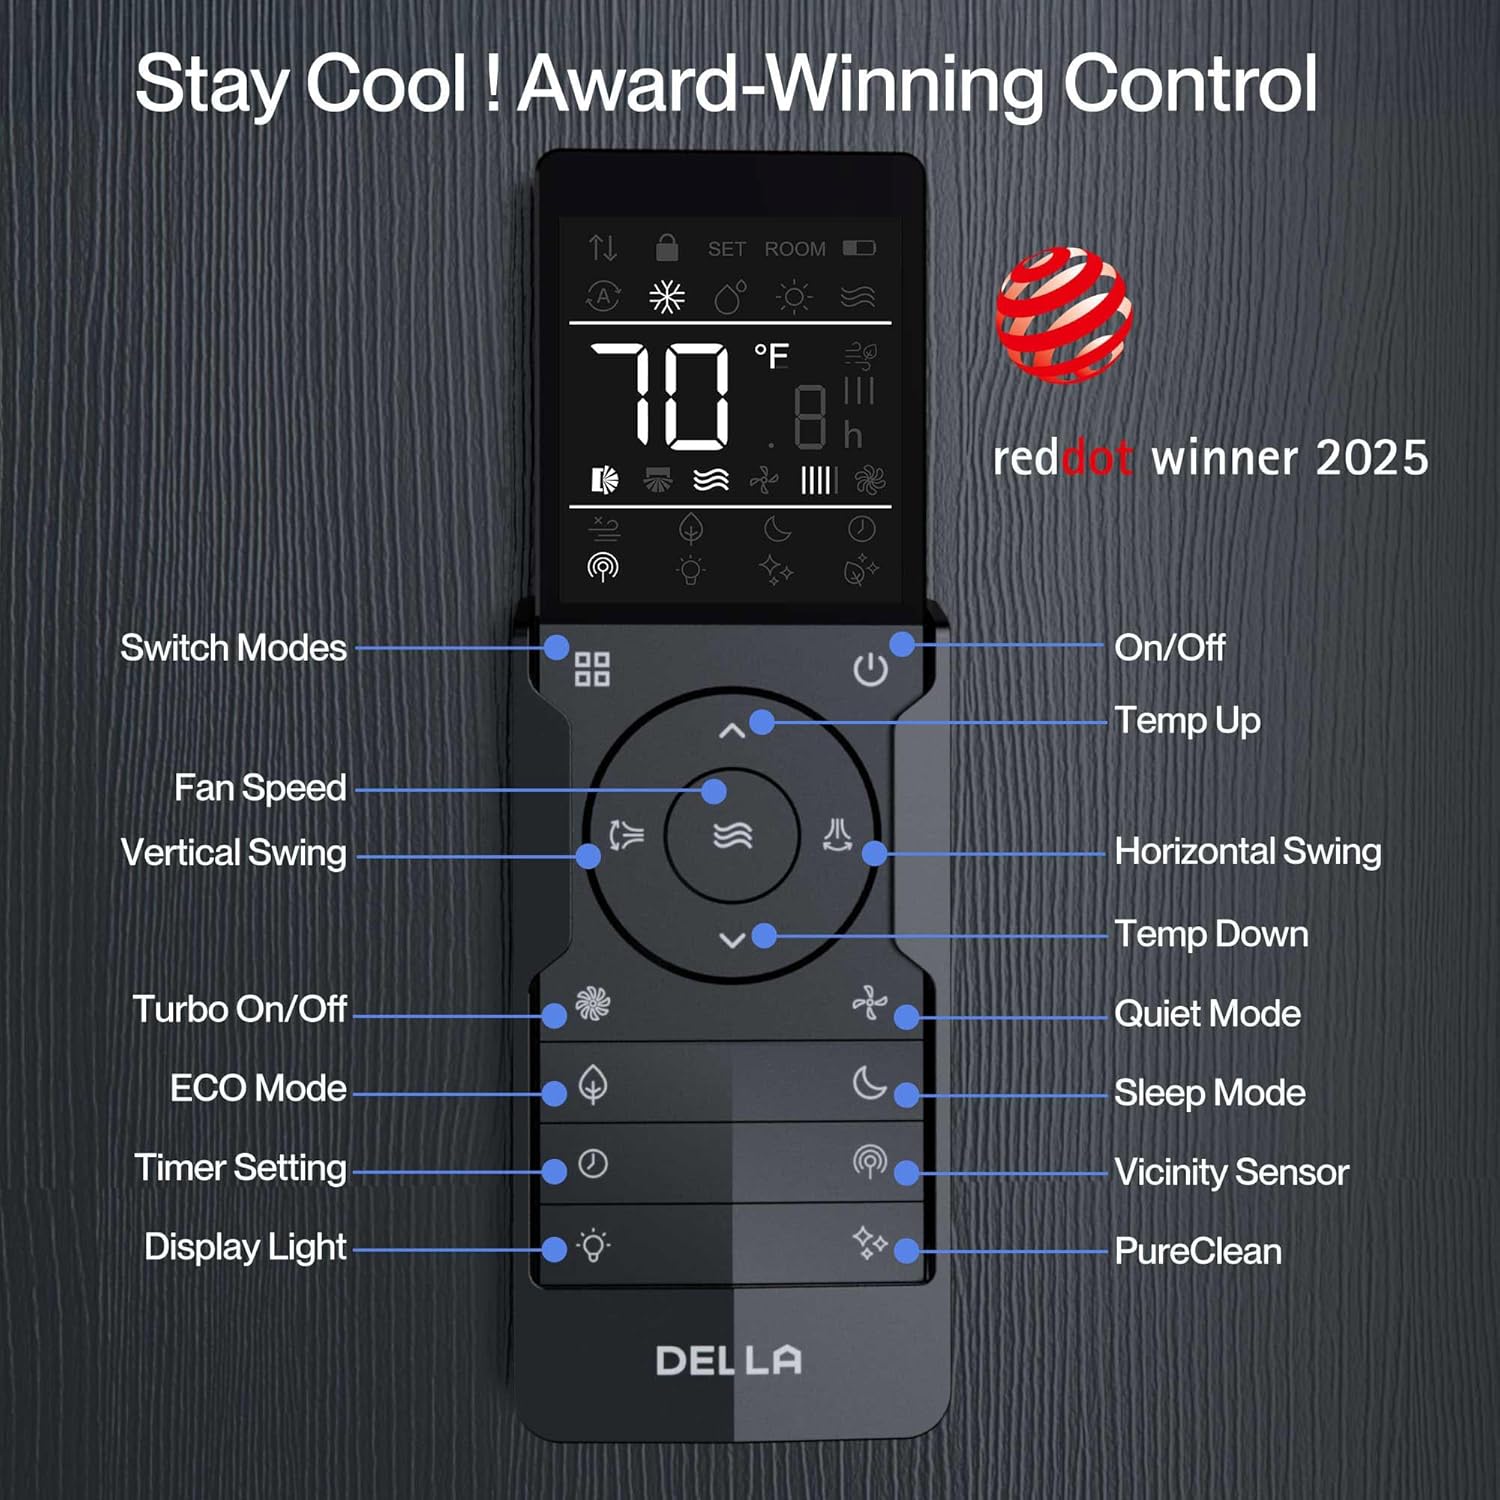
5.1 Funcións de control remoto
The included remote controls allow you to manage your indoor units individually. Key functions include:
- On/Off: Acenda ou apague a unidade.
- Selección de modo: Choose between Heating, Cooling, Dry (dehumidifying), Fan Only, and Auto modes.
- Axuste de temperatura: Set your desired temperature (60-90°F range).
- Velocidade do ventilador: Adjust fan speed (multiple settings available).
- Fluxo de aire 4D: Control vertical and horizontal swing for even air distribution.
- Función de temporizador: Set specific times for the unit to turn on or off.
- Modo de suspensión: Optimiza a temperatura e a velocidade do ventilador para un sono cómodo.
- ECO Energy Saving Mode: Reduce o consumo de enerxía.
- Función Turbo: Proporciona un arrefriamento ou quecemento rápido.
- Modo Síntome: Adjusts temperature based on the remote's location for personalized comfort.
5.2 Smart Control with Della+ App (Wi-Fi & Alexa)
Control your DELLA Mini Split unit remotely using the free Della+ app, compatible with Wi-Fi and Alexa. This allows for advanced scheduling, mode selection, and geo-location features.
- Acceso remoto: Control your unit from anywhere with an internet connection.
- Programación: Set custom schedules for your unit to turn on/off or change modes.
- Geo-Location Function: Automatically adjust AC settings based on your proximity to your home.
- Control de voz: Integrate with Alexa for hands-free temperature adjustments.

6. Mantemento
Regular maintenance ensures optimal performance and longevity of your DELLA Mini Split unit.
- Limpeza de filtros: Regularly clean or replace air filters in the indoor units to maintain airflow and efficiency.
- Limpeza da unidade exterior: Keep the outdoor condenser unit free from debris, leaves, and obstructions to ensure proper heat exchange.
- Drain Line Check: Periodically check the drain line for blockages to prevent water leakage.
- Inspección profesional: Schedule annual professional inspections to check refrigerant levels, electrical connections, and overall system health.
7 Solución de problemas
If you encounter issues with your DELLA Mini Split unit, refer to the following common troubleshooting tips:
- A unidade non se acende: Comprobe a fonte de alimentación, o disxuntor e asegúrese de que as pilas do mando a distancia funcionen.
- Refrixeración/calefacción insuficiente: Verify temperature settings, clean air filters, and ensure no obstructions around indoor/outdoor units.
- Ruídos pouco comúns: Minor operational noises are normal. Excessive or unusual noises may indicate a problem; contact professional service.
- Códigos de erro: If an error code appears on the display (e.g., "EU code" as mentioned by some users), consult the full user manual or contact customer support for specific diagnostic steps.
- Wi-Fi/Alexa Connectivity Issues: Ensure your Wi-Fi network is stable and the Della+ app is updated. Re-pair the device if necessary.
8. Especificacións
| Característica | Detalle |
|---|---|
| Número de modelo | 1D4-TL+D1224 |
| Capacidade BTU | 35,000 BTU/h (Dual Zone: 12,000 BTU + 24,000 BTU) |
| Clasificación SEER2 | 19 SEER2 |
| Voltage | 208-230 V |
| Área de cobertura | Up to 2050 Sq. Ft. (550 Sq. Ft. for 12K unit, 1500 Sq. Ft. for 24K unit) |
| Temperatura de funcionamento (calefacción) | Ata -13 °F (-25 °C) |
| Tipo de refrixerante | R454B (environmentally friendly) |
| Nivel de ruído (interior) | 36 dBa (ultra silent) |
| Características especiais | 4D Airflow, I Feel Mode, 24-hour Timer, Sleep Mode, ECO Mode, Multiple Fan Speeds, Turbo Function, Dehumidifier, Remote Controlled, Alexa & Wi-Fi Compatible |
| Tamaño máximo de fusible | 35A |
| Dimensións do produto | 8.07 cm de profundidade x 31.92 cm de ancho x 11.49 cm de alto (unidade interior) |
| Peso do elemento | 224 libras (sistema total) |
| Certificacións | ETL Listed, AHRI Certified |


9. Garantía e soporte
DELLA offers unmatched support and warranty coverage for your peace of mind.
- Garantía limitada de por vida: Enjoy best-in-class warranty coverage with no additional costs.
- Atención ao cliente: 24/7 live chat support is available. Phone support is available from 6 AM to 4 PM PST.

Ask a question about this manual
Ask about setup, troubleshooting, compatibility, parts, safety, or missing instructions. Manuals+ will review the question and use this page’s manual context to help answer it.