
Introdución
Welcome to your new TechniSat Viola CD-1. This portable stereo CD player offers versatile audio playback options including CD, FM radio, and Bluetooth streaming. Its compact design and battery operation make it suitable for both home and on-the-go use. This manual provides essential information for setting up, operating, and maintaining your device.
Información importante de seguridade
- Read all instructions thoroughly before using the device.
- Conserve este manual para futuras consultas.
- Non expoña a unidade á choiva, á humidade ou ao exceso de humidade.
- Ensure that ventilation openings are not blocked to prevent overheating.
- Use só anexos e accesorios especificados polo fabricante.
- Encargue toda a reparación a persoal de servizo cualificado.
Produto rematadoview
Familiarize yourself with the main components and controls of your Viola CD-1.

Fronte view of the TechniSat Viola CD-1, highlighting its main controls and central display.

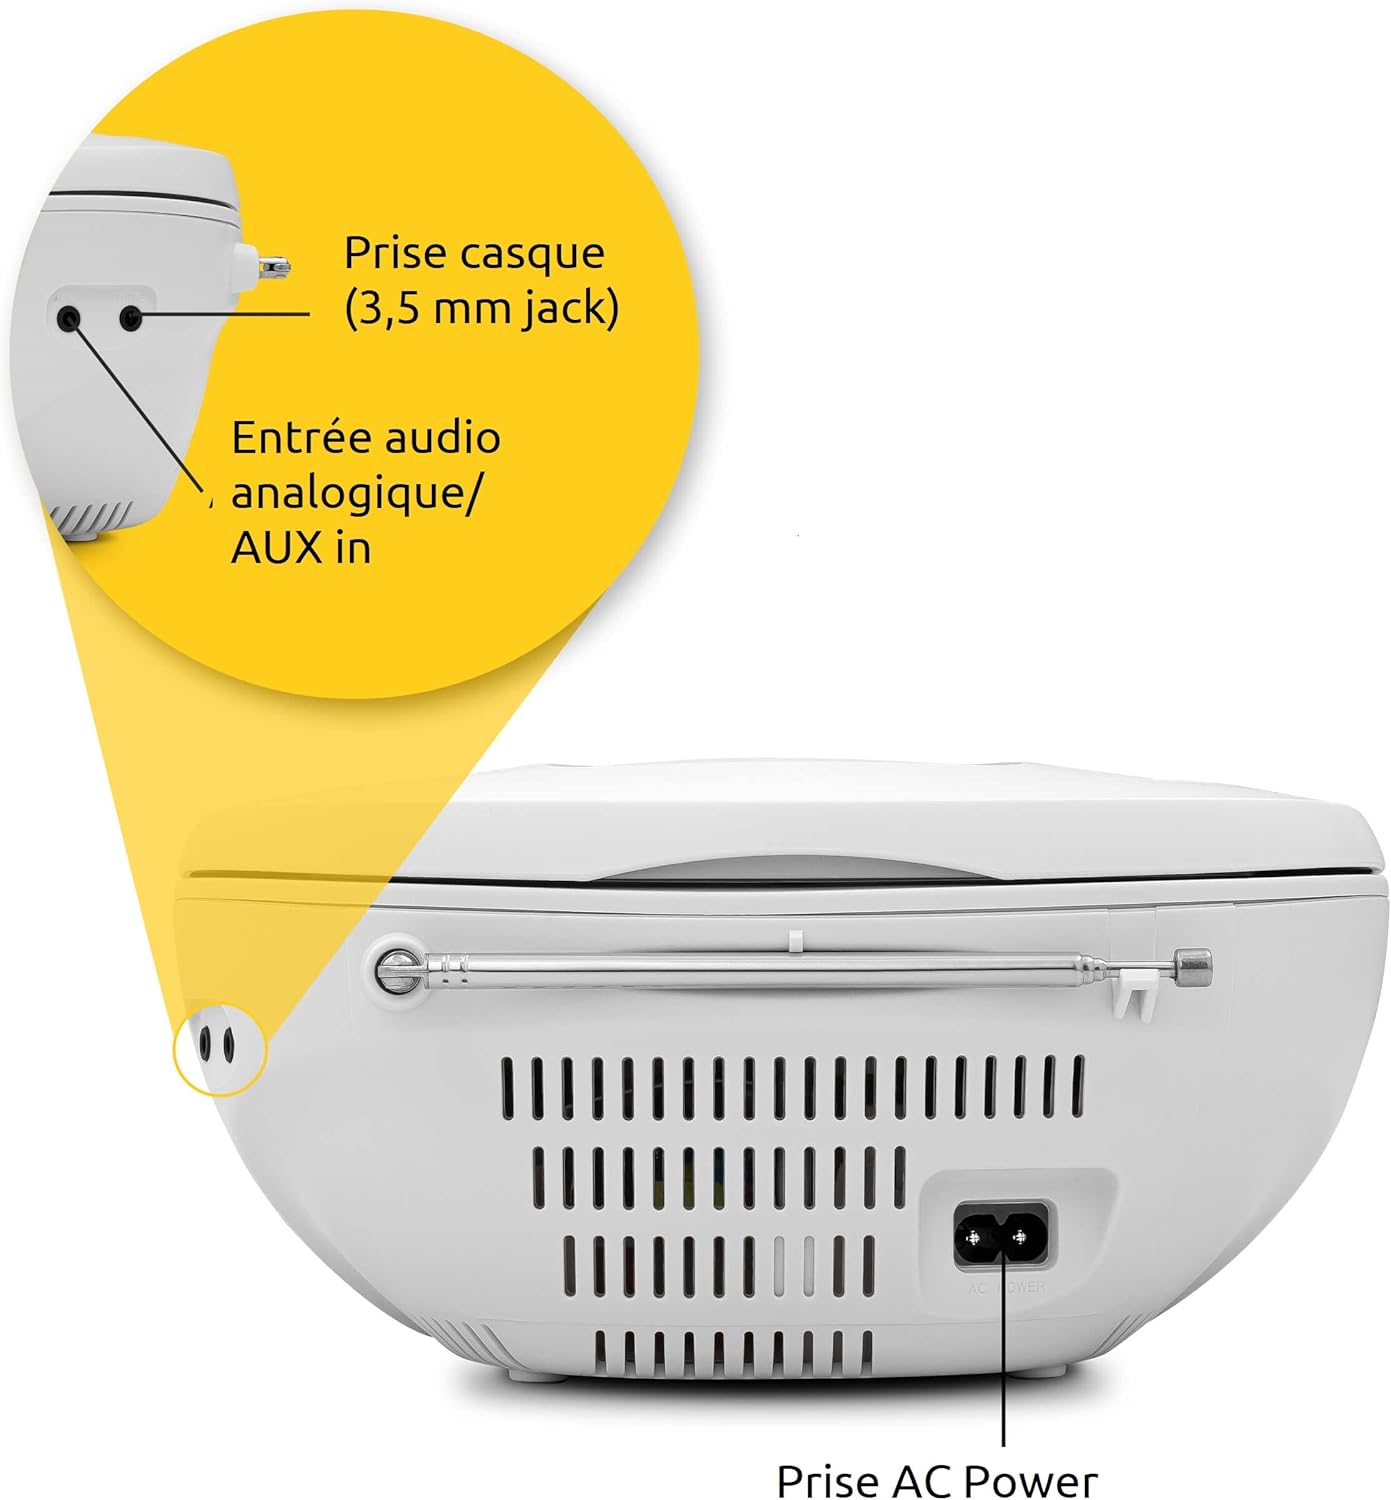
The rear panel of the Viola CD-1 features the AC power input, a 3.5mm AUX in port for external devices, and a 3.5mm headphone jack.
Key Controls and Features:
- Botón de encendido: Acende ou apaga a unidade.
- Botón de modo: Switches between CD, FM, Bluetooth, and AUX input modes.
- Botóns de volume +/-: Axusta o nivel de saída de audio.
- Botón Reproducir/Pausa: Starts or pauses playback in CD and Bluetooth modes.
- Skip/Tune Buttons: Navigates tracks on a CD or tunes radio stations.
- Botón de escaneo: Initiates automatic station search in FM mode.
- Botón do álbum: For MP3 CDs, navigates between folders.
- Antena telescópica: Para a recepción de radio FM.
- Asa de transporte: Para unha fácil portabilidade.
Configuración
Fonte de alimentación
The Viola CD-1 can be powered by either AC mains or batteries.
- Potencia CA: Connect the provided power cable to the AC power input on the rear of the unit and then to a standard wall outlet (230V).
- Potencia da batería: For portable use, open the battery compartment located on the bottom of the unit. Insert 6 x 1.5V C-type batteries (R14), ensuring correct polarity (+/-). Close the compartment securely.
Configuración da antena
For optimal FM radio reception, fully extend the telescopic antenna.
Instrucións de funcionamento
Reprodución de CD
- Open the CD compartment lid located on the top of the unit.
- Carefully place a CD (standard audio CD or MP3 CD) onto the spindle with the label side facing up.
- Peche ben a tapa do compartimento do CD.
- Preme o Modo button repeatedly until "CD" appears on the display.
- Preme o Reproducir/Pausa botón para comezar a reprodución.
- Usa o Saltar buttons (forward/backward) to navigate between tracks.
- If playing an MP3 CD with multiple folders, use the Álbum button to switch between folders.

To insert a CD, lift the compartment lid as shown and place the disc with the label facing upwards.

The integrated CD player supports standard audio CDs, CD-R, CD-RW, and MP3 CDs.
Funcionamento da radio FM
- Fully extend the telescopic antenna for best reception.
- Preme o Modo repetidamente ata que apareza "FM" na pantalla.
- Manteña premido o Escanear button to automatically search for and store available FM stations.
- Usa o Saltar buttons (forward/backward) to select a stored station.
The Viola CD-1 features an FM radio tuner, allowing reception of various regional radio stations. Extend the telescopic antenna for best reception.
Transmisión de audio Bluetooth
- Preme o Modo button repeatedly until "BT" appears on the display. The "BT" indicator will flash, signifying that the unit is in pairing mode.
- On your smartphone or other Bluetooth-enabled mobile device, enable Bluetooth and search for available devices.
- Select "TechniSat Viola CD-1" from the list of devices to initiate pairing.
- Once successfully paired, the "BT" indicator will stop flashing, and you can stream audio wirelessly from your device to the Viola CD-1.

Wirelessly stream music from your smartphone or tablet to the Viola CD-1 via Bluetooth.
Entrada AUX
- Conecte un dispositivo de son externo (por exemplo, un reprodutor de MP3, un teléfono intelixente) ao AUX IN jack on the rear of the unit using a 3.5mm audio cable.
- Preme o Modo button repeatedly until "AUX" appears on the display.
- Control audio playback and volume directly from your external device.
Uso de auriculares
Connect headphones with a 3.5mm jack to the headphone output on the rear of the unit for private listening. When headphones are connected, sound from the speakers will be muted.

The practical carry handle makes transporting the boombox comfortable and easy.

Integrated stereo speakers provide clear audio with a total output of 2 x 1 Watt.
Mantemento
Limpeza
- Wipe the exterior of the unit with a soft, dry cloth. Do not use abrasive cleaners, solvents, or chemical sprays, as these can damage the finish.
- For cleaning the CD lens, use a specialized CD lens cleaner disc according to its instructions.
Substitución da batería
When using battery power, replace all 6 C-type batteries when the unit's performance (e.g., sound quality, volume) begins to degrade. Always replace all batteries at once with new ones of the same type.
Resolución de problemas
If you encounter issues with your Viola CD-1, refer to the table below for common problems and solutions.
| Problema | Causa posible | Solución |
|---|---|---|
| A unidade non se acende. | No power supply or dead batteries. | Check AC power connection or replace all batteries. |
| O CD non se reproduce. | CD inserted incorrectly, dirty, scratched, or unsupported format. | Ensure CD is inserted correctly (label side up). Clean the CD. Try a different CD. Ensure it's an audio CD or MP3 CD. |
| Mala recepción de radio FM. | Antena non estendida ou sinal débil. | Fully extend the telescopic antenna. Try repositioning the unit for better signal. |
| O dispositivo Bluetooth non se pode emparellar. | A unidade non está en modo de emparellamento, o dispositivo está demasiado lonxe ou xa estaba emparellado. | Ensure Viola CD-1 is in Bluetooth pairing mode (BT flashing). Move devices closer. On your device, forget/unpair the Viola CD-1 and try pairing again. |
| Non hai son dos altofalantes. | Volume too low, headphones connected, or incorrect mode selected. | Increase volume. Disconnect headphones. Press the Modo button to select the correct input source. |
Especificacións
Detailed technical specifications for the TechniSat Viola CD-1.
| Característica | Detalle |
|---|---|
| Marca | TechniSat |
| Número de modelo | 0001/2980 |
| Cor | Branco |
| Tecnoloxía de conectividade | Auxiliary, Bluetooth (reception) |
| Características especiais | AC and Battery operation, MP3 CD Player, Convenient carry handle, Bluetooth audio streaming (reception) |
| Dispositivos compatibles | Auriculares |
| Fonte de enerxía | AC and Battery operation |
| Tipo de altofalante | Estéreo |
| Potencia de saída | 2 x 1 W RMS |
| Dimensións (LxWxH) | 21.5 x 21.5 x 10 cm |
| Peso do elemento | 828 gramos |
| Requisito da batería | 6 x 1.5V C-type batteries (R14) |
Garantía e Soporte
Información da garantía
This product comes with a manufacturer's warranty. Please refer to the warranty card included in the product packaging for specific terms, conditions, and duration of the warranty. (Note: Specific warranty details were not available in the provided product data.)
Atención ao cliente
For technical assistance, troubleshooting beyond this manual, or service inquiries, please visit the official TechniSat websitio web ou póñase en contacto directamente co servizo de atención ao cliente.
Oficial Websitio: www.technisat.com