1. Instrucións de seguridade importantes
Please read and understand all instructions thoroughly before installation and operation. Failure to follow these instructions may result in serious injury or property damage. Keep this manual for future reference.
- Seguridade xeral: This gate opener is designed for sliding gates. Do not use it for other purposes.
- Instalación: Installation must be performed by qualified personnel. Ensure all electrical connections comply with local codes and regulations.
- Detección de obstáculos: The system includes infrared sensors for obstacle detection. Regularly test these sensors to ensure proper function.
- Nenos e animais: Keep children and pets away from the gate area, especially during operation. Do not allow children to play with the gate opener or its controls.
- Lanzamento manual: Familiarize yourself with the manual release mechanism for emergency situations or power outages.
- Mantemento: Perform regular maintenance as described in this manual to ensure safe and reliable operation.
- Protección contra sobrecalentamento: The motor is equipped with overheat protection. If the motor stops due to overheating, allow it to cool down before resuming operation.
2. Contido do paquete
Verify that all components listed below are present in your package. If any items are missing or damaged, please contact customer support.
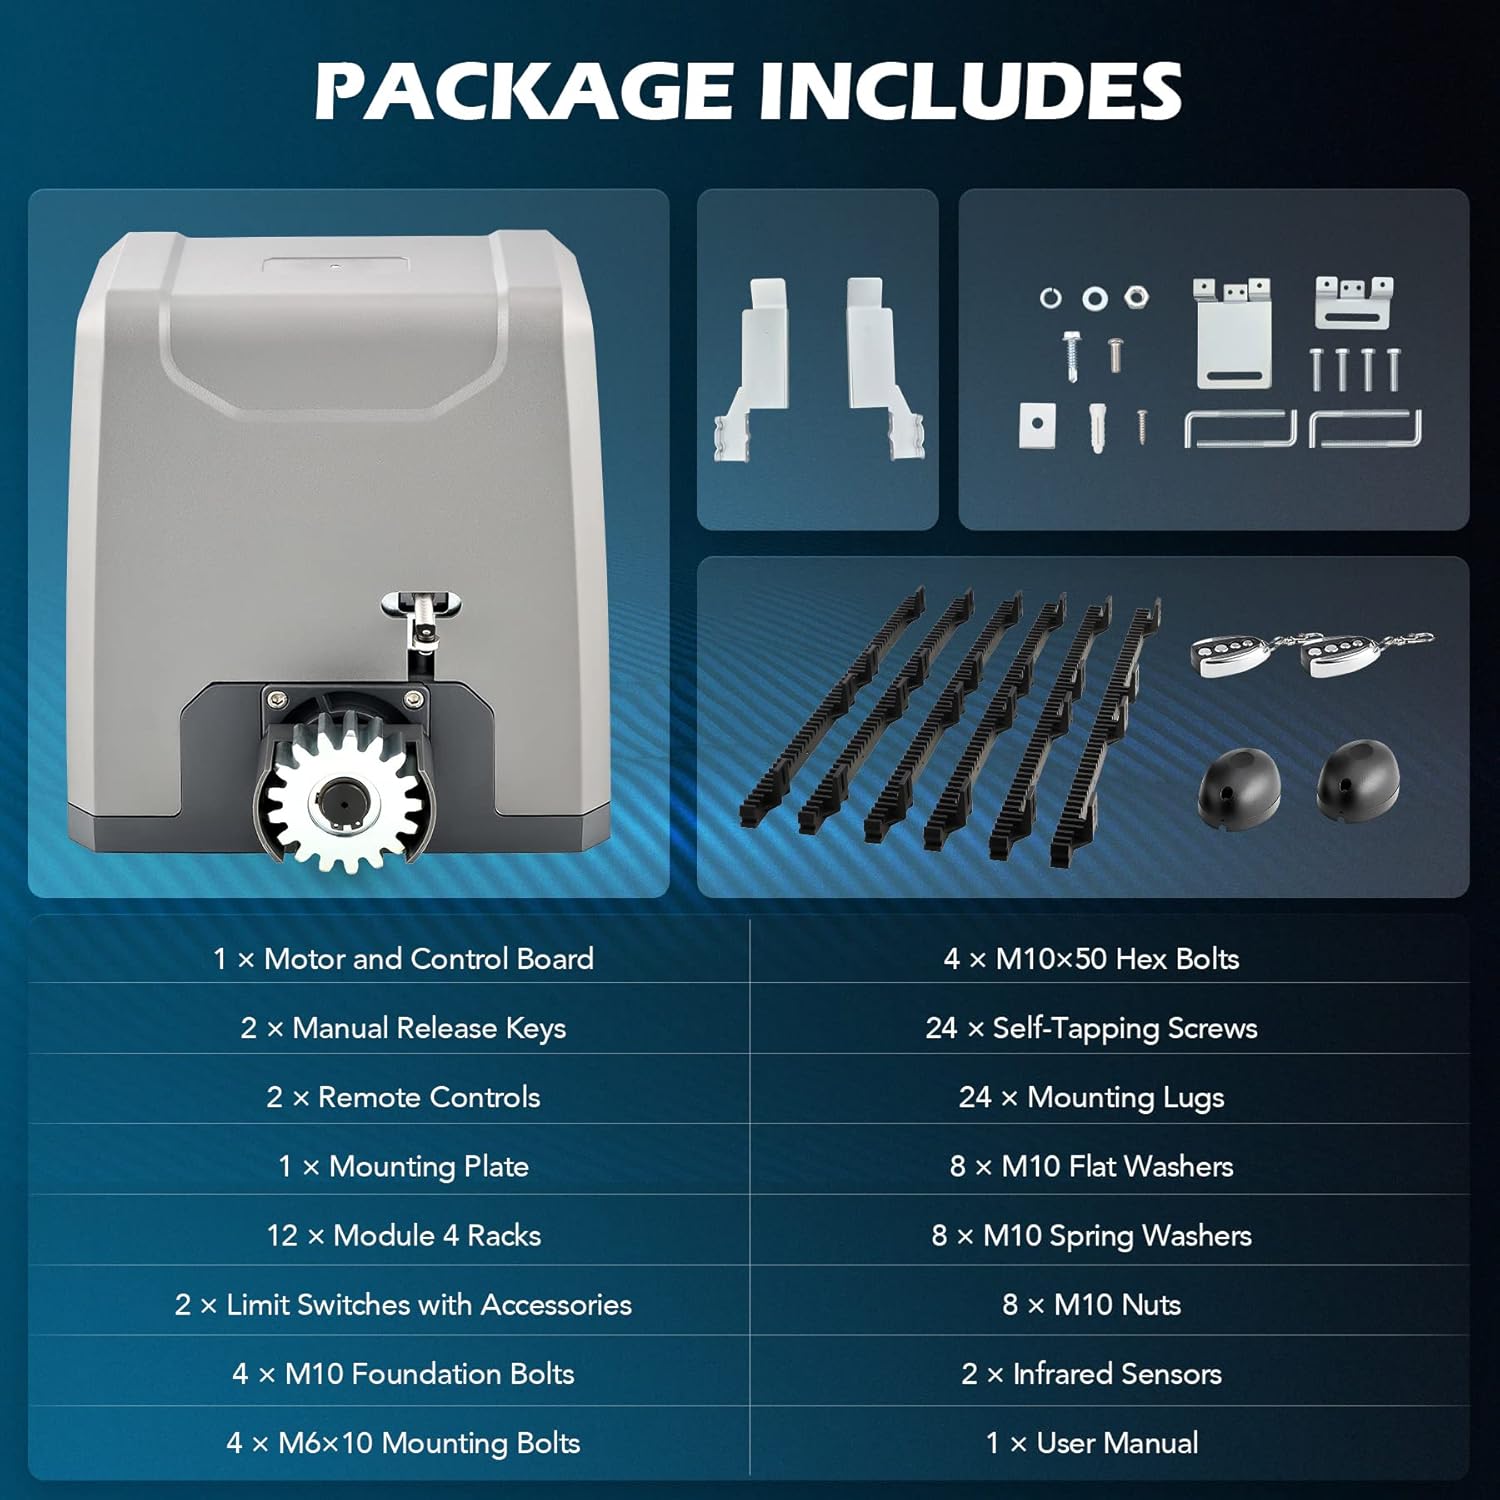
Image: All components included in the CO-Z Sliding Gate Opener kit.
- 1 x Motor and Control Board
- 2 x chaves de liberación manual
- 2 x Mandos a distancia
- 1 x placa de montaxe
- 12 x Module 4 Racks (Nylon Gear Racks)
- 2 x Limit Switches with Accessories
- 4 x M10 Foundation Bolts
- 4 x M6x10 Mounting Bolts
- 4 parafusos hexagonais M10x50
- 24 x parafusos autorroscantes
- 24 x Mounting Lugs
- 8 x arandelas planas M10
- 8 x M10 arandelas de resorte
- 8 porcas M10
- 2 x sensores infravermellos
- 1 x Manual de usuario (este documento)
3. Especificacións
| Vol. De entradatage | 230 V / 50 Hz |
| Potencia nominal | 550 W |
| Torque | 32 Nm |
| Max. Gate Width | 12.2 m |
| Máx. Peso da porta | 1500 kg |
| Gate Speed Range | 11-13 m/min. |
| Rango de control remoto | 30 m |
| Resistencia á intemperie | IP44 |
| Max. Remote Controls Supported | 40 |
| Máx. Nivel de ruído | 56 dB |
| Rango de temperatura | -20 a 70 °C |
| Gear Rack Material | Nylon |
| Dimensións do produto | 27.1 x 22.8 x 28 cm |
| Número de modelo do artigo | RA3301 |

Image: Technical diagram showing product specifications and dimensions.
4. Configuración e instalación
This section outlines the general steps for installing your CO-Z Automatic Sliding Gate Opener. For detailed diagrams and specific wiring instructions, please refer to the included installation guide.
4.1 Preparación do lugar
- Asegúrate de que a porta se deslice suavemente e estea correctamente aliñada.
- Clear any obstructions along the gate's path.
- Prepare unha plataforma ou cimentación de formigón estable e nivelada para montar a unidade abridora.
4.2 Montaxe da unidade de apertura
- Position the mounting plate on the prepared foundation, ensuring it is level and correctly aligned with the gate.
- Mark the drilling points for the M10 foundation bolts.
- Drill holes and secure the mounting plate using the foundation bolts, washers, and nuts.
- Mount the gate opener unit onto the secured mounting plate using the M6x10 mounting bolts.

Image: The CO-Z sliding gate opener unit installed on a concrete base.
4.3 Installing the Gear Racks
Attach the nylon gear racks to the bottom edge of your sliding gate. Ensure the racks are level and maintain a small clearance (approx. 1-2mm) from the opener's drive gear to allow for smooth operation and prevent binding.

Image: Two black nylon gear racks with mounting brackets, used for gate movement.
4.4 Electrical Connections and Sensors
- Connect the power supply to the control board according to the wiring diagram in the detailed manual.
- Install the infrared sensors on opposite sides of the gate opening, ensuring they are aligned and free from obstructions. These sensors detect obstacles and prevent the gate from closing.
- Connect the limit switches to the control board. These switches define the open and closed positions of the gate.

Imaxe: Primeiro plano view of the gate opener's control board with various wiring terminals.
5. Instrucións de funcionamento
Your CO-Z gate opener offers various modes of operation for convenience and security.
5.1 Operación de control remoto
- Apertura/Peche: Press the designated button on your remote control to open or close the gate. A single press will initiate the movement.
- Parando: Press the same button again during gate movement to stop the gate at any desired position.
- Rango: The remote control has an operating range of up to 30 meters. Ensure a clear line of sight for optimal performance.
- Emparellamento de mandos a distancia: Refer to the detailed manual for instructions on pairing additional remote controls (up to 40 supported).

Image: Two remote controls with multiple buttons for operating the gate opener.
5.2 Automatic Closing Function
The gate opener can be programmed to close automatically after a set delay (e.g., 15, 30, or 45 seconds). Consult the control board programming section in your detailed manual to enable and configure this feature.
5.3 Pedestrian Mode
This mode allows the gate to open partially, providing enough space for pedestrian access without fully opening the gate. This feature can be activated via a dedicated remote button or programmed through the control board.
5.4 Publicación manual
En caso de poder outage or system malfunction, the gate can be operated manually. Locate the manual release key slot on the opener unit, insert the key, and turn it to disengage the motor. This allows you to push the gate open or closed by hand.

Image: Close-up of the manual release mechanism on the gate opener, showing the key slot.
6. Mantemento
Un mantemento regular garante a lonxevidade e o funcionamento seguro do seu abridor de porta.
- Mensual:
- Inspect the gate's movement for any signs of friction or binding. Lubricate gate rollers and hinges if necessary.
- Limpe os sensores infravermellos para asegurarse de que estean libres de sucidade, po ou arañas.webs.
- Test the obstacle detection system by placing an object in the gate's path during closing. The gate should stop and reverse.
- Trimestral:
- Check all mounting bolts and screws for tightness.
- Inspect the gear racks for wear or damage. Replace if necessary.
- Verify that the manual release mechanism functions correctly.
- Anualmente:
- Have a qualified technician inspect the electrical connections and motor for any signs of wear or corrosion.
7 Solución de problemas
This section provides solutions to common issues you might encounter. For more complex problems, please contact customer support.
| Problema | Causa posible | Solución |
|---|---|---|
| A porta non responde ao control remoto. |
|
|
| A porta para ou inverte o seu movemento inesperadamente. |
|
|
| O motor funciona pero a porta non se move. |
|
|
| Gate opens/closes only partially. |
|
|
8. Garantía e soporte
CO-Z products are designed for durability and performance. This product comes with a standard manufacturer's warranty against defects in materials and workmanship. Please refer to your purchase documentation or the CO-Z official websitio web para coñecer os termos e condicións específicos da garantía.
For technical assistance, troubleshooting not covered in this manual, or to inquire about replacement parts, please contact CO-Z customer support:
- Websitio: Visit the official CO-Z websitio web con preguntas frecuentes e información de contacto para o soporte técnico.
- Correo electrónico: Refer to your product packaging or the CO-Z websitio para correo electrónico de atención ao cliente.
- Teléfono: Refer to your product packaging or the CO-Z websitio web con números de teléfono de atención ao cliente.
When contacting support, please have your product model number (RA3301) and purchase date available.