
Introdución
The Dirt Devil DD2505 Bagless Vacuum Cleaner is designed for efficient home cleaning, particularly beneficial for individuals with allergies or dust sensitivities. This vacuum features a HEPA 12 filter, which captures 99.5% of small dust particles, preventing them from recirculating into the air. Its bagless design includes a 2.5-liter dust collection bin for easy emptying and no need for replacement bags. The vacuum comes equipped with a combibrush for various floor types, a crevice tool, and an upholstery attachment, offering versatile cleaning options for both hard-to-reach areas and furniture.

Image: The Dirt Devil DD2505 Bagless Vacuum Cleaner, showcasing its compact design and transparent dustbin.
Configuración e montaxe
Follow these steps to assemble your Dirt Devil DD2505 vacuum cleaner before first use.
- Desempaquetar compoñentes: Carefully remove all parts from the packaging. Ensure all accessories (hose, telescopic tube, floor nozzle, crevice tool, upholstery brush) are present.
- Conecte a mangueira: Insira a mangueira flexible na entrada de succión da unidade principal ata que encaixe firmemente no seu lugar.
- Conectar o tubo telescópico: Attach the telescopic metal tube to the handle end of the flexible hose. Adjust the tube length by pressing the release button and sliding it to your desired height.
- Colocar a boquilla do chan: Connect the combibrush floor nozzle to the end of the telescopic tube. Ensure it is firmly attached.
- Conexión de alimentación: Extend the power cord from the vacuum cleaner. Plug the power cord into a suitable electrical outlet (220-240V AC, 50/60Hz).

Image: The Dirt Devil DD2505 vacuum cleaner fully assembled with hose, telescopic tube, and floor nozzle, ready for use.
Instrucións de funcionamento
Learn how to effectively use your vacuum cleaner and its attachments.
- Encendido/apagado: Press the power button located on the main unit to start or stop the vacuum cleaner.
- Using the Combibrush: The combibrush is suitable for various floor types. Use the foot switch on the nozzle to retract the bristles for hard floors or extend them for carpets and rugs.
- Using the Crevice Tool: For narrow spaces, corners, and edges, attach the crevice tool directly to the hose handle or the telescopic tube.

Image: The crevice tool, ideal for cleaning tight spaces and corners.
- Using the Upholstery Brush: Attach the upholstery brush for cleaning furniture, curtains, or car interiors.
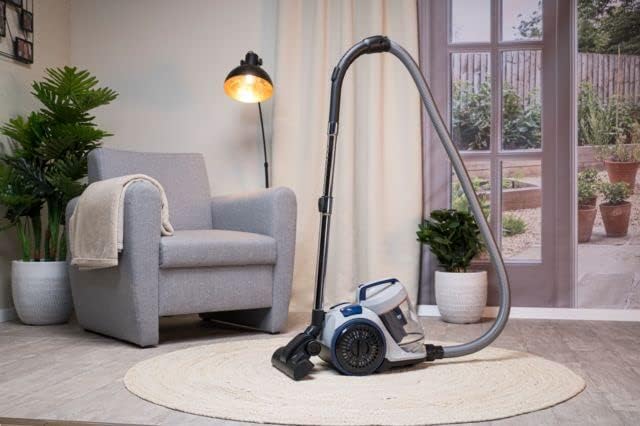
Image: The upholstery brush, designed for effective cleaning of fabric surfaces.
- Rebobinado automático do cable: After use, gently pull the power cord to activate the automatic cable rewind function. The cord will retract into the unit.
Mantemento
Un mantemento regular garante un rendemento óptimo e prolonga a vida útil do teu aspirador.
Baleirando o lixo
The 2.5-liter dustbin should be emptied regularly, especially when the 'Max' fill line is reached, to maintain suction power.
- Desconectar a enerxía: Desconecte sempre o aspirador da toma de corrente antes de realizar calquera mantemento.
- Eliminar a papeleira: Press the dustbin release button (if applicable) and lift the dustbin away from the main unit.
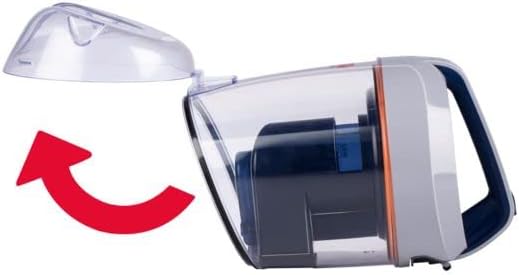
Image: Illustration showing how to detach the dustbin from the main vacuum unit.
- Contido baleiro: Position the dustbin over a waste bin. Open the bottom flap of the dustbin to release the collected dirt and debris.
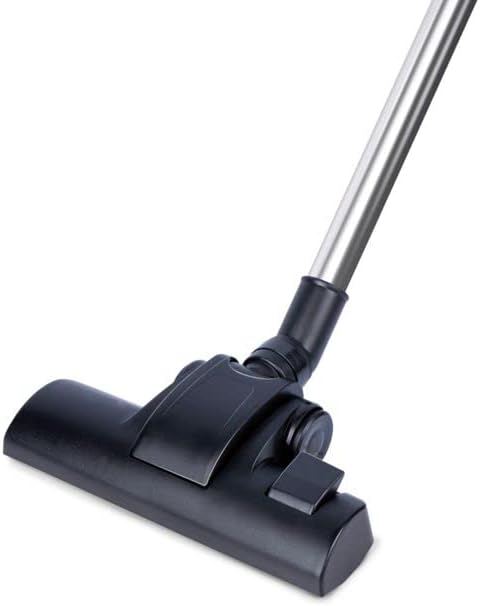
Image: The dustbin with its bottom flap open, ready to be emptied into a waste receptacle.
- Remontar: Close the dustbin flap securely and reattach the dustbin to the vacuum cleaner until it locks into place.
Cleaning the HEPA 12 Filter
The HEPA 12 filter is washable and should be cleaned periodically to maintain filtration efficiency. The frequency depends on usage.
- Filtro de acceso: The HEPA filter is located within the dustbin assembly. Remove the dustbin as described above and locate the filter.
- Lavar o filtro: Enxágüe o filtro HEPA con auga fría corrente ata que a auga saia limpa. Non empregue deterxentes nin auga quente.
- Secar ben: Allow the filter to air dry completely for at least 24 hours before reinserting it into the vacuum cleaner. Do not use heat to dry the filter.
- Volver inserir o filtro: Once completely dry, place the filter back into its housing within the dustbin and reattach the dustbin to the vacuum.
Resolución de problemas
Se tes problemas coa túa aspiradora, consulta os seguintes problemas e solucións comúns.
- Sen enerxía:
- Comprobe se o cable de alimentación está conectado correctamente a unha toma de corrente que funcione.
- Ensure the power button on the vacuum cleaner is pressed.
- Perda de succión:
- Comprobe se o colector de lixo está cheo e precisa ser baleirado.
- Inspect the HEPA filter for excessive dirt and clean it if necessary.
- Check the hose, telescopic tube, and floor nozzle for any blockages. Remove any obstructions carefully.
- Ruído inusual:
- Turn off and unplug the vacuum. Check for any foreign objects caught in the brush roll or hose.
- Asegúrate de que todas as pezas estean correctamente montadas e fixadas de forma segura.
Especificacións
| Número de modelo | DD2505 |
| Potencia de saída | 800 W |
| Voltage | 220-240 V CA, 50/60 Hz |
| Capacidade do lixo | 2.5 litros |
| Tipo de filtro | HEPA 12 (Washable) |
| Lonxitude do cable | 5 metros |
| Radio de operación | 7.5 metros |
| Nivel de ruído | 80 dB |
| Peso | 4.7 quilogramos |
| Dimensións (L x W x H) | 38 x 27 x 32 cm |
| Accesorios incluídos | Combibrush, Crevice Tool, Upholstery Tool |
| Automatic Cable Rewind | Si |
Garantía e Soporte
This Dirt Devil DD2505 Bagless Vacuum Cleaner comes with a 2 anos de garantía. For warranty claims, technical support, or service inquiries, please refer to the contact information provided with your purchase documentation or visit the official Dirt Devil websitio. Garde o comprobante de compra para validar a garantía.