
1. Introdución
The Y&H 60A PWM MPPT Solar Charge Controller is designed for efficient and reliable management of solar power systems. It is compatible with various battery types, including sealed, GEL, flooded, and LifePO4 batteries, and features automatic voltage recognition for 12V, 24V, 36V, and 48V systems. This controller ensures optimal charging and protection for your battery bank, extending its lifespan and maximizing energy harvest from your solar panels.
Key features include a multifunctional LCD display with backlight, dual 5V USB charging ports, and comprehensive protection mechanisms against over-voltage, over-discharge, over-charge, and over-temperature.
2. Instrucións de seguridade
- Ensure all wiring is correctly connected and securely fastened before operation. Incorrect wiring can cause damage to the controller or connected devices.
- Always connect the battery to the controller first, then the solar panel, and finally the DC load. Disconnect in the reverse order: DC load, then solar panel, then battery.
- This controller deals with voltages that exceed safe limits. Proper installation and handling by qualified personnel are recommended.
- Do not attempt to disassemble or repair the controller yourself. Contact technical support for assistance.
- Install the controller in a well-ventilated area, away from direct sunlight, high temperatures, and moisture to prevent overheating.
- Ensure the battery is fully charged before connecting the solar panel for the first time.
3. Produto rematadoview
The Y&H 60A Solar Charge Controller features a robust design with a clear LCD display and intuitive control buttons. It is engineered for high tracking and conversion efficiency to optimize your solar power system.

Figura 3.1: Fronte view do controlador de carga solar Y&H 60A, que mostra a pantalla LCD e os botóns de control.
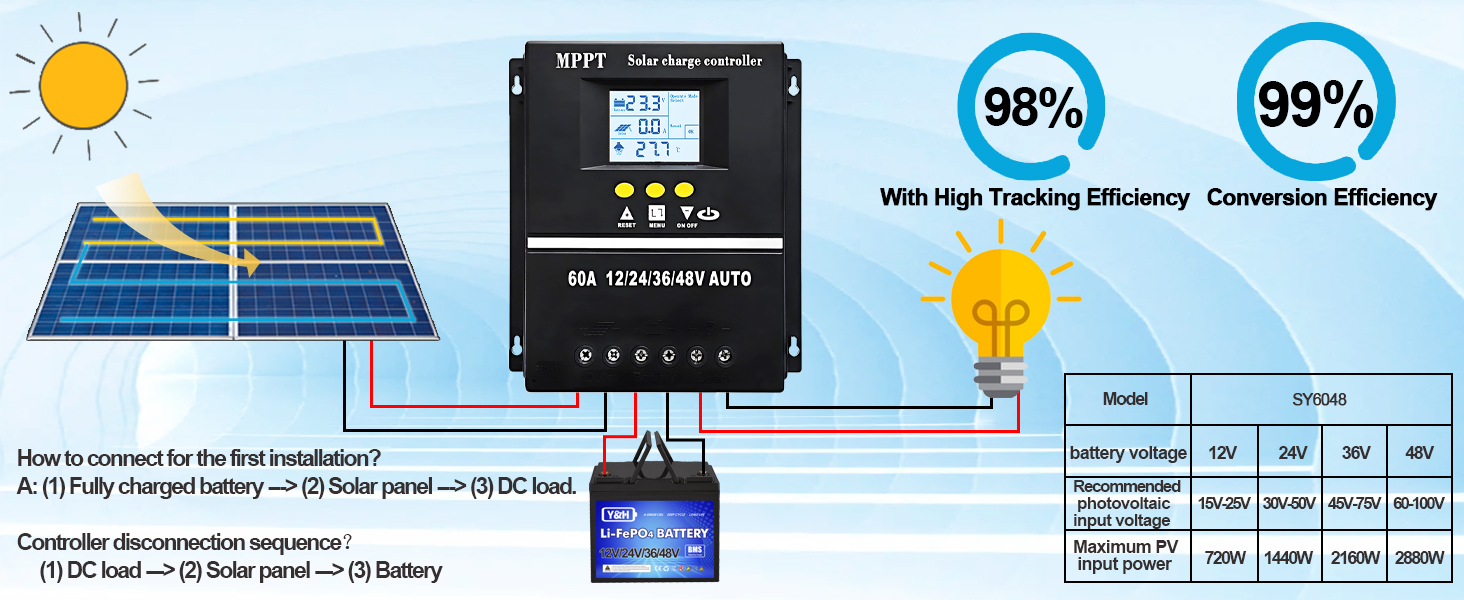
Figure 3.2: Diagram illustrating the connection of solar panels, charge controller, and battery, highlighting 98% tracking efficiency and 99% conversion efficiency.

Figure 3.3: The controller is compatible with multiple battery types including SLD, GEL, Flooded, and Lithium batteries.

Figure 3.4: The controller utilizes a rapid, efficient, and safe four-stage battery charging algorithm: Bulk Charge, Boost Charge, Float Charge, and Equalization Charge.
4. Configuración e cableado
Follow these steps for proper installation and wiring of your solar charge controller:
- Conecte a batería: Ensure the battery is fully charged. Connect the battery terminals to the controller's battery ports (positive to positive, negative to negative).
- Conecta o panel solar: Connect the solar panel to the controller's PV input ports (positive to positive, negative to negative).
- Conecta a carga de CC: Connect your DC load to the controller's load output ports (positive to positive, negative to negative).
Secuencia de desconexión: When disconnecting, always follow the reverse order: first disconnect the DC load, then the solar panel, and finally the battery.

Figure 4.1: Detailed wiring diagram showing the connection order for battery, solar panel, and DC load.
Vídeo 4.1: Desempaquetado e máisview of a Y&H solar charge controller, highlighting its physical components.
5. Operating Modes and Display Interface
The controller features a clear LCD display and multiple operating modes to suit various application needs.
5.1 Interface de visualización
The LCD provides real-time information on battery status, solar input, and load output. Use the buttons to navigate through different display screens and settings.

Figura 5.1: Máisview of the LCD display interface, showing battery work status, solar panel operating status, load output status, and mode control area.
Video 5.1: Demonstration of display navigation and setting adjustments on the Y&H solar charge controller.
5.2 Modos de traballo da carga
The controller offers 7 operational modes for the DC load:
- Modo de carga: Standard battery charging.
- Modo de control de luz: A carga acende ao solpor e apágase ao amencer.
- Light Control + Delay Mode: Load turns on at sunset and stays on for a set duration.
- Universal Control Mode: A carga está sempre activada.
- Modo de control manual: Load is controlled manually via the ON/OFF button.
- Timing Control Mode: Load operates according to a set schedule.
- Modo de proba: For system testing and diagnostics.

Figure 5.2: Digital control panel interface displaying various load working modes, including Manual Mode and Solar Light Control.
6. Mantemento
To ensure optimal performance and longevity of your Y&H Solar Charge Controller, regular maintenance is recommended:
- Inspeccionar conexións: Comprobe periodicamente todas as conexións do cableado para comprobar se están ben apertadas e corroídas. As conexións soltas poden provocar perdas de enerxía ou sobrequecemento.
- Limpar o controlador: Keep the controller clean and free from dust and debris. Use a dry cloth to wipe the exterior. Do not use liquids or solvents.
- Ventilación: Ensure the installation area has adequate ventilation to prevent heat buildup. The heat sink on the back of the unit should not be obstructed.
- Inspección da batería: Regularly inspect your batteries for any signs of damage, swelling, or leakage. Ensure battery terminals are clean.
- Actualizacións de software: Consulte o do fabricante websitio web para ver se hai actualizacións de firmware dispoñibles para garantir que o controlador teña as últimas funcións e correccións de erros.
7 Solución de problemas
If you encounter issues with your Y&H Solar Charge Controller, refer to the following common problems and solutions:
| Problema | Causa posible | Solución |
|---|---|---|
| Sen pantalla/o controlador non se acende | Batería non conectada ou de baixo volumetage; faulty wiring. | Comprobe as conexións da batería e o voltage. Asegúrate de que o volume da bateríatage está por riba do limiar mínimo de funcionamento. |
| A batería non se está cargando | Solar panel not connected; insufficient sunlight; faulty solar panel; incorrect battery type setting. | Verify solar panel connections. Check solar panel output. Ensure battery type setting matches your battery. |
| A carga non funciona | Load disconnected; load overcurrent; battery low voltage disconnect; incorrect load mode setting. | Check load connections. Reduce load if overcurrent. Charge battery. Adjust load working mode. |
| Sobrequecemento | Mala ventilación; carga excesiva. | Ensure adequate airflow around the controller. Reduce load if possible. |
If the problem persists after trying these solutions, please contact Y&H customer support.
8. Especificacións
| Característica | Especificación |
|---|---|
| Marca | Y&H |
| Modelo | SY6048 |
| Valoración actual | 60A |
| Sistema Voltage | Recoñecemento automático 12V/24V/36V/48V |
| Material | Plástico |
| Cor | Negro |
| Tipo de visualización | LCD |
| Saída USB | Dual 5V USB ports |
| Compatibilidade da batería | Selo, XEL, Inundado, LifePO4 |
| Características de protección | Voltage protection, discharge current protection, charge protection, over-temperature protection |
| GTIN | 716963493208, 716963493246 |
9. Garantía e soporte
Y&H products are covered by a warranty. For technical assistance, troubleshooting, or any questions regarding your solar charge controller, please do not hesitate to contact our dedicated support team. Our engineers are available to provide advice and solutions to any issues you may encounter.
Please refer to your purchase documentation or the official Y&H websitio web para obter os termos específicos da garantía e a información de contacto.