1. Introdución
This manual provides comprehensive instructions for the installation, configuration, and operation of your ASUS TUF GAMING B650M-E AMD mATX Motherboard. Please read this manual thoroughly before installing or using the product to ensure proper functionality and to prevent damage.
The ASUS TUF GAMING B650M-E is designed to support AMD Ryzen 7000 Series processors and features an 8+2 DrMOS power solution, DDR5 memory support, PCIe 5.0, and multiple M.2 slots for high-performance storage. It is built for durability and stable performance.
2. Información de seguridade
Observe the following safety precautions to prevent damage to the motherboard and injury to yourself:
- Always disconnect the power cable from the wall socket before touching any internal components.
- Use unha pulseira antiestática ou toque con frecuencia un obxecto metálico conectado á terra para descargar a electricidade estática antes de manipular a placa base ou outros compoñentes.
- Sujete a placa base polos bordos para evitar tocar os compoñentes sensibles.
- Ensure all cables are connected correctly and securely before powering on the system.
- Manteña a placa base lonxe da humidade e das temperaturas extremas.
3. Contido do paquete
Verify that all items are present in your motherboard package. If any item is damaged or missing, contact your retailer.
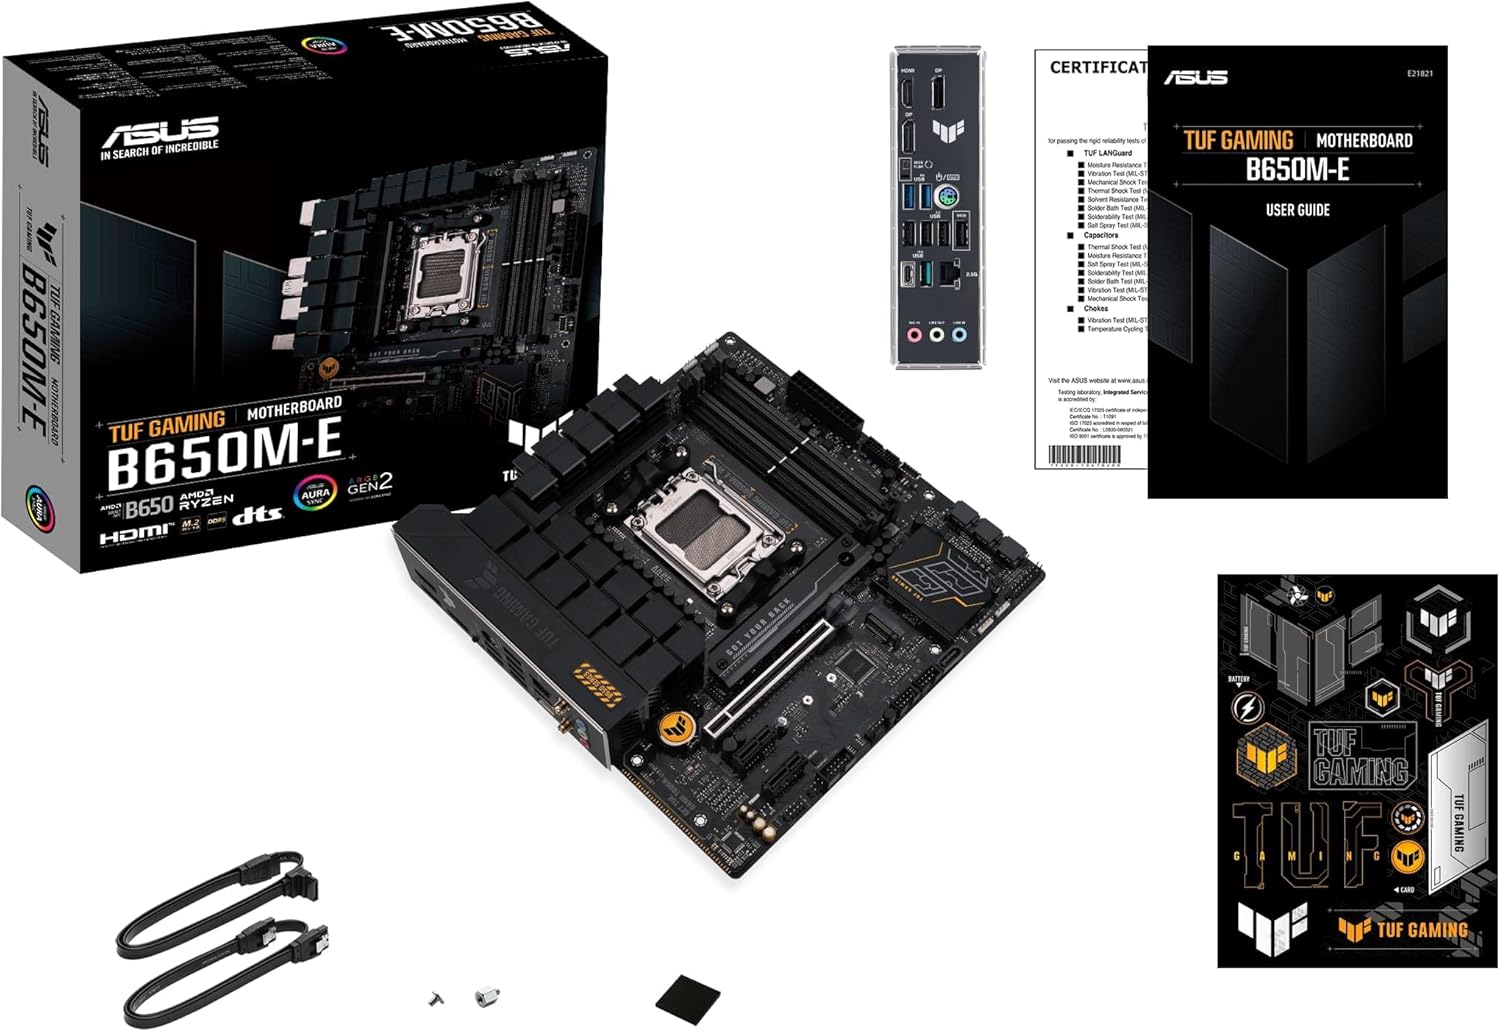
Imaxe 3.1: Contents of the ASUS TUF GAMING B650M-E package. This image displays the motherboard, user guide, SATA cables, M.2 screws, and TUF Gaming stickers.
- ASUS TUF GAMING B650M-E Motherboard
- Guía de usuario
- Cables SATA 6 Gb/s
- M.2 SSD screw package
- TUF Gaming stickers
4. Deseño da placa base
Familiarícese cos distintos compoñentes e conectores da placa base antes da instalación.
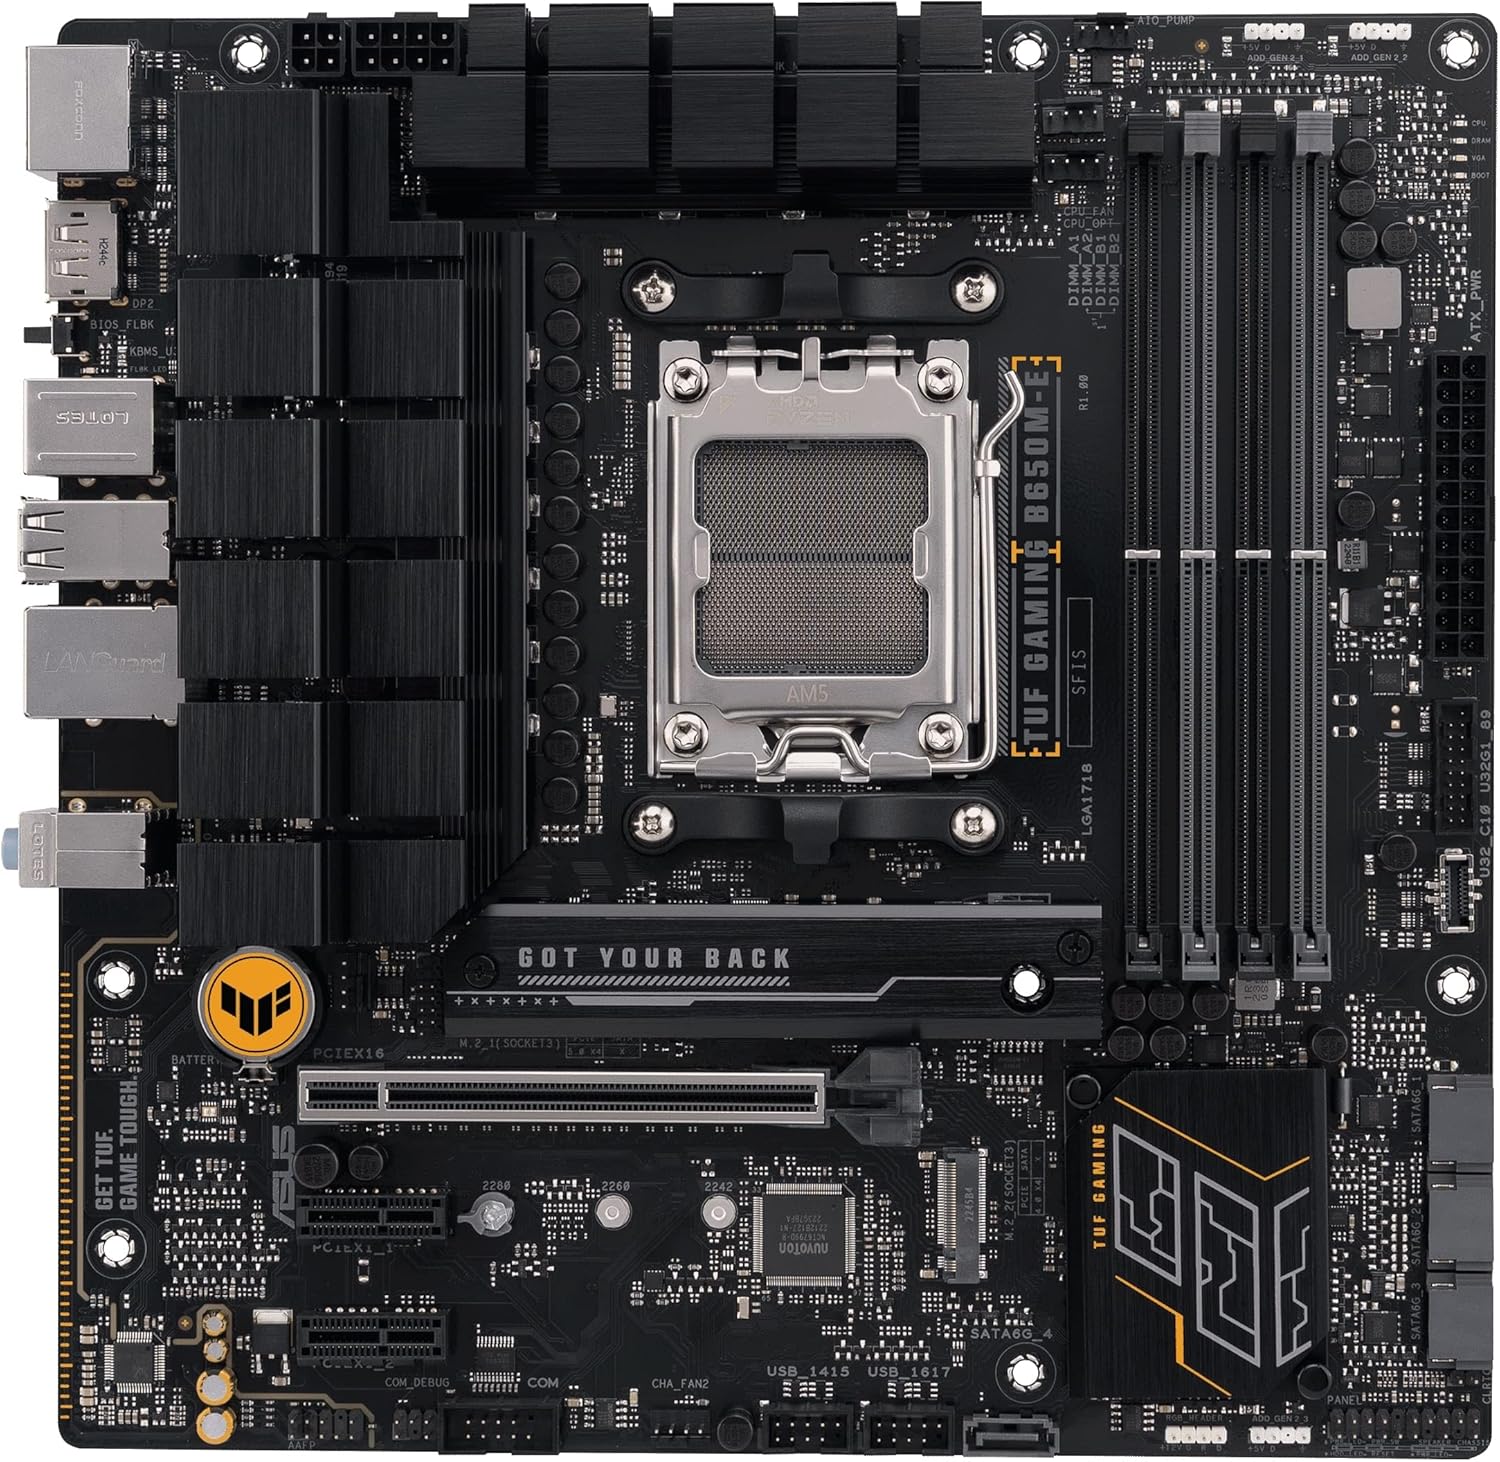
Imaxe 4.1: Arriba abaixo view of the ASUS TUF GAMING B650M-E motherboard, highlighting the CPU socket, DIMM slots, PCIe slots, and M.2 slots.
4.1. Panel de E/S traseiro
O panel de E/S traseiro ofrece varios portos para conectar dispositivos externos.

Imaxe 4.2: Primeiro plano view of the rear I/O panel, showing ports for USB, DisplayPort, HDMI, LAN, and audio.
- DisplayPort (DP): For connecting display devices.
- HDMI: For connecting display devices.
- Portos USB 2.0: Para conectar periféricos.
- Portos USB 3.2 de 1.ª xeración: Para conectar dispositivos USB de alta velocidade.
- Porto USB 3.2 Xen 2 Tipo C: For connecting USB Type-C devices.
- 2.5 Gb Ethernet Port: Para a conectividade de rede.
- Conectores de son: For connecting audio devices (Line In, Line Out, Mic In).
- Botón de retroceso da BIOS: For updating BIOS without a CPU or RAM.
5. Configuración e instalación
Follow these steps to install the motherboard and its components into your PC case.
5.1. Instalación da CPU
- Localiza o socket da CPU AM5 na placa base.
- Abra a panca do socket da CPU e retire a tapa protectora.
- Aliña coidadosamente a CPU co socket, asegurándote de que a marca triangular da CPU coincida coa marca do socket.
- Coloque a CPU no socket con coidado sen aplicar forza.
- Peche a panca do zócalo para fixar a CPU.
- Instala o refrigerador da CPU segundo as instrucións do fabricante.
5.2. Instalación da memoria (RAM)
This motherboard supports DDR5 memory modules. Refer to the motherboard's QVL (Qualified Vendor List) for compatible memory.
- Abra os clips nos dous extremos das ranuras DIMM.
- Aliñe a muesca do módulo de memoria DDR5 coa chave da ranura DIMM.
- Insira o módulo de memoria firmemente na ranura ata que os clips encaixen no seu lugar.
- For dual-channel configuration, install modules into the recommended slots (usually A2 and B2).
5.3. Storage (M.2 and SATA) Installation
Instalación de SSD M.2
- Localiza as ranuras M.2 na placa base.
- Remove the M.2 heatsink (if present) and the standoff screw.
- Insira o SSD M.2 na ranura nun ángulo de 30 graos.
- Prema con coidado o SSD M.2 cara abaixo e asegúreo co parafuso separador.
- Reinstall the M.2 heatsink (if applicable).
Instalación de dispositivos SATA
- Conecta un extremo do cable de datos SATA a un porto SATA da placa base.
- Conecta o outro extremo do cable de datos SATA ao teu dispositivo de almacenamento SATA (HDD/SSD).
- Conecta un cable de alimentación SATA da fonte de alimentación (PSU) ao dispositivo de almacenamento SATA.
5.4. Instalación da tarxeta de expansión (PCIe)
This motherboard features PCIe 5.0 x16 and other PCIe slots for graphics cards and other expansion cards.
- Localice a ranura PCIe desexada.
- Retire a tapa da ranura de expansión correspondente da caixa do seu PC.
- Aliña a tarxeta de expansión coa ranura e prema firmemente cara abaixo ata que estea asentada correctamente.
- Secure the card with a screw or the case's retention mechanism.
5.5. Conexións de alimentación
Connect the power supply unit (PSU) cables to the motherboard.
- Conector de alimentación ATX de 24 pines: Connect the main 24-pin power cable from the PSU.
- 8-pin + 4-pin ATX 12V Power Connectors: Connect the CPU power cables from the PSU. Ensure both are connected for stable power delivery, especially with high-end CPUs.
5.6. Conexións do panel frontal
Connect the cables from your PC case's front panel to the corresponding headers on the motherboard.
- Front Panel Header (F_PANEL): For power button, reset button, HDD LED, and power LED. Refer to the user guide for pin assignments.
- Cabeceiras USB: Connect front panel USB ports (USB 2.0, USB 3.2 Gen 1, USB 3.2 Gen 2 Type-C).
- Front Panel Audio Header (AAFP): For front panel headphone and microphone jacks.
6. Instrucións de funcionamento
6.1. Configuración da BIOS/UEFI
The BIOS (Basic Input/Output System) or UEFI (Unified Extensible Firmware Interface) is firmware that initializes hardware during the booting process and provides runtime services for the operating system. You can access the BIOS/UEFI setup utility to configure system settings.
- Accedendo á BIOS/UEFI: During system startup, press the Eliminar chave ou F2 tecla repetidamente.
- Navegación: Usa as teclas de frecha para navegar e Entra to select. Many ASUS UEFI interfaces also support mouse input.
- Configuración clave:
- Orde de arranque: Configure the sequence of storage devices for booting the operating system.
- Overclocking (OC) Settings: Axustar as frecuencias/volumes da CPU e da memoriatages (use with caution).
- Control do ventilador: Monitor and adjust fan speeds.
- SATA Configuration: Set SATA mode (AHCI/RAID).
- Gardando os cambios: Always save changes before exiting the BIOS/UEFI setup.
6.2. Instalación de controladores
After installing your operating system, install the necessary drivers for optimal performance and functionality. Drivers can be found on the ASUS support websitio para o modelo da túa placa base.
- Controladores de chipsets: Essential for motherboard functionality.
- Controladores LAN: Para a conectividade de rede.
- Controladores de audio: For sound output and input.
- Controladores gráficos: If using integrated graphics or a dedicated GPU.
- Controladores USB: For optimal USB device performance.
6.3. Utilidades de software
ASUS provides various software utilities to enhance your user experience:
- Caixa de armería: A central hub for managing drivers, utilities, and Aura Sync lighting.
- Sincronización de aura: For customizing RGB lighting effects on compatible components.
- Redución de ruído AI: Mellora a claridade do audio para a comunicación.
7. Mantemento
7.1. Actualizacións da BIOS
Regularly updating your BIOS can improve system stability, compatibility, and performance. Visit the ASUS support websitio web para obter as últimas versións da BIOS e as instrucións de actualización.
- Flash EZ 3: Update BIOS directly from the UEFI interface using a USB flash drive.
- Flashback da BIOS: Update BIOS without a CPU or RAM installed by using the dedicated USB port and button on the rear I/O panel.
7.2. Limpeza
To ensure optimal performance and longevity, periodically clean your motherboard and PC case.
- Disconnect all power before cleaning.
- Use compressed air to remove dust from heatsinks, fans, and other components.
- Usa un pano suave e sen fiapos para limpar as superficies con suavidade. Evita usar produtos de limpeza líquidos directamente sobre os compoñentes.
8 Solución de problemas
Esta sección aborda problemas comúns cos que podes atoparte.
| Problema | Posible Solución |
|---|---|
| O sistema non se acende. |
|
| Sen saída de visualización. |
|
| System reboots or crashes randomly. |
|
| Sistema operativo non detectado. |
|
9. Especificacións
Key technical specifications for the ASUS TUF GAMING B650M-E Motherboard.
| Característica | Detalle |
|---|---|
| Marca | ASUS |
| Nome do modelo | TUF Gaming B650M-E |
| Socket CPU | Enchufe AM5 |
| Procesadores compatibles | AMD Ryzen 7000 Series (and future compatible generations) |
| Tipo de chipset | AMD B650 |
| Tecnoloxía de memoria RAM | DDR5 |
| Velocidade do reloxo da memoria | Up to 2400 MHz (JEDEC), higher with EXPO/OC |
| Slots PCIe | 1 x PCIe 5.0 x16, additional PCIe slots |
| M.2 Ranuras | 2 x M.2 slots |
| LAN | 2.5 Gb Ethernet |
| Saída de vídeo | 2 x DisplayPort, 1 x HDMI |
| Portos USB | USB 2.0, USB 3.2 Gen 1, USB 3.2 Gen 2 Type-C |
| Factor de forma | mATX |
| Peso do elemento | 2.2 libras |
10. Garantía e soporte
For detailed warranty information, please refer to the warranty card included in your product package or visit the official ASUS websitio.
ASUS Support: For technical assistance, driver downloads, and further information, please visit the official ASUS support websitio: www.asus.com/support/
When contacting support, please have your motherboard model (TUF GAMING B650M-E) and serial number ready.