Xiaomi BHR7112GL
Manual do usuario do compresor de aire eléctrico portátil Xiaomi 2
Model: BHR7112GL | Brand: Xiaomi
1. Introdución
Thank you for choosing the Xiaomi Portable Electric Air Compressor 2. This device is a versatile and portable solution for inflating tires of various vehicles and other inflatable items. Designed for ease of use and efficiency, it features a powerful motor, multiple preset modes, and a digital display for accurate pressure readings. Please read this manual carefully before use to ensure proper operation and maintenance.
2. Información de seguridade
- Do not overinflate. Always refer to the recommended pressure for the item being inflated.
- Manteña o dispositivo fóra do alcance dos nenos.
- Do not operate the compressor in wet conditions or near flammable liquids or gases.
- The device can become warm during prolonged use. Allow it to cool down between inflation cycles if it becomes excessively hot.
- The operating noise level is approximately 80 dB. Use hearing protection if necessary, especially during extended operation.
- Ensure the valve connection is secure before starting inflation to prevent air leakage or injury.
- Do not disassemble or attempt to repair the device yourself. Contact authorized service personnel for repairs.
3. Contido do paquete
O paquete estándar inclúe os seguintes elementos:
- Xiaomi Portable Electric Air Compressor 2
- Manual de usuario
- Cable de carga USB-A a USB-C
- Adaptador de válvulas Presta
- Adaptador de válvula de agulla
- Quick-Connect Valve Adapter
- Bolsa de almacenamento
4. Produto rematadoview
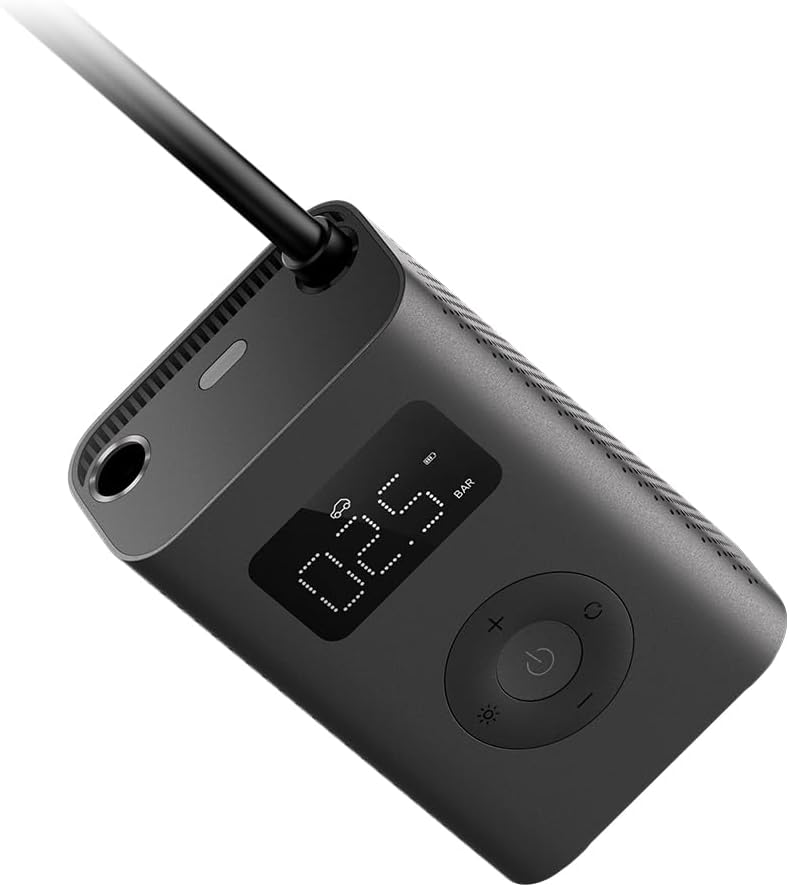
The Xiaomi Portable Electric Air Compressor 2 is designed for portability and ease of use. It features a clear digital display and intuitive controls.

Fronte view of the compressor, showing the digital display and control buttons.
En ángulo view highlighting the compact design and hose connection point.

Lado view of the compressor, showing the textured grip and ventilation.

De volta view displaying product specifications and regulatory marks.
Características principais:
- High-Precision Cylinder: Supports inflation up to 150 PSI.
- Inflación rápida: Approximately 25% faster than the previous generation, capable of inflating a car tire in about 8 minutes.
- Batería de longa duración: Integrated 2000mAh lithium-ion battery, capable of inflating up to 10 tires on a full charge.
- Seis modos predefinidos: Manual, Bicycle, Motorcycle, Car, E-scooter, and Ball modes with customizable pressure settings.
- Función de parada automática: Detén automaticamente o inflado unha vez que se alcanza a presión preestablecida.
- Pantalla dixital: Clear, real-time pressure display.
- Carga universal USB-C: Interface de carga cómoda e moderna.
- Luz LED incorporada: Improved brightness for use in low-light conditions.
- Lixeiro e portátil: Pesa aproximadamente 490 gramos, polo que é doado de transportar.
5. Configuración
5.1 Carga inicial
Before first use, fully charge the air compressor. Connect the provided USB-A to USB-C charging cable to the device's USB-C port and a suitable USB power adapter (not included). The battery indicator on the display will show the charging status. A full charge takes approximately 3 hours.
5.2 Attaching the Hose and Adapters
The compressor comes with a flexible hose and various adapters for different valve types.
- Screw the inflation hose securely into the inflation port at the top of the compressor.
- Select the appropriate valve adapter for the item you wish to inflate (e.g., Presta valve adapter for certain bicycle tires, needle valve for balls, or the quick-connect adapter for standard car/motorcycle valves).
- Attach the chosen adapter firmly to the end of the inflation hose.

The compressor connected to a bicycle tire valve for inflation.
6. Instrucións de funcionamento
6.1 Acendido/Apagado
Press and hold the power button (center button) to turn the compressor on. The display will light up. To turn off, press and hold the power button again, or the device will automatically shut off after a period of inactivity.
6.2 Selección do modo de inflado
The compressor offers six preset inflation modes. Press the mode button (right button) to cycle through the modes:
- Modo manual: Default pressure 35 PSI (adjustable range: 3-150 PSI / 0.2-10.3 Bar).
- Modo bicicleta: Default pressure 45 PSI (adjustable range: 30-65 PSI).
- Modo motocicleta: Default pressure 2.4 Bar (adjustable range: 1.8-3.0 Bar).
- Modo coche: Default pressure 2.5 Bar (adjustable range: 1.8-3.5 Bar).
- E-scooter Mode: Default pressure 50 PSI (adjustable range: 45-60 PSI).
- Modo pelota: Default pressure 8 PSI (adjustable range: 4-16 PSI).

Visual representation of the six available inflation modes.
6.3 Axuste da presión obxectivo
Once a mode is selected, the default pressure for that mode will be displayed. Use the '+' and '-' buttons to adjust the target pressure to your desired value. The unit (PSI or Bar) can be switched by pressing and holding the mode button.
6.4 Comezar e deter a inflación
After setting the target pressure and securely connecting the hose to the item, press the power button to start inflation. The compressor will automatically stop once the target pressure is reached. To manually stop inflation at any time, press the power button again.

The compressor in use, inflating a car tire.
6.5 Using the Built-in LED Light
Press the light button (left button) to turn on the LED light. This is useful for inflating in low-light conditions or at night. Press the button again to turn it off.
7. Mantemento
- Limpeza: Limpe o exterior do compresor cun pano suave eamp pano. Non use produtos químicos agresivos ou produtos de limpeza abrasivos.
- Almacenamento: Store the compressor in a cool, dry place, away from direct sunlight and extreme temperatures. Use the provided storage pouch to protect the device and its accessories.
- Coidado da batería: To prolong battery life, avoid fully discharging the battery frequently. If storing for an extended period, charge the battery to approximately 50% every 3-6 months.
- Refrixeración: After continuous or heavy use, the compressor may become warm. Allow it to cool down for several minutes before further operation or storage to prevent overheating.
8 Solución de problemas
| Problema | Causa posible | Solución |
|---|---|---|
| O compresor non se acende. | Batería baixa ou sen carga. | Cargue o compresor completamente usando o cable USB-C. |
| O compresor non se infla. | Hose not securely connected; target pressure already reached; valve blocked. | Ensure hose and adapter are tightly screwed on. Check current pressure. Clear any obstructions in the valve. |
| Lectura de presión inexacta. | Improper connection; sensor issue. | Ensure the hose is firmly attached to the valve. If problem persists, contact support. |
| Preset pressure values reset after turning off. | This is normal behavior for some modes. | Manually adjust the pressure each time for specific needs. Manual mode allows saving custom pressure values. |
| Unit changes from BAR to PSI after restart. | Default unit setting for certain modes. | Press and hold the mode button to switch between PSI and BAR as needed. |
| Device becomes very hot during use. | Prolonged or heavy inflation. | This is normal. Allow the device to cool down for several minutes before continuing use. |
9. Especificacións
| Característica | Especificación |
|---|---|
| Número de modelo | BHR7112GL |
| Dimensións do produto | 7.5 x 4.5 x 12.3 cm |
| Peso | 490 gramos |
| Presión máxima de inflado | 150 PSI (10.3 bar) |
| Capacidade da batería | 2000mAh ión de litio |
| Porto de carga | USB-C |
| Tempo de carga | Aprox. 3 horas |
| Nivel de ruído | 80 dB |
| Temperatura de funcionamento | 0 °C a 45 °C (32 °F a 113 °F) |
| Temperatura de almacenamento | -10 °C a 45 °C (14 °F a 113 °F) |
10. Garantía e soporte
This product is covered by a manufacturer's warranty. Please refer to the warranty card included in your package or visit the official Xiaomi website for detailed warranty terms and conditions specific to your region. For technical support, troubleshooting assistance, or service inquiries, please contact Xiaomi customer service or your local authorized dealer. Keep your purchase receipt as proof of purchase for warranty claims.
Ask a question about this manual
Ask about setup, troubleshooting, compatibility, parts, safety, or missing instructions. Manuals+ will review the question and use this page’s manual context to help answer it.