1. Introdución e finalview
This Docooler Wireless Digital Thermometer provides simultaneous display of indoor and outdoor temperatures, along with the current time. It utilizes wireless technology for convenient outdoor temperature monitoring from an indoor receiver. The device records maximum and minimum indoor/outdoor temperatures and offers selectable temperature units (Celsius/Fahrenheit) and time formats (12H/24H).

Image 1.1: Docooler Wireless Digital Thermometer main unit and outdoor transmitter.
2. Compoñentes do produto
O paquete inclúe os seguintes elementos:
- Main Temperature Unit (Receiver)
- Transmisor sen fíos para exteriores
- Manual de usuario (este documento)
Nota: 2x AA 1.5V batteries for the transmitter and 2x AAA 1.5V batteries for the main unit are non incluído e debe mercarse por separado.

Imaxe 2.1: Parte dianteira e traseira view of the main temperature unit.
3. Configuración
3.1 Instalación da batería
- For the Main Temperature Unit: Open the battery compartment cover on the back of the main unit. Insert 2x AAA 1.5V batteries, ensuring correct polarity (+/-). Close the cover.
- For the Wireless Outdoor Transmitter: Open the battery compartment cover on the back of the transmitter. Insert 2x AA 1.5V batteries, ensuring correct polarity (+/-). Close the cover.

Image 3.1: Battery compartment of the main temperature unit.

Image 3.2: Battery compartment of the wireless outdoor transmitter.
3.2 Colocación
- Main Temperature Unit: Place the main unit indoors on a flat surface using its integrated kickstand or mount it on a wall using the hanging hole. Ensure it is away from direct sunlight or heat sources that could affect indoor temperature readings.
- Wireless Outdoor Transmitter: Place the outdoor transmitter in a sheltered location outdoors, protected from direct rain and sunlight. For optimal wireless signal, ensure it is within 100 meters (unobstructed) of the main unit. Avoid placing it near large metal objects or electrical appliances that may cause interference.

Image 3.3: Diagram illustrating wireless data transmission.
4. Instrucións de funcionamento
The main unit features an LCD screen displaying indoor temperature, outdoor temperature, and current time. Control buttons are located below the display.

Image 4.1: Main unit display and control buttons.
4.1 Funcións de visualización
- Outdoor: Displays the temperature measured by the wireless outdoor transmitter.
- INTERIOR: Displays the temperature measured by the main unit's internal sensor.
- HORA: Mostra a hora actual.
4.2 Funcións dos botóns
The main unit has several buttons for control:
- SET / ℃/℉: Press to switch between Celsius (℃) and Fahrenheit (℉). Press and hold to enter time setting mode.
- ▲ / MAX/MIN: Preme para view maximum and minimum recorded temperatures. Press and hold to clear MAX/MIN records. In time setting mode, press to increase value.
- ▼ / 12/24: Press to switch between 12-hour and 24-hour time format. In time setting mode, press to decrease value.
4.3 Axustar a hora
- Manteña premido o SET / ℃/℉ durante aproximadamente 3 segundos ata que os díxitos das horas comecen a parpadear.
- Usa o ▲ / MAX/MIN e ▼ / 12/24 botóns para axustar a hora.
- Preme o SET / ℃/℉ button again to confirm the hour and move to setting the minutes.
- Usa o ▲ / MAX/MIN e ▼ / 12/24 botóns para axustar os minutos.
- Preme o SET / ℃/℉ button one last time to confirm the minutes and exit time setting mode.
5. Mantemento
5.1 Substitución da batería
When the display becomes dim or readings are inconsistent, it is time to replace the batteries in both the main unit and the outdoor transmitter. Follow the battery installation steps in Section 3.1.
5.2 Limpeza
Limpe o dispositivo cun suave, damp cloth. Do not use abrasive cleaners or immerse the unit in water. Ensure the device is completely dry before re-inserting batteries or operating.
5.3 Almacenamento
If the device will not be used for an extended period, remove all batteries to prevent leakage and store it in a cool, dry place.
6 Solución de problemas
- Non se mostra ningunha lectura de temperatura exterior ou '---':
- Check if the outdoor transmitter batteries are correctly installed and not depleted.
- Ensure the outdoor transmitter is within the 100m wireless range and there are no major obstructions (e.g., thick walls, large metal objects) between the transmitter and the main unit.
- Try repositioning both units closer to each other.
- Lecturas de temperatura inexactas:
- Ensure both units are not exposed to direct sunlight, heat sources, or extreme drafts.
- Substitúa as pilas en ambas unidades.
- A hora é incorrecta:
- Follow the time setting instructions in Section 4.3 to reset the time.
- A pantalla está escura ou en branco:
- Substitúa as pilas da unidade principal.
7. Especificacións
| Característica | Especificación |
|---|---|
| Material | ABS (acrilonitrilo butadieno estireno) |
| Pantalla LCD Tamaño | 94 x 54 mm |
| Rango de temperatura interior | 0 ℃ ~ 50 ℃ / 32 ℉ ~ 122 ℉ |
| Rango de temperatura exterior | -20 ℃ ~ 70 ℃ / -4 ℉ ~ 158 ℉ |
| Precisión da temperatura | ± 1 ℃ |
| Indoor Temp. Detection Period | Unha vez cada 30 segundos |
| Outdoor Temp. Detection Period | Unha vez cada 57 segundos |
| Fonte de alimentación do transmisor | 2x 1.5V AA Batteries (not included) |
| Fonte de alimentación da unidade principal | 2x 1.5V AAA Batteries (not included) |
| Dimensións do transmisor | 130 x 40 x 22 mm |
| Dimensións da unidade principal | 150 x 86 x 23 mm |
| Rango de transmisión sen fíos | Ata 100 m (sen obstáculos) |
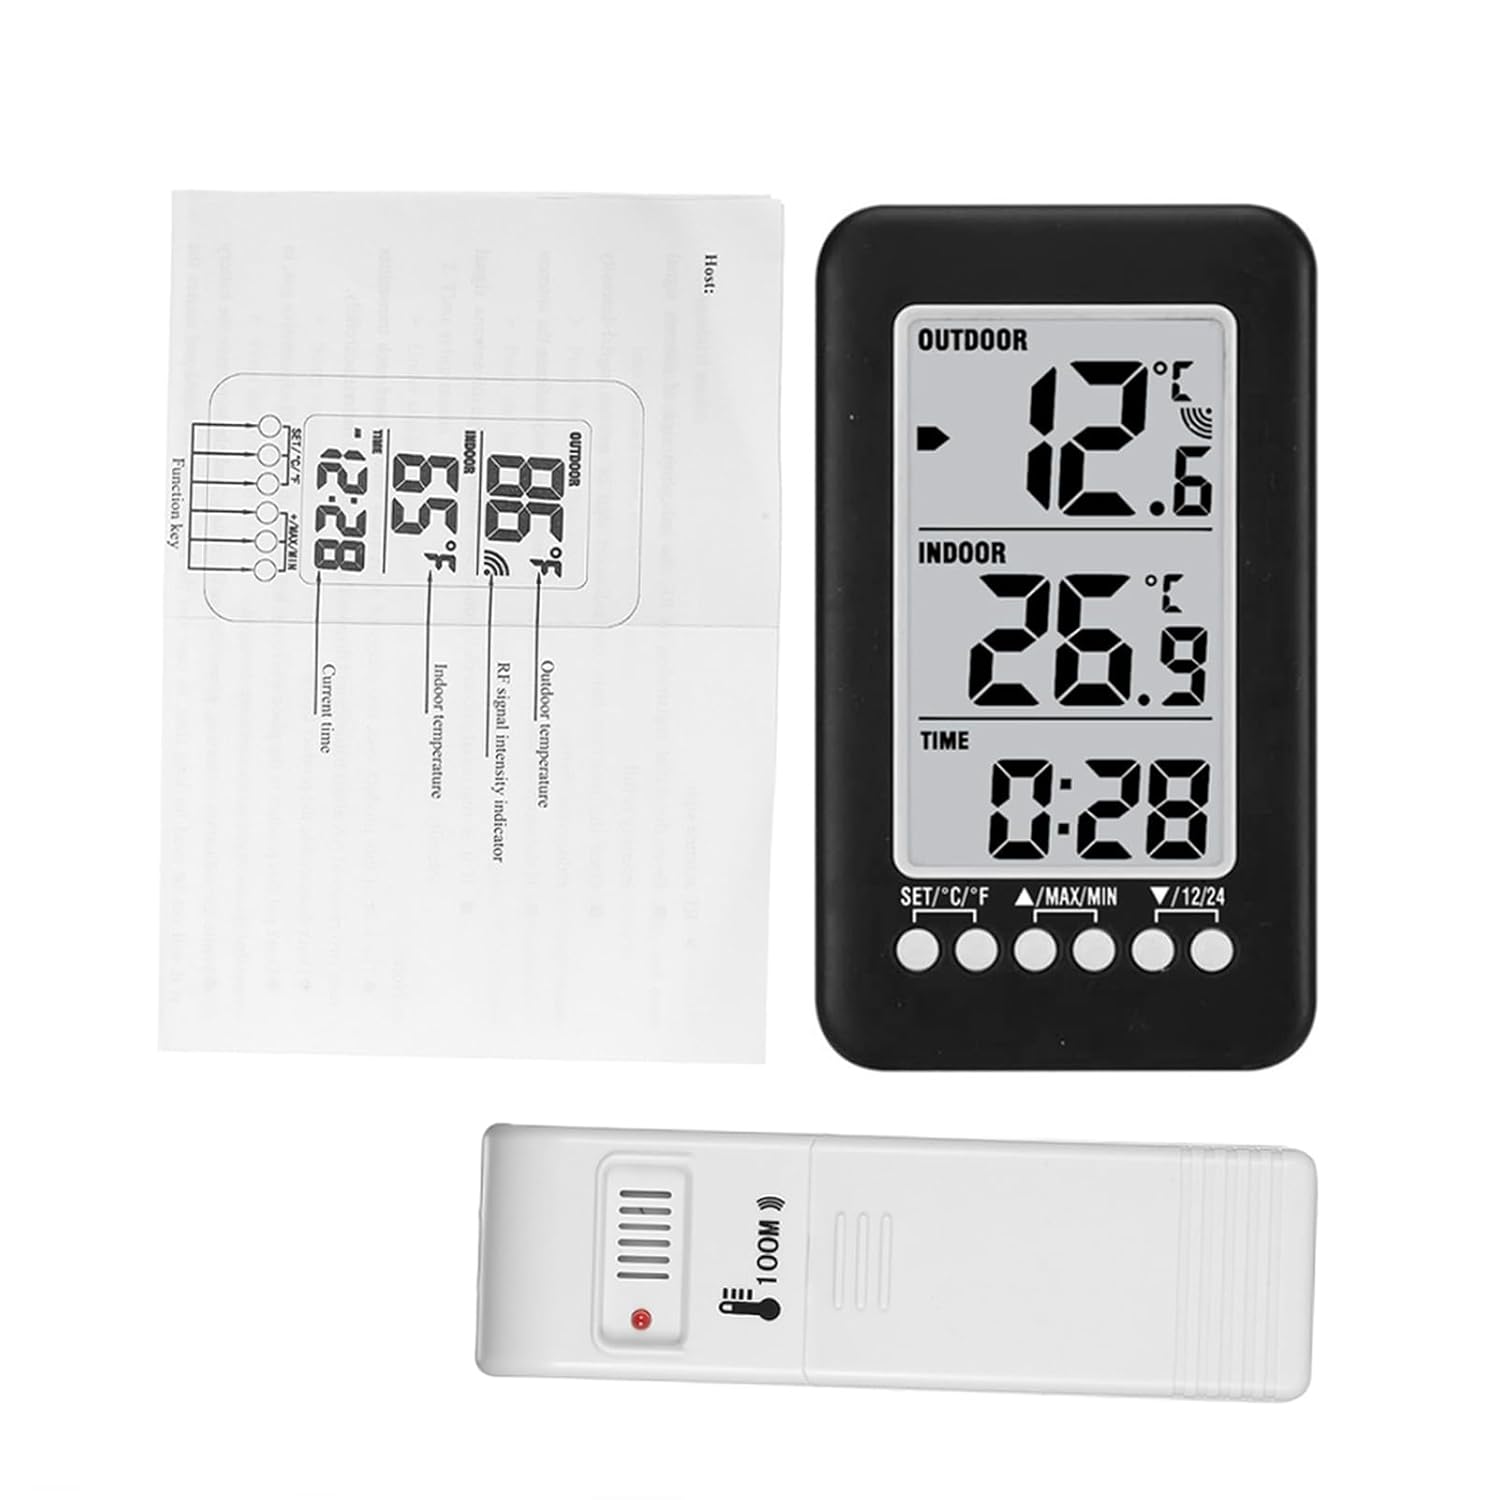
Image 7.1: Dimensions of the main unit and outdoor transmitter.
8. Información de seguridade
- Non expoñas o dispositivo a temperaturas extremas, luz solar directa nin humidade elevada.
- Evite deixar caer ou someter o dispositivo a fortes impactos.
- Do not attempt to disassemble or modify the device. This will void any potential warranty.
- Elimina as baterías usadas de forma responsable segundo a normativa local.
9. Garantía e soporte
For warranty information or technical support, please refer to the retailer where the product was purchased or visit the official Docooler website. Please have your product model number (36ea5cd0-0bae-43c6-b51b-88b35e12f8b8) available when contacting support.