
DinoFire X17
DinoFire Rechargeable Presentation Clicker X17 User Manual
Modelo: X17
Introdución
Thank you for choosing the DinoFire Rechargeable Presentation Clicker, Model X17. This device is designed to enhance your presentations with its wireless control, integrated laser pointer, and user-friendly features. This manual provides detailed instructions for setup, operation, maintenance, and troubleshooting to ensure optimal performance.
Contido do paquete
Verifique que todos os elementos estean presentes no seu paquete:
- DinoFire Rechargeable Presentation Clicker (X17)
- USB Receiver (stored inside the clicker)
- Cable de carga micro USB
- Manual de usuario (este documento)
Produto rematadoview
The DinoFire X17 Presentation Clicker features an ergonomic design with intuitive controls for seamless presentation delivery. Familiarize yourself with the device's components and button functions.
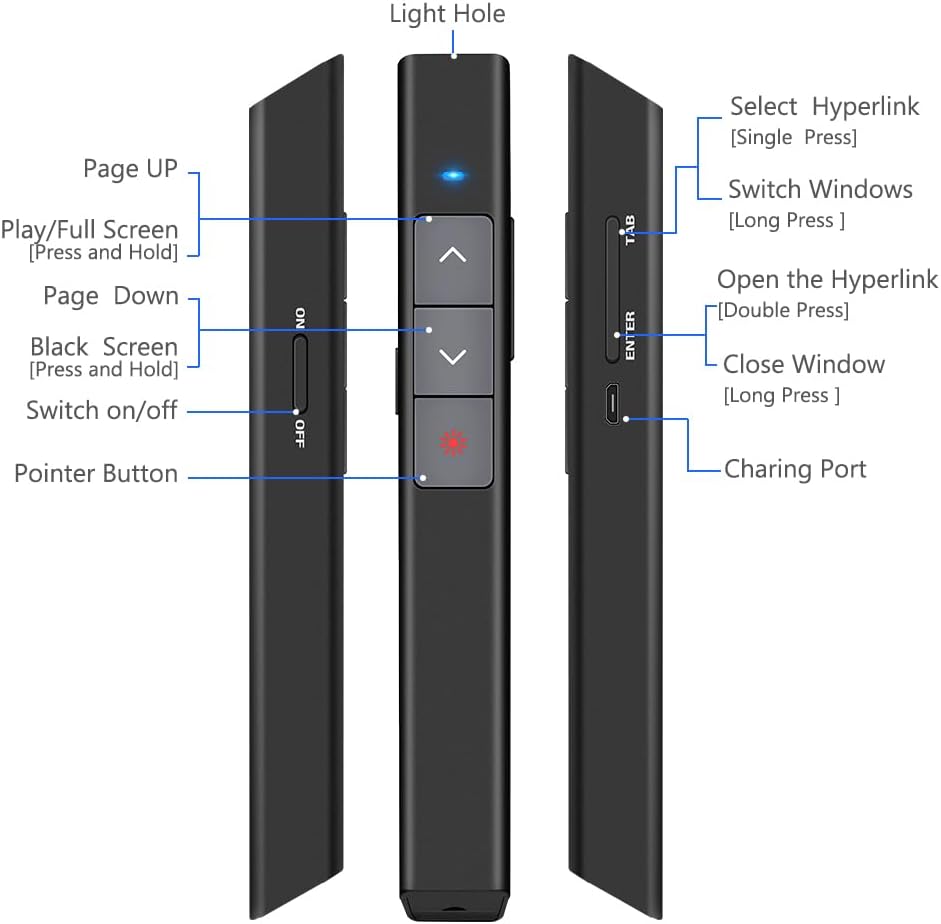
Figura 1: Detallado view of the DinoFire X17 Presentation Clicker showing button functions and port locations.
Funcións do botón:
- Page Up (▲): Advances to the previous slide.
- Page Down (▼): Advances to the next slide.
- Pointer Button: Activates the red laser pointer.
- Play/Full Screen (Press and Hold): Initiates or exits full-screen presentation mode.
- Black Screen (Press and Hold): Toggles a black screen during presentation.
- Activar/desactivar: Interruptor de alimentación para o dispositivo.
- Select Hyperlink (Single Press): Selects a hyperlink on the slide.
- Open the Hyperlink (Double Press): Opens the selected hyperlink.
- Switch Windows (Long Press): Cycles through open application windows.
- Close Window (Long Press): Closes the active window.
- Porto de carga: Micro USB port for recharging the device.
- Light Hole: Location of the laser emitter.
Guía de configuración
1. Charging the Presenter
Before initial use, fully charge the presentation clicker. A full charge typically takes approximately one hour and provides power for over one week of use.
- Connect the provided Micro USB charging cable to the charging port on the side of the presenter.
- Conecta o outro extremo do cable a unha fonte de alimentación USB (por exemplo, un porto USB do ordenador ou un adaptador de parede USB).
- The charging indicator light will illuminate (refer to "Low Power Indicator" section for details).
- Unha vez cargado completamente, desconecta o cable.

Figura 2: The presentation clicker being charged via its Micro USB port, connected to a laptop.
2. Conexión do receptor USB
The USB receiver is stored magnetically within the presentation clicker for convenience and to prevent loss.
- Gently pull out the USB receiver from the bottom end of the presentation clicker.
- Insert the USB receiver into an available USB port on your computer (laptop or desktop).
- The system will automatically detect and install the necessary drivers. No manual driver installation is required.

Figura 3: The magnetic storage for the USB receiver, demonstrating its removal and insertion into a computer's USB port.
3. Acendido/apagado
- Locate the "Switch on/off" button on the side of the clicker.
- Deslice o interruptor á posición "ON" para acender o dispositivo.
- Slide the switch to the "OFF" position when not in use to conserve battery life.
4. System and Software Compatibility
The DinoFire X17 is widely compatible with various operating systems and presentation software.
- Sistemas soportados: Windows 2003, XP, Windows Vista, Windows 7, 8, 10, Linux, Android, Mac OS.
- Software compatible: Keynote, Prezi, MS Word, Excel, PowerPoint, ACD See, website browsers, iWork, Google Slides, etc.
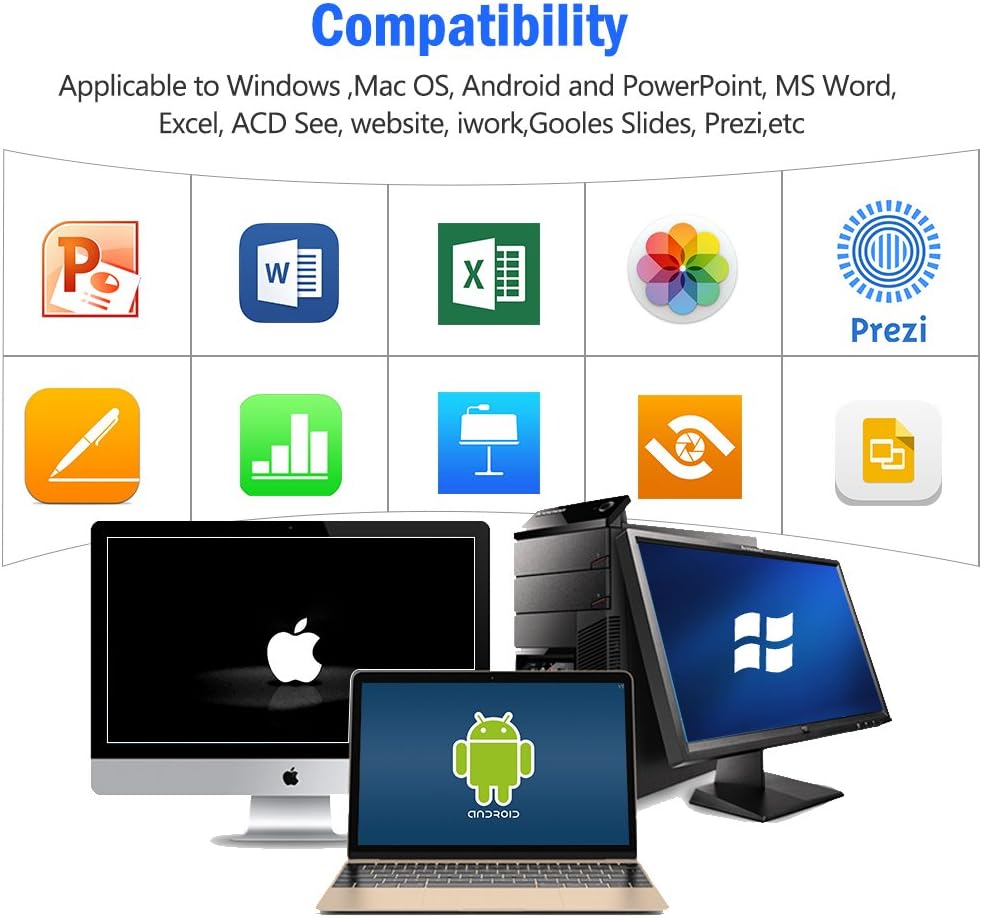
Figura 4: Visual representation of the broad compatibility of the presentation clicker with different operating systems and presentation applications.
Instrucións de funcionamento
Basic Presentation Control
- Seguinte diapositiva: Press the "Page Down" (▼) button.
- Diapositiva anterior: Press the "Page Up" (▲) button.
- Start/Exit Full Screen: Press and hold the "Page Up" (▲) button.
- Pantalla negra: Press and hold the "Page Down" (▼) button to toggle a black screen.
Usando o punteiro láser
The integrated red laser pointer allows you to highlight specific content on your screen or projection.
- Press and hold the "Pointer Button" (red dot icon) to activate the laser.
- Solte o botón para apagar o láser.
- The laser has a range of up to 300 feet (91 meters).
- Atención: Do not point the laser directly at people's eyes or at highly reflective surfaces.

Figura 5: The red laser pointer in operation, highlighting its visibility and including a safety warning.
Funcións avanzadas
- Select Hyperlink: Single press the "ENTER" button.
- Open Hyperlink: Double press the "ENTER" button.
- Cambiar de fiestras: Long press the "TAB" button to cycle through open applications.
- Close Window: Long press the "ENTER" button to close the active window.
Alcance de control sen fíos
The DinoFire X17 offers a wireless control range of up to 100 feet (30 meters), allowing you freedom of movement during your presentation.

Figura 6: Illustration of the presentation clicker's effective long control range in a presentation setting.
Mantemento
Directrices de carga
- Charge the device when the low power indicator flashes continuously.
- Avoid overcharging by disconnecting the cable once fully charged.
- Use the provided Micro USB cable or a certified equivalent for charging.
Almacenamento do receptor USB
Always store the USB receiver inside the magnetic compartment of the clicker when not in use to prevent loss and damage.
Limpeza
Limpe o dispositivo cun pano suave e seco. Non empregue produtos de limpeza líquidos nin materiais abrasivos.
Resolución de problemas
| Problema | Causa posible | Solución |
|---|---|---|
| O dispositivo non responde. | Low battery; USB receiver not connected; Device is off. | Charge the device; Ensure USB receiver is securely plugged in; Turn on the device. |
| Laser pointer not working. | Low battery; Laser button not pressed correctly. | Charge the device; Press and hold the laser button firmly. |
| Rango de control curto. | Obstrucións; Interferencias; Batería baixa. | Ensure clear line of sight to the receiver; Move away from sources of interference; Charge the device. |
| Hyperlink function not working. | Software specific issue; Hyperlink not properly selected. | Ensure the hyperlink is active and selected (single press ENTER) before attempting to open (double press ENTER). Check software settings. |
Indicador de baixa potencia
The device features a low power indicator to alert you when charging is needed. When the indicator flashes continuously, please charge the device. The device will enter auto-sleep mode after approximately 5 minutes of inactivity to save energy.

Figura 7: Explanation of the indicator light states for working, charging, and fully charged conditions.
Especificacións
- Modelo: X17
- Marca: DinoFire
- Tecnoloxía sen fíos: 2.4GHz RF
- Rango de control: Ata 100 pés (30 metros)
- Tipo de láser: Láser vermello
- Rango de láser: Ata 300 pés (91 metros)
- Tipo de batería: 1 batería de polímero de litio (incluída)
- Tempo de carga: Aproximadamente 1 hora
- Tempo de uso: Over one week (on a single charge)
- Dimensións: 6.42 x 1.61 x 1.14 polgadas (16.3 x 4.1 x 2.9 cm)
- Peso do artigo: 1.6 onzas (45 gramos)
- Sistemas compatibles: Windows 2003/XP/Vista/7/8/10, Linux, Android, Mac OS
- Software compatible: Keynote, Prezi, MS Word, Excel, PowerPoint, ACD See, web browsers, iWork, Google Slides
Garantía e Soporte
Información da garantía
The DinoFire Rechargeable Presentation Clicker X17 typically comes with a 3-year warranty. Please refer to your purchase documentation or the manufacturer's official websitio web para coñecer os termos e condicións específicos da garantía.
Atención ao cliente
For technical assistance, troubleshooting beyond this manual, or warranty claims, please contact DinoFire customer support through their official website or the retailer where the product was purchased. Keep your purchase receipt or order number handy for faster service.
Ask a question about this manual
Ask about setup, troubleshooting, compatibility, parts, safety, or missing instructions. Manuals+ will review the question and use this page’s manual context to help answer it.