
1. Introdución
Thank you for choosing the SEMIER Portable AM FM SW Radio with Bluetooth Speaker. This versatile device offers multiple listening options, including AM, FM, and Shortwave radio bands, along with Bluetooth connectivity, MP3 playback via USB/TF card, and a built-in microphone for recording. It also features an LCD display, alarm clock, and multiple power supply options for convenience at home or on the go.
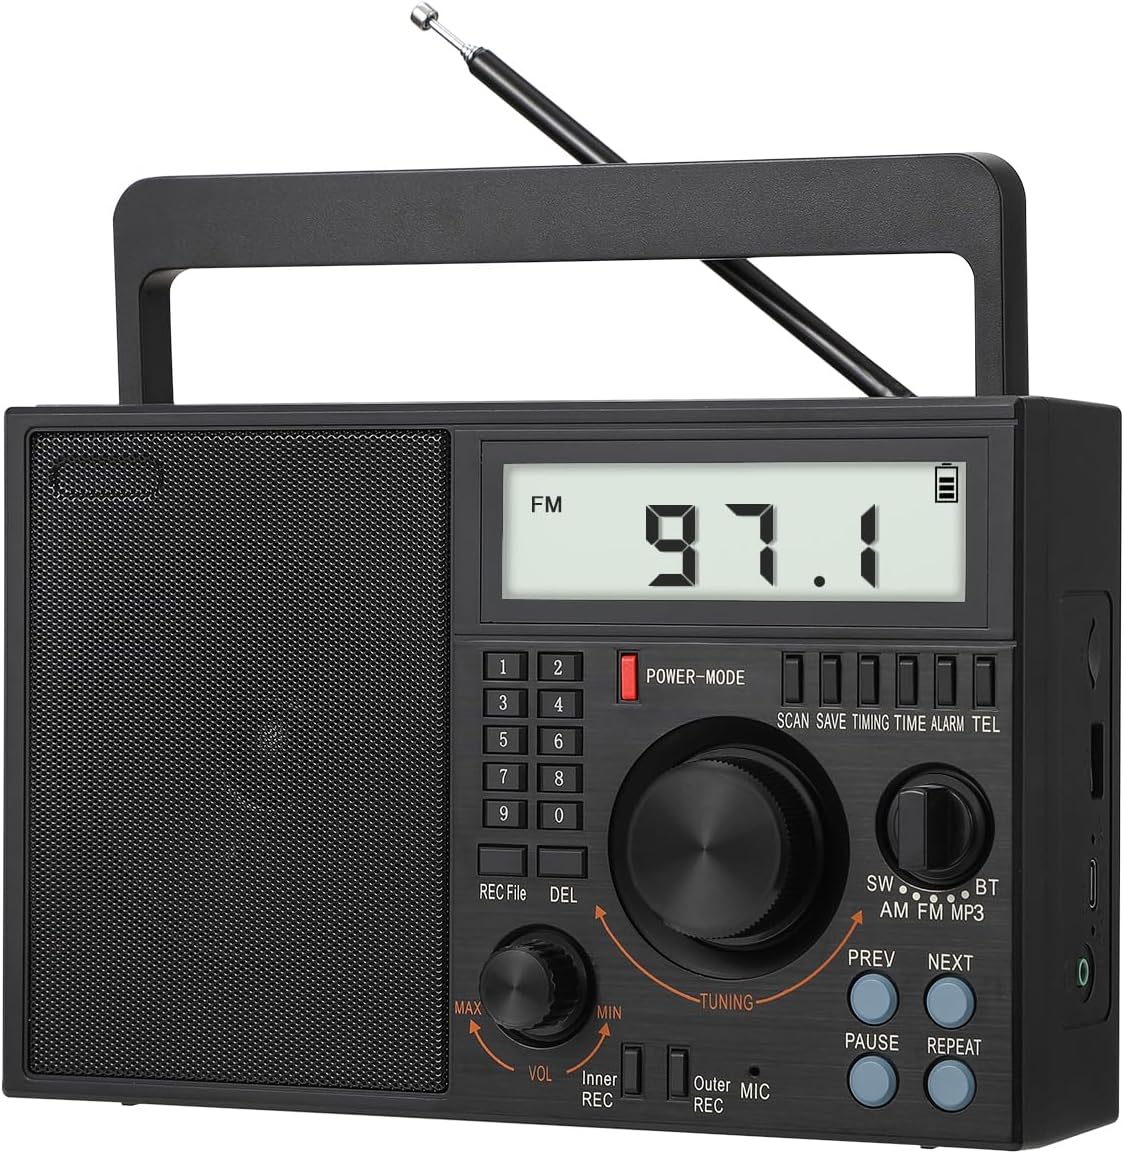
Figure 1: SEMIER Portable AM FM SW Radio (Model SM-828)
2. Características clave
- Radio multibanda: Listen to AM (520–1710 KHz), FM (87–108 MHz), and SW (2.3–21.95 MHz) stations with enhanced reception via a 22.8-inch telescopic antenna and DSP chip.
- Conectividade Bluetooth 5.0: Stream audio wirelessly from your smartphone or other Bluetooth-enabled devices.
- Reprodutor mp3: Play music directly from USB drives or TF (Micro SD) cards.
- MIC Recording Function: Record audio using the built-in microphone.
- Pantalla LCD: Large, clear LCD screen for easy viewing of frequency, time, and other information.
- Múltiples opcións de enerxía: Operates via AC 110V plug-in, a replaceable 1200 mAh 18650 rechargeable battery (included), or 3 D batteries (not included).
- Audio de alta calidade: Features a premium built-in 6W speaker for clear sound and a 3.5mm earphone jack for private listening.
- Deseño portátil: Compact and lightweight (8.6 x 3.8 x 5.5 inches, 2.0 pounds) with an attached swivel handle for easy transport.
3. Contido do paquete
Asegúrate de que todos os elementos estean presentes no paquete:
- SEMIER Portable AM FM SW Radio (SM-828)
- 1200 mAh 18650 Rechargeable Battery
- Cable de alimentación de CA
- Cable de carga USB
- Manual do propietario (este documento)
4. Produto rematadoview
Familiarize yourself with the radio's controls and components:
Figura 2: Disposición do panel frontal
- Pantalla LCD: Shows frequency, time, battery status, and mode.
- Teclado numérico (0-9): For direct frequency input and setting time/alarm.
- Botón de alimentación / modo: Turns the radio on/off and cycles through modes (Radio, Bluetooth, MP3).
- Botón de afinación: Adjusts radio frequency or navigates menus.
- Botón de volume (VOL): Axusta o nivel de saída de audio.
- REC /File/DEL Buttons: For recording functions and file xestión.
- SW/AM/FM/BT/MP3 Switch: Selecciona o modo de funcionamento desexado.
- Botóns ANTERIOR/SEGUINTE: For navigating tracks in MP3 mode or presets in radio mode.
- PAUSE/REPEAT Buttons: Para o control da reprodución multimedia.
- Antena telescópica: Extends for improved radio reception.
- Porto USB: Para a reprodución desde unha unidade USB.
- Ranura para tarxetas TF: Para reprodución con tarxetas TF (Micro SD).
- Conector para auriculares de 3.5 mm: Para conectar auriculares.
- MIC (Micrófono): Micrófono incorporado para gravación.
5. Configuración
5.1 Fonte de alimentación
The radio offers three power options:
- AC Power (110V): Connect the included AC power cord to the radio's AC input and plug it into a standard wall outlet. This powers the radio and charges the internal rechargeable battery.
- Pilas D: For portable use without a power outlet, insert three (3) D-size batteries (not included) into the battery compartment on the back of the radio. Ensure correct polarity (+/-).
- Batería recargable: The radio comes with a pre-installed 1200 mAh 18650 rechargeable battery. This battery can be charged via the AC power cord or the included USB charging cable connected to a USB power source (e.g., computer, USB wall adapter).

Figura 3: Opcións de fonte de alimentación
5.2 Configuración da antena
For optimal radio reception, especially for FM and SW bands, extend the telescopic antenna fully. For AM reception, the radio has a built-in AM antenna, but adjusting the radio's orientation may improve reception.

Figure 4: Extending the Telescopic Antenna
6. Instrucións de funcionamento
6.1 Encendido/apagado
Preme o POWER-MODE button to turn the radio on or off. The LCD display will illuminate when powered on.
6.2 Radio Tuning (AM/FM/SW)
Slide the band switch to select SW, AM, ou FM modo. Usa o TUNING knob to manually scan for stations. The frequency will be displayed on the LCD. For direct frequency input, use the numeric keypad.

Figure 5: Radio Reception and Display
6.3 Bluetooth (BT) Mode
Slide the band switch to BT mode. The radio will enter pairing mode. On your smartphone or Bluetooth device, search for available devices and select "BT-07" (or similar name) to connect. Once paired, you can stream audio to the radio.

Figura 6: Conectividade Bluetooth
Reprodución de tarxetas USB/TF 6.4
Insira unha unidade USB ou unha tarxeta TF (Micro SD) que conteña son MP3 files into the respective slot. Slide the band switch to MP3 mode. The radio will automatically detect and begin playing the audio files. Usa o PREV, SEGUINTE, PAUSA, e REPETIR botóns para controlar a reprodución.

Figura 7: Reprodución por USB e tarxeta TF
6.5 MIC Recording
To record audio using the built-in microphone, ensure a USB drive or TF card is inserted. Press the REC button to start recording. Press it again to stop. Recorded files can be accessed and played back in MP3 mode.
6.6 Función de alarma
The radio features an alarm clock. To set the alarm, refer to the detailed instructions in the full owner's manual. The LCD display will show the current time and can be used to set the alarm time.

Figure 8: Alarm Clock Display
6.7 Conector para auriculares
For private listening, plug any standard 3.5mm headphones into the earphone jack located on the side of the radio. The internal speaker will automatically mute when headphones are connected.
Figure 9: Earphone Jack Usage
6.8 Demostración en vídeo do produto
For a visual guide on setup and operation, please watch the official product video below:
Video 1: Official Product Demonstration of SEMIER SM-828 Radio. This video demonstrates various features including power options, antenna extension, radio tuning (AM/FM/SW), Bluetooth pairing, USB/TF card playback, voice recording, and alarm clock setup.
7. Mantemento
To ensure the longevity and optimal performance of your radio:
- Clean the radio with a soft, dry cloth. Do not use liquid cleaners or abrasive chemicals.
- Keep the radio away from extreme temperatures, direct sunlight, and high humidity.
- If not using D batteries for an extended period, remove them to prevent leakage.
- Garde a radio nun lugar fresco e seco cando non a estea a usar.
8 Solución de problemas
| Problema | Causa posible | Solución |
|---|---|---|
| A radio non se acende. | No power source; batteries drained or incorrectly inserted; AC cord not connected. | Check AC connection. Ensure rechargeable battery is charged. Insert fresh D batteries with correct polarity. |
| Mala recepción de radio. | Antena non estendida; zona de sinal débil; interferencias. | Fully extend the telescopic antenna. Reposition the radio for better signal. Move away from electronic devices causing interference. |
| LCD display goes blank during radio playback. | This is normal operation to conserve power. The display backlight and frequency information will turn off after a few seconds of inactivity. | Press any button or turn a knob to temporarily reactivate the display. |
| Radio does not remember last station. | This model may not retain the last tuned station upon power cycle or band switch. | Manually tune to your desired station or use preset functions if available (refer to full manual for preset instructions). |
| Problemas de conexión Bluetooth. | Radio not in BT mode; device too far; interference; device not discoverable. | Ensure radio is in BT mode. Keep devices within 10 meters. Turn off and on Bluetooth on both devices. |
| A tarxeta USB/TF non se reproduce. | Tarxeta/unidade non inserida correctamente; non compatible file formato; corrompido files. | Ensure card/drive is fully inserted. Verify files are in MP3 format. Try a different USB/TF card. |
9. Especificacións
| Característica | Detalle |
|---|---|
| Dimensións do produto | 8.6 x 3.8 x 5.5 inches (approx. 7"L x 9"W x 4"H) |
| Peso do elemento | 2.0 libras (aprox. 1.9 libras) |
| Marca | SEMIER |
| Cor | Negro |
| Tecnoloxía de conectividade | Bluetooth, Auxiliar, USB |
| Tecnoloxía de sintonizador | AM/FM/SW |
| Fonte de enerxía | Battery Powered (Rechargeable 18650, 3x D batteries), AC Plug-in |
| Bandas de radio admitidas | 3-Band (AM 520-1710 KHz, FM 87-108 MHz, SW 2.3-21.95 MHz) |
| Características especiais | Lightweight, Built-In AM Antenna, Built-In Clock, Rechargeable, LCD Display, Bluetooth Speaker, TF Card/USB Playing, MIC Recording |
| Compoñentes incluídos | AC Power Cord, Rechargeable Battery, USB Charging Cable, Owner's Manual |

Figura 10: Dimensións do produto
10. Garantía e soporte
SEMIER offers a 90-day money-back guarantee for this product. For any questions, technical assistance, or customer service inquiries, please contact SEMIER customer support. They provide 24/7 customer service to ensure a satisfactory experience.