1. Introdución
This manual provides essential information for the safe installation, operation, and maintenance of your MODEBHD Contemporary Resin Bird Pendant Light. Please read this manual thoroughly before installation and retain it for future reference.
The pendant light features a unique design with a white resin bird accent and a hand-blown clear glass shade, offering adjustable hanging length to suit various ceiling heights and room configurations.
2. Información de seguridade
- AVISO: Risco de descarga eléctrica. Desconecte a alimentación na caixa de fusibles ou no disyuntor antes da instalación ou do mantemento.
- All electrical connections must be in accordance with local codes, ordinances, or the National Electric Code (NEC). Consult a qualified electrician if you are unfamiliar with electrical wiring.
- Non instale este aparello en lugares húmidos.
- Asegúrate de que a luminaria estea fixada de forma segura a un elemento estrutural do teito.
- Use só o tipo de lámpada e o wat especificadostage para evitar o sobrequecemento.
- Do not touch the bulb directly with bare hands during operation or immediately after turning off, as it may be hot.
3. Contido do paquete
Comprobe que todos os compoñentes estean presentes antes de comezar a instalación:
- 1 x Pendant Light Fixture (including resin bird, glass shade, and wiring)
- 1 x Ceiling Canopy/Suction Cup
- Ferraxes de montaxe (parafusos, porcas para cables, etc.)
- Light bulb is NOT included.

Imaxe 1: Acabadoview of the MODEBHD Contemporary Resin Bird Pendant Light, showcasing the white resin bird perched atop the clear glass shade and the hanging wire.
4. Especificacións
| Característica | Detalle |
|---|---|
| Nome do produto | Lámpara colgante |
| Estilo | Nordic, Contemporary |
| Cor | Branco |
| Material | Resin, Hand-Blown Glass |
| Diámetro do dispositivo de fixación | 20 cm / 7.9 polgadas |
| Altura do aparello | 26 cm / 10.2 polgadas |
| Lonxitude colgante axustable | Up to 150 cm / 59 inches |
| Ceiling Canopy Diameter | 10 cm / 3.9 polgadas |
| Light Source Base | E26 / E27 (1 bulb required, not included) |
| Max Wattage | 60W por bombilla |
| Voltage | AC110V (Compatible with 110-240V systems) |
| Certificacións | ETL Listed, 3C, UL, CE |
| Área de cobertura recomendada | 5-10 metros cadrados |
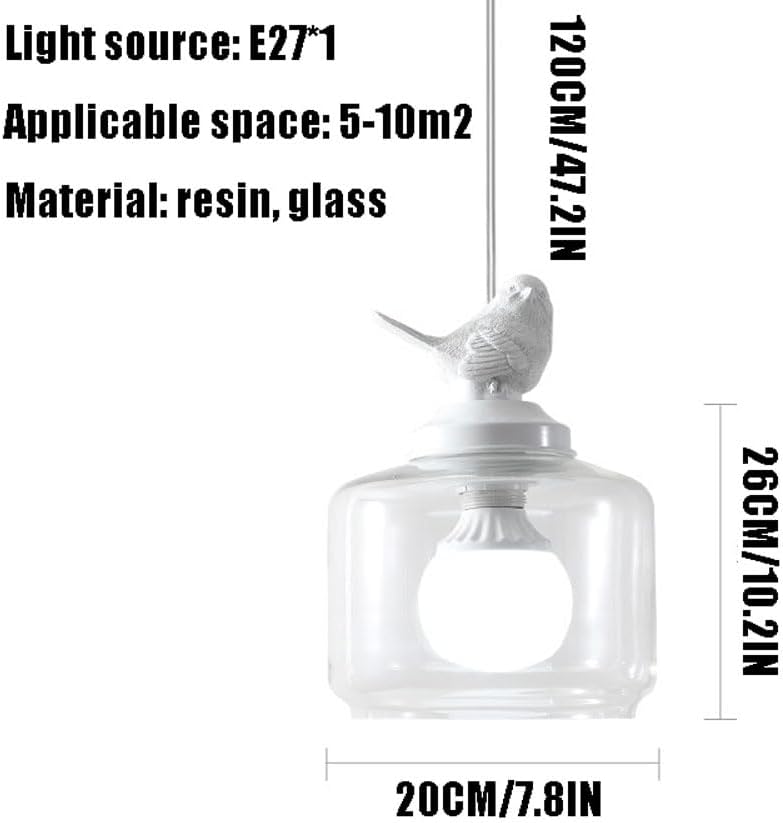
Image 2: Diagram illustrating the dimensions of the pendant light, including fixture diameter, height, and adjustable hanging wire length.
5. Configuración e instalación
Antes de comezar: Ensure power is disconnected at the circuit breaker. Gather necessary tools (screwdriver, wire strippers, electrical tape, ladder).
- Preparar o cableado: Carefully unpackage the fixture. If necessary, strip approximately 1/2 inch of insulation from the ends of the fixture wires.
- Mount Ceiling Canopy: Secure the ceiling canopy to the junction box in your ceiling using the provided mounting hardware. Ensure it is firmly attached.
- Axustar a lonxitude da suspensión: The pendant light features an adjustable hanging wire. To adjust the length, gently push the wire into the canopy or pull it out until the desired height is achieved. You may need to loosen a set screw on the canopy to facilitate adjustment, then tighten it once the length is set. The maximum hanging length is 59 inches (150 cm).
- Realizar conexións eléctricas: Connect the fixture's wires to your household electrical wires using wire nuts. Typically, connect the black fixture wire to the black (live) household wire, the white fixture wire to the white (neutral) household wire, and the bare copper or green fixture wire to the green or bare copper (ground) household wire. Ensure all connections are secure.
- Canopy segura: Carefully push the wired canopy up to the ceiling, ensuring all wires are tucked inside the junction box. Secure the canopy to the mounting bracket with the provided screws.
- Instalar lámpada: Screw an E26 or E27 base bulb (max 60W, not included) into the socket within the glass shade. Do not overtighten.
- Restaurar enerxía: Unha vez rematada a instalación, restableza a corrente no disxuntor.

Image 3: Two pendant lights installed in a modern dining or bar area, demonstrating their aesthetic integration into a contemporary space.
6. Instrucións de funcionamento
Once installed and powered, the pendant light operates via your standard wall switch. Simply toggle the switch to turn the light on or off.

Image 4: A detailed close-up of the white resin bird accent, highlighting its intricate design and texture.
7. Mantemento
- Limpeza: Disconnect power before cleaning. Use a soft, dry cloth to wipe the fixture. For the glass shade, a slightly damp cloth with a mild glass cleaner can be used, then dry thoroughly. Avoid abrasive cleaners or solvents that may damage the finish.
- Substitución da lámpada: Disconnect power before replacing the bulb. Allow the old bulb to cool completely. Unscrew the old bulb and screw in a new E26 or E27 base bulb (max 60W). Do not exceed the maximum wattage.
- Inspección: Periodically inspect the wiring and connections for any signs of wear or damage. If any issues are found, disconnect power and consult a qualified electrician.
8 Solución de problemas
| Problema | Causa posible | Solución |
|---|---|---|
| A luz non se acende | 1. A enerxía está apagada 2. Conexión de cable solta 3. Bombilla defectuosa 4. Faulty wall switch | 1. Check circuit breaker and wall switch. 2. Disconnect power and check wiring connections. 3. Substitúe a lámpada por unha nova. 4. Consult an electrician to check the switch. |
| Luz parpadea | 1. Bombilla solta 2. Conexión de cable solta 3. Interruptor regulador de intensidade incompatible (se corresponde) | 1. Tighten bulb. 2. Disconnect power and check wiring connections. 3. Ensure dimmer switch is compatible with the bulb type. |
| Ruído de zumbido procedente do aparello | 1. Incompatible bulb or dimmer switch | 1. Try a different bulb or ensure dimmer switch is compatible with the bulb type. |
9. Información da garantía
Specific warranty details for this product are not provided in the available information. Please refer to your purchase documentation or contact the seller/manufacturer directly for warranty terms and conditions.
10. Apoio
If you have any questions, require assistance with installation, or encounter issues not covered in this manual, please contact the seller or manufacturer. You can typically find contact information on your purchase receipt or the product listing page.
For general inquiries, you may reach out via email or through the platform's question and answer feature. Responses are typically provided within 24 hours.