
1. Introdución
This manual provides detailed instructions for the installation, operation, and maintenance of your UNITOPSCI Android Car Stereo, Model A7321A2516KTA3. Please read this manual thoroughly before use to ensure proper functionality and safety.

Figure 1.1: UNITOPSCI Android Car Stereo with accessories.
2. Compatibilidade e notas importantes
This UNITOPSCI Android Car Stereo is specifically designed for the following vehicle models:
- Subaru Legacy (2010, 2011, 2012, 2013, 2014)
- Subaru Outback (2010, 2011, 2012, 2013, 2014)
Nota importante sobre compatibilidade:
- Esta unidade é non compatible with vehicles equipped with the original Harman Kardon Sound System. If your vehicle has this system, please contact customer support for guidance on suitable wiring harnesses.
- For vehicles without an OEM sound system, the provided wire harness is typically plug-and-play.
- This unit is suitable for vehicles with a small original screen. If your vehicle has a large original screen, a different frame may be required.

Figure 2.1: Vehicle compatibility overview.
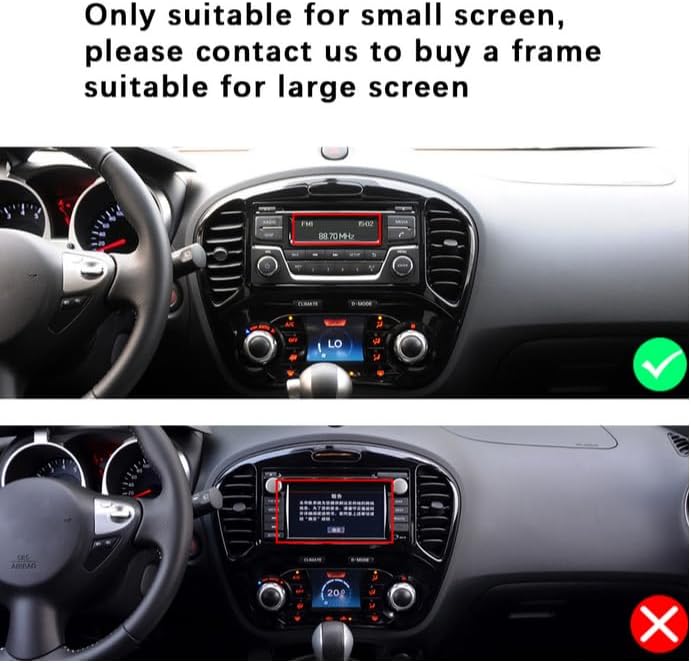
Figure 2.2: Visual guide for screen size compatibility.
3. Contido do paquete
Verifique que todos os elementos que se indican a continuación estean incluídos no seu paquete:
- Android Car Stereo Unit (9-inch display)
- Traseira View Camera (12 LEDs, night vision, waterproof, 170-degree angle)
- Cabo RCA
- Cable de alimentación
- Ferramenta de instalación
- Cable de entrada da cámara
- Antena GPS
- USB Cables (6-pin and 4-pin)
- Manual de usuario (este documento)

Figura 3.1: Contido do paquete e dimensións do produto.
4. Guía de instalación
Recoméndase a instalación por parte dun profesional. Asegúrese de que a batería do vehículo estea desconectada antes de comezar a instalación.
4.1. Comprobación previa á instalación
- Verify vehicle compatibility (refer to Section 2).
- Confirma que todo o contido do paquete está presente.
4.2. Removal of Original Unit
- Carefully remove the trim panels surrounding the original car stereo.
- Unscrew and detach the original stereo unit.
- Disconnect all wiring harnesses and antenna cables from the original unit.
4.3. Installing the New Unit
- Connect the provided power cable and other necessary harnesses to the UNITOPSCI Android Car Stereo.
- Connect the GPS antenna and route it to a suitable location (e.g., dashboard, A-pillar) for optimal signal reception.
- If installing the backup camera, route its cable from the rear of the vehicle to the head unit's camera input. Refer to Section 4.4 for wiring details.
- Carefully slide the new stereo unit into the dashboard opening.
- Secure the unit with screws and reattach the trim panels.

Figure 4.1: Visual comparison of dashboard before and after installation.

Figure 4.2: Installation comparison for proper fitment.
4.4. Traseira View Diagrama de cableado da cámara
To connect the backup camera:
- Connect the camera's video output to the head unit's 'CAM IN' or 'REVERSE IN' port.
- Connect the camera's power wire (red) to the vehicle's reverse light positive (+12V).
- Connect the camera's ground wire (black) to a suitable chassis ground (GND).
- Connect the trigger wire (labeled 'back' or 'reverse' on the power cable) from the head unit to the reverse light positive. This signals the head unit to switch to the camera view cando se engancha a marcha atrás.

Figura 4.3: Traseira View Diagrama de cableado da cámara.
5. Configuración inicial
After installation, turn on your vehicle's ignition to power on the stereo. The unit will boot into the Android operating system.
- Configuración de idioma e hora: Navigate to 'Settings' to set your preferred language, time zone, and date.
- Conexión Wi-Fi: Go to 'Settings' > 'Network & Internet' > 'Wi-Fi' to connect to an available Wi-Fi network. This is necessary for online maps, app downloads, and internet browsing.
- GPS Configuration: Ensure the GPS antenna is properly connected. The system should automatically detect GPS signals. You can verify this in the GPS settings.
- Aprendizaxe do control do volante: If your vehicle supports steering wheel controls, go to 'Settings' > 'Steering Learn' to program the buttons. Follow the on-screen instructions to assign functions to each button.
6. Instrucións de funcionamento
6.1. Función Bluetooth
The built-in Bluetooth 4.2 module allows for hands-free calling and audio streaming.
- Emparejamento: On your mobile device, search for Bluetooth devices and select 'UNITOPSCI' (or similar name). Confirm the pairing code if prompted.
- Chamadas mans libres: Once paired, you can make and receive calls directly from the stereo's touch screen. The unit supports automatic phone book download.
- Transmisión de audio: Play music from your paired phone through the car stereo speakers.

Figura 6.1: Interface Bluetooth para chamadas e música.

Figure 6.2: Bluetooth handsfree calling in use.
6.2. Navegación GPS
The unit comes with built-in GPS and preloaded offline maps. Online navigation is also supported via Wi-Fi.
- Mapas sen conexión: The stereo includes free offline maps. You can download additional maps via Wi-Fi using applications like 'Here WeGo'.
- Navegación en liña: Connect to Wi-Fi to use online navigation apps for real-time traffic updates and more detailed mapping.

Figura 6.3: Navegación GPS en acción.

Figure 6.4: Built-in WiFi and GPS Navigation features.
6.3. Conectividade Wi-Fi
Connect the stereo to a Wi-Fi hotspot (e.g., from your phone) to access online features.
- Browse the internet, watch real-time TV shows, use social media, and download apps from the app store.
6.4. Función de ligazón espello
Mirror Link allows you to display your smartphone's screen on the car stereo.
- For iPhone (iOS): One-way operation via Wi-Fi. The phone screen is mirrored to the stereo.
- Para teléfonos Android: Two-way operation via Wi-Fi or USB. You can control your phone from the stereo's touch screen.

Figura 6.5: Funcionalidade de Mirror Link.

Figure 6.6: Mirror Link for iOS and Android devices.
6.5. Radio FM/RDS
Access local radio stations and enjoy news, music, and weather broadcasts.
- The unit supports FM radio with 18 preset stations.
- RDS (Radio Data System) provides additional information like station name and song title where available.

Figure 6.7: FM/RDS Radio interface.
6.6. Control do volante (SWC)
Control basic functions of the stereo using your vehicle's existing steering wheel buttons for convenience and safety.
- Refer to Section 5 for initial setup of SWC.
- Functions typically include volume control, track skipping, mode switching, and answering/ending calls.

Figura 6.8: Configuración do control do volante.
6.7. Entrada da cámara de seguridade
The included 12LEDs rear view cámara ofrece unha clara view ao dar marcha atrás.
- The stereo automatically switches to display the HD reversing image when the vehicle is put into reverse gear.
- Features include night vision, a 170-degree viewing angle, and waterproof design for enhanced parking safety.

Figura 6.9: Cámara de marcha atrás view on the stereo screen.

Figure 6.10: Parking Assistant features.
6.8. EQ Audio Settings
Adjust the audio output to your preference using the built-in equalizer.
- The digital chip allows adjustment of delay time, loudness, equalizer settings (e.g., Jazz, Pop, Rock, Classical), and balance.

Figura 6.11: Interface de configuración de son do ecualizador.
6.9. Función de pantalla dividida
The unit supports split-screen display, allowing you to run two applications simultaneously.
- Por example, use navigation on one side and music playback on the other.

Figura 6.12: Funcionalidade de pantalla dividida.
7 Solución de problemas
If you encounter issues, please refer to the following common problems and solutions before contacting support.
| Problema | Causa posible | Solución |
|---|---|---|
| Head unit not turning on when car starts | Pink wire or KEY 1 blocking electricity. | Locate the pink wire or KEY 1 wire. Cut it off and ensure it is isolated. This wire may be designed to prevent operation while driving, but can interfere with normal power-on. |
| Sen saída de audio | Incorrect wiring; volume too low; mute function active; incompatible sound system. | Check all speaker wire connections. Ensure volume is up and not muted. Verify compatibility with your vehicle's sound system (especially Harman Kardon). Check EQ settings. |
| Problemas de conexión Bluetooth | Phone not paired; interference; unit/phone software glitch. | Ensure Bluetooth is enabled on both devices. Delete previous pairings and re-pair. Restart both the stereo and your phone. |
| GPS signal weak or inaccurate | GPS antenna placement; environmental interference. | Ensure the GPS antenna is mounted in a clear, unobstructed location (e.g., dashboard, not under metal). Check antenna connection. |
| Backup camera not displaying | Incorrect wiring; camera malfunction. | Verify all camera wiring connections, especially the trigger wire and power supply to the reverse light. Check camera for damage. |
8. Especificacións

Figure 8.1: Core system specifications.
| Característica | Detalle |
|---|---|
| Número de modelo | A7321A2516KTA3 |
| Sistema Operativo | Android |
| CPU | Quad Core |
| RAM | 1 GB |
| ROM | 32 GB |
| Tamaño de visualización | 9 polgadas |
| Resolución | 1024 x 600 |
| Potencia de saída | 4 x 45 W |
| Versión Bluetooth | 4.2 |
| Tecnoloxía de conectividade | Sen fíos (Wi-Fi, Bluetooth) |
| Características especiais | Backup Camera Input, Bluetooth, FM Radio, Mirror Link, Touchscreen, GPS Navigation, Steering Wheel Control |
| Modo de saída de audio | Estéreo |
| Peso do elemento | 3.78 libras |
| Dimensións do paquete | 16.73 x 13.07 x 4.06 polgadas |

Figure 8.2: Display resolution comparison.
9. Garantía e soporte
UNITOPSCI is committed to providing high-quality products and satisfactory services.
- Garantía: Este produto vén cunha garantía de 1 anos.
- Política de substitución: Replacement available within 24 months for eligible issues.
- Política de devolución: 60-day no-worry return period.
- Soporte técnico: Lifetime after-sales consultation and technical support are provided.
- Contacte con Soporte: For any inquiries or technical assistance, please contact UNITOPSCI customer support via email at UNITOPSCI@126.com. Expect a quick response within 16 hours.

Figure 9.1: UNITOPSCI Customer Support Information.