
Introdución
This manual provides detailed instructions for the installation, operation, and maintenance of the IXITAB STC-3008, STC-3018, and STC-3028 series of digital temperature and humidity controllers. These devices are designed for precise control in various applications, including aquariums, terrariums, incubators, and industrial temperature/humidity control systems.
Variantes do produto
- STC-3008: Dual Digital Temperature Controller with two temperature probes.
- STC-3018: Dual Digital Temperature Controller with two temperature probes.
- STC-3028: Digital Temperature and Humidity Controller with one combined temperature and humidity sensor.
Características clave
- Dual display for simultaneous monitoring of two temperatures or temperature and humidity.
- Two independent relay outputs for controlling heating/cooling or humidification/dehumidification devices.
- Wide range of power supply options (AC 110V/220V, DC 12V/24V) depending on the model.
- High precision sensors for accurate readings.
- User-friendly interface for setting parameters.
Precaucións de seguridade
Para garantir un funcionamento seguro e evitar danos no dispositivo, observe as seguintes precaucións:
- Desconecte sempre a alimentación antes de realizar calquera cableado ou mantemento.
- Asegúrese de que a fonte de alimentación voltage matches the requirements of your specific controller model.
- Strictly distinguish the interface of the relay, sensor, and power connections to avoid short circuits or damage.
- Asegúrese de que todas as conexións de cableado estean seguras e debidamente illadas.
- Keep the sensor and power wires separate and maintain a proper distance to prevent interference.
- Non expoñas o dispositivo á auga nin a humidade excesiva.
 Imaxe: Arriba view of the STC-3018 controller showing the display, buttons, and a label with wiring instructions and safety notes. The label indicates power supply options (110-220VAC, 12V, 24V) and relay outputs (10A/220VAC). A temperature probe is connected to the device.
Produto rematadoview
Compoñentes
- Main Controller Unit (with digital displays and control buttons)
- Temperature Sensor (for STC-3008/3018 models)
- Temperature and Humidity Sensor (for STC-3028 model)
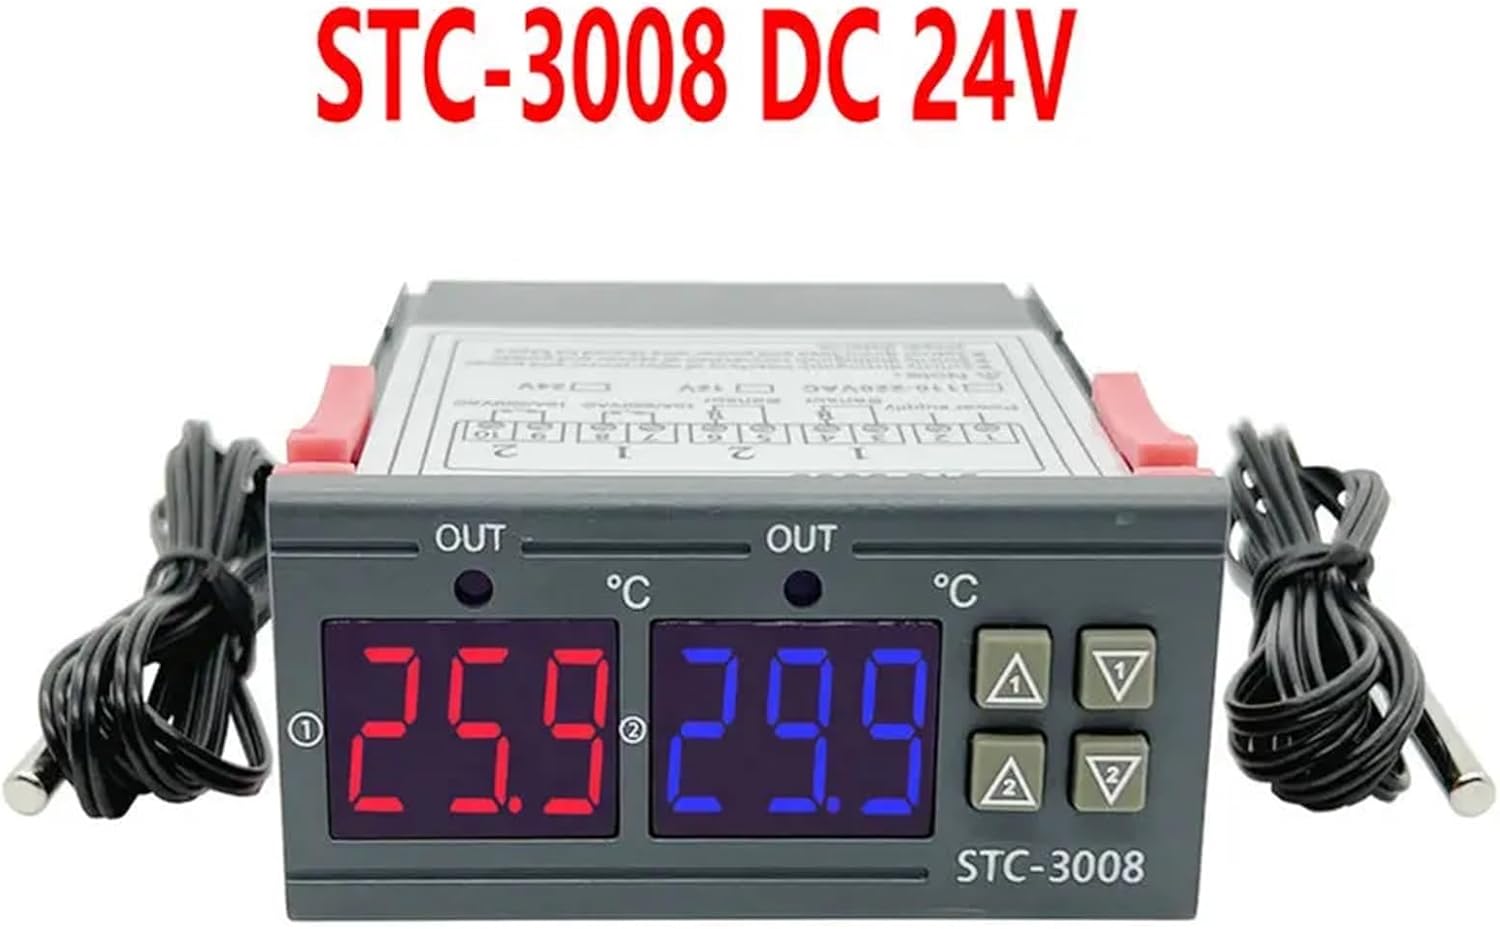 Imaxe: Fronte view of the STC-3008 DC 24V model, featuring two digital displays (red and blue) showing temperature readings, and two connected temperature probes. The model name "STC-3008" is visible on the front panel.
 Image: A collage showing three different models: STC-3018 (top left), STC-3008 (top right and bottom left), and STC-3028 (bottom right). Each model is shown with its respective sensor, highlighting the visual differences and sensor types (temperature probe for 3008/3018, combined temperature/humidity sensor for 3028).
 Imaxe: Primeiro plano view of the STC-3028 model, showcasing its dual digital display for temperature and humidity, along with the connected combined temperature and humidity sensor.
Especificacións
| Parámetro | Valor |
|---|---|
| Modelo | STC-3008, STC-3018, STC-3028 |
| Fonte de alimentación | AC 110V/220V, DC 12V/24V (model dependent) |
| Rango de medición de temperatura | -50 °C a 110 °C (-58 °F a 230 °F) |
| Humidity Measurement Range (STC-3028) | 0% RH a 99% RH |
| Capacidade do relé de saída | 10A/220VAC |
| Tipo de sensor | NTC sensor (temperature), integrated sensor (humidity for STC-3028) |
| Dimensións | Approx. 1.18 x 0.79 x 0.39 inches (main unit) |
| Peso do elemento | Aprox. 1.76 onzas |
| País de Orixe | China |
Instalación e cableado
Importante: Ensure power is disconnected before performing any wiring to prevent electric shock or damage to the device.
Diagrama de cableado
 Image: Detailed wiring diagram for the STC-3018 model. It illustrates connections for power supply (110V/AC220V, 12V, 24V), two sensor inputs, and two relay outputs (10A/220VAC). Examples of connected loads like a refrigerator, fan, and water heater are shown.
Pasos de cableado
- Fonte de alimentación: Connect the appropriate power supply (AC 110V/220V or DC 12V/24V) to terminals 1 and 2. Verify that the voltage matches your specific controller model.
- Sensores: Connect the temperature sensors to terminals 3 and 4, and 5 and 6 (for STC-3008/3018). For the STC-3028, connect the combined temperature/humidity sensor to its designated terminals.
- Relés de saída: Connect your heating/cooling or humidification/dehumidification devices to terminals 7 and 8 (Relay 1) and 9 and 10 (Relay 2). These are dry contacts, meaning they act as switches, and your load will require its own power source.
- Montaxe: The controller is designed for panel mounting. Insert the unit into a suitable cutout and secure it using the integrated clips on the sides.
Instrucións de funcionamento
Funcións dos botóns
- Botón de configuración: Úsase para entrar no modo de configuración de parámetros e confirmar as seleccións.
- Up (▲) Button: Increases values, navigates through menu options.
- Down (▼) Button: Decreases values, navigates through menu options.
- Botón Rst: Prema brevemente para view current settings; long press (3 seconds) to reset to factory default settings.
Temperature/Humidity Setting
 Image: A visual guide demonstrating the temperature and humidity setting process on the STC-3028 model. It shows how to set starting and stopping values for both temperature (heating/cooling) and humidity (humidification/dehumidification) using the control buttons.
- Setting Starting Temperature/Humidity: Mantén presionado Arriba (▲) button for 3 seconds. The starting value on the display will flash. Use the Arriba (▲) or Abaixo (▼) buttons to adjust to your desired starting value. Press the Establecer botón para confirmar e saír.
- Setting Stopping Temperature/Humidity: Mantén presionado Abaixo (▼) button for 3 seconds. The stopping value on the display will flash. Use the Arriba (▲) or Abaixo (▼) buttons to adjust to your desired stopping value. Press the Establecer botón para confirmar e saír.
- Restablecer a configuración de fábrica: Mantén presionado Rst button for 3 seconds until the display shows "888" or similar indication of reset.
The controller will automatically activate or deactivate the connected relays based on the set starting and stopping values to maintain the desired temperature or humidity range. For temperature control, if the starting temperature is lower than the stopping temperature, it operates in heating mode. If the starting temperature is higher than the stopping temperature, it operates in cooling mode. Similar logic applies to humidity control for humidification/dehumidification.
Mantemento
Proper maintenance ensures the longevity and accuracy of your controller:
- Manteña o dispositivo limpo e libre de po e residuos. Use un pano suave e seco para limpar.
- Asegúrese de que haxa unha ventilación axeitada arredor da unidade para evitar o sobrequecemento.
- Periodically inspect all wiring connections to ensure they remain secure and free from corrosion.
- Avoid exposing the unit or sensors to extreme temperatures, high humidity, or corrosive environments outside their specified operating ranges.
- Do not attempt to disassemble the unit beyond what is described in this manual.
Resolución de problemas
If you encounter issues with your controller, refer to the table below for common problems and solutions:
| Problema | Causa posible | Solución |
|---|---|---|
| A pantalla non funciona | No power, incorrect wiring, faulty unit. | Check power supply connections. Verify wiring against the diagram. If problem persists, contact support. |
| Relay not switching | Incorrect temperature/humidity settings, faulty relay, load issue. | Review your set starting and stopping values. Check the wiring to the load device. Test the load device independently. |
| Lecturas inexactas | Sensor damaged, sensor not properly placed, environmental interference. | Inspect sensor for physical damage. Ensure sensor is in the correct environment and not obstructed. Avoid placing sensor near heat sources or drafts. |
| "LLL" or "HHH" on display | Sensor open circuit (LLL) or short circuit (HHH). | Check sensor connection for looseness or damage. Replace sensor if it appears faulty. |
| Display shows "--- " | Sensor not connected or faulty. | Ensure sensor is securely connected. Replace sensor if necessary. |
Garantía e Soporte
For warranty information or technical support regarding your IXITAB STC-3008, STC-3018, or STC-3028 controller, please refer to the documentation provided with your product at the time of purchase or contact IXITAB customer service through the platform where you purchased the item.
When contacting support, please be prepared to provide your product model number (STC-3008, STC-3018, or STC-3028) and details of your purchase.