
1. Introdución
This manual provides detailed instructions for the installation, operation, and maintenance of the IXITAB KWS-AC301 and KWS-AC300 series Digital AC Power Energy Meters. These devices are designed to measure and display various electrical parameters including voltage, current, power, energy consumption (Kwh), timing, temperature, frequency, and power factor (for KWS-AC301 models). Please read this manual thoroughly before use to ensure proper and safe operation.
2. Información de seguridade
- Asegúrese de desconectar toda a alimentación antes da instalación ou do cableado para evitar descargas eléctricas.
- A instalación só debe ser realizada por persoal cualificado.
- Non utilice o dispositivo en lugares húmidos ou damp condicións.
- Non exceda o vol especificadotage and current ratings of the meter.
- Verifique que todas as conexións estean seguras antes de conectar a enerxía.
3. Características do produto
The IXITAB KWS-AC300 and KWS-AC301 series meters offer comprehensive monitoring of AC electrical parameters:
- Real-time display of AC Voltage (V), Current (A), and Active Power (W).
- Measurement of cumulative Electrical Energy (Kwh) and Timing (H).
- Medición de temperatura.
- Frequency measurement (Hz).
- Power Factor measurement (PF) (KWS-AC301 models only).
- Electrical energy and timing reset function.
- Power-down memory function for electrical energy and timing.
- Optional 485 communication interface for data transmission (KWS-AC301L models).
4. Especificacións
KWS-AC300 Series
| Parámetro | AC300-20A | AC300-100A |
|---|---|---|
| Voltage | CA 50-300 V | CA 50-300 V |
| Actual | 0-20A | 0-100A |
| Poder | 0-3000 W | 0-30 kW |
| Capacity (Kwh) | 0.01-19999Kwh | 0.01-19999Kwh |
| Temporalización | 0-200 horas | 0-200 horas |
| Temperatura | -10°C a 99°C | -10°C a 99°C |
| Frecuencia | 45-65 Hz | 45-65 Hz |
KWS-AC301 Series
| Parámetro | AC301-20A / AC301L-20A | AC301-100A / AC301L-100A |
|---|---|---|
| Voltage | CA 50-300 V | CA 50-300 V |
| Actual | 0-20A | 0-100A |
| Shunt Way | Integrado | Integrado |
| 485 Comunicación | AC301-20A: No, AC301L-20A: Yes | AC301-100A: No, AC301L-100A: Yes |
| Poder | 0-4400 W | 0-22 kW |
| Capacity (Kwh) | 0.01-99999Kwh | 0.01-99999Kwh |
| Temporalización | 0-999 horas | 0-999 horas |
| Temperatura | -10°C a 150°C | -20°C a 150°C |
| Frecuencia | 50-60 Hz | 50-60 Hz |
| Factor de potencia | 0.01-1 PF | 0.01-1 PF |
Note: Dimensions for KWS-AC300 are approximately 79mm x 37.5mm x 20.7mm. Dimensions for KWS-AC301 are approximately 73mm x 44mm x 24mm. Both models use a CT coil with a diameter of 15mm.

Figure 4.1: Physical dimensions of KWS-AC300 and KWS-AC301 models, including CT coil measurements.
5. Contido do paquete
- 1 x Digital AC Power Energy Meter (KWS-AC300 or KWS-AC301 model)
- 1 x Manual de usuario
- For 100A models: 1 x 100A Shunt / CT Coil
- For 20A models: No external shunt/CT Coil (built-in)
6. Configuración e instalación
Siga estes pasos atentamente para unha instalación correcta:
6.1 Wiring Diagram (KWS-AC301L-100A Example)
The following diagram illustrates the wiring for the KWS-AC301L-100A model with a closed sensor (CT coil). Ensure all connections are made correctly before applying power.

Figure 6.1: Wiring connections for the KWS-AC301L-100A model, showing input voltage (IN-AC), load connection, and CT coil placement around the live wire.
- Entrada de enerxía: Connect the AC 50-300V power supply to terminals L and N (typically labeled 3 and 4 on the meter).
- Conexión de carga: Connect the load in series with the live wire (L). The CT coil should be placed around the live wire that feeds the load.
- CT Coil: Connect the CT coil wires to the designated CT terminals on the meter (typically labeled 1 and 2). Ensure the direction of the CT coil is correct as indicated by any arrows on the coil or meter.
- 20A Models: For 20A models without an external CT coil, the current measurement is internal. Connect the AC 50-300V power supply to the meter's input terminals, and the load directly through the meter's designated load terminals.
6.2 485 Communication and Temperature Sensor (KWS-AC301L Models)
For KWS-AC301L models, additional interfaces are available for 485 communication and an external temperature sensor.

Figure 6.2: KWS-AC301L model showing the dedicated interfaces for the temperature sensor and 485 communication (RS485 A+ and B- terminals).
- Sensor de temperatura: Connect the external temperature sensor to the dedicated interface.
- 485 Interface: Connect the RS485 A+ and B- terminals to your 485 communication network for data acquisition. PC software may be available for data logging and analysis (refer to product documentation or manufacturer's website for download links).
7. Funcionamento
The meter features a clear digital display and intuitive buttons for navigation and settings.
7.1 Mostrar máisview
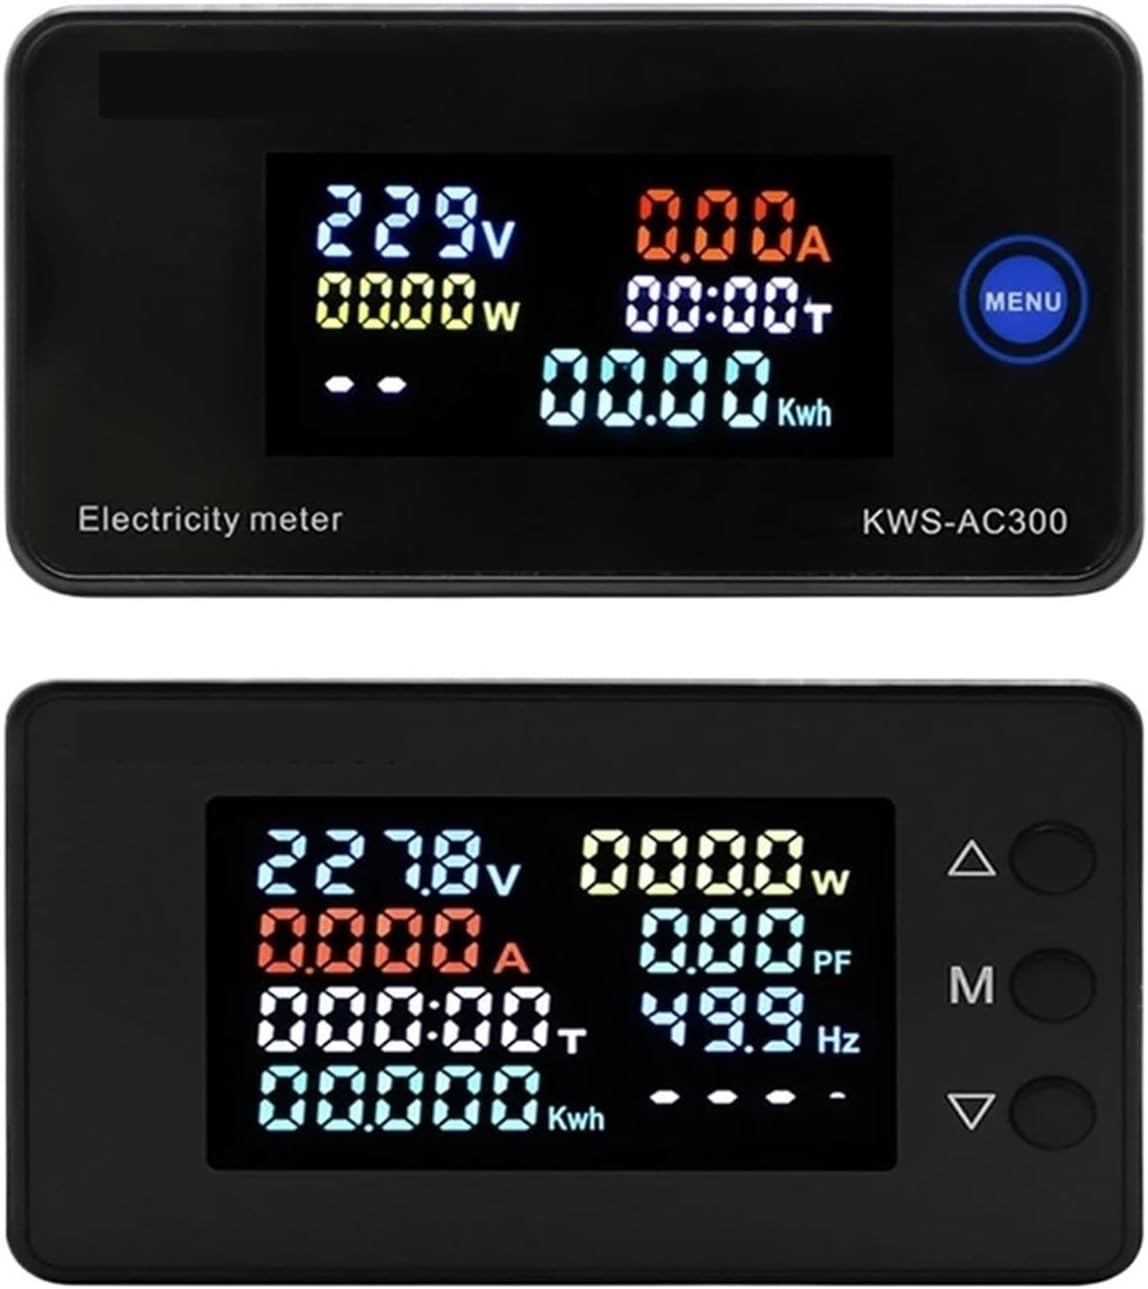
Figure 7.1: Top display shows KWS-AC300 with Voltage, Current, Power, Timing, and Kwh. Bottom display shows KWS-AC301 with Voltage, Current, Power, Timing, Kwh, Power Factor, and Frequency.
The display shows various parameters simultaneously. The KWS-AC300 typically displays Voltage, Current, Power, Timing, and Kwh. The KWS-AC301 models additionally display Frequency and Power Factor.
7.2 Funcións dos botóns
The meters typically feature one or more buttons for interaction:
- KWS-AC300: Features a "MENU" button. Pressing this button allows cycling through display modes or accessing settings.
- KWS-AC301: Features three buttons: Up (Δ), Middle (M), and Down (∇).

Figure 7.2: KWS-AC301 button interaction. Pressing the 'M' button for 3 seconds allows entry into setting or alarm value adjustment modes.
- "M" Button (KWS-AC301):
- Prensa curta: Cycles through different display parameters (e.g., Voltage, Current, Power, Kwh, Timing, Temperature).
- Presión longa (3 segundos): Enters the setting mode or alarm value adjustment mode. Use the Up (Δ) and Down (∇) buttons to navigate and adjust values.
- Up (Δ) and Down (∇) Buttons (KWS-AC301): Used to navigate menus, increase or decrease values in setting modes.
7.3 Resetting Electrical Energy and Timing
To reset the cumulative electrical energy (Kwh) and timing (H) values, typically a long press on a specific button (often the "M" or "MENU" button) while in the Kwh or Timing display mode will initiate the reset process. Confirm the reset if prompted by the display.
8. Mantemento
- Keep the meter clean and free from dust. Use a soft, dry cloth for cleaning.
- Avoid exposing the device to extreme temperatures, direct sunlight, or corrosive environments.
- Do not attempt to open or repair the meter yourself, as this may void the warranty and pose a safety risk.
- Ensure all wiring connections remain secure over time.
9 Solución de problemas
- Sen visualización:
- Check if the power supply (AC 50-300V) is connected correctly and active.
- Asegúrese de que a entrada voltage está dentro do intervalo especificado.
- Incorrect Current/Power Reading:
- For 100A models, verify the CT coil is correctly installed around the live wire and connected to the meter.
- Ensure the CT coil direction is correct.
- Check if the load is properly connected.
- Parameters Not Resetting:
- Refer to Section 7.3 for the correct procedure to reset Kwh and Timing. Ensure the button is pressed for the required duration.
- 485 Communication Issues (KWS-AC301L):
- Verify the A+ and B- connections are correct.
- Check communication settings (baud rate, parity, stop bits) on both the meter and the connected device.
10. Garantía e soporte
Para obter información sobre a garantía, asistencia técnica ou consultas sobre o servizo, póñase en contacto co fabricante ou co seu distribuidor autorizado. Garde o recibo de compra como proba de compra.
Manufacturer: IXITAB