1. Introdución
This manual provides detailed instructions for the installation, operation, and maintenance of your Rimoody 10.1 Inch Android Car Stereo. Please read this manual thoroughly before using the product to ensure proper function and safety. This device is designed to enhance your driving experience with advanced features such as GPS navigation, multimedia playback, and smartphone integration.

Image 1.1: Rimoody 10.1 Inch Android Car Stereo main unit.
2. Contido do paquete
Verifique que todos os elementos que se indican a continuación estean incluídos no seu paquete. Se falta algún elemento ou está danado, póñase en contacto co servizo de atención ao cliente.
- 10.1 Inch Android Car Stereo Unit
- Cable(s) de alimentación
- Cable(s) USB
- Antena GPS
- Radio Antena
- Reversing Camera Input Cable
- Cabo RCA
- Cámara de respaldo
- Ferramenta de instalación
- Manual de usuario
- Canbus (se corresponde ao modelo do teu vehículo)
- Antenna Adapter (if applicable for your vehicle model)

Imaxe 2.1: Acabadoview of the car stereo unit and included accessories.

Imaxe 2.2: Detallada view of the car stereo components and various wiring harnesses.
3. Configuración e instalación
Professional installation is recommended. Ensure the vehicle's battery is disconnected before beginning installation. Refer to your vehicle's specific wiring diagrams if necessary.
3.1 Comprobación de compatibilidade
This car stereo is designed for Citroen C1, Peugeot 107, and Toyota Aygo models manufactured between 2004 and 2014.
3.2 Conexións de cableado
- Cable de alimentación: Connect the main power harness to the vehicle's power supply (ACC, B+, GND).
- Fíos dos altofalantes: Connect the speaker output wires to the corresponding vehicle speakers.
- Antena GPS: Monte a antena GPS nun lugar con luz despexada view do ceo, normalmente no taboleiro.
- Antena de radio: Connect the vehicle's radio antenna to the stereo unit.
- Cables USB: Connect the provided USB cables for external devices or data transfer.
- Cámara de respaldo: Connect the backup camera cable to the designated input on the stereo. Ensure the reverse trigger wire is connected to the vehicle's reverse light circuit.
- Cables RCA: Connect RCA cables for external amplifiers or video outputs/inputs as needed.
- Control do volante: Connect the steering wheel control wires (Key1, Key2, GND) to your vehicle's steering wheel control interface. Configuration may be required in the stereo settings.
3.3 Montaxe da unidade
Carefully insert the stereo unit into the dashboard opening, ensuring all cables are properly routed and not pinched. Secure the unit using the provided mounting brackets and screws.
Image 3.1: Comparison of the dashboard before and after installing the Rimoody car stereo in a compatible vehicle.
4. Instrucións de funcionamento
The Rimoody Android Car Stereo features a 10.1-inch capacitive touchscreen for intuitive control. The user interface is designed for ease of use while driving.
4.1 Encendido/apagado
- The unit will power on automatically when the vehicle's ignition is turned on.
- To manually power off, press and hold the power button (if available) or turn off the vehicle's ignition.
Carplay sen fíos de 4.2 polgadas e Android Auto
Connect your iOS or Android smartphone wirelessly or via USB to access navigation, music, calls, and messages directly on the stereo screen.
- Asegúrate de que Bluetooth e Wi-Fi estean activados no teu smartphone.
- On the stereo, select the Carplay or Android Auto application.
- Follow the on-screen prompts to pair your device. For wireless connection, pair via Bluetooth first, then confirm the Wi-Fi connection. For wired connection, connect via USB.

Image 4.1: Wireless Carplay and Android Auto interfaces.
4.3 GPS Navigation & WiFi
The built-in GPS module allows for precise navigation. Connect to Wi-Fi to download offline maps or use online navigation services and other applications.
- To use GPS, ensure the GPS antenna is properly installed.
- To connect to Wi-Fi, go to Settings > Network > Wi-Fi, select your network, and enter the password.
- Download preferred navigation apps from the app store or use pre-installed options.

Image 4.2: GPS Navigation and Wi-Fi connection interface.
4.4 Funcionalidade Bluetooth
Vincula o teu smartphone a través de Bluetooth para facer chamadas mans libres e transmitir audio.
- Activa o Bluetooth no teu teléfono intelixente e no estéreo do coche.
- On the stereo, go to the Bluetooth application and search for available devices.
- Selecciona o teu teléfono da lista e confirma o código de emparellamento.
- Once connected, you can make/receive calls and play music through the stereo.

Image 4.3: Bluetooth interface for hands-free calling and music.
Radio 4.5 FM/RDS
Tune into your favorite radio stations with FM and RDS (Radio Data System) support.
- Open the Radio application.
- Use a función de busca para atopar emisoras dispoñibles ou sintonizar manualmente unha frecuencia.
- Save your preferred stations to the preset buttons for quick access.
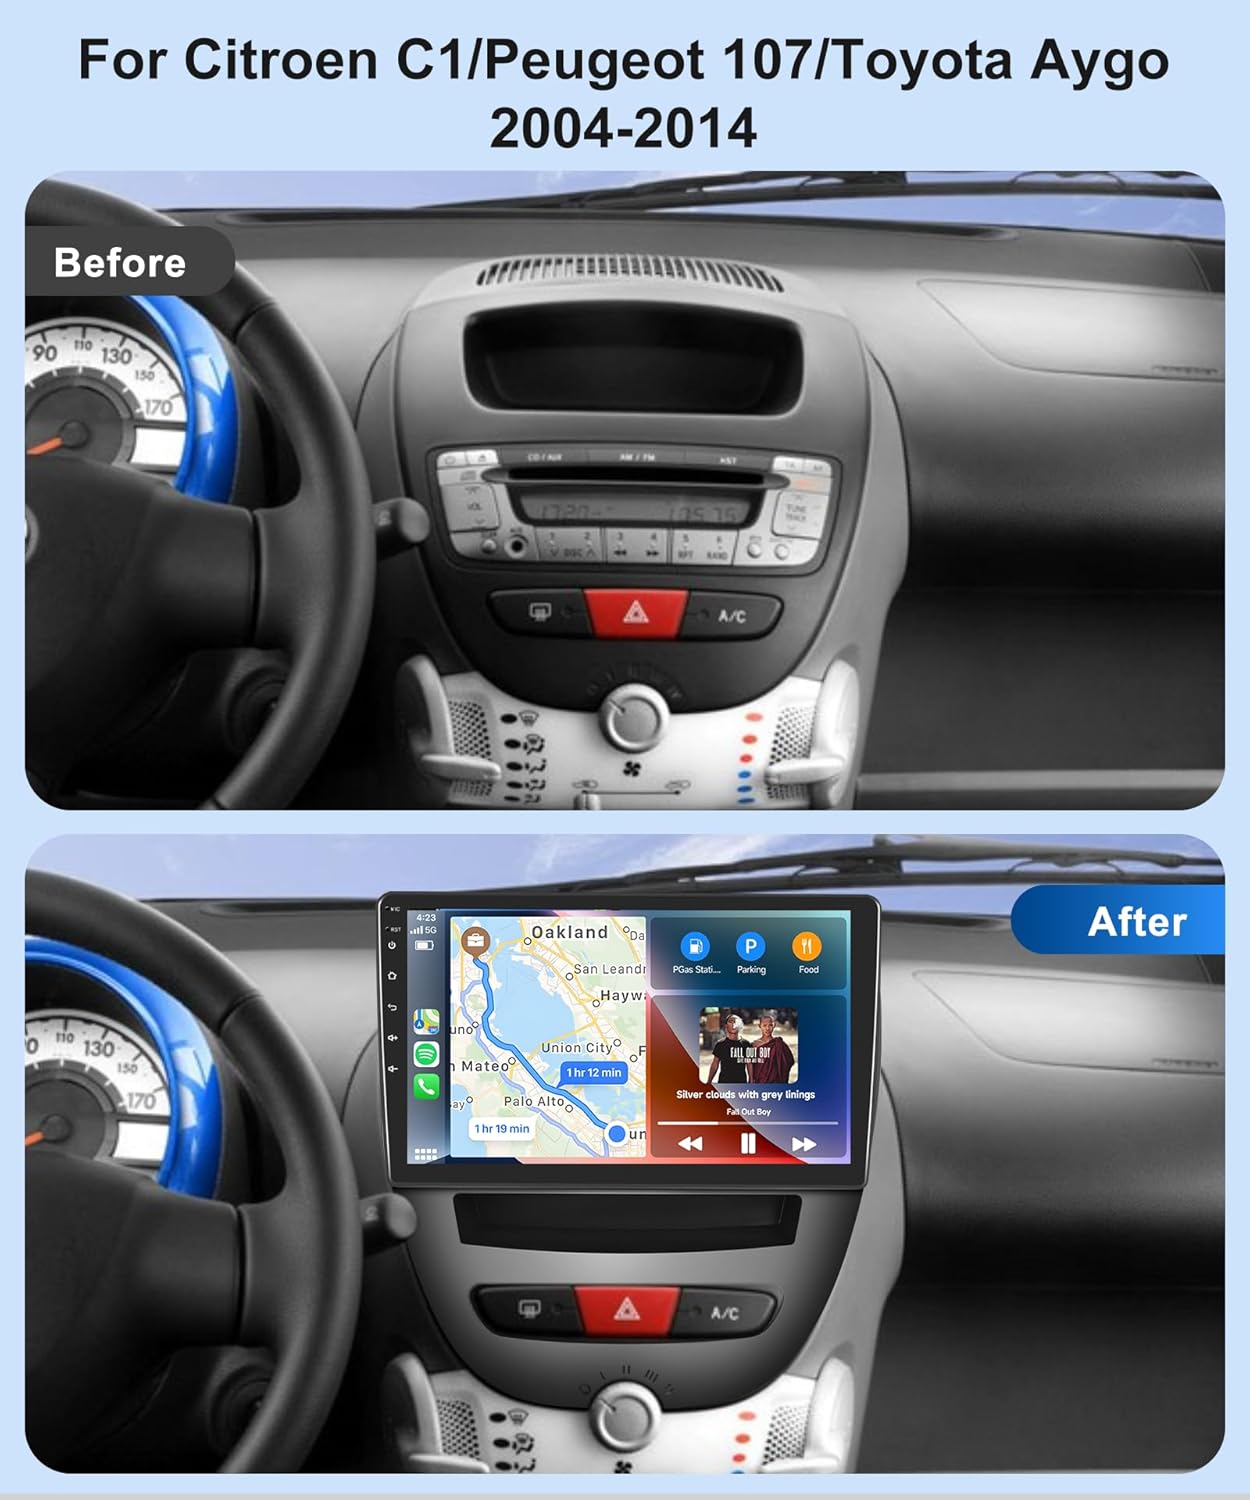
Image 4.4: FM/RDS Radio interface.
4.6 Axustes de son DSP
Utilize the built-in Digital Signal Processor (DSP) to customize your audio experience with various equalizer settings and sound effects.
- Access the DSP or Equalizer settings from the main menu.
- Adjust frequency bands, balance, fader, and other sound parameters to your preference.

Image 4.5: DSP Audio Equalizer settings.
4.7 Traseira View Cámara
The stereo supports a rear view camera, providing a clear image on the screen when reversing.
- When the vehicle is shifted into reverse gear, the stereo will automatically display the camera feed.
- Ensure the backup camera is correctly installed and connected to the reverse trigger wire.

Imaxe 4.6: Traseira View Pantalla da cámara.
4.8 Control do volante
Configure your vehicle's steering wheel buttons to control the stereo functions for convenience and safety.
- Go to Settings > Steering Wheel Control.
- Follow the on-screen instructions to map each button to its desired function (e.g., volume up/down, track skip).

Image 4.7: Steering Wheel Control functionality.
4.9 Funcionalidade de pantalla dividida
Run two applications simultaneously on the screen, such as navigation and music playback.
- Abre a primeira aplicación.
- Press and hold the recent apps button or drag from the side to activate split-screen mode.
- Selecciona a segunda aplicación para que se mostre xunto á primeira.

Image 4.8: Split Screen, Wallpapers, and UI Themes options.
4.10 Ligazón de espello
Mirror your smartphone's screen directly onto the car stereo display, allowing you to use phone apps, music, and videos.
- Select the Mirror Link application on the stereo.
- Follow the instructions to connect your iOS or Android phone via Bluetooth or USB.

Image 4.9: iOS/Android Mirror Link functionality.
5. Mantemento
Para garantir a lonxevidade e o rendemento óptimo do equipo de son do teu coche, segue estas pautas de mantemento:
- Limpeza da pantalla: Usa un pano suave e sen pelusa para limpar con suavidade a pantalla táctil. Para manchas difíciles, limpa lixeiramenteampLimpe o pano con auga ou cun limpador de pantallas. Evite materiais abrasivos ou produtos químicos agresivos.
- Actualizacións de software: Comprobe periodicamente se hai actualizacións de software a través da configuración do sistema ou do fabricante websitio para garantir que tes as últimas funcións e correccións de erros.
- Conexións por cable: Regularly inspect all cable connections to ensure they are secure and free from damage. Loose connections can lead to intermittent issues.
- Evita temperaturas extremas: Do not expose the unit to extreme temperatures for extended periods, as this can affect performance and lifespan.
6 Solución de problemas
If you encounter issues with your car stereo, refer to the following common troubleshooting steps:
| Problema | Causa posible | Solución |
|---|---|---|
| Sen Poder | Loose power connection, blown fuse, vehicle ignition off. | Check power cables, inspect vehicle fuses, ensure ignition is on. |
| Sen son | Volume too low, speaker wires disconnected, mute function active. | Increase volume, check speaker connections, disable mute. |
| O GPS non funciona | GPS antenna not connected or improperly placed, no satellite signal. | Ensure GPS antenna is connected and has a clear view do ceo. |
| Fallo de emparellamento Bluetooth | Bluetooth not enabled, incorrect pairing code, device out of range. | Enable Bluetooth on both devices, re-enter pairing code, ensure devices are close. |
| Pantalla táctil non responde | Software glitch, screen dirty. | Restart the unit, clean the screen. If issue persists, contact support. |
| Non se mostra a cámara de marcha atrás | Camera cable loose, reverse trigger wire not connected, camera faulty. | Check camera connections, verify reverse trigger wire, test camera. |
If these steps do not resolve the issue, please contact Rimoody customer support for further assistance.
7. Especificacións
| Característica | Especificación |
|---|---|
| Número de modelo | ab5c7f1e-9691-444b-87e8-51ae6a15acef |
| Tamaño da pantalla | 10.1 polgadas |
| Tipo de visualización | 2.5D Tempered Glass, Full Capacitance Touch Screen |
| Sistema Operativo | Android |
| Procesador | 8 núcleos |
| Memoria (RAM) | 4 GB |
| Almacenamento (ROM) | 64 GB |
| Resolución | 1080P High Definition |
| Conectividade | Bluetooth, Wi-Fi, USB, FM Antenna |
| Características especiais | Wireless Carplay, Wireless Android Auto, GPS Navigation, DSP, RDS, Split Screen, Mirror Link, Backup Camera Support, Steering Wheel Control |
| Modo de saída de audio | Estéreo |
| Son envolvente | 7.1 Configuración da canle |
| Potencia de saída | 180 Watts (4 Channels) |
| Codificación de vídeo | H.264, H.265/HEVC |
| Servizos de Internet compatibles | YouTube, Spotify, Online Maps |
| Método de control | Toca |
Image 7.1: Dimensions and rear connection layout of the car stereo.
8. Garantía e soporte
Rimoody is committed to providing high-quality products and customer satisfaction.
8.1 Garantía do produto
Este produto vén cun 2 anos de garantía do fabricante desde a data de compra. Esta garantía cobre defectos de materiais e fabricación en condicións de uso normal. Conserve o comprobante de compra para reclamacións de garantía.
8.2 Atención ao cliente
For any questions, technical assistance, or warranty claims, please contact Rimoody customer support:
- Resposta rápida: Expect a response within 24 hours.
- Guía de instalación: Professional installation guides and videos are available.
- Devolucións: 90 days free return for refund or exchange.
- Soporte técnico: Ofrécese soporte técnico de por vida.

Image 8.1: Rimoody Customer Support details.