Introdución
Thank you for choosing the Yes4All Dip Stand BMEV. This manual provides essential information for the safe assembly, operation, and maintenance of your new dip station. Please read all instructions carefully before use to ensure proper function and to prevent injury. This dip stand is designed for home gym use, offering versatile bodyweight exercises with adjustable features for a customized workout experience.
Información de seguridade
- Consulte a un médico antes de comezar calquera programa de exercicios.
- Read and understand all instructions in this manual before assembly and use.
- Keep children and pets away from the equipment during assembly and use.
- Place the dip stand on a flat, stable surface. Ensure adequate space around the equipment for safe operation.
- Inspect the equipment for loose parts, damage, or wear before each use. Do not use if any components are compromised.
- Ensure all bolts, nuts, and adjustment pins are securely tightened before each use.
- Non exceda a capacidade de peso máxima de 500 lb (226.8 kg).
- Wear appropriate athletic attire and footwear during exercise.
- Deixar de facer exercicio inmediatamente se sentes dor, mareos ou falta de aire.
- Realiza exercicios con movementos controlados. Evita movementos bruscos ou bruscos.
Contido do paquete
Comprobe que todos os compoñentes estean presentes e sen danos antes de comezar a montaxe.
- Main Frame Components (Vertical Posts, Base Supports)
- Dip Handles with NBR foam padding
- Asas para flexións
- Hand Screws for adjustments
- Rubber Foot Bases
- Ferraxes de montaxe (parafusos, arandelas, porcas)
- Wrench Support Tool

Figura 1: Explotado view of the dip stand components.
Instrucións de montaxe
Assembly is required. It involves connecting the main frame components and adjusting the height and width of the dip bars. A wrench support tool is included to assist with assembly.
- Unpack all components and lay them out on a clean, flat surface. Refer to the package contents list to ensure all parts are present.
- Attach the vertical posts to the base supports using the provided hardware. Ensure all bolts are finger-tightened initially.
- Slide the dip handles onto the vertical posts.
- Insert the hand screws into the designated holes to secure the dip handles at your desired height and width.
- Attach the rubber foot bases to the bottom of the base supports.
- Once all components are in place, securely tighten all bolts and hand screws using the wrench support tool. Double-check all connections for stability.
Axustes
The Yes4All Dip Stand offers extensive adjustability to accommodate various body types and exercise preferences.
Axuste de altura
- The dip stand features 8 height adjustment levels.
- To adjust the height, loosen the hand screws on the vertical posts, slide the dip handles to the desired height (Min 41 3/8 in - Max 52 in), and securely tighten the hand screws. Ensure both sides are adjusted to the same level.
Axuste de ancho
- The dip stand offers 10 width adjustment levels.
- To adjust the width, loosen the hand screws connecting the two vertical posts at the base, slide the posts to the desired width (Min 21 3/4 in - Max 28 3/4 in), and securely tighten the hand screws.

Figure 2: Adjustable height and width features.
Operating Instructions: Exercises
The Yes4All Dip Stand is a versatile tool for various bodyweight exercises. Always maintain proper form and control during your workouts.
Exercicios comúns:
- Dips de tríceps: Position yourself between the bars, grip the handles, and lower your body by bending your elbows until your shoulders are below your elbows. Push back up to the starting position.
- L-Sit Holds: Grip the handles, lift your body off the ground, and extend your legs straight out in front of you, forming an 'L' shape with your body. Hold this position.
- Flexións: Utilize the integrated push-up handles on the base for a deeper range of motion and wrist comfort during push-ups.
- Alpinistas: Place hands on the push-up handles, assume a plank position, and alternate bringing knees towards your chest.
- Filas invertidas: Position yourself under the dip bars, grip the handles, and pull your chest towards the bars, keeping your body straight.
- Knee Raises: Grip the dip handles, lift your body, and bring your knees towards your chest in a controlled motion.
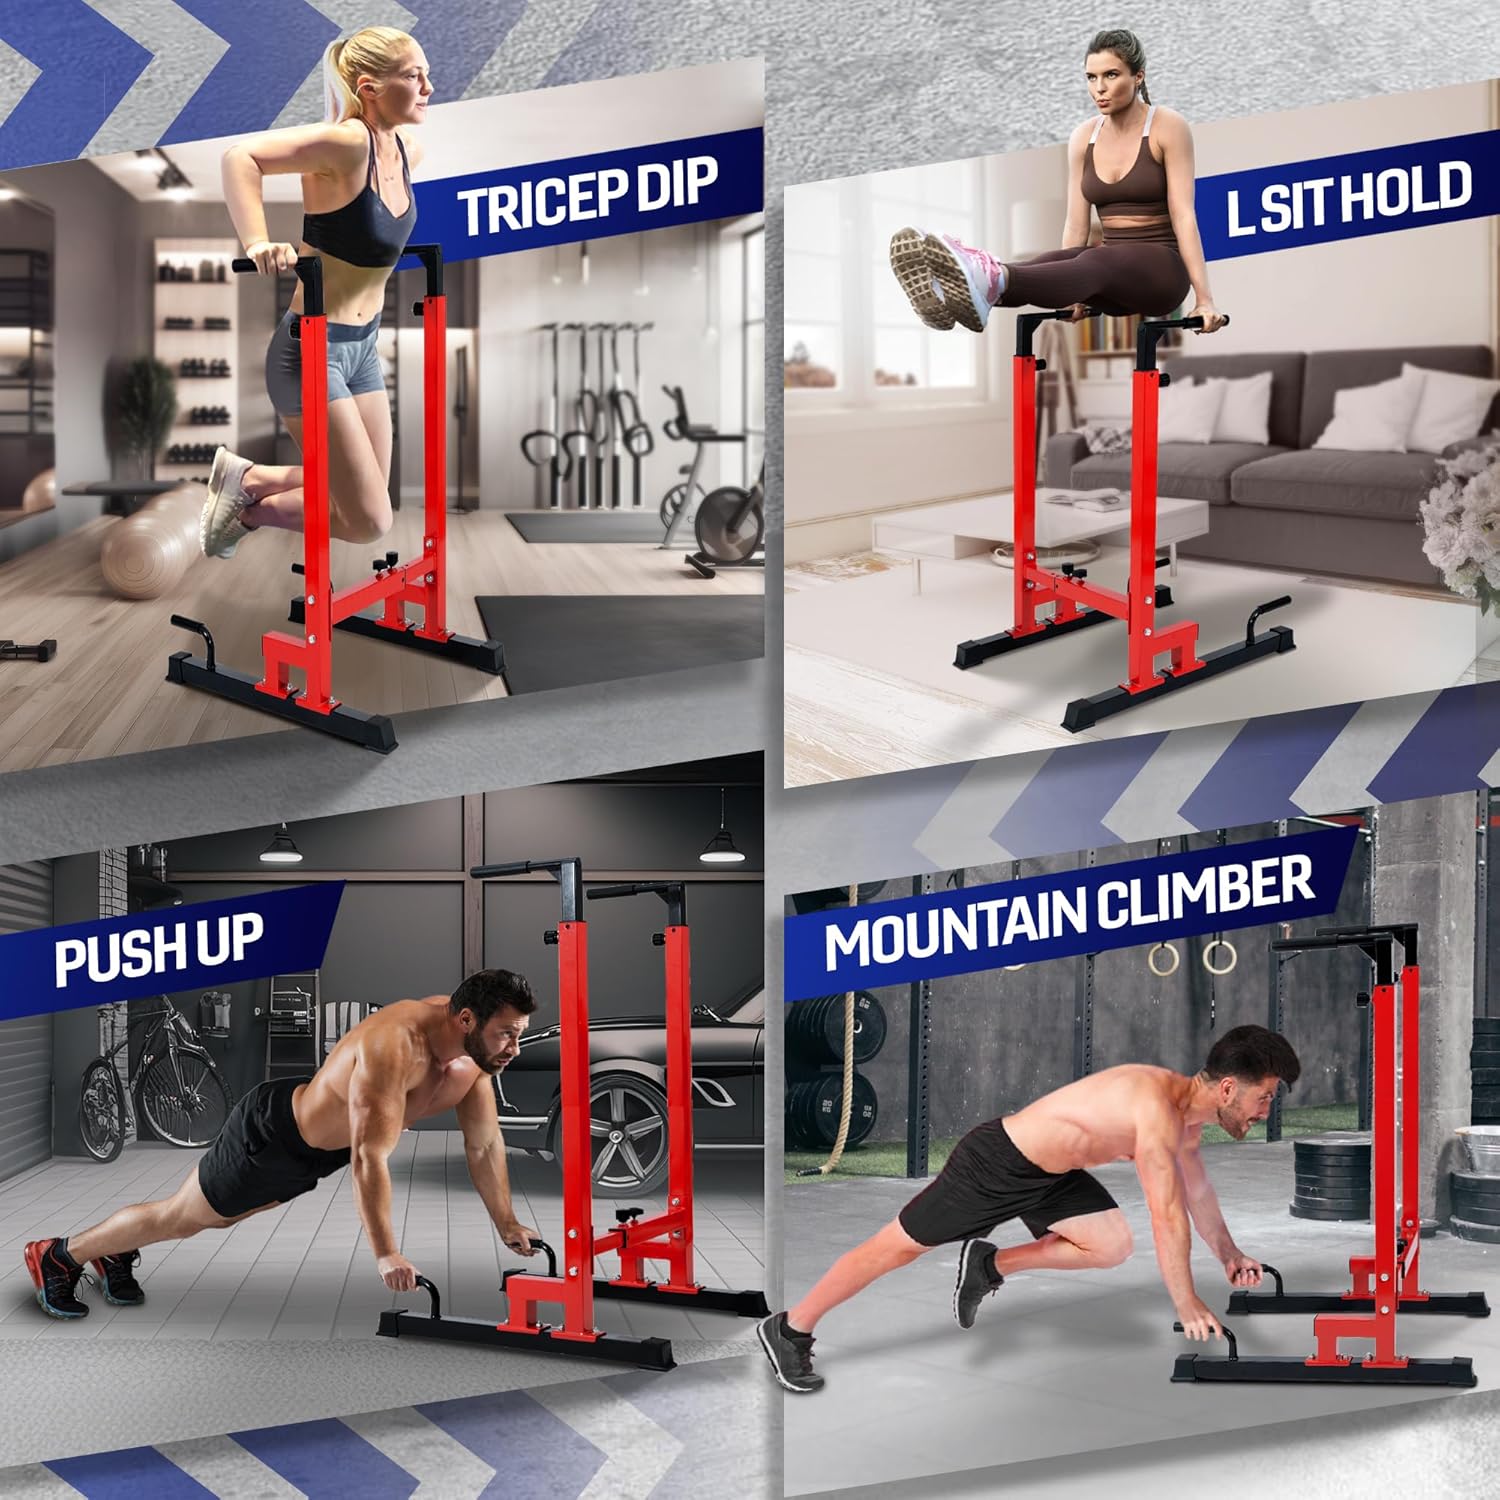
Figura 3: Examples of exercises using the dip stand.

Figure 4: Additional exercises: L Sit Hold, Push Up, Knee Raise.

Figure 5: More exercise variations: Mountain Climber, Inverted Row, Tricep Dip.

Figure 6: Muscle groups strengthened by using the dip stand.
Mantemento
- Limpeza: Wipe down the dip stand with a damp un pano despois de cada uso para eliminar a suor e a sucidade. Evite produtos de limpeza abrasivos.
- Inspección: Regularly check all bolts, nuts, and adjustment pins to ensure they are tight. Inspect the foam handles and rubber foot bases for any signs of wear or damage.
- Almacenamento: Store the dip stand in a dry, cool place away from direct sunlight and extreme temperatures.
Resolución de problemas
| Problema | Causa posible | Solución |
|---|---|---|
| Equipment feels unstable or wobbly | Loose bolts or adjustment screws; uneven surface. | Ensure all assembly bolts and hand screws are fully tightened. Verify the dip stand is placed on a flat, level surface. |
| Difficulty adjusting height/width | Hand screws not fully loosened; debris in adjustment holes. | Fully loosen the hand screws before attempting to adjust. Check for any obstructions in the adjustment holes. |
| Ruídos de chirrido durante o uso | Conexións soltas; fricción entre pezas metálicas. | Tighten all bolts and screws. Apply a small amount of silicone lubricant to contact points if necessary. |
Especificacións
| Característica | Detalle |
|---|---|
| Número de modelo | BMEV |
| Marca | Si 4Todos |
| Material | Metal |
| Cor | Vermello |
| Capacidade máxima de peso | 500 libras (226.8 kg) |
| Niveis de altura axustables | 8 levels (Min 41 3/8 in - Max 52 in) |
| Adjustable Width Levels | 10 levels (Min 21 3/4 in - Max 28 3/4 in) |
| Tipo de mango | Foam (NBR foam - non-slip) |
| Peso do elemento | 15.31 kg (33.75 lb) |
| Dimensións do paquete | 96.52 x 37.34 x 12.7 cm |
| País de Orixe | China |

Figura 7: Dimensións do produto.
Garantía e Soporte
For warranty information or technical support, please refer to the contact details provided with your purchase or visit the official Yes4All websitio. Garde o recibo da compra como proba de compra para calquera reclamación de garantía.