
1. Introdución
This manual provides instructions for the proper use and maintenance of the SUNMI V2SE Smart Mobile Terminal. The V2SE is a versatile device designed for various business applications, featuring an integrated 58mm thermal printer, 1D/2D barcode recognition, NFC capabilities, and running on Android 12.0.
As características principais inclúen:
- Integrated 58mm thermal printer with 80mm/s print speed.
- 1D/2D Barcode recognition for efficient scanning.
- NFC for contactless transactions.
- Android 12.0 operating system with a Quad Core 2.0 GHz CPU.
- 2 GB RAM and 8 GB ROM for smooth operation.
- Connectivity: 4G/3G/2G, 2.4G/5G Wi-Fi, Bluetooth 2.1/3.0/4.2.
- Removable Lithium Ion battery.
2. Compoñentes do dispositivo
Familiarize yourself with the main components of your SUNMI V2SE terminal.
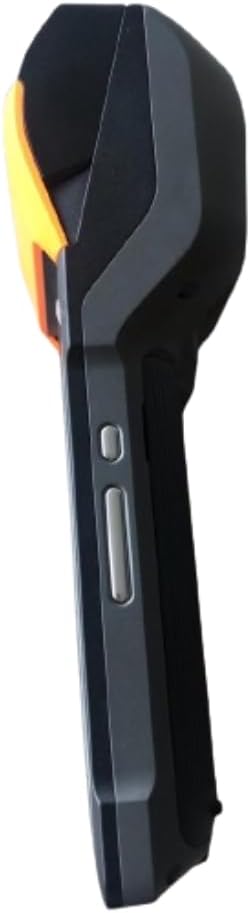
Figura 2.1: Diante e lateral View. This image displays the device's screen, the integrated barcode scanner at the top, and the power and volume buttons located on the side.

Figura 2.2: Lado ViewEsta imaxe mostra o lado profile of the terminal, including the cover for the SIM card slot and additional buttons.

Figura 2.3: De volta View. This image illustrates the rear of the device, featuring the thermal printer cover, the 0.3 MP camera, and the charging contact points.
Lista de compoñentes:
- Pantalla de visualización: Touch-sensitive LCD for user interaction.
- Escáner de código de barras: Integrated 1D/2D scanner for data capture.
- Impresora térmica: For printing receipts and other documents.
- Botón de encendido: To turn the device on/off or wake/sleep.
- Botóns de volume: To adjust audio levels.
- Cámara: 0.3 MP front photo sensor.
- Ranura para tarxeta SIM: Supports 1 Nano SIM.
- Compartimento de batería: Houses the removable Lithium Ion battery.
- Charging Port/Contacts: Para cargar o dispositivo.
3. Configuración inicial
3.1. Instalación da batería
- Asegúrese de que o dispositivo estea apagado.
- Localice a tapa do compartimento da batería na parte traseira do dispositivo (consulte a Figura 2.3).
- Remove the cover by sliding or lifting it according to the markings.
- Insert the provided Lithium Ion battery, ensuring the contacts align correctly.
- Coloque a tapa do compartimento da batería de forma segura.
3.2. Instalación da tarxeta SIM
- Ensure the device is powered off and the battery is installed.
- Locate the SIM card slot cover on the side of the device (refer to Figure 2.2).
- Abre a tapa.
- Insert a Nano SIM card into the designated slot with the gold contacts facing down and the notched corner aligned.
- Close the SIM card slot cover firmly.
3.3. Thermal Paper Loading
- Locate the printer cover release latch, typically on the top or side of the printer compartment (refer to Figure 2.3).
- Abra a tapa da impresora.
- Insert a 58mm thermal paper roll into the compartment, ensuring the paper feeds from the bottom and the leading edge extends out of the printer slot.
- Close the printer cover firmly until it clicks into place. Ensure there is no slack in the paper roll.
3.4. Carga inicial e acendido
- Connect the provided power adapter to the device's charging port.
- Plug the adapter into a power outlet. Allow the device to charge fully before first use.
- To power on, press and hold the Power button (refer to Figure 2.1) until the SUNMI logo appears on the screen.
4. Instrucións de funcionamento
4.1. Acendido/apagado e modo de repouso
- Encendido: Manteña premido o botón de acendido/apagado ata que o dispositivo vibre e a pantalla se ilumine.
- Apagado: Press and hold the Power button until a power menu appears. Select "Power Off" and confirm.
- Durmir/Espertar: Briefly press the Power button to put the device into sleep mode or wake it up.
4.2. Using the Thermal Printer
The integrated 58mm thermal printer can be used to print receipts, tickets, and other documents.
- Ensure thermal paper is correctly loaded (refer to Section 3.3).
- Open the application that requires printing (e.g., POS software).
- Initiate the print command within the application. The device will automatically print the content.
- Tear off the printed paper against the serrated edge.
4.3. Escaneado de códigos de barras
The V2SE supports 1D and 2D barcode recognition.
- Open an application that requires barcode input.
- Point the scanner window (located at the top of the device, refer to Figure 2.1) at the barcode.
- Press the dedicated scan button (if available) or trigger the scan function within the application.
- Ensure the barcode is within the scanner's field of view and well-lit for optimal performance.
4.4. Funcionalidade NFC
The device supports Near Field Communication (NFC) for contactless operations.
- Ensure NFC is enabled in the device settings (Settings > Connected devices > NFC).
- Open an application that utilizes NFC (e.g., payment app, data transfer app).
- Hold the NFC-enabled card or device close to the NFC detection area on your terminal (typically near the top or back of the device).
- Follow the on-screen prompts to complete the transaction or data transfer.
4.5. Conectividade de rede
- Wi-Fi: Vaia a Configuración > Rede e internet > Wi-Fi para conectarse ás redes sen fíos dispoñibles.
- Datos móbiles (4G/3G/2G): Ensure a valid SIM card is installed and mobile data is enabled in Settings > Network & internet > Mobile network.
- Bluetooth: Vaia a Axustes > Dispositivos conectados > Bluetooth para emparellalo con outros dispositivos Bluetooth.
5. Mantemento
5.1. Limpeza do dispositivo
- Apague o dispositivo antes de limpar.
- Use un pano suave e sen pelusa lixeiramente dampenxugado con auga ou un limpador suave e non abrasivo para limpar o exterior.
- For the display, use a screen-specific cleaner and a microfiber cloth.
- Do not use harsh chemicals, solvents, or abrasive materials. Avoid spraying liquids directly onto the device.
5.2. Coidado da batería
- Charge the battery regularly, avoiding complete discharge whenever possible.
- Non expoña a batería a temperaturas extremas.
- Se o dispositivo non se vai usar durante un período prolongado, cárgueo ata aproximadamente o 50 % e gárdeo nun lugar fresco e seco.
- Use only the original or approved charger and battery.
5.3. Printer Head Cleaning
Regular cleaning of the printer head can prevent print quality issues.
- Power off the device and open the printer cover.
- Use un hisopo de algodón lixeiramenteampened with isopropyl alcohol to gently wipe the thermal print head.
- Allow the print head to dry completely before closing the cover and powering on the device.
6 Solución de problemas
| Problema | Causa posible | Solución |
|---|---|---|
| O dispositivo non se acende | Low battery; Faulty battery; Power button issue | Charge the device for at least 30 minutes. Ensure battery is correctly installed. Try a different charger. |
| A impresora non imprime | No paper; Paper jammed; Printer head dirty; Application error | Check and load paper. Clear any paper jams. Clean the printer head (Section 5.3). Restart the application or device. |
| Barcode scanner not working | Scanner window obstructed; Barcode damaged; Application error | Ensure scanner window is clean. Try scanning a different barcode. Restart the application or device. |
| Sen conexión wifi | Wi-Fi off; Incorrect password; Out of range | Enable Wi-Fi in settings. Re-enter password. Move closer to the Wi-Fi router. |
| No mobile data | SIM card not installed; Mobile data off; No network coverage | Check SIM card installation. Enable mobile data in settings. Check for network coverage in your area. |
7. Especificacións
| Característica | Detalle |
|---|---|
| Modelo | V2SE |
| Sistema Operativo | Android 12.0 |
| CPU | Quad Core 2.0 GHz |
| RAM | 2 GB |
| ROM | 8 GB |
| Mostrar | LCD, 1920 x 1080 resolution, 16:9 Aspect Ratio |
| Impresora | 58 mm thermal printer, 80 mm/s print speed |
| Barcode Recognition | 1D / 2D Barcode recognition |
| Cámara | 0.3 MP Front Photo Sensor |
| Ranura para SIM | 1 Nano SIM (Dual SIM support) |
| Conectividade | 4G/3G/2G Cellular, Wi-Fi (2.4G/5G), Bluetooth 2.1/3.0/4.2, NFC |
| GPS | True, Supports GPS satellite navigation system |
| Batería | 1 Lithium Ion battery (removable, included) |
| Dimensións | 22 x 9 x 9 cm |
| Peso | 400 g |
| Fabricante | SUNMI |
8. Garantía e soporte
For warranty information and technical support, please refer to the documentation provided with your purchase or contact your vendor. Keep your proof of purchase for warranty claims.