
HOCO QS2
Hoco QS2 Portable Smart Air Pump & Emergency Start-Up Power Bank User Manual
Modelo: QS2
1. Introdución
Thank you for choosing the Hoco QS2 Portable Smart Air Pump & Emergency Start-Up Power Bank. This device is a multi-functional tool designed to provide reliable assistance in various situations, including jump-starting vehicles, inflating tires, and charging electronic devices. Please read this manual thoroughly before use to ensure proper operation and to maximize the lifespan of your device.
2. Precaucións de seguridade
Always observe the following safety guidelines to prevent injury or damage to the device and property.
- Non expoñas o dispositivo a temperaturas extremas, á luz solar directa nin ao lume.
- Manter fóra do alcance dos nenos.
- Do not disassemble, modify, or attempt to repair the device yourself. Contact qualified service personnel.
- Ensure proper ventilation during operation, especially when using the air pump or jump start function.
- Evite curtocircuítos nos terminais de saída.
- Non empregues o arrancador se a batería está pechadaamps ou cables están danados.
- When jump-starting, ensure the vehicle's ignition is off and all accessories are unplugged.
- Do not over-inflate tires. Always refer to the recommended tire pressure for your vehicle.
- If the device becomes excessively hot during use, discontinue operation immediately.
3. Contido do paquete
Marque a caixa para os seguintes elementos:
- 1 x Hoco QS2 8000 mAh Portable Smart Air Pump Emergency Start-Up Power Bank
- 1 x Jump Start Cables (Red and Black Clamps)
- 1 x Air Hose with Valve Connector
- Various Nozzle Adapters (e.g., for bicycles, balls)
- 1 x cable de carga USB tipo C

Figure 1: Hoco QS2 and its complete set of accessories.
4. Compoñentes do produto
Familiarize yourself with the different parts of your Hoco QS2 device.
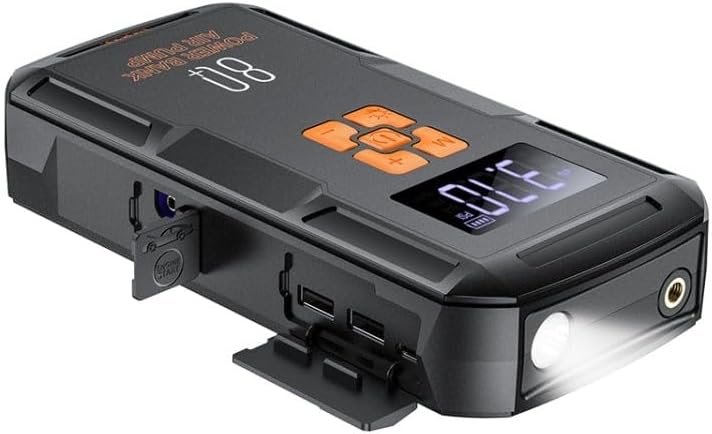
Figura 2: Máisview of the Hoco QS2 device.
- Pantalla dixital: Shows current pressure, battery level, and selected mode.
- Botóns de control: Potencia, selección de modo, aumentar/diminuír a presión.
- Porto da mangueira de aire: Connects the inflation hose.
- Porto de arranque auxiliar: Connects the jump start cables.
- USB Output Ports (2x): For charging external devices (5V/2.4A).
- Porto de entrada tipo C: For charging the Hoco QS2 itself (5V/2.4A).
- Linterna LED: Proporciona iluminación.
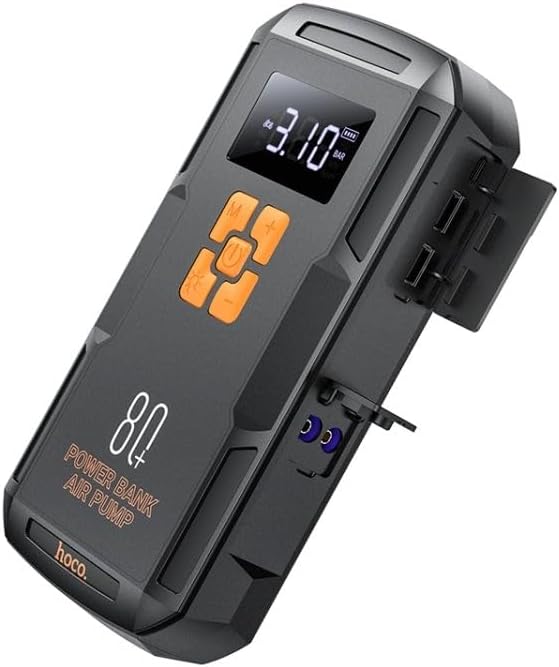
Figura 3: Lateral view of the Hoco QS2 with ports visible.
5. Configuración e carga
5.1 Charging the Hoco QS2
Before first use, fully charge the Hoco QS2. It is recommended to keep the device charged above 50% for optimal performance, especially for jump-starting.
- Connect the provided USB Type-C charging cable to the Type-C input port on the Hoco QS2.
- Connect the other end of the USB cable to a 5V/2.4A USB wall adapter (not included) or a compatible USB port.
- The digital display will indicate the charging status and battery level.
- O tempo de carga pode variar dependendo da fonte de enerxía.
6. Instrucións de funcionamento
6.1 Jump Start Function
The Hoco QS2 can jump-start vehicles with up to 4.0L gasoline or 2.0L diesel engines.
- Ensure the Hoco QS2 is sufficiently charged (at least 75% battery recommended).
- Turn off the vehicle's ignition and all electrical accessories.
- Conecta o vermello (+) clamp of the jump start cable to the positive (+) terminal of the vehicle's battery.
- Conecte o negro (-) clamp to the negative (-) terminal of the vehicle's battery or a solid, unpainted metal part of the engine block (ground point).
- Insert the blue connector of the jump start cable into the jump start port on the Hoco QS2.
- Once connected, the Hoco QS2 will automatically enter jump start mode.
- Arranca o motor do vehículo. Se non arranca inmediatamente, agarda 30 segundos antes de intentalo de novo. Non fagas que o arranque se faga máis de 3 segundos por intento.
- Once the vehicle starts, immediately disconnect the jump start cable from the Hoco QS2, then remove the black (-) clamp, seguido do cl vermello (+)amp da batería do vehículo.
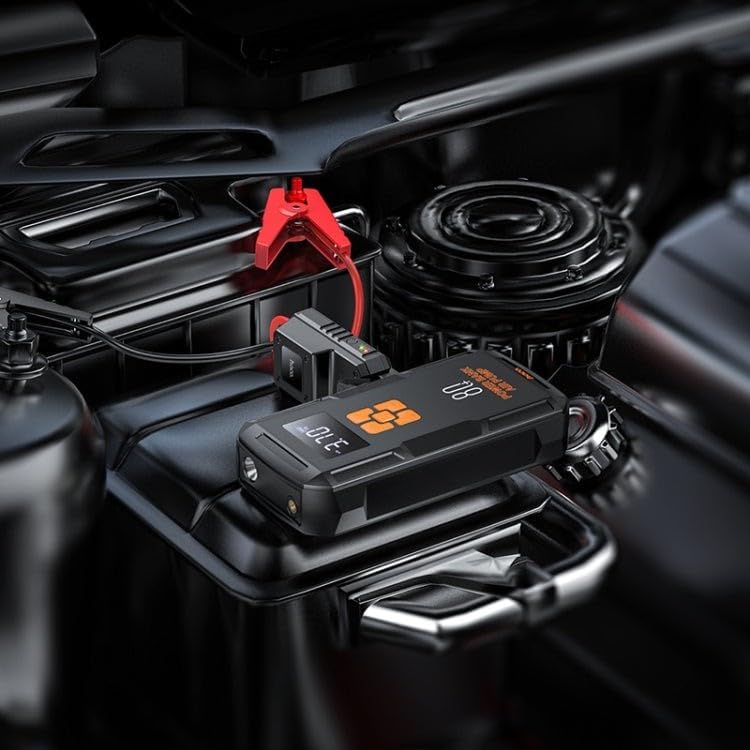
Figure 4: Using the Hoco QS2 for jump-starting a vehicle.
6.2 Tire Inflation Function (Air Pump)
The Hoco QS2 can inflate tires up to 10.3 bar (150 PSI) and features multiple inflation modes.
- Connect the air hose to the air hose port on the Hoco QS2.
- Attach the other end of the air hose to the tire valve. Ensure a secure connection to prevent air leakage. Use appropriate nozzle adapters for other inflatables (e.g., bicycle tires, sports balls).
- Press the Power button to turn on the device. The display will show the current tire pressure.
- Press the 'M' (Mode) button to cycle through the inflation modes: Car, Motorcycle, Bicycle, Basketball. Each mode has a default pressure setting, which can be adjusted.
- Use os botóns "+" e "-" para axustar a presión desexada.
- Press the Power button again to start inflation. The pump will automatically stop once the target pressure is reached.
- Disconnect the air hose from the tire valve and the device.

Figure 5: Inflating a car tire with the Hoco QS2.
6.3 Función de batería externa
The Hoco QS2 can charge your electronic devices via its dual USB output ports.
- Connect your device's USB charging cable to one of the USB output ports on the Hoco QS2.
- Connect the other end of the cable to your electronic device (e.g., smartphone, tablet).
- The Hoco QS2 will automatically begin charging your device.
- The digital display will show the remaining battery level of the power bank.
Función de lanterna LED 6.4
The integrated LED flashlight provides illumination for various situations.
- To turn on the flashlight, press and hold the 'Light' button (usually indicated by a light bulb icon).
- Press the 'Light' button again to cycle through different light modes (e.g., steady on, SOS signal, strobe).
- Press and hold the 'Light' button again to turn off the flashlight.
7. Mantemento e almacenamento
- Limpa o dispositivo cun pano suave e seco. Non empregues produtos químicos agresivos nin produtos de limpeza abrasivos.
- Store the Hoco QS2 in a cool, dry place, away from direct sunlight and moisture.
- For long-term storage, charge the device every 3-6 months to maintain battery health.
- Ensure all ports are covered when not in use to prevent dust and debris from entering.
8 Solución de problemas
| Problema | Causa posible | Solución |
|---|---|---|
| O dispositivo non se acende. | Batería baixa. | Cargue o dispositivo completamente. |
| O vehículo non arranca con axuda. | Incorrect cable connection; Device battery too low; Vehicle battery severely discharged. | Ensure correct polarity (+ to +, - to -). Charge the Hoco QS2. Allow more time for the vehicle battery to receive a charge, or seek professional assistance if the battery is completely dead. |
| Air pump not inflating or inflating slowly. | Air hose not securely connected; Nozzle adapter not suitable; Device battery low. | Check all connections for leaks. Use the correct adapter. Charge the device. |
| A carga por USB non funciona. | Device battery low; Cable faulty; Device not compatible. | Charge the Hoco QS2. Try a different USB cable. Ensure your device is compatible with 5V/2.4A charging. |
9. Especificacións técnicas
| Característica | Especificación |
|---|---|
| Número de modelo | QS2 |
| Capacidade da batería | 8000 mAh (29.6 Wh) |
| Entrada tipo C | 5V/2.4A |
| USB Output 1/2 | 5V/2.4A |
| Saída USB total | 5V/2.4A |
| Saída de inicio de salto | 12V (for vehicle emergency start) |
| Presión máxima de aire | 10.3 bar / 150 PSI |
| Dimensións | Aprox. 12 x 10 x 8 cm |
| Peso | Aprox. 800 gramos |
| Temperatura de funcionamento | Refer to product packaging for specific range. |
10. Garantía e soporte
HOCO products are designed and manufactured to the highest quality standards. For warranty information and customer support, please refer to the warranty card included with your purchase or visit the official HOCO websitio. Garde o recibo da compra como proba de compra para calquera reclamación de garantía.
Ask a question about this manual
Ask about setup, troubleshooting, compatibility, parts, safety, or missing instructions. Manuals+ will review the question and use this page’s manual context to help answer it.