
1. Introdución
Thank you for choosing the Y&H MPPT Solar Charge Controller 20A. This device is designed to efficiently manage power flow from your solar panels to your battery bank, ensuring optimal charging and extending battery life. It incorporates advanced Maximum Power Point Tracking (MPPT) technology for high efficiency and supports various battery types, including 12V, 24V, 36V, and 48V systems.

Image 1.1: The Y&H MPPT Solar Charge Controller 20A, highlighting its 100% MPPT technology, auto-switching for 12V/24V/36V/48V battery banks, 3-stage charging, built-in DSP controller, troubleshooting function, and compatibility with sealed lead acid, gel, and lithium batteries.
2. Instrucións de seguridade
- Ensure all wiring is correctly connected before powering on the controller. Incorrect wiring can cause damage.
- Do not disassemble or attempt to repair the controller. Contact qualified personnel for service.
- Instale o controlador nunha zona ben ventilada, lonxe de materiais inflamables e da luz solar directa.
- Wear appropriate personal protective equipment (PPE) when working with batteries and solar panels.
- Asegúrese de que a batería voltage matches the controller's supported voltagrango.
- Disconnect solar panels and batteries before performing any maintenance or wiring changes.
3. Produto rematadoview
3.1 Características
- 100% MPPT (Maximum Power Point Tracking) technology for high tracking efficiency (not less than 99.5%).
- Automatic detection for 12V/24V/36V/48V battery systems.
- 3-stage charging algorithm to optimize battery performance and lifespan.
- Controlador DSP integrado para un alto rendemento.
- Comprehensive electronic protection functions.
- Compatible with various battery types: sealed lead-acid, gel, flooded, and lithium batteries.
- Vol. de entrada PV máximotage ata 150 VDC.
- Corriente de carga máxima: 20 A.
3.2 Compoñentes
The Y&H MPPT Solar Charge Controller 20A features an LCD display for monitoring system status, control buttons for settings, and clearly labeled terminals for solar panel, battery, and load connections.

Imaxe 3.1: Fronte view of the Y&H MPPT Solar Charge Controller 20A, showing the display, buttons, and USB ports.

Image 3.2: Illustration of the advanced MPPT technology, demonstrating high tracking and conversion efficiencies, and compatibility with various battery types (FLD, SLD, GEL, LI, AGM, USER).

Image 3.3: Feature comparison highlighting the advantages of the Y&H Upgrade 20A MPPT controller, including 100% MPPT technology, auto battery bank detection, higher max PV input voltage (up to 160V), higher max input solar power (up to 960W), troubleshooting function, and terminal protection cover.
4. Configuración
Follow these steps for proper installation and connection of the solar charge controller:
- Montaxe: Mount the controller vertically on a wall or stable surface in a cool, dry, and well-ventilated area. Ensure sufficient clearance around the unit for heat dissipation.
- Conexión da batería: Conecta primeiro a batería aos terminais da batería do controlador. Asegúrate da polaridade correcta (+ a + e - a -). O controlador detectará automaticamente o volume da batería.tage.
- Conexión do panel solar: Connect the solar panels to the controller's PV terminals. Ensure correct polarity. The controller will begin charging the battery.
- Conexión de carga (opcional): Connect your DC loads to the controller's load terminals. Ensure correct polarity.
Importante: Conecta sempre primeiro a batería, despois os paneis solares e, finalmente, a carga. Desconecta na orde inversa: carga, despois os paneis solares e, finalmente, a batería.
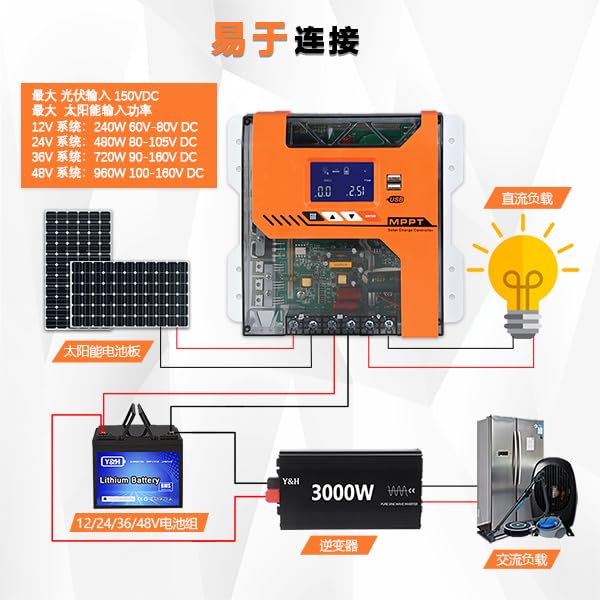
Image 4.1: Connection diagram showing solar panels, the MPPT controller, battery, inverter, and AC/DC loads. This illustrates the proper wiring sequence for a complete solar power system.
Maximum Input Power for MPPT-20A:
- 12V Battery System: Max 240W (PV input voltage range DC 60V-80V)
- 24V Battery System: Max 480W (PV input voltage range DC 80V-105V)
- 36V Battery System: Max 720W (PV input voltage range DC 90V-150V)
- 48V Battery System: Max 960W (PV input voltage range DC 100V-160V)
5. Instrucións de funcionamento
5.1 Screen Interface Cycle
The controller's LCD display cycles through various parameters, providing real-time information about your solar system. Use the buttons to navigate or adjust settings.
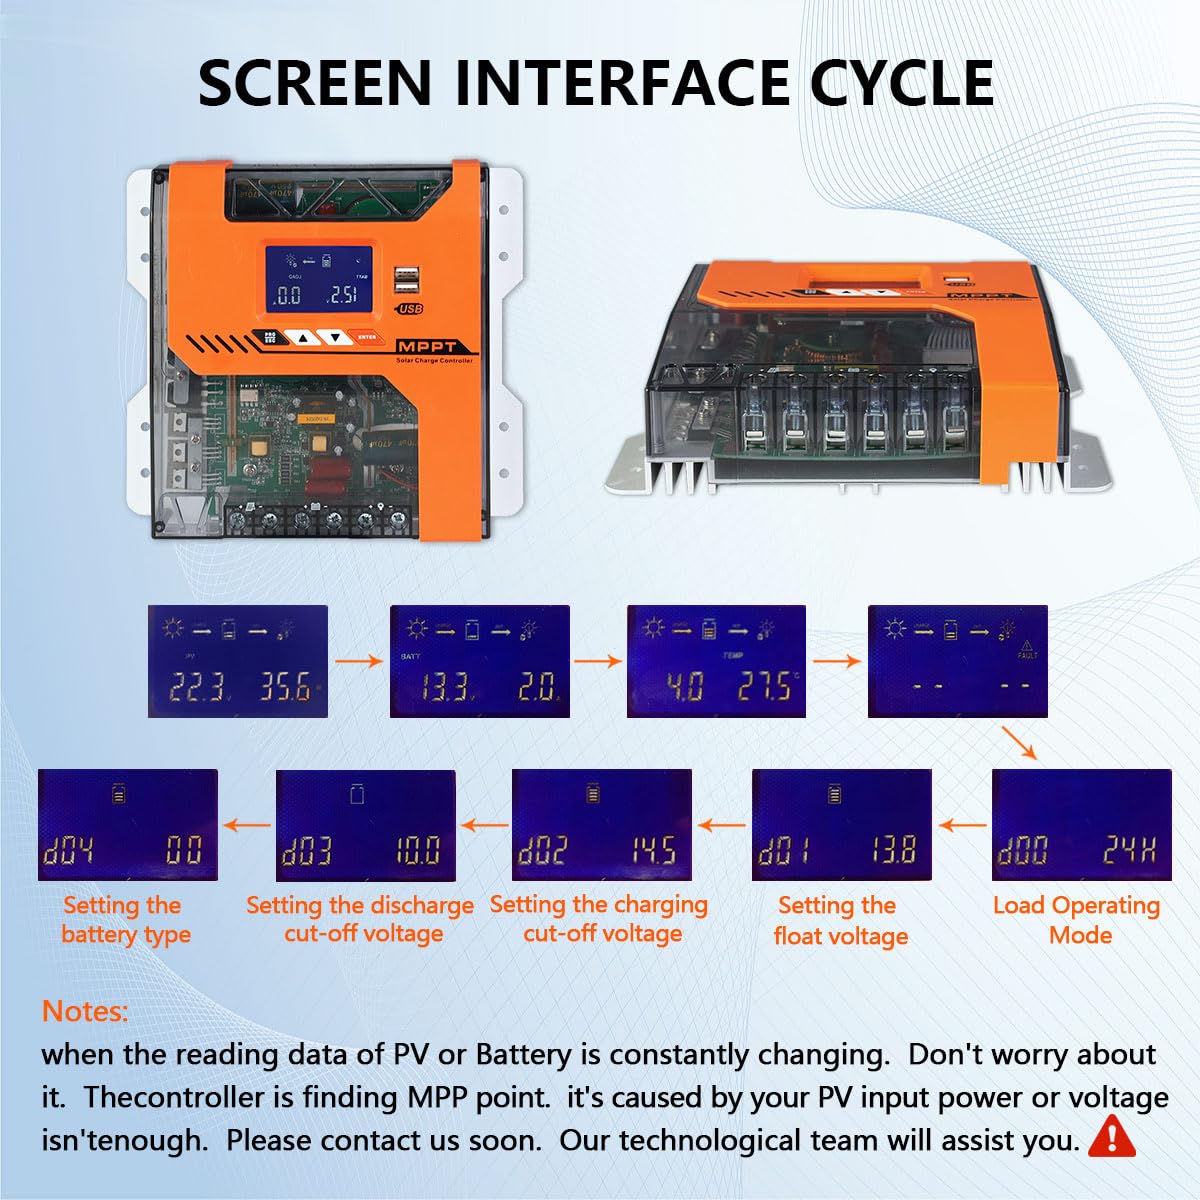
Image 5.1: The screen interface cycle, illustrating different display modes for battery voltage, charging current, temperature, and fault indicators. It also shows steps for setting battery type, discharge cut-off voltage, charging cut-off voltage, float voltage, and load operating mode.
Nota: If the reading data for PV or Battery is constantly changing, the controller is actively finding the Maximum Power Point (MPP). This is normal operation. If the PV input power or voltage is insufficient, contact support.
5.2 Modos de carga
O controlador utiliza un módulo de 3 segundostage charging process to optimize battery health and performance:
- Carga masiva: Charges the battery at its maximum current until voltage rises to the absorption level.
- Constant Charging (Absorption): Mantén un volume constantetage, allowing the current to gradually decrease as the battery approaches full charge.
- Carga flotante: Unha vez que a batería estea completamente cargada, o volumetage is reduced to a lower level to maintain the battery at full capacity and prevent self-discharge.

Image 5.2: A graph depicting the 4-stage MPPT charging mode, including Bulk Charge, Constant Charging, and Float Charge, and how it improves battery life by preventing sulfation.
6. Características de protección
The Y&H MPPT Solar Charge Controller 20A includes multiple protection mechanisms to ensure safe and reliable operation of your solar power system:
- PV Over Current Protection: Prevents excessive current from solar panels.
- PV Short Circuit Protection: Protects against short circuits in the solar panel array.
- PV Reverse Polarity Protection: Safeguards against incorrect solar panel wiring.
- Batería sobre voltage Protección: Evita a sobrecarga da batería.
- Protección contra descarga de batería: Protects the battery from deep discharge.
- Load Over Current Protection: Prevents excessive current draw by connected loads.
- Load Short Circuit Protection: Protects against short circuits in the load circuit.
- Protección contra sobretemperatura: Shuts down the controller if internal temperature exceeds safe limits.

Image 6.1: Visual representation of the 8 comprehensive protection features integrated into the controller.
7. Especificacións
| Característica | Especificación |
|---|---|
| Modelo | MPPT-20A |
| Corrente de carga nominal | 20A |
| Batería Voltage | 12V / 24V / 36V / 48V Auto |
| Vol. de entrada PV máxtage | 150VDC |
| Potencia máxima de entrada fotovoltaica (12 V) | 240 W |
| Potencia máxima de entrada fotovoltaica (24 V) | 480 W |
| Potencia máxima de entrada fotovoltaica (36 V) | 720 W |
| Potencia máxima de entrada fotovoltaica (48 V) | 960 W |
| Eficiencia de seguimento | ≥99.5 % |
| Eficiencia de conversión | 97% máximo |
| Tipo de visualización | LCD |
| Dimensións (L x W x H) | 22 x 16 x 7.5 cm |
| Peso | 800 gramos |
| Temperatura de funcionamento | 20 Degrees Celsius (Note: This seems to be a minimum or specific test temperature, typical operating range is wider) |
| Material | Plástico |

Image 7.1: Diagram showing the physical dimensions of the controller: 22cm (length), 16cm (width), and 7.49cm (height).
8 Solución de problemas
Esta sección ofrece orientación para problemas comúns. Para problemas que non aparecen na lista, póñase en contacto co servizo de atención ao cliente.
| Problema | Causa posible | Solución |
|---|---|---|
| O controlador non se acende | Batería non conectada ou de baixo volumetage) polaridade inversa. | Comprobe as conexións da batería e o voltage. Asegúrese de que a polaridade sexa correcta. Cargue a batería se está demasiado baixa. |
| Sen carga desde paneis solares | Solar panels not connected; insufficient sunlight; PV reverse polarity; PV over-voltage. | Verify solar panel connections and polarity. Check for adequate sunlight. Ensure PV voltage está dentro dos límites. |
| A carga non funciona | Load not connected; load over current; load short circuit; battery low voltage. | Check load connections. Reduce load. Check for short circuits. Charge battery. |
| Código de erro na pantalla | Specific system fault (e.g., over-temperature, battery over-voltage). | Refer to the controller's display for the specific error code and consult the manual for its meaning and resolution. Address the underlying issue. |
9. Mantemento
- Inspección periódica: Comprobe periodicamente todas as conexións do cableado para comprobar se están ben apertadas e se presentan corrosión.
- Limpeza: Manteña o controlador limpo e libre de po e residuos. Use un pano seco para limpar.
- Ventilación: Asegúrate de que a zona de instalación permaneza ben ventilada para evitar o sobrequecemento.
- Saúde da batería: Monitor de volumen de bateríatage and performance regularly. Follow battery manufacturer's maintenance guidelines.
10. Garantía e soporte
For warranty information or technical support, please refer to the documentation included with your purchase or contact Y&H customer service directly. Ensure you have your model number (MPPT-20A) and purchase details available when seeking support.
Manufacturer: Y&H