
Mount-It! MI-4751WHT
Mount-It! Single Monitor Arm User Manual
Model: MI-4751WHT
Introdución
This manual provides detailed instructions for the installation, operation, and maintenance of your Mount-It! Single Monitor Arm. Please read this manual thoroughly before installation and use to ensure proper function and safety.
The Mount-It! Single Monitor Arm is designed to provide an ergonomic and space-saving solution for mounting a single computer monitor to your desk. It features full motion adjustability, including tilt, swivel, and rotation, allowing you to position your monitor for optimal viewcomodidade.
Información de seguridade
Observe as seguintes precaucións de seguridade:
- Ensure the desk surface is stable and strong enough to support the weight of the monitor arm and the monitor.
- Non exceda a capacidade de peso máxima de 19.8 lb (9 kg).
- Asegúrese de que todos os parafusos e parafusos estean ben axustados antes do uso.
- Manteña os nenos e as mascotas lonxe da zona de instalación.
- If any parts are missing or damaged, contact Mount-It! customer support immediately. Do not attempt to install with damaged parts.
Contido do paquete
Verificar que todos os compoñentes estean presentes e en bo estado:
- Conxunto do brazo do monitor
- Escritorio Clamp (C-Clamp)
- Base de arandela
- Prato VESA
- Kit de ferramentas (parafusos, arandelas, chaves Allen)
- Clips de xestión de cables

Image: All components of the Mount-It! Single Monitor Arm, including the arm, desk clamp, grommet base, and VESA plate.

Image: A visual representation of the various parts included with the monitor mount, such as the arm, pole, VESA plate, and mounting hardware.
Configuración e instalación
The Mount-It! Single Monitor Arm offers two installation options: C-Clamp and Grommet Mount.

Image: Illustration showing the C-Clamp and Grommet mounting options for the monitor arm, with dimensions for desk thickness compatibility.
1. Choose Your Mounting Option
C-Clamp Instalación:
- Coloque o C-clamp to the bottom of the pole.
- Colocar o C-clamp no bordo da túa mesa.
- Apretar o clamp parafuso ata que o soporte estea fixado firmemente ao escritorio. Asegúrate de que estea estable e que non se mova.
Instalación de montaxe de arandela:
- Se a súa mesa ten un orificio para ilhós, insira a base do ilhós a través del.
- Secure the grommet base from underneath the desk using the provided plate and nut.
- Attach the pole to the grommet base and tighten securely.
2. Attach the Monitor Arm to the Pole
Slide the monitor arm assembly onto the pole. Adjust the height as desired and secure it with the provided collar and screw.
3. Attach the VESA Plate to Your Monitor
The monitor arm supports VESA patterns of 75x75mm and 100x100mm.

Image: Diagram illustrating VESA compatibility (75x75mm, 100x100mm) and the maximum weight capacity of 19.8 lbs for the monitor arm.
- Carefully remove the VESA plate from the monitor arm by loosening the top screw.
- Aliña a placa VESA cos orificios de montaxe na parte traseira do monitor.
- Secure the VESA plate to the monitor using the appropriate screws from the hardware kit. Ensure they are tightened firmly but do not overtighten.
4. Mount the Monitor to the Arm
- With the VESA plate attached to your monitor, carefully slide the monitor onto the monitor arm's VESA head.
- Secure the monitor by tightening the screw on top of the VESA head.
5. Xestión de cables
Utilize the integrated cable management clips on the arm to route your monitor cables neatly along the arm and down the pole, reducing clutter.
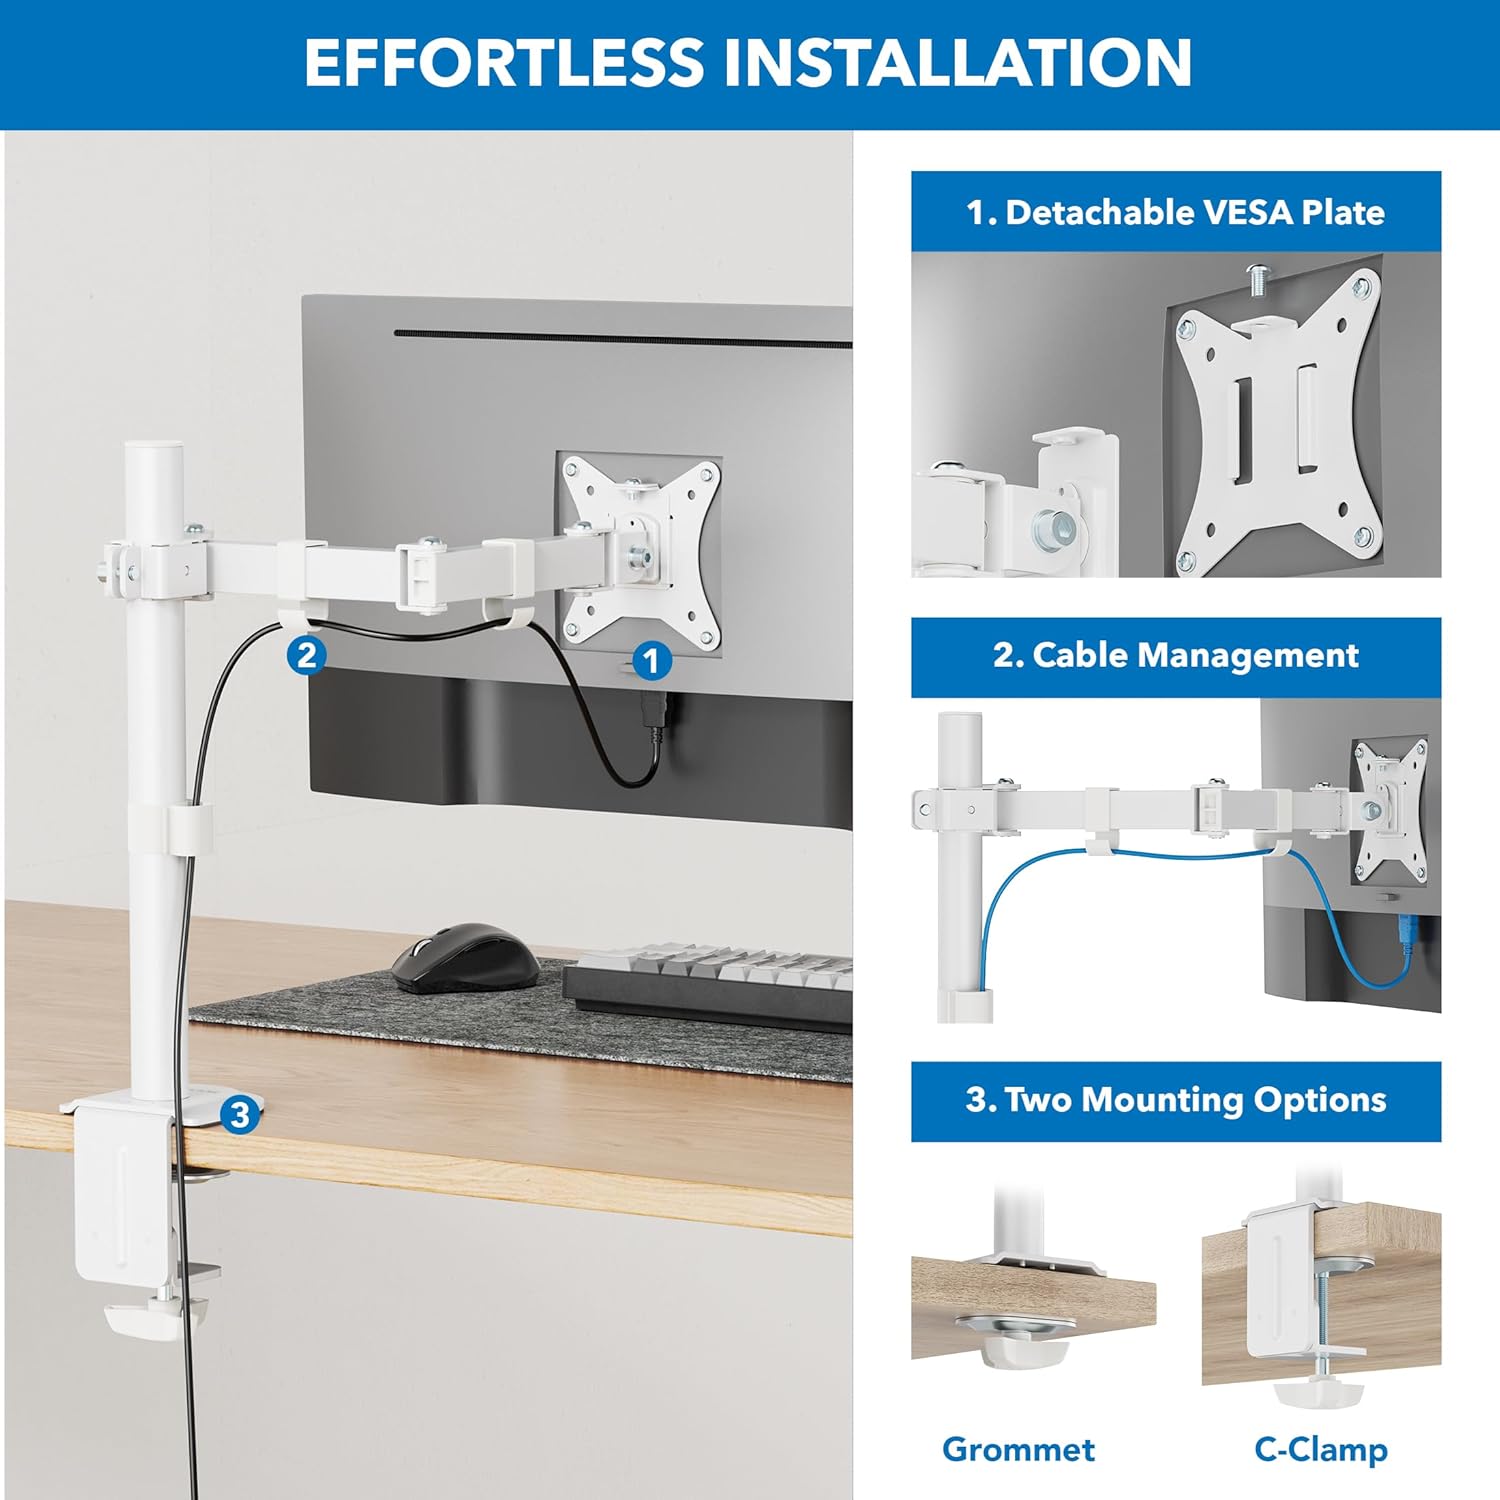
Image: Step-by-step illustration of the installation process, highlighting the detachable VESA plate, cable management, and two mounting options (Grommet and C-Clamp).
Funcionamento e axustes
The Mount-It! Single Monitor Arm offers a range of adjustments for optimal viewcomodidade.
Axuste de altura:
To adjust the monitor height, loosen the collar screw on the pole, slide the arm to the desired height, and re-tighten the screw firmly.

Image: Illustration showing how the monitor arm allows for height adjustment along the central pole, with a pole height of 16 inches indicated.

Image: A person sitting at a desk with a monitor mounted on the arm, demonstrating how to adjust the monitor to eye level for ergonomic comfort.
Axuste de inclinación:
The monitor can be tilted +/- 45 degrees. Loosen the tilt knob or screw behind the VESA plate, adjust the angle, and re-tighten.

Image: Diagram showing the monitor's tilt range of +/- 45 degrees and the 16-inch pole height, illustrating ergonomic comfort adjustments.
Axuste de xiro:
The arm features multiple swivel points, allowing for +/- 90 degrees of rotation at each joint. This enables flexible positioning and screen sharing.

Image: Illustration of the monitor arm's full motion design, showing multiple swivel points with +/- 90-degree rotation for easy screen sharing and optimal positioning.

Image: A monitor mounted on the arm, demonstrating the tilt and swivel functionality to find the perfect screen position.
Rotación (Retrato/Paisaxe):
The VESA plate allows for 180-degree rotation, enabling quick switching between landscape and portrait orientations.
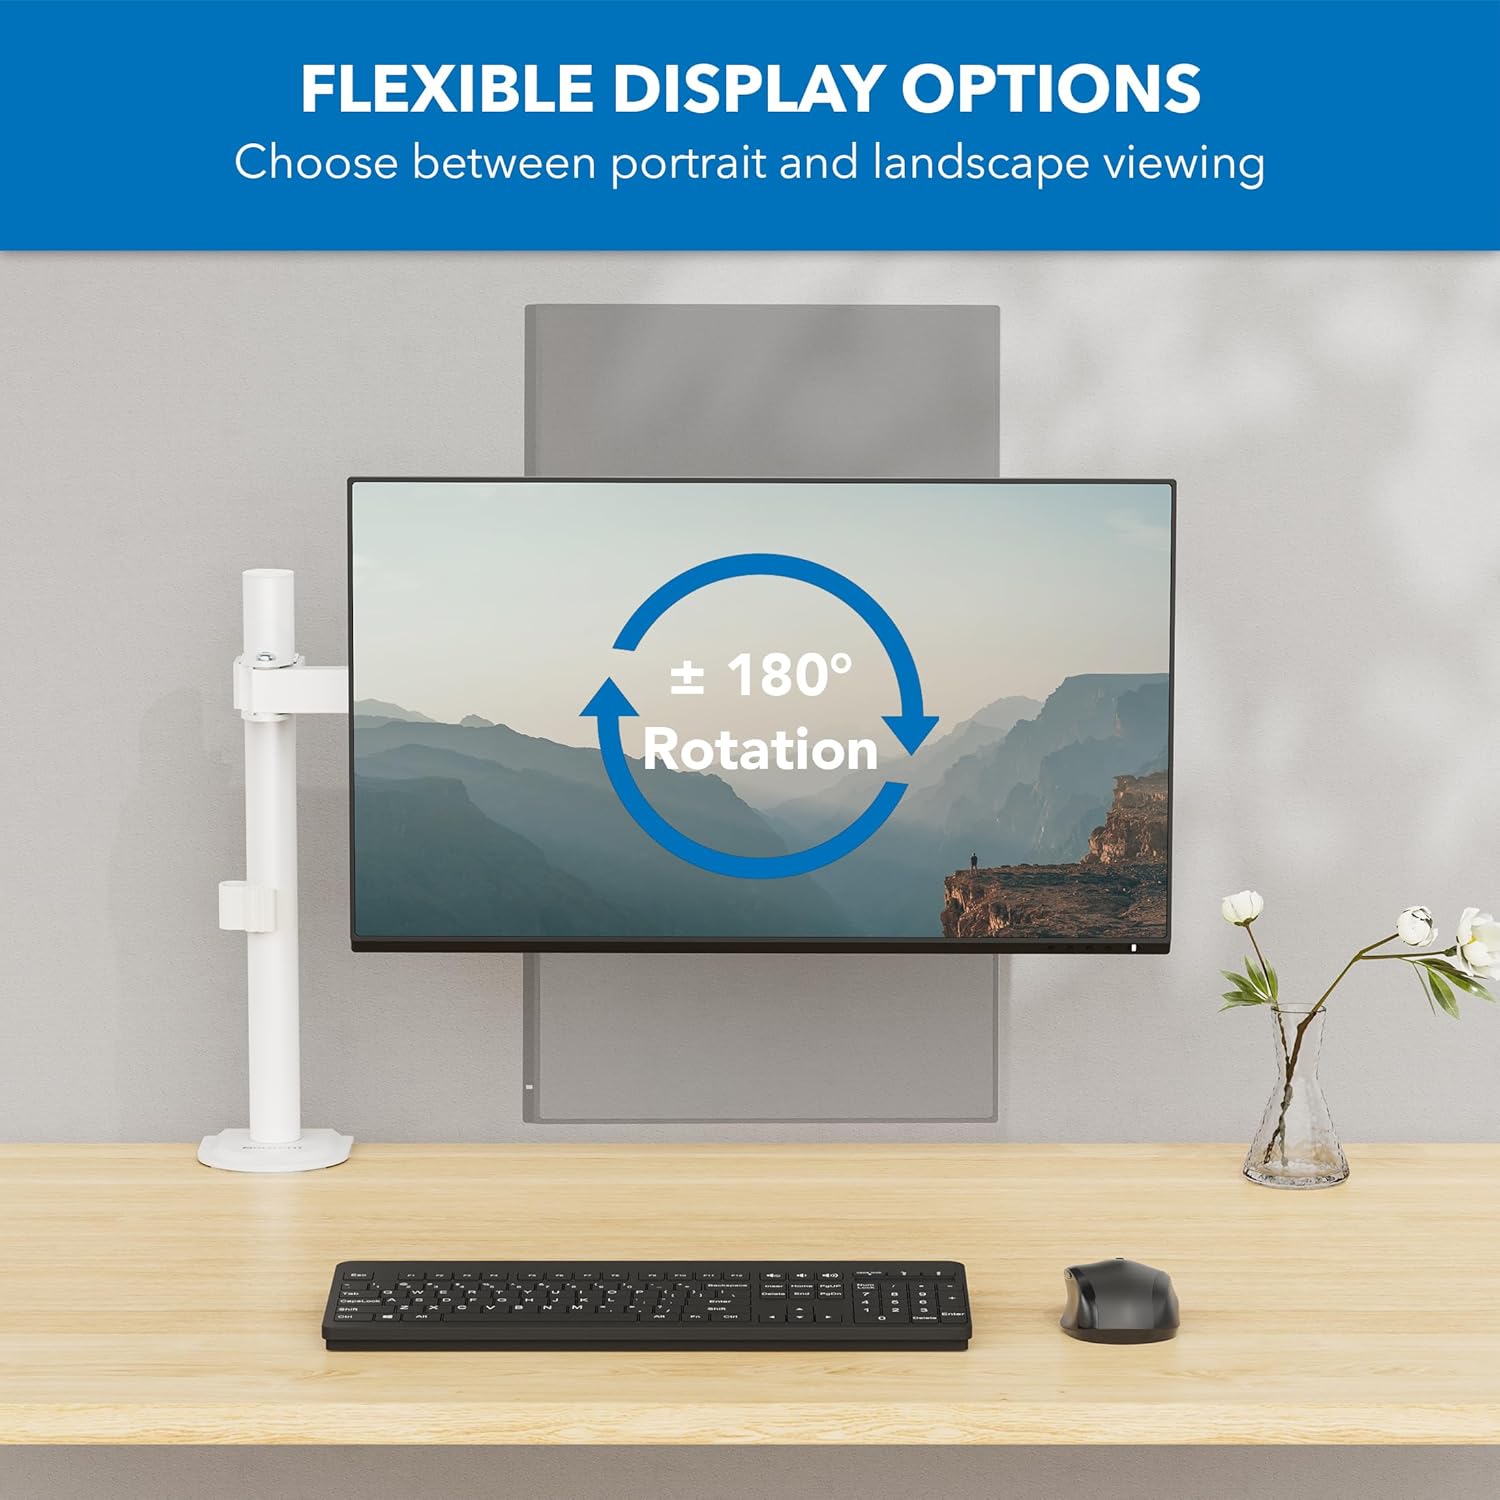
Image: Diagram showing the monitor's 180-degree rotation capability, allowing for flexible display options between portrait and landscape viewing.

Image: Two monitors, one in landscape and one in portrait orientation, demonstrating the arm's ability to switch display orientation.
Mantemento
Regular maintenance ensures the longevity and safe operation of your monitor arm.
- Limpeza: Limpe o brazo do monitor cun pano suave eamp pano. Evite produtos de limpeza abrasivos ou solventes que poidan danar o acabado.
- Comprobación de estanqueidade: Comprobe periodicamente todos os parafusos e conexións, especialmente a abrazadera do escritorio.amp/grommet mount and VESA plate screws, to ensure they remain tight. Re-tighten if necessary.
- Lubricación: The joints are designed for smooth movement and typically do not require lubrication. If movement becomes stiff, consult customer support.
Resolución de problemas
If you encounter issues with your Mount-It! Single Monitor Arm, refer to the following common solutions:
| Problema | Causa posible | Solución |
|---|---|---|
| Monitor arm is unstable or wobbles. | Escritorio clamp/grommet mount is not tight enough. Monitor is too heavy. | Asegúrese de que a mesa clamp/grommet mount is securely tightened. Verify monitor weight is within the 19.8 lbs (9 kg) limit. |
| Monitor sags or does not hold position. | Tilt or swivel screws are loose. Monitor is too heavy. | Tighten the tilt and swivel adjustment screws. Confirm monitor weight is within specifications. |
| Os cables están desordenados. | Non se utilizou a xestión de cables. | Route cables through the integrated cable management clips on the arm and pole. |
| O monitor non encaixa na placa VESA. | Incorrect VESA pattern. | Verify your monitor's VESA pattern is 75x75mm or 100x100mm. |
Especificacións
| Característica | Detalle |
|---|---|
| Número de modelo | MI-4751WHT |
| Cor | Branco |
| Material | Aceiro de aliaxe |
| Tipo de montaxe | Soporte de mesa (C-Cl)amp, Grommet) |
| Tamaño de monitor compatible | 17 - 32 polgadas |
| Capacidade de peso | Ata 19.8 libras (9 kg) |
| Compatibilidade VESA | 75x75mm, 100x100mm |
| Ángulo de inclinación | +/- 45 graos |
| Ángulo de giro | +/- 90 degrees (at each joint) |
| Rotación | 180 degrees (Portrait/Landscape) |
| Altura do poste | 16 polgadas |
| Peso do elemento | 6.45 libras |
| UPC | 810041739841 |

Image: Detailed technical drawing showing the dimensions of the monitor arm, including pole height, arm lengths, and various angles of adjustment.
Garantía e Soporte
Mount-It! products are designed for durability and performance. For warranty information, product support, or to purchase replacement parts, please visit the official Mount-It! websitio web ou póñase en contacto directamente co servizo de atención ao cliente.
Información de contacto:
- Websitio: www.mount-it.com
- Customer Service: Refer to the Mount-It! websitio para os métodos de contacto actuais (teléfono, correo electrónico, chat).
Please have your model number (MI-4751WHT) and purchase date available when contacting support.
Ask a question about this manual
Ask about setup, troubleshooting, compatibility, parts, safety, or missing instructions. Manuals+ will review the question and use this page’s manual context to help answer it.