Introdución
This manual provides comprehensive instructions for the setup, operation, and maintenance of your ZEISS Secacam 7 Classic Trail Camera. Designed for observing wildlife, this camera captures high-quality photos and videos day and night. Please read this manual carefully before using the device to ensure optimal performance and longevity.
Produto rematadoview
The ZEISS Secacam 7 Classic is a robust trail camera featuring a wireless connection, a 32 GB SD card, and a color LCD display. It is equipped with an infrared flash and a light-sensitive photo sensor for clear recordings in various lighting conditions.

Figura 1: Fronte View of ZEISS Secacam 7 Classic. This image shows the front of the trail camera, featuring its camouflage casing, lens, and infrared sensor.
Compoñentes clave:
- Lente: Captura imaxes e vídeos.
- Sensor infravermello: Detects motion and triggers recording.
- Status Indicator & Light Sensor: Provides operational feedback and adjusts settings based on ambient light.
- LED Field (60 LEDs): Provides infrared illumination for night vision.
- Clip de bloqueo: Secures the camera housing.
- Eylet for Attaching Locks: Allows for securing the camera against theft.
- 2.4" TFT-LCD Color Display: For menu navigation and viewgravacións.
- Botóns de control: ON/SETUP/OFF switch, OK, MENU, PLAY, and directional arrows for navigation.
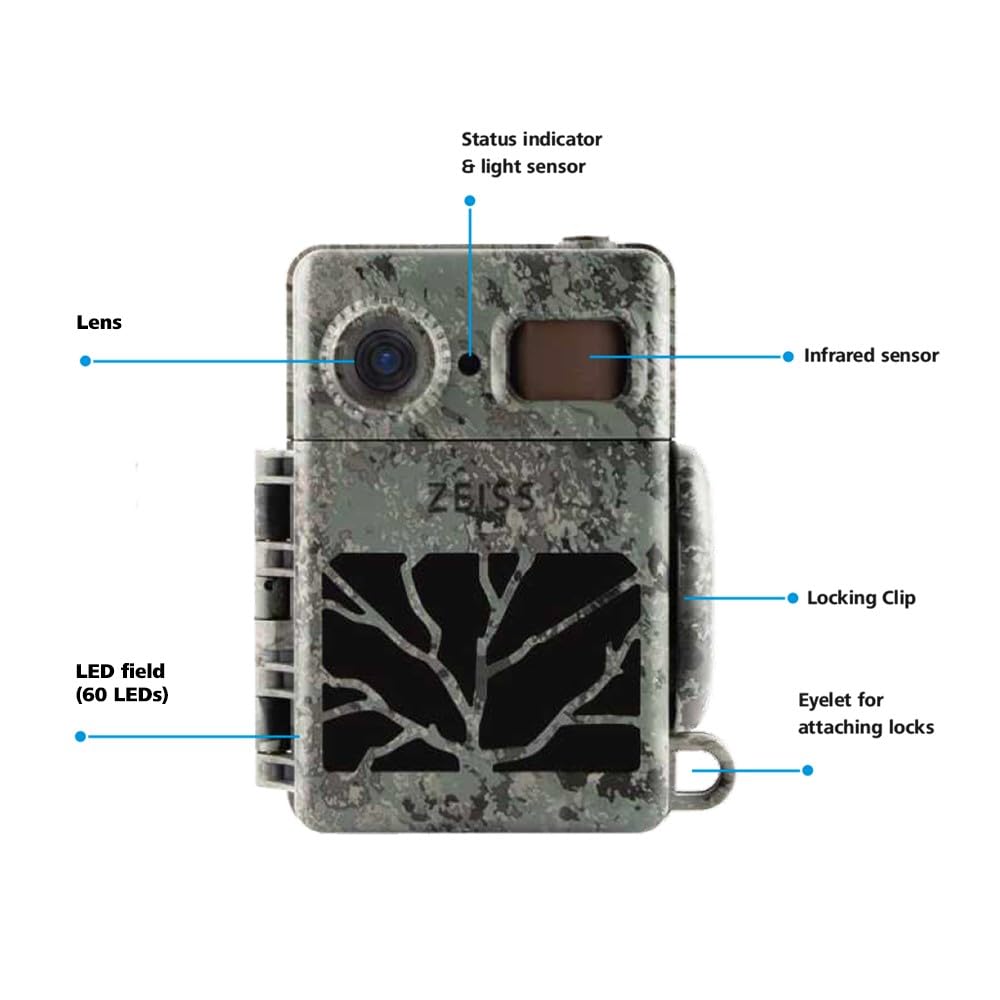
Figure 2: Internal Display and Controls. This image displays the camera with its front cover open, revealing the 2.4-inch color LCD display and the control buttons for operation.
Configuración
1. Instalación da batería
The ZEISS Secacam 7 Classic requires 8 AA batteries for operation. Ensure to use high-quality alkaline or rechargeable batteries.
- Open the camera's housing by releasing the locking clips.
- Localiza o compartimento da batería.
- Insert 8 AA batteries, paying close attention to the correct polarity (+/-) indicated inside the compartment.
- Pecha o compartimento da batería de forma segura.

Figura 3: Instalación da batería. This image illustrates the process of inserting AA batteries into the camera's designated compartment.
2. Instalación da tarxeta SD
A 32 GB SD card is included with your camera. This card is essential for storing photos and videos.
- With the camera housing open, locate the SD card slot, typically near the display.
- Insert the 32 GB SD card into the slot until it clicks into place. Ensure the card is inserted in the correct orientation.
- Para retirala, empurre a tarxeta con coidado ata que saia de golpe.
3. Montaxe da cámara
The camera can be mounted using the included mounting girdle.
- Select a suitable location, such as a tree or post, ensuring a clear view da área de monitorización desexada.
- Thread the mounting girdle through the designated slots on the back of the camera.
- Securely fasten the girdle around the mounting surface.
- Open the camera's front flap to access the display. The lens is fixed to the front, allowing you to check the coverage area on the display and adjust the camera's angle for optimal positioning.
- Once positioned, close the front flap and secure the locking clips.

Figure 4: Camera Mounted (Closed). This image shows the camera securely attached to a tree, ready for operation.
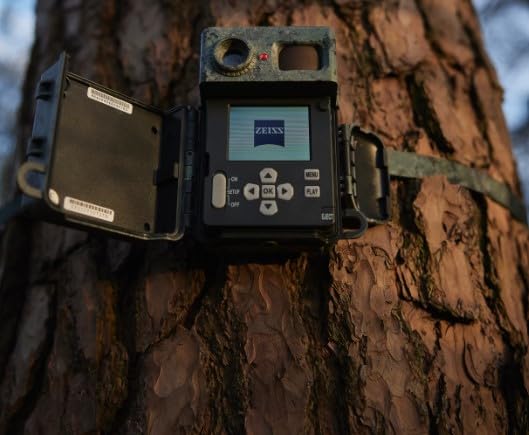
Figure 5: Camera Mounted (Open for Alignment). This image demonstrates the camera mounted on a tree with its front cover open, allowing for precise alignment using the internal display.
Instrucións de funcionamento
Powering On/Off and Setup Mode
- To power on the camera and enter setup mode, slide the ON/SETUP/OFF switch to the "SETUP" position. The display will activate.
- To power off the camera, slide the switch to the "OFF" position.
- To activate the camera for monitoring, slide the switch to the "ON" position after completing setup. The status indicator will blink, and the camera will enter monitoring mode.
Navegación de menús
Usa os botóns de frecha direccional (Arriba, Abaixo, Esquerda, Dereita) para navegar polas opcións do menú. Prema a tecla OK botón para confirmar as seleccións. Preme o MENÚ button to access the main menu or go back to the previous screen.
Configuración de axustes
In "SETUP" mode, press the MENÚ button to access various settings, including:
- Modo: Escolle entre Foto, Vídeo ou Foto+Vídeo.
- Resolución: Set image and video quality.
- Sensibilidade PIR: Adjust the motion sensor's sensitivity.
- Intervalo de activación: Define the delay between consecutive recordings.
- Data e hora: Establece a data e a hora actual.
- Formato da tarxeta SD: Borrar todos os datos da tarxeta SD. (Caution: This will delete all stored files.)
Viewgravacións
In "SETUP" mode, press the XOGAR button to enter playback mode. Use the directional arrows to browse through captured photos and videos. Press OK a view un elemento seleccionado.
Mantemento
Limpeza
- Limpe o exterior da cámara cun pano suave eamp pano.
- For the lens and display, use a specialized lens cleaning cloth and solution to avoid scratches.
- Ensure all ports and seals are free of dirt and debris to maintain water resistance.
Substitución da batería
Replace batteries when the low battery indicator appears on the display or when performance degrades. Always replace all 8 batteries simultaneously with new ones.
Almacenamento
When not in use for extended periods, remove the batteries to prevent leakage and store the camera in a cool, dry place.
Resolución de problemas
| Problema | Causa posible | Solución |
|---|---|---|
| A cámara non se acende. | Pilas gastadas ou inseridas incorrectamente. | Comprobe a polaridade das baterías, substitúaas por baterías novas. |
| No photos/videos captured. | SD card full, incorrectly inserted, or corrupted; PIR sensitivity too low; camera in OFF mode. | Format or replace SD card; adjust PIR sensitivity; ensure camera is in ON mode. |
| Mala calidade de imaxe pola noite. | Infrared LEDs obstructed; low battery power. | Clear any obstructions from LEDs; replace batteries. |
| A pantalla non funciona. | Camera not in SETUP mode; display settings. | Ensure switch is in SETUP position; check display brightness settings in menu. |
Especificacións
| Característica | Detalle |
|---|---|
| Número de modelo | ZEISS SECACAM 7 Classic |
| Mostrar | 2.4" TFT-LCD Color Display |
| Sensor | Infrared Sensor, Light Sensor |
| Visión Nocturna | 60 Black LEDs (Infrared Flash) |
| Memoria incluída | Tarxeta SD de 32 GB |
| Conectividade | Wireless, Matter Protocol |
| Fonte de enerxía | Alimentado por pilas (8 pila AA) |
| Temperatura de funcionamento | -20 °C ~ 55 °C |
| Dimensións (LxWxH) | 14.3 x 12 x 7.5 centímetros |
| Peso | 440 g |
| Resolución de captura de vídeo | 1080 p |
| Tipo de montaxe | Monte das árbores |
| Uso interior/exterior | Ao aire libre |
Garantía e Soporte
Your ZEISS Secacam 7 Classic Trail Camera comes with a standard manufacturer's warranty. An optional 1-year extended warranty may be available for purchase.
For technical support, service, or warranty claims, please contact ZEISS customer service.
- Fabricante: ZEISS, Carl-Zeiss-Strasse 22, 73447 Oberkochen, Germany
- Importador (India): Carl Zeiss India (Bangalore) Pvt Ltd., Plot No. 3, Jigan Link Road, Bommasandra Industrial Area Bangalore 560099 India
- Primeira data dispoñible: 3 de xuño de 2024
Conserve o comprobante de compra para efectos da garantía.