
1. Introdución
This manual provides essential information for the installation, operation, and maintenance of your Varstrom 36V 250W E-Bike Conversion Kit. This kit is designed to transform a standard bicycle into an electric bicycle, offering enhanced riding capabilities with a powerful rear hub motor and an intuitive LCD display. Please read this manual thoroughly before installation and use to ensure safe and optimal performance.
2. Información de seguridade
Always prioritize safety when operating an electric bicycle. Failure to follow safety guidelines can result in serious injury or damage to the product.
- Use casco: Always wear an approved bicycle helmet while riding.
- Comprobacións previas á viaxe: Before each ride, check the brakes, tire pressure, and ensure all connections are secure.
- Cumprir as leis de tráfico: Follow all local traffic laws and regulations for bicycles and electric bicycles.
- Condicións meteorolóxicas: Exercise caution when riding in wet or adverse weather conditions.
- Exposición á auga: Avoid submerging the motor or electrical components in water.
- Instalación profesional: If you are unsure about any installation steps, seek assistance from a qualified bicycle mechanic.
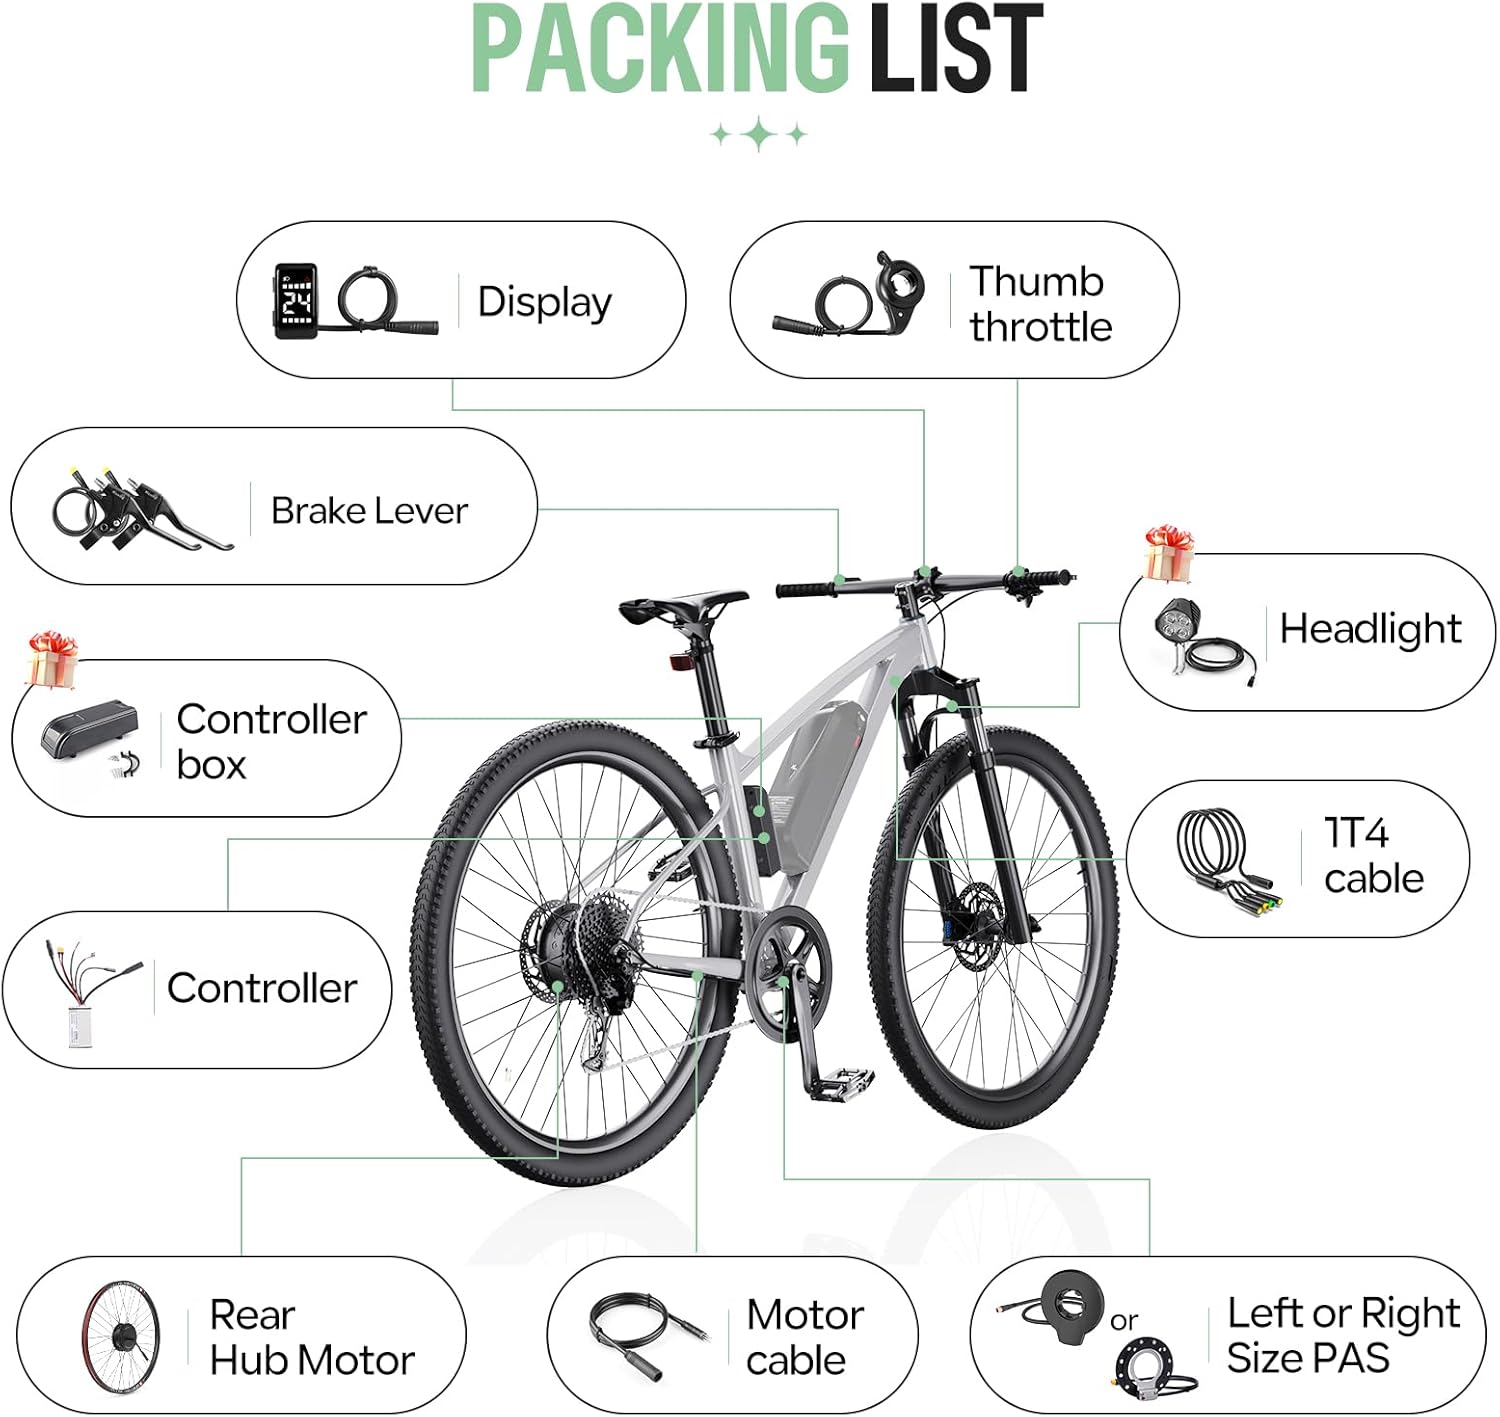
3. Contido do paquete
Comprobe que todos os compoñentes estean presentes e sen danos ao abrir o envase.
- 1 x 36V 250W Rear Hub Motor
- 1 x controlador
- 1 x DZ40 LCD Display
- 1 x Pair of Hydraulic Brake Sensors (or Mechanical Brake Levers, depending on selection)
- 1 x Acelerador de polgar
- 1 x 1T4 Cable
- 1 x PAS Sensor (Left or Right side)
- Necessary mounting accessories
4. Especificacións
4.1. Especificacións do motor
- Voltage: 36 V
- Potencia: 250 W
- Torque máximo: 35 Nm
- Tipo de motor: Brushless Geared Hub Motor
- Eficiencia: ≥78 %
- Velocidade máxima: Up to 30 km/h (470 rpm)
- Compatibilidade do tamaño da roda: 26", 27.5", 28"/29"/700C
4.2. Especificacións do controlador
- Voltage: 36 V
- Potencia: 250 W
- Corrente máxima: 14A
4.3. DZ40 LCD Display Specifications
- Tamaño da pantalla: LCD de 1.3 polgadas
- Visibilidade: Clear visibility even in sunlight
- Funcións: Displays speed, battery status, headlight indicators, PAS level (0-5)
- Diámetro do manillar: 22.2 mm


5. Guía de instalación
5.1. Requisitos de compatibilidade
- Rear Dropout (OLD): Your bicycle's rear dropout must be between 135-138 mm.
- Tipo de freo: Compatible with bicycles equipped with disc brakes.
- Tamaño da roda: Ensure you select the correct wheel size (26", 27.5", 28"/29"/700C) for your bicycle.

5.2. Pasos da instalación
The conversion kit is designed for straightforward installation. Follow these general steps:
- Prepara a túa bicicleta: Remove the existing rear wheel and any associated components that will be replaced.
- Install the Hub Motor: Mount the new rear hub motor wheel into the bicycle's rear dropout, ensuring it is securely fastened.
- Montar o controlador: Find a suitable location on your bike frame for the controller. Secure it using the provided mounting accessories.
- Install the DZ40 Display: Attach the DZ40 LCD display to your handlebar (22.2mm diameter).
- Install Brake Sensors/Levers: Replace your existing brake levers with the provided brake sensors or mechanical brake levers. Ensure they are properly aligned and functional.
- Install Thumb Throttle: Mount the thumb throttle on the handlebar in a comfortable position.
- Instalar o sensor PAS: Attach the Pedal Assist Sensor (PAS) to the crank arm area, ensuring proper alignment with the magnet disc.
- Conectar cableado: Use the 1T4 cable to connect the display, throttle, and brake sensors to the controller. Connect the motor cable to the controller. Ensure all connections are firm and waterproof.
- Cables seguros: Route and secure all cables neatly along the bicycle frame to prevent snagging or damage.

6. Instrucións de funcionamento
6.1. Acendido/apagado
To power on the system, press and hold the power button on the DZ40 display. To power off, press and hold the power button again.
6.2. DZ40 Display Functions
The DZ40 display provides real-time information about your ride:
- Velocidade: Velocidade actual de condución.
- Estado da batería: Indica a carga restante da batería.
- Headlight Indicators: Shows if the headlights are on (if connected).
- Nivel PAS: Displays the current level of pedal assistance (0-5). Use the '+' and '-' buttons to adjust the PAS level.
6.3. Modos de conducción
The Varstrom E-Bike Conversion Kit offers three flexible riding modes:
- Modo eléctrico puro: Engage the thumb throttle to propel the bicycle without pedaling.
- Pedal Assisted Mode (PAS): The motor provides assistance as you pedal. The level of assistance can be adjusted via the DZ40 display.
- Modo de condución física: The motor is off, and the bicycle operates as a standard pedal bike.

7. Mantemento
Regular maintenance ensures the longevity and safe operation of your e-bike conversion kit.
- Motor: The brushless motor design requires low maintenance, contributing to its durability. Keep the motor free from excessive dirt and debris.
- Conexións: Comprobe periodicamente todas as conexións eléctricas para comprobar se están ben axustadas e se presentan signos de desgaste ou corrosión.
- Freos: Regularly inspect brake pads and cables (or hydraulic fluid) for wear and proper function. Adjust or replace as necessary.
- Pneumáticos: Maintain correct tire pressure as specified on your tire sidewall. Inspect tires for cuts or punctures.
- Limpeza: Limpar a bicicleta eléctrica con anunciosamp pano. Evite usar lavadoras de alta presión directamente sobre os compoñentes eléctricos.
- Almacenamento: When storing the e-bike for extended periods, ensure the battery is charged to approximately 50-70% and stored in a cool, dry place.
8 Solución de problemas
If you encounter issues with your e-bike conversion kit, refer to the following common problems and solutions:
| Problema | Causa posible | Solución |
|---|---|---|
| O motor non se conecta | Loose electrical connection, low battery, PAS sensor issue, brake sensor engaged | Check all cable connections. Charge the battery. Ensure PAS sensor is correctly installed and not obstructed. Verify brake levers are fully released. |
| A pantalla non se acende | Loose display cable, no power from battery, faulty display | Check display cable connection to controller. Ensure battery is connected and charged. If problem persists, contact support. |
| Asistencia de pedaleo inconsistente | PAS sensor misalignment, dirty PAS sensor, incorrect PAS level setting | Check PAS sensor alignment and clean it. Adjust PAS level on the display. |
| Os freos non funcionan eficazmente | Worn brake pads, loose cables, air in hydraulic system (for hydraulic brakes) | Inspect and replace worn brake pads. Adjust brake cable tension. For hydraulic brakes, bleeding may be required by a professional. |
If you cannot resolve an issue using this guide, please contact Varstrom customer support for further assistance.
9. Garantía e soporte
Para obter información sobre a garantía e a atención ao cliente, consulte a documentación que se incluíu coa súa compra ou póñase en contacto co seu vendedor. Garde o comprobante de compra para reclamacións de garantía.
Manufacturer: Shenzhen Yihang Cross-border E-commerce Co., Ltd.