
1. Introdución
Grazas pola compraasing the HITBOX ARC200D MINI Arc Welder. This manual provides essential information for the safe and efficient operation of your new welding machine. Please read it thoroughly before use and keep it for future reference.
2. Instrucións de seguridade
Always prioritize safety when operating welding equipment. Failure to follow safety guidelines can result in serious injury or damage to the equipment.
- Equipos de protección individual (EPI): Always wear appropriate PPE, including a welding helmet, welding gloves, protective clothing, and safety shoes.
- Ventilación: Asegurar unha ventilación axeitada na zona de traballo para evitar a inhalación de fumes de soldadura.
- Riscos de incendio: Manteña os materiais inflamables lonxe da zona de soldadura. Teña un extintor á man.
- Seguridade eléctrica: Ensure the machine is properly grounded. Do not operate in wet conditions. Regularly inspect cables for damage.
- Protección contra sobrecalentamento: The machine is equipped with overheat protection. If it overheats, it will automatically shut down. Allow it to cool before resuming operation.
- VRD Function: O Voltage Reduction Device (VRD) reduces the open-circuit voltage for increased safety, especially in hazardous environments.

Image: A welder wearing protective gear operating the machine. Always use appropriate safety equipment.
3. Contido do paquete
The HITBOX ARC200D MINI package includes the following items:
- 1 x ARC200D MINI Arc Welding Machine
- 1 x 1.8M Welding Holder Cable
- 1 x 1.2M Earth Cable
- 1 cepillo de arame
- 5 x Welding Rods
- 1 x Carrying Belt
- 1 x Japanese Instruction Manual
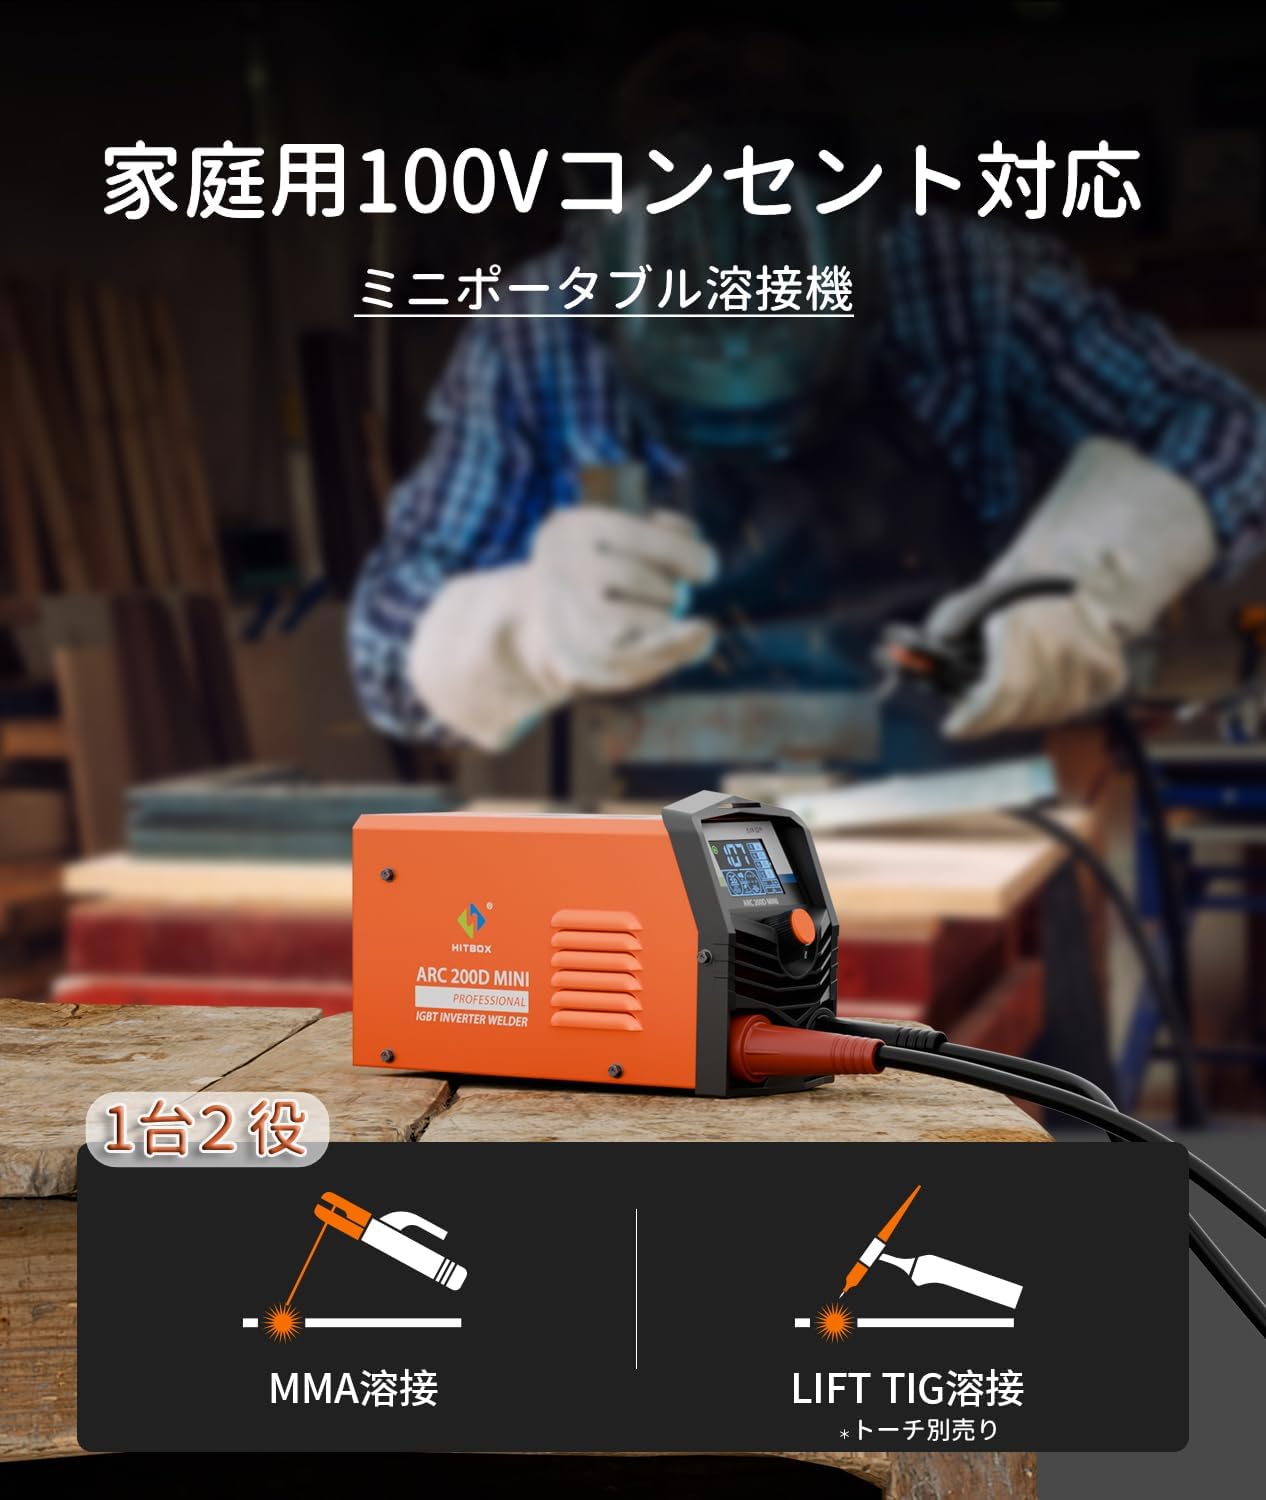
Image: The ARC200D MINI welding machine displayed with its complete set of accessories, including cables, welding rods, brush, and carrying belt.
4. Características do produto
The HITBOX ARC200D MINI is designed for versatility and ease of use, offering:
- Dual Welding Modes: Supports both MMA/ARC (Stick) welding and LIFT TIG welding (TIG torch sold separately).
- 100V Household Compatibility: Operates on standard household 100V outlets, making it convenient for home DIY projects.
- Compacto e lixeiro: With dimensions of 20x8.5x10.5cm and a weight of 2.1kg, it is highly portable and easy to carry with the included belt.
- Corrente axustable: Offers a welding current range up to 140A, suitable for various material thicknesses (0.8mm-5mm).
- Pantalla LCD: A clear liquid crystal display shows selected mode and current settings for intuitive operation.
- Seguridade avanzada: Features VRD, overcurrent, overheat, and overvoltage protection for user safety and machine longevity.

Image: The HITBOX ARC200D MINI welding machine, highlighting its compact design and user-friendly interface.

Image: Visual representation of the compact size (20x8.5x10.5cm) and light weight (2.1kg) of the ARC200D MINI, with a carrying belt shown.
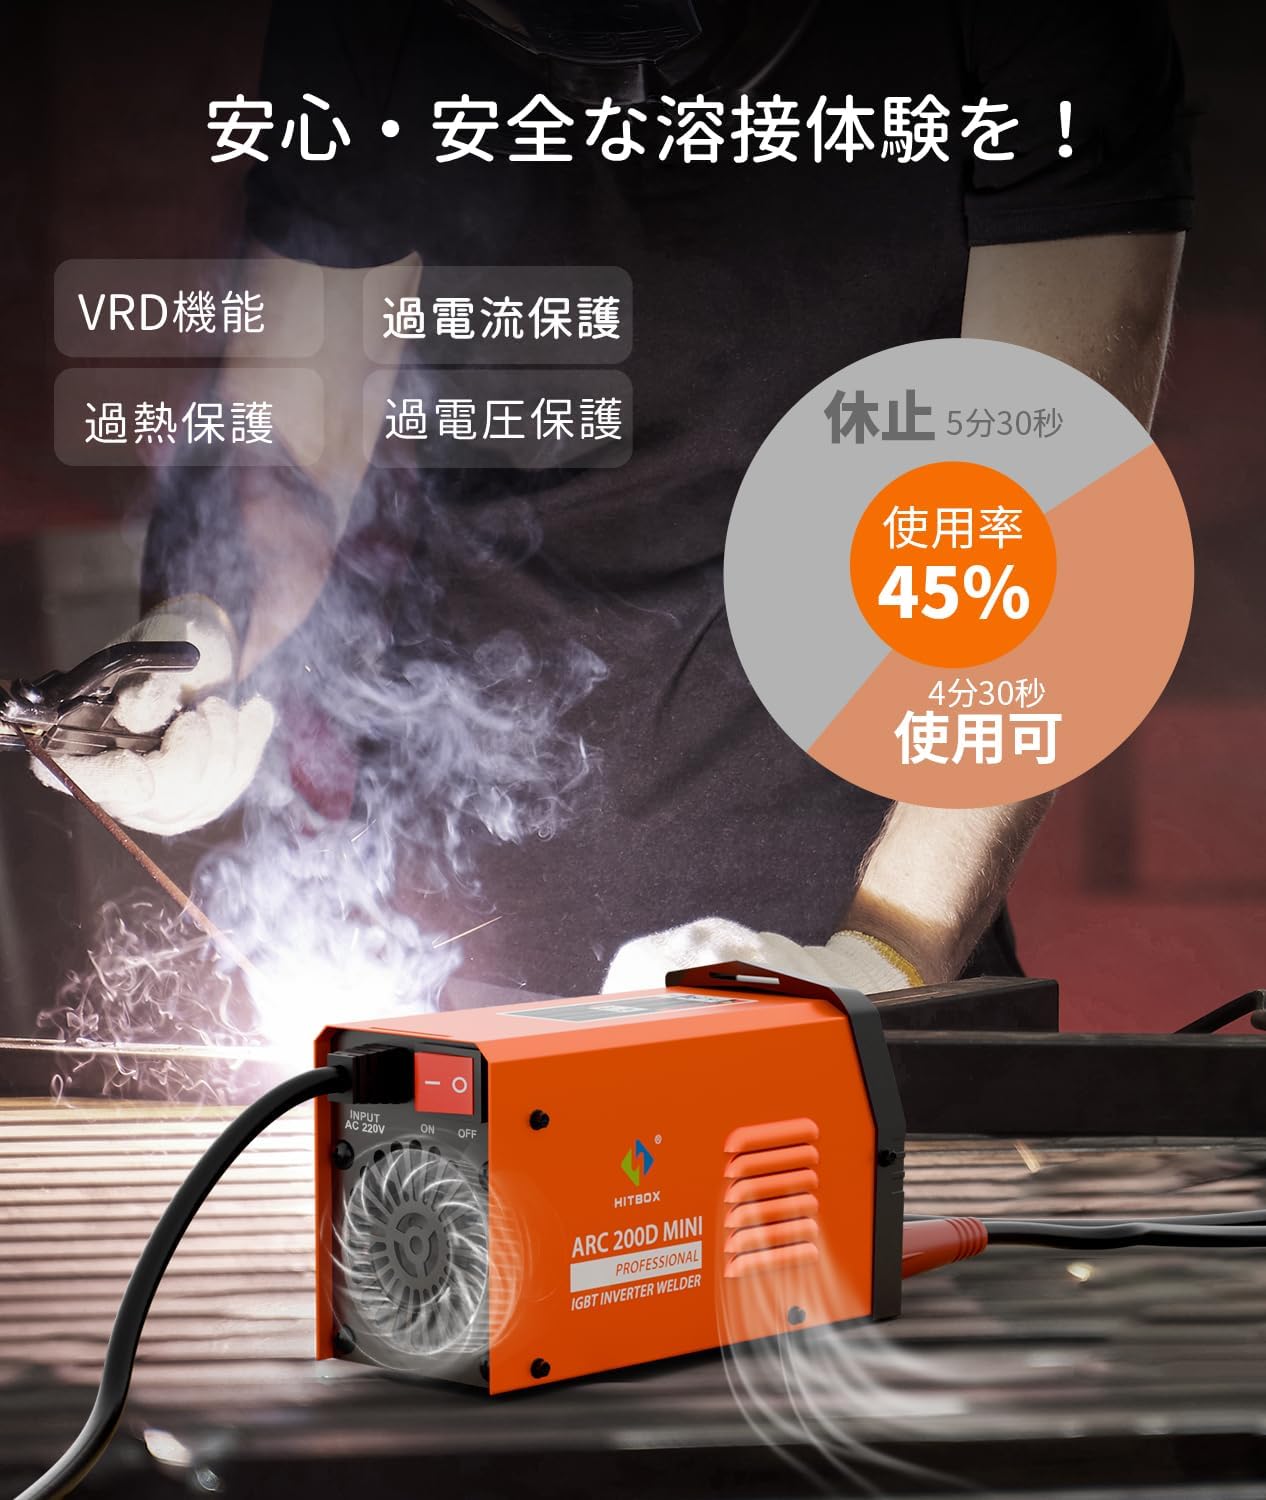
Image: Diagram illustrating the safety features including VRD, overcurrent, overheat, and overvoltage protection, along with the 45% duty cycle.

Image: Close-up of the LCD display showing current, mode selection (MMA/ARC, LIFT TIG), and welding rod size settings.
5. Configuración
Before operating the welding machine, ensure proper setup:
- Conexión de alimentación: Connect the power cable to a suitable 100V household outlet.
- Cl Claseamp Conexión: Connect the earth cable to the designated terminal on the welding machine and securely attach the ground clamp á peza de traballo.
- Welding Holder Connection: Connect the welding holder cable to the appropriate terminal on the machine.
- Welding Rod Insertion: Insert the welding rod into the welding holder. Ensure it is securely fastened.
- Selección de modo: Use the control knob to select either MMA/ARC or LIFT TIG mode.
- Axuste actual: Adjust the welding current according to the material thickness and welding rod specifications.
Video: A demonstration of how to set up and use the welding machine for basic operations.
Video: A general operation video demonstrating connections and welding processes. Note: This video may feature a slightly different model (HT2000) but illustrates common welding procedures.
6. Instrucións de funcionamento
6.1. MMA/ARC Welding (Stick Welding)
- Ensure the machine is set to MMA/ARC mode.
- Select the appropriate welding current based on the welding rod diameter and material thickness.
- Strike the welding rod against the workpiece to initiate the arc.
- Maintain a consistent arc length and travel speed while moving the rod along the joint.
- After welding, use the wire brush to remove any slag from the weld bead.
6.2. LIFT TIG Welding
Note: A WP-17V TIG torch is required and sold separately for LIFT TIG welding.
- Connect the TIG torch to the appropriate terminals on the welding machine.
- Ensure the machine is set to LIFT TIG mode.
- Gently touch the tungsten electrode to the workpiece to initiate the arc.
- Lift the torch slightly to establish the arc and begin welding.
- Feed filler rod manually into the weld puddle as needed.

Imaxe: Examples of clean and stable weld beads achieved with the HITBOX ARC200D MINI, demonstrating low spatter and good arc stability.
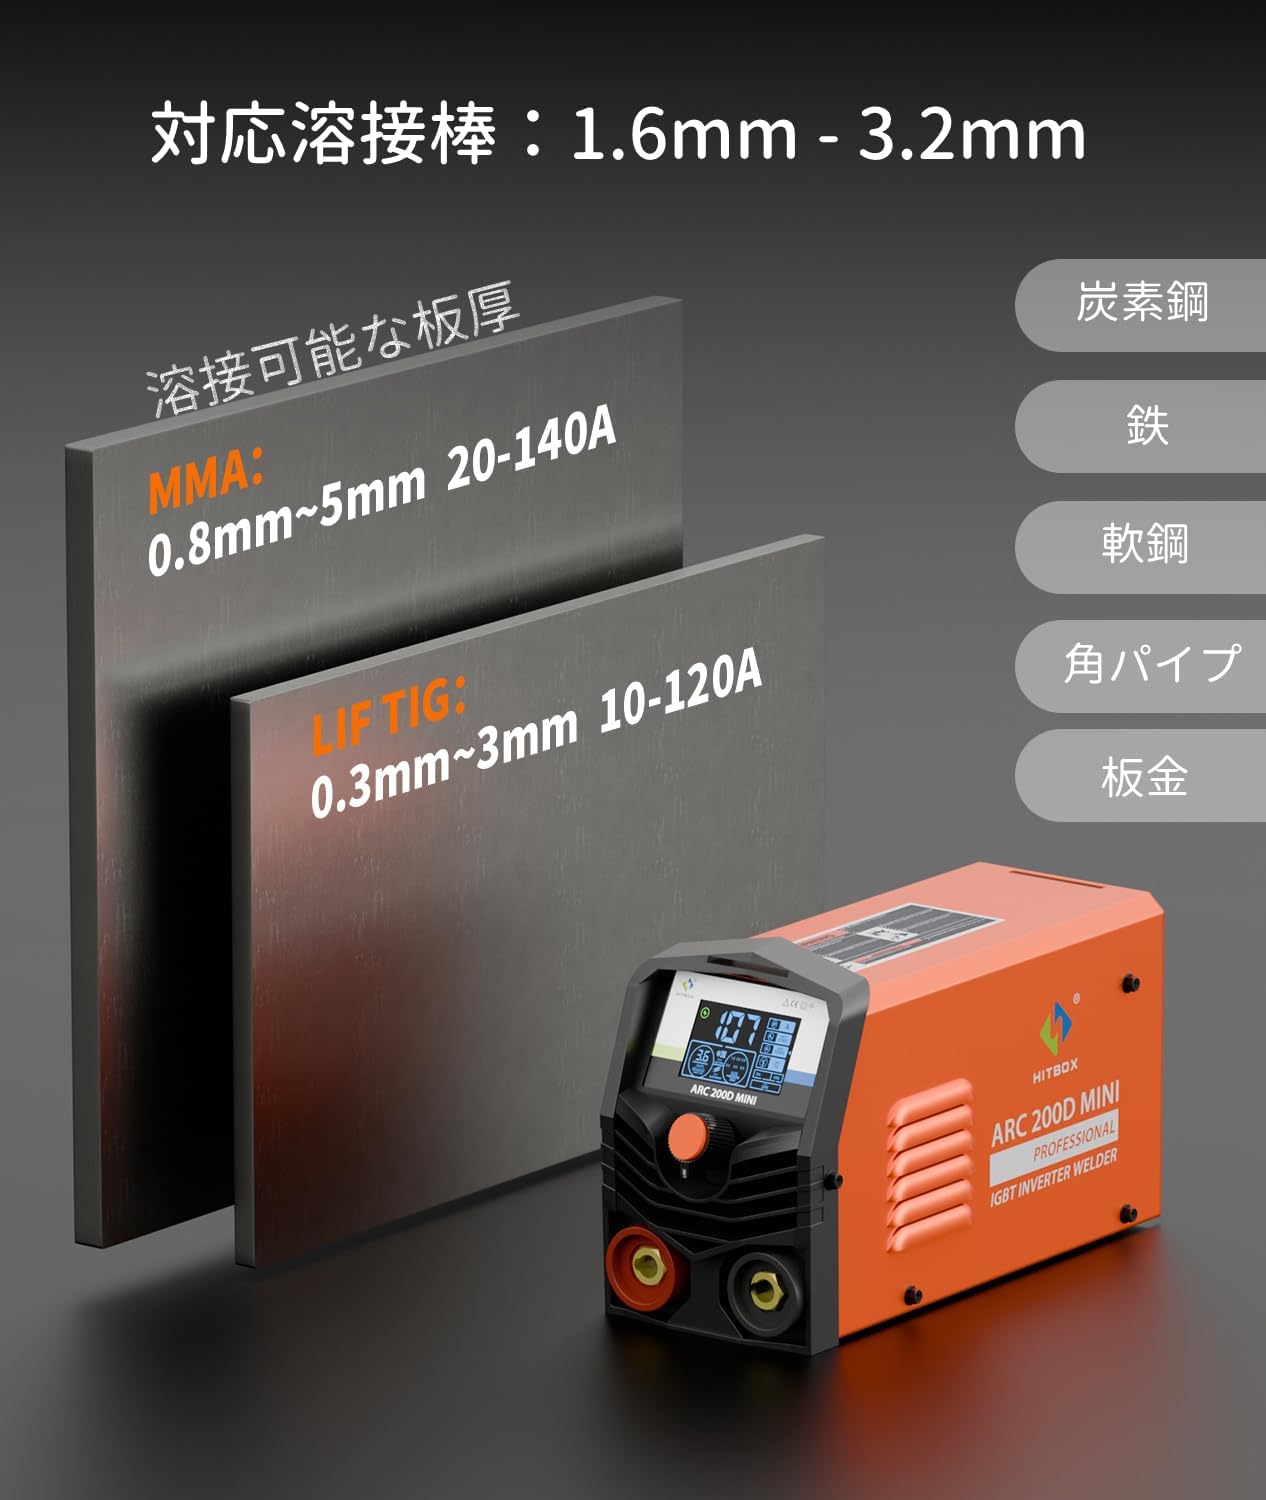
Image: A guide showing compatible welding rod sizes (1.6mm, 2.0mm, 2.5mm) and applicable plate thicknesses (0.8mm-5mm for MMA, 0.3mm-3mm for LIFT TIG) for various materials like carbon steel, iron, and mild steel.
7. Mantemento
Un mantemento regular garante a lonxevidade e o rendemento óptimo da súa máquina de soldar:
- Limpeza: Periodically clean the machine's exterior and ventilation openings to prevent dust buildup. Use a dry, soft cloth.
- Inspección de cables: Regularly check all cables (power, welding holder, earth) for cuts, fraying, or damage. Replace damaged cables immediately.
- Almacenamento: Almacene a máquina nun ambiente seco e sen po cando non estea en uso.
- Welding Rods: Store welding rods in a dry place to prevent moisture absorption, which can affect weld quality.
8 Solución de problemas
If you encounter issues with your HITBOX ARC200D MINI, refer to the following common troubleshooting tips:
- Sen enerxía: Check the power cable connection, wall outlet, and ensure the power switch is ON. Verify the circuit breaker has not tripped.
- Sen arco: Asegúrese de que o chan clamp is securely attached to the workpiece and the welding holder is properly connected. Check the welding rod for proper insertion and contact.
- Weak Arc/Poor Weld: Verify the welding current setting is appropriate for the material and rod size. Ensure the welding rod is dry and not expired. Check for proper voltage subministración.
- Overheat Indicator (OC) On: The machine has overheated. Turn off the machine, allow it to cool down for several minutes, and ensure ventilation is not obstructed.
- Welding Rod Sticking: This can occur if the current is too low, the arc length is too short, or the rod is not properly conditioned. Increase current, adjust technique, or replace the rod.
If the problem persists after attempting these solutions, please contact HITBOX customer support.
9. Especificacións
| Marca | HITBOX |
| Número de modelo | ARC200D MINI |
| Vol. De entradatage | 100 V |
| Máxima corrente de soldadura | 140A |
| Ciclo de servizo clasificado | 45 % |
| Modos de soldadura | MMA/ARC, LIFT TIG |
| Varillas compatibles | 1.6 mm, 2.0 mm, 2.5 mm |
| Applicable Plate Thickness (MMA) | 0.8 mm - 5 mm |
| Applicable Plate Thickness (LIFT TIG) | 0.3 mm - 3 mm |
| Dimensións (L x W x H) | 20 x 8.5 x 10.5 cm |
| Peso | 2.1 kg |
| Características de seguridade | VRD, Overcurrent Protection, Overheat Protection, Overvoltage Protección |
10. Garantía e soporte
The HITBOX ARC200D MINI comes with a 2 ano de garantía de calidade desde a data de compra.
For any questions, concerns, or technical support, please contact HITBOX customer service through your purchase platform. Refer to your purchase details for specific contact methods.