1. Introdución
The PEAKMETER PM2016S is a compact and intelligent digital clamp meter designed for accurate electrical measurements. This instrument features a liquid crystal display with a maximum count value of 5999 and a backlight function for improved visibility in various environments. It offers a range of measurement functions with automatic range selection, making it suitable for both beginners and experienced users. The PM2016S can measure AC and DC voltage, AC current, resistance, frequency, and also includes continuity testing, Non-Contact Voltage (NCV) detection, and V/Ω/A auto-scan capabilities. Its portable design ensures ease of use and convenience.
2. Información de seguridade
WARNING: To avoid electric shock or personal injury, read and understand all instructions and safety information before using this instrument.
- Asegúrese sempre de que o instrumento estea en bo estado de funcionamento antes do seu uso.
- Non aplique máis que o voltage, as marked on the instrument, between the terminals or between any terminal and earth ground.
- Teña coidado ao traballar con voltagpor riba de 30 V CA RMS, 42 V pico ou 60 V CC. Estes voltagsupoñen un perigo de descarga.
- Do not use the instrument if it appears damaged or if the insulation is compromised.
- Ensure the test leads are in good condition, without any cracks or breaks in the insulation.
- Desconecte sempre os cables de proba do circuíto antes de cambiar as funcións.
- Substitúa as pilas inmediatamente cando apareza o indicador de pila baixa para garantir lecturas precisas.
- Cumprir os códigos de seguridade locais e nacionais.
This instrument complies with EN61010-1, EN61010-2-033, EN61326, CAT. III 600V safety ratings.
3. Características do produto
- High Quality Jaw Head: Durable and precise clamp mechanism for current measurement.
- Clear LCD Display and Backlight: Easy-to-read 6000-count display with backlight for visibility in various lighting conditions.
- Fácil operación: Simple, intuitive controls, often requiring just one click for common functions.
- Rango automático: Selecciona automaticamente o rango de medición axeitado, o que simplifica o funcionamento.
- Retención de datos: Conxela a lectura visualizada para unha cómoda gravación.
- Vol. Sen contactotagDetección de e (NCV): Detecta con seguridade o volume da CAtage sen contacto directo.
- V/Ω/A Auto Scan: Automatically identifies and measures voltage, resistance, or current.
- Proba de continuidade: Comproba a continuidade eléctrica cun zumbador audible.
- Medición de frecuencia: Measures frequency via clamp ou voltage entrada.
- Compacto e lixeiro: Handheld design for portability and ease of use.
- Apagado automático: Automatically shuts down after 10 minutes of inactivity to conserve battery life.
4. Contido do paquete

O paquete normalmente inclúe os seguintes elementos:
- Color Box (Packaging)
- PEAKMETER PM2016S Digital Clamp Contador
- Cables de proba (vermello e negro)
- AAA Batteries (2x 1.5V)
- Manual de usuario
Description: This image displays the complete contents of the PEAKMETER PM2016S Digital Clamp Multimeter package, including the device itself, test leads, batteries, and the user manual, all presented within its retail packaging.
5. Configuración
5.1 Instalación da batería
The PM2016S requires two 1.5V AAA batteries. To install or replace batteries:
- Asegúrate de que o medidor estea apagado.
- Localice a tapa do compartimento das baterías na parte traseira do medidor.
- Use un desaparafusador para abrir o compartimento da batería.
- Insert the two AAA batteries, observing the correct polarity (+ and -).
- Coloque a tapa do compartimento da batería e fíxaa co parafuso.
5.2 Conexión dos cables de proba
Para o voltage, resistance, frequency (voltage), and continuity measurements, connect the test leads:
- Insira o cable de proba negro na toma de entrada "COM" (común).
- Insert the red test lead into the "VΩ" input jack.
6. Instrucións de funcionamento
The PM2016S features an auto-ranging function, simplifying most measurements. Press the red power button to turn the meter on or off. The meter will typically start in auto-scan mode (V/Ω/A Auto Scan).
6.1 AC/DC Voltage Medición
- Conecte os cables de proba como se describe na Sección 5.2.
- Turn on the meter. It will automatically detect AC or DC voltage.
- Touch the red and black test probes to the points in the circuit where you want to measure voltage.
- Le o voltago valor da pantalla LCD.
Description: This video demonstrates the unboxing of the PEAKMETER PM2016S and its accessories, followed by a practical demonstration of measuring AC voltage using the test leads. The user connects the leads to a power outlet and the meter displays the voltage lectura.
6.2 Medición da corrente alterna (Clamp función)
- Ensure the meter is on.
- Prema o clamp gatillo para abrir as mandíbulas.
- Enclose a single conductor (not a bundle of wires) within the jaws. Ensure the jaws are fully closed.
- The meter will display the AC current reading.
Description: This video demonstrates the AC current measurement function of the PEAKMETER PM2016S. The user clamps the meter around a power cable connected to an appliance (kettle), and the meter displays the current draw.
6.3 Medición de frecuencia
The PM2016S can measure frequency in two ways:
- Via Test Leads (Voltage Frequency): No voltage measurement mode, the meter can display frequency. Press the "Hz/NCV" button to toggle to frequency display.
- Via Clamp (Current Frequency): Ao medir a corrente alterna co clamp, the meter can also display the frequency of the current. Press the "Hz/NCV" button to toggle to frequency display.

Description: This image shows the clear LCD display of the PM2016S, highlighting its backlight feature and the various measurement indicators, including frequency (Hz).
6.4 Vol. sen contactotagDetección e (NCV).
- Press the "Hz/NCV" button to activate NCV mode. The display will show "NCV".
- Move the top end of the meter near a live AC voltage fonte.
- The meter will beep and the NCV indicator will light up, with the frequency of beeps and light increasing a medida que se achega ao volumetage fonte.
Description: This video demonstrates the NCV (Non-Contact Voltage) function of the PEAKMETER PM2016S. The user activates NCV mode and brings the meter near a power outlet, showing the audible and visual alerts when voltage é detectado.
6.5 Proba de continuidade
- Conecte os cables de proba como se describe na Sección 5.2.
- The meter will automatically enter continuity mode if resistance is low.
- Toca as sondas de proba nos dous puntos nos que queres comprobar a continuidade.
- If there is continuity (resistance less than 30Ω), the buzzer will sound.
6.6 Retención de datos e retroiluminación
- Retención de datos: Press the "HOLD" button (often combined with the backlight button) to freeze the current reading on the display. Press again to release.
- Retroiluminación: Press and hold the "HOLD" button (or a dedicated backlight button if present) to turn the backlight on or off.

Description: This image highlights the user-friendly design of the PM2016S, showing the main power button and other function buttons, emphasizing its easy operation.
7. Mantemento
7.1 Limpeza
Limpar o caso co anuncioamp un pano e un deterxente suave. Non empregue abrasivos nin disolventes. Manteña os terminais de entrada libres de sucidade e humidade.
7.2 Substitución da batería
When the low battery indicator appears on the display, replace the batteries as described in Section 5.1. Remove batteries if the meter is not used for an extended period to prevent leakage.
8 Solución de problemas
- Sen pantalla/o medidor non se acende: Comprobe a instalación das baterías e asegúrese de que non estean esgotadas. Substitúaas se é necesario.
- Lecturas inexactas: Ensure test leads are properly connected. Check for damaged leads. Verify the correct measurement function is selected (though auto-ranging minimizes this). Ensure the clamp jaws are fully closed for current measurements.
- "OL" ou Indicación de sobrecarga: The measured value exceeds the meter's range. Select a higher range if available, or ensure the input is within the meter's specifications.
- Sen detección de NCV: Ensure NCV mode is active. The NCV sensor is typically at the top of the clamp head; ensure it is close to the AC source.
9. Especificacións
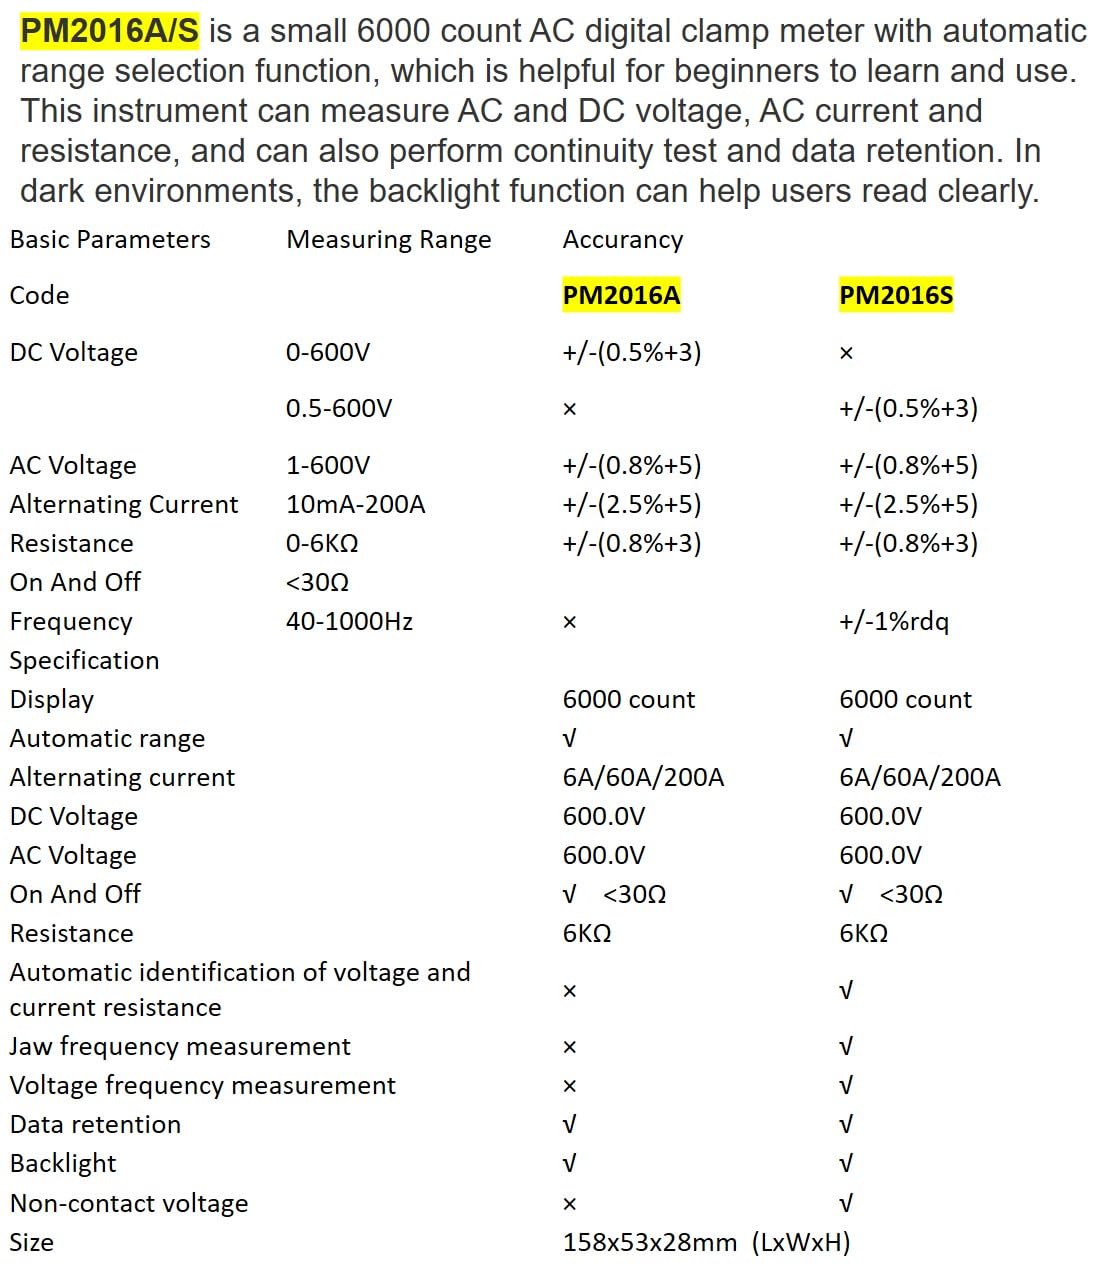
Description: This image presents a comprehensive table detailing the basic parameters, measuring ranges, and accuracy for both the PM2016A and PM2016S models, including features like display count, auto-ranging, and NCV.
| Parámetro | Range (PM2016S) | Accuracy (PM2016S) |
|---|---|---|
| DC Voltage | 0.5 ~ 600 V | ±(0.5 %+3) |
| Vol. ACtage | 1.0 ~ 600 V | ±(0.8 %+5) |
| Corrente alterna | 6A/60A/200A | ±(2.5 %+8) |
| Resistencia | 0 ~ 6 kΩ | ±(0.8 %+3) |
| Frecuencia | 60Hz~1000Hz | ±(1.0 %+5) |
| Mostrar | 6000 contas | |
| Rango automático | Si | |
| Continuidade | <30Ω | |
| V/Ω/A Auto Scan | Si | |
| Frequency (Clamp) | Si | |
| Frequency (Voltage) | Si | |
| Retención de datos | Si | |
| Retroiluminación | Si | |
| NCV | Si | |
| Fonte de alimentación | 2*1.5V AAA Batteries | |
| Peso neto | 122.4g (sen baterías) | |
| Tamaño | 158 mm * 55 mm * 29 mm | |
| Tamaño da mandíbula | Ø 20 mm | |
| Valoración de seguridade | EN61010-1, EN61010-2-033, EN61326, CAT. III 600V | |

Description: This image provides a visual representation of the physical dimensions of the PEAKMETER PM2016S, including its length, width, and jaw opening size, along with its weight.
10. Garantía e soporte
The PEAKMETER PM2016S Digital Clamp Multimeter comes with a 1 ano de garantía desde a data de compra. Esta garantía cobre defectos de materiais e fabricación en condicións de uso normal.
For technical support, warranty claims, or service inquiries, please contact your retailer or the manufacturer directly. Keep your purchase receipt as proof of purchase for warranty purposes.