
1. Introdución
The PEAKMETER PM8215 is a compact, handheld digital multimeter designed for measuring various electrical parameters. This instrument offers high stability and accuracy, featuring a 4000-count display. It is suitable for a wide range of users, from hobbyists to professionals, for tasks requiring AC/DC voltage, AC/DC current, resistance, frequency, and capacitance measurements, along with continuity and diode testing.
2. Información de seguridade
Always read and understand all safety instructions before operating the multimeter.
- This device complies with safety standards EN61010-1, EN61010-2-033, EN61326, and is rated for CAT. III 600V.
- Non aplicar voltage ou corrente que supera os límites máximos especificados para o multímetro.
- Extremar as precaucións ao traballar con circuítos con tensión. Alto volumetages can cause severe injury or death.
- Asegúrate de que os cables de proba estean en bo estado, sen ningún dano no illamento.
- Do not operate the multimeter if it appears damaged or if the casing está aberto.
- Substitúa a batería inmediatamente cando apareza o indicador de batería baixa para garantir lecturas precisas.
- Desconecte sempre os cables de proba do circuíto antes de cambiar as funcións.
3. Produto rematadoview
3.1 Características principais
- Visualización: Pantalla dixital de 4000 contaxes.
- Funcións de medición: AC / DC Voltage, AC/DC Current, Resistance, Frequency, Capacitance.
- Funcións especiais: Buzzer, Continuity Test, Diode Test, Low Battery Indication.
- Modos de funcionamento: Auto Range, Auto Power Off.
- Portabilidade: Mini pocket design, lightweight (approx. 75g), and ultra-thin (12mm thickness).
- Seguridade: Equipped with a 400mA/250V fuse for protection.
3.2 Características físicas




4. Configuración
4.1 Instalación da batería
The PM8215 multimeter is powered by one 3.0V CR2032 button battery.
- Asegúrese de que o multímetro estea apagado.
- Localice o compartimento da batería na parte traseira do dispositivo.
- Use a small screwdriver or coin to open the battery cover.
- Insert the CR2032 battery, observing the correct polarity (+/-).
- Pecha de forma segura a tapa da batería.
Nota: Replace the battery when the low battery indicator appears on the display to maintain measurement accuracy.
5. Instrucións de funcionamento
5.1 Encendido/apagado
To power on the multimeter, rotate the central selector knob from the 'OFF' position to any desired measurement function. To power off, rotate the knob back to the 'OFF' position.
5.2 Auto Range Function
The PM8215 features an auto-ranging function, which automatically selects the appropriate measurement range. This simplifies operation as you do not need to manually select the range for most measurements.
5.3 Funcións de medición
Connect the test leads to the appropriate input jacks and the circuit under test. Select the desired function using the rotary switch.
- DC Voltage (V–): Rotate the knob to the 'V–' position. Connect the red test lead to the positive side and the black test lead to the negative side of the DC voltage fonte.
- Vol. ACtage (V∼): Rotate the knob to the 'V∼' position. Connect the test leads across the AC voltage fonte.
- DC Current (mA/µA–): Rotate the knob to the 'mA/µA–' position. Use the 'SEL' button to switch between mA and µA. Connect the multimeter in series with the circuit.
- AC Current (mA/µA∼): Rotate the knob to the 'mA/µA∼' position. Use the 'SEL' button to switch between mA and µA. Connect the multimeter in series with the circuit.
- Resistencia (Ω): Rotate the knob to the 'Ω' position. Ensure the circuit is de-energized before measuring resistance. Connect the test leads across the component.
- Frecuencia (Hz): Rotate the knob to the 'Hz' position. Connect the test leads across the signal source.
- Capacitancia (F): Rotate the knob to the 'F' position. Ensure the capacitor is discharged before measurement. Connect the test leads across the capacitor.
- Proba de díodos (→|): Rotate the knob to the '→|' position. Connect the red lead to the anode and the black lead to the cathode of the diode. The display will show the forward voltagcaída de e. Inverta os cables para comprobar se hai un circuíto aberto.
- Proba de continuidade (♫): Rotate the knob to the '♫' position. If the resistance between the test leads is below a certain threshold (typically 50Ω), the buzzer will sound, indicating continuity.
5.4 Botóns de función
- SEL (Seleccionar): Used to toggle between different measurement types within a single rotary switch position (e.g., AC/DC current, or diode/continuity).
- GAMA: Allows manual selection of measurement ranges, overriding the auto-ranging function. Press repeatedly to cycle through available ranges.
- MANTENER: Conxela a lectura actual na pantalla. Prema de novo para desactivala.
6. Mantemento
6.1 Limpeza
Limpar o multímetro casing con anuncioamp un pano e un deterxente suave. Non empregue produtos de limpeza abrasivos nin disolventes. Asegúrese de que o dispositivo estea completamente seco antes de usalo.
6.2 Substitución da batería
Refer to Section 4.1 for instructions on replacing the CR2032 button battery.
6.3 Substitución de fusibles
The multimeter is equipped with a 400mA/250V fuse. If the current measurement function stops working, the fuse may need replacement. Fuse replacement should only be performed by qualified personnel. Open the casing carefully, replace the fuse with one of identical specifications, and ensure the casing is properly sealed before reuse.
7 Solución de problemas
- Sen visualización: Check if the multimeter is turned ON. Verify battery installation and replace if necessary.
- Lecturas incorrectas: Ensure test leads are properly connected and not damaged. Verify the correct function is selected for the measurement. Check battery level.
- A medición actual non funciona: The fuse may be blown. Refer to Section 6.3 for fuse replacement.
- O zumbador non soa na proba de continuidade: The resistance of the circuit may be too high, or the function is not correctly selected.
8. Especificacións
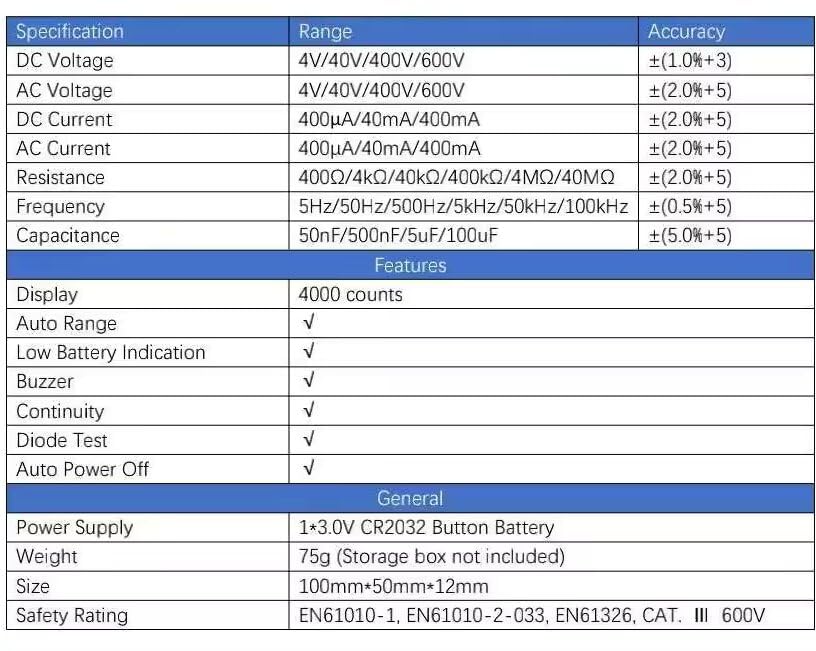
| Especificación | Rango | Precisión |
|---|---|---|
| DC Voltage | 4V/40V/400V/600V | ±(1.0 %+3) |
| Vol. ACtage | 4V/40V/400V/600V | ±(2.0 %+5) |
| Corrente DC | 400µA/40mA/400mA | ±(2.0 %+5) |
| Corrente alterna | 400µA/40mA/400mA | ±(2.0 %+5) |
| Resistencia | 400Ω/4kΩ/40kΩ/400kΩ/4MΩ/40MΩ | ±(2.0 %+5) |
| Frecuencia | 5Hz/50Hz/500Hz/5kHz/50kHz/100kHz | ±(0.5 %+5) |
| Capacitancia | 50nF/500nF/5uF/100uF | ±(5.0 %+5) |
| Características | ||
| Mostrar | 4000 contas | |
| Rango automático | √ | |
| Indicación de batería baixa | √ | |
| Zumbador | √ | |
| Proba de diodo | √ | |
| Apagado automático | √ | |
| Xeral | ||
| Fonte de alimentación | 1*3.0V CR2032 Button Battery | |
| Peso | 75g (Storage box not included) | |
| Tamaño | 100 mm * 50 mm * 12 mm | |
| Valoración de seguridade | EN61010-1, EN61010-2-033, EN61326, CAT. III 600V | |
9. Garantía e soporte
9.1 Información da garantía
The PEAKMETER PM8215 Digital Mini Multimeter comes with a 1 ano de garantía from the date of purchase. This warranty covers manufacturing defects and ensures the product meets its specified performance. Please retain your proof of purchase for warranty claims.
9.2 Atención ao cliente
For technical assistance, troubleshooting beyond this manual, or warranty inquiries, please contact your retailer or the manufacturer directly. Refer to the product packaging or the manufacturer's official websitio para os detalles de contacto.