
1. Introdución e información de seguridade
This manual provides essential instructions for the safe operation, maintenance, and troubleshooting of your PowerSmart 4400W Inverter Generator. Please read and understand all instructions before operating the generator.
Pautas xerais de seguridade:
- Risco de monóxido de carbono: Generators produce carbon monoxide, a colorless, odorless, poisonous gas. Operate the generator outdoors only, far away from windows, doors, and vents. Never operate indoors or in enclosed spaces.
- Risco de descarga eléctrica: Do not operate the generator in wet conditions. Ensure all connections are dry and secure. Never touch the generator with wet hands.
- Risco de incendio: Gasoline is highly flammable. Refuel in a well-ventilated area with the engine off and cool. Do not smoke while refueling. Store fuel in an approved container.
- Superficies quentes: The generator's engine and muffler become very hot during operation and remain hot for some time after shutdown. Avoid touching hot surfaces to prevent burns.
- Nenos e animais: Manteña os nenos e as mascotas lonxe do xerador durante o funcionamento.
- Ventilación adecuada: Ensure adequate clearance around the generator for proper airflow.
2. Que está incluído
Comprobe que todos os compoñentes estean presentes na embalaxe:
- PowerSmart 4400W Inverter Generator
- Manual de usuario
- Chave de ignición
- Funil

This image displays the PowerSmart 4400W Inverter Generator along with its accessories: a user manual, a spark plug wrench, and a funnel, indicating a complete package for initial setup and maintenance.
3. Configuración
3.1 Engadir aceite de motor
Before first use, the generator requires engine oil. Use 10W-30 4-stroke engine oil. The engine crankcase holds approximately 16.9 fluid ounces (0.5 liters).
- Coloque o xerador nunha superficie plana.
- Locate and remove the oil fill cap/dipstick.
- Using the provided funnel, slowly add 10W-30 4-stroke engine oil until it reaches the upper mark on the dipstick. Do not overfill.
- Volva colocar a tapa/varilla de nivel de aceite de forma segura.
3.2 Engadir combustible
Use fresh, unleaded gasoline with an octane rating of 87 or higher. Do not use E85 fuel or mix oil with gasoline.
- Asegúrate de que o xerador estea apagado e arrefriado.
- Desenrosque a tapa do combustible.
- Carefully pour gasoline into the fuel tank, avoiding overfilling. Leave some space for fuel expansion.
- Volva colocar a tapa do depósito de combustible de forma segura.
This video demonstrates the initial setup process, including adding engine oil and fuel, and the steps to start the generator's engine. It visually guides users through preparing the generator for its first use.
4. Instrucións de funcionamento
4.1 Panel de control rematadoview
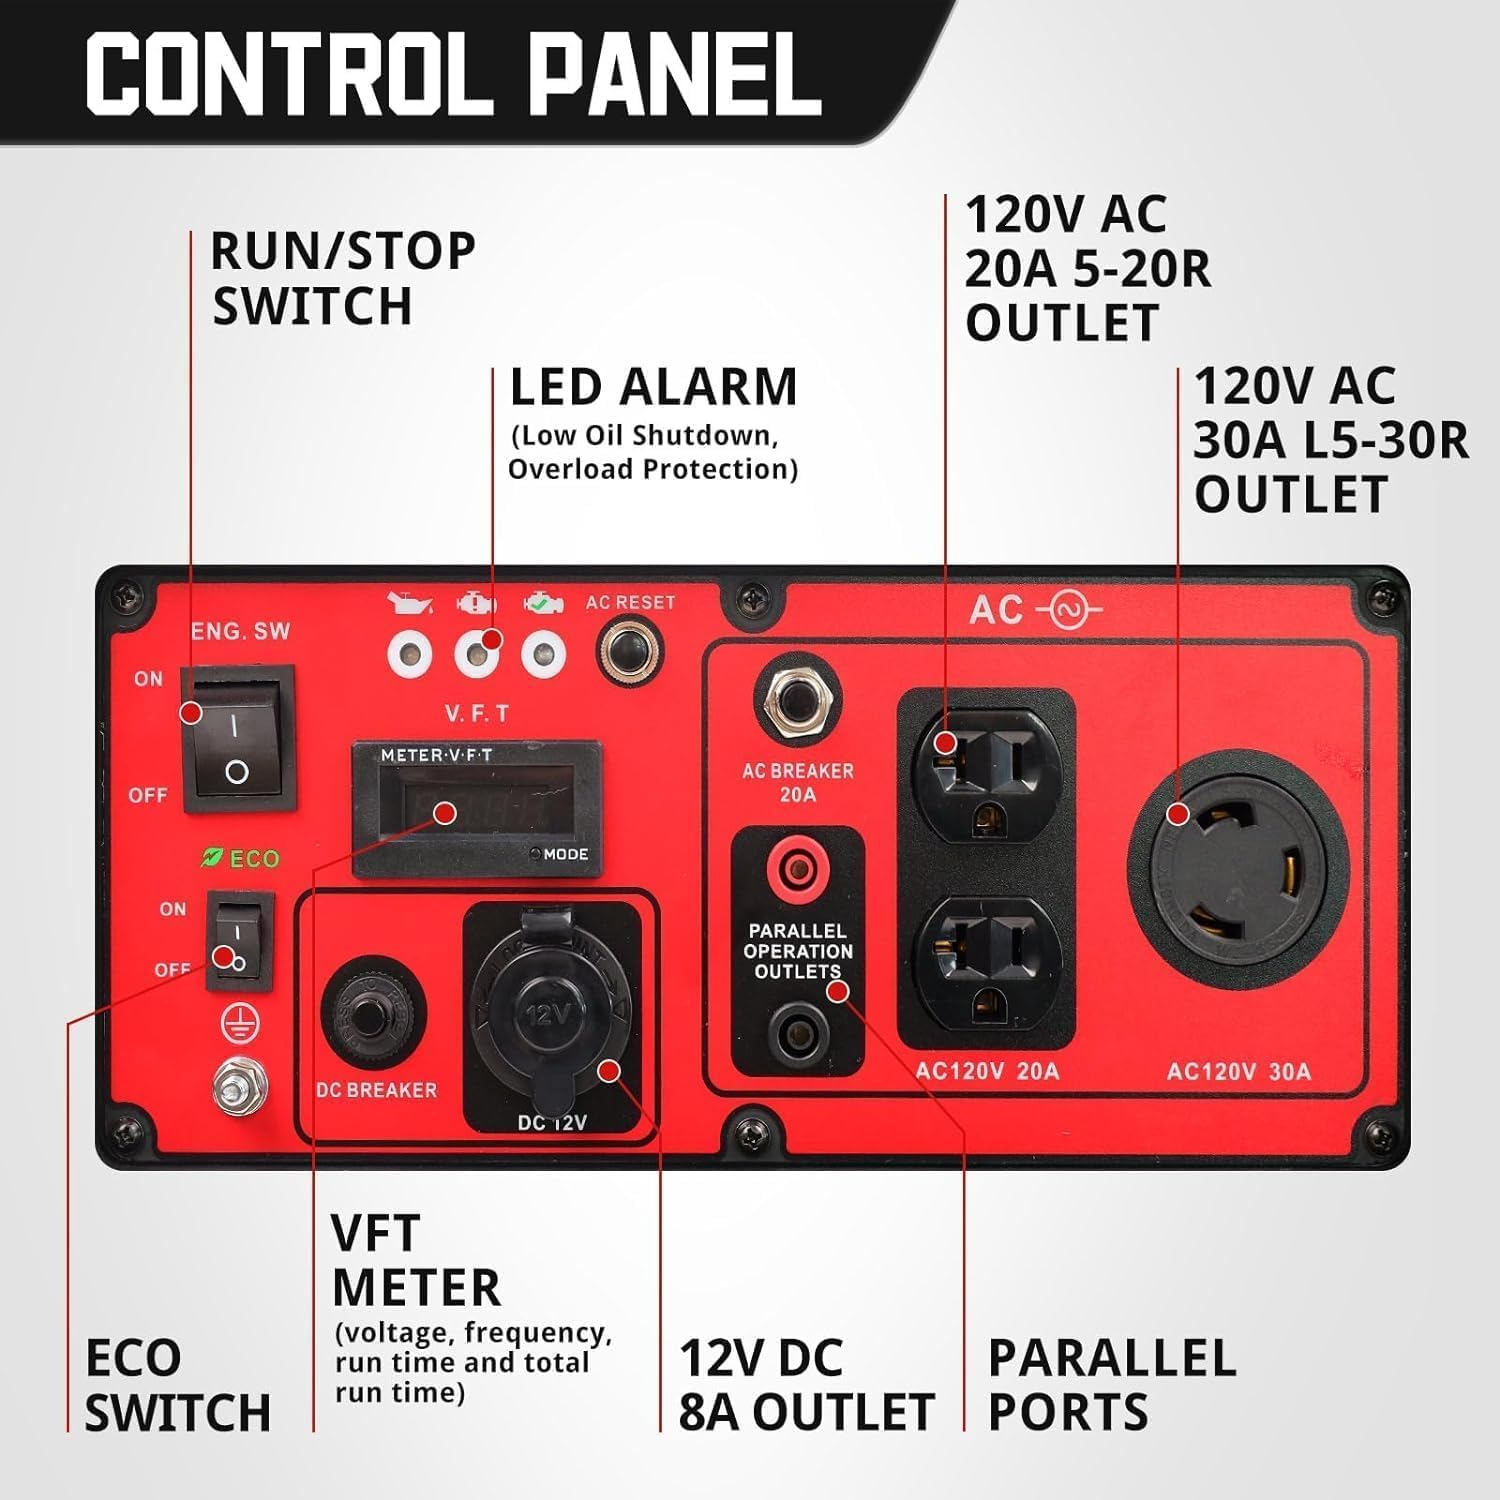
Familiarize yourself with the generator's control panel for efficient operation.

Esta imaxe ofrece información detallada view of the generator's control panel, highlighting key components such as the Run/Stop switch, LED alarm indicators (for low oil and overload), the VFT (Voltage, Frequency, Run Time) meter, Eco switch, 12V DC outlet, 120V AC outlets (20A and 30A), and parallel operation ports.
4.2 Arranque do motor
- Ensure the generator is on a level surface and away from any obstructions.
- Turn the fuel cap vent to the ON position (if applicable).
- Coloque o interruptor do motor na posición ON.
- If the engine is cold, move the choke lever to the CHOKE position. If warm, move to the RUN position.
- Tire da manivela do arrancador de retroceso firmemente e suavemente ata que o motor arranque.
- Once the engine starts, slowly move the choke lever to the RUN position.

This image focuses on the engine switch, choke lever, and Eco Mode switch on the control panel, illustrating the sequence for starting the generator's engine.
4.3 Funcionamento en modo Eco
The Eco-mode switch allows the engine to automatically adjust its speed to match the load, improving fuel efficiency and reducing noise when less power is required. To activate, simply switch the ECO switch to the ON position.
4.4 Conexión de dispositivos
The generator includes (1) 120V RV-ready 30A L5-30R outlet, (2) 120V 20A NEMA 5-20R household outlets, and (1) 12V DC outlet for charging batteries. Connect your devices to the appropriate outlets once the generator is running stably.
This image shows the PowerSmart Inverter Generator connected and supplying power to various electronic devices, including a laptop, smartphone, camera, and drone, demonstrating its versatility for different power needs.
5. Funcionamento en paralelo
The parallel-ready panel allows you to increase output by connecting two 4400-watt open frame inverters. A parallel kit is sold separately and is required for this functionality.
- Ensure both generators are off and cool.
- Connect the parallel kit cables to the designated parallel ports on both generators.
- Follow the starting procedure for each generator.
- Once both generators are running, they will operate in parallel to provide increased power output.

This image illustrates two PowerSmart Inverter Generators connected via a parallel kit, demonstrating their capability to combine power for higher output requirements.
6. Mantemento
Un mantemento regular garante a lonxevidade e o rendemento óptimo do seu xerador.
6.1 Cambio de aceite do motor
Change the engine oil regularly according to the manufacturer's recommendations in the full user manual. Frequent oil changes are crucial for engine health, especially during heavy use or in varying temperatures.
6.2 Air Filter Inspection
Inspect the air filter periodically and clean or replace it as needed to ensure proper engine performance.
6.3 Mantemento da bujía
Check the spark plug for wear and proper gap. Replace if necessary using the provided spark plug wrench.
6.4 Coidado do sistema de combustible
For long-term storage, drain the fuel tank and carburetor or use a fuel stabilizer to prevent fuel degradation.
7 Solución de problemas
Esta sección aborda problemas comúns que podes atopar co teu xerador.
7.1 O motor non arranca
- Comprobar o nivel de combustible: Ensure there is sufficient fresh gasoline in the tank.
- Comprobar o nivel de aceite: The generator features low-oil shutdown. If the oil level is too low, the engine will not start. Add oil if necessary.
- Posición de estrangulamento: Ensure the choke is in the correct position for starting (CHOKE for cold engine, RUN for warm engine).
- Interruptor do motor: Verify the engine switch is in the ON position.
7.2 Sen saída de potencia
- Protección contra sobrecarga: The generator has overload protection. If an overload occurs, the output will shut off. Reduce the load and press the AC reset button.
- Interruptores: Check if any AC or DC circuit breakers have tripped. Reset them if necessary.
- Conexións: Ensure all power cords are securely connected to the generator and devices.
7.3 Engine Runs Poorly
- Calidade do combustible: Use fresh, clean gasoline. Stale fuel can cause poor performance.
- Filtro de ar: A dirty air filter can restrict airflow. Clean or replace the air filter.
- Buxía: Inspect the spark plug for fouling or damage. Clean or replace as needed.
8. Especificacións
| Característica | Especificación |
|---|---|
| Marca | PowerSmart |
| Número de modelo | XYJ-5020 |
| Wattage (Pico) | 4400 vatios |
| Wattage (Correndo) | 3600 vatios |
| Tipo de combustible | Gasolina |
| Tipo de motor | 4 Trazo |
| Cilindrada do motor | 223 centímetros cúbicos |
| Runtime (50% load) | 11 horas |
| Noise Level (23ft) | Tan baixo como 76 dB |
| Puntos de venda | (1) 120V RV-ready 30A L5-30R, (2) 120V 20A NEMA 5-20R, (1) 12V DC |
| Dimensións do produto (L x W x H) | 17" x 20" x 21" |
| Peso | 68 pounds (approximate, based on similar models/images) |
| Características especiais | Portable, Parallel Ready, Low-Oil Shutdown, Overload Protection, Eco-mode, Digital Hour Meter |

This image displays the physical dimensions (height, length, width) and approximate weight of the PowerSmart Inverter Generator, providing a clear understanding of its size and portability.
9. Información da garantía
The PowerSmart 4400W Inverter Generator comes with a 2 ano de garantía. Please refer to the full warranty document included with your product for detailed terms and conditions.
10. Atención ao cliente
For technical assistance, parts, or service, please contact PowerSmart Customer Support. Refer to the contact information provided in your product packaging or on the official PowerSmart websitio.