CREALITY FALCON CR-Laser Falcon
Creality Falcon 5W Laser Engraver Machine
Model: CR-Laser Falcon
Comprehensive Instruction Manual
1. Introdución
The Creality Falcon 5W Laser Engraver Machine is designed for precise cutting and engraving tasks, offering a working speed of up to 10,000mm/min. This machine is suitable for various applications, from small business projects to personal crafting. It is capable of processing materials such as wood, acrylic, and leather with high efficiency and accuracy.
Key features include a 500mm x 500mm honeycomb working panel for enhanced airflow and material protection, a 0.06mm ultra-fine compression spot for detailed engravings, and a spacious 15.7" × 16.3" work area. The device is pre-assembled for quick setup and is compatible with popular software like LaserGRBL and LightBurn on Windows and macOS. Safety features include an emergency stop button and an active stop function that detects tilt or drops.
2. Información de seguridade
AVISO: This is a Class 4 laser product. Direct exposure to the laser beam can cause severe eye damage and skin burns. Always wear appropriate laser safety goggles (OD6+) when operating the machine. Never look directly into the laser beam or at its reflection.
- Ensure the work area is well-ventilated to dissipate smoke and fumes generated during engraving.
- Manteña os materiais inflamables lonxe do gravador láser.
- Non deixe a máquina sen vixilancia durante o funcionamento.
- Familiarícese coa localización e a función do botón de parada de emerxencia.
- Avoid operating the machine on unstable or uneven surfaces. The active stop function will trigger if the machine is tilted or dropped.
- Manteña os nenos e as mascotas lonxe da zona de operación.
3. Guía de configuración
The Creality Falcon 5W Laser Engraver is designed for quick assembly, typically taking 5-10 minutes.
3.1 Desembalaxe e identificación de compoñentes
Carefully open the packaging and remove all components. Verify that all parts listed in the packing list are present.
Descrición do vídeo: This video demonstrates the unboxing process and identification of all components included with the Creality Falcon 5W Laser Engraver Machine. It shows how to carefully remove the main frame, laser module, power supply, cables, honeycomb bed, and other accessories from the packaging.
3.2 Pasos de montaxe
- Place the Frame: Remove the main frame from the packaging and place it on a stable, flat surface.
- Instalar o módulo láser: Attach the laser module to the gantry. Secure it using the provided screws or knobs. Ensure the module is firmly in place.
- Cables de conexión: Connect the laser module cable to the designated port on the main control unit. Connect the power cable to the power adapter, and then connect the power adapter to the machine.
- Position Honeycomb Bed: Place the honeycomb working panel on your desktop. Ensure the front and back are correctly oriented, leaving a small gap on the desktop as indicated in the diagram for proper airflow. Then, place the laser engraver frame over the honeycomb bed.
- Encendido: Plug the power adapter into a suitable power outlet. The machine is now ready for initial operation.

Descrición da imaxe: The Creality Falcon 5W Laser Engraver is shown partially assembled within its protective foam packaging, highlighting its 'pre-assembled for easy start' design. A USB cable is also visible, indicating connectivity options.
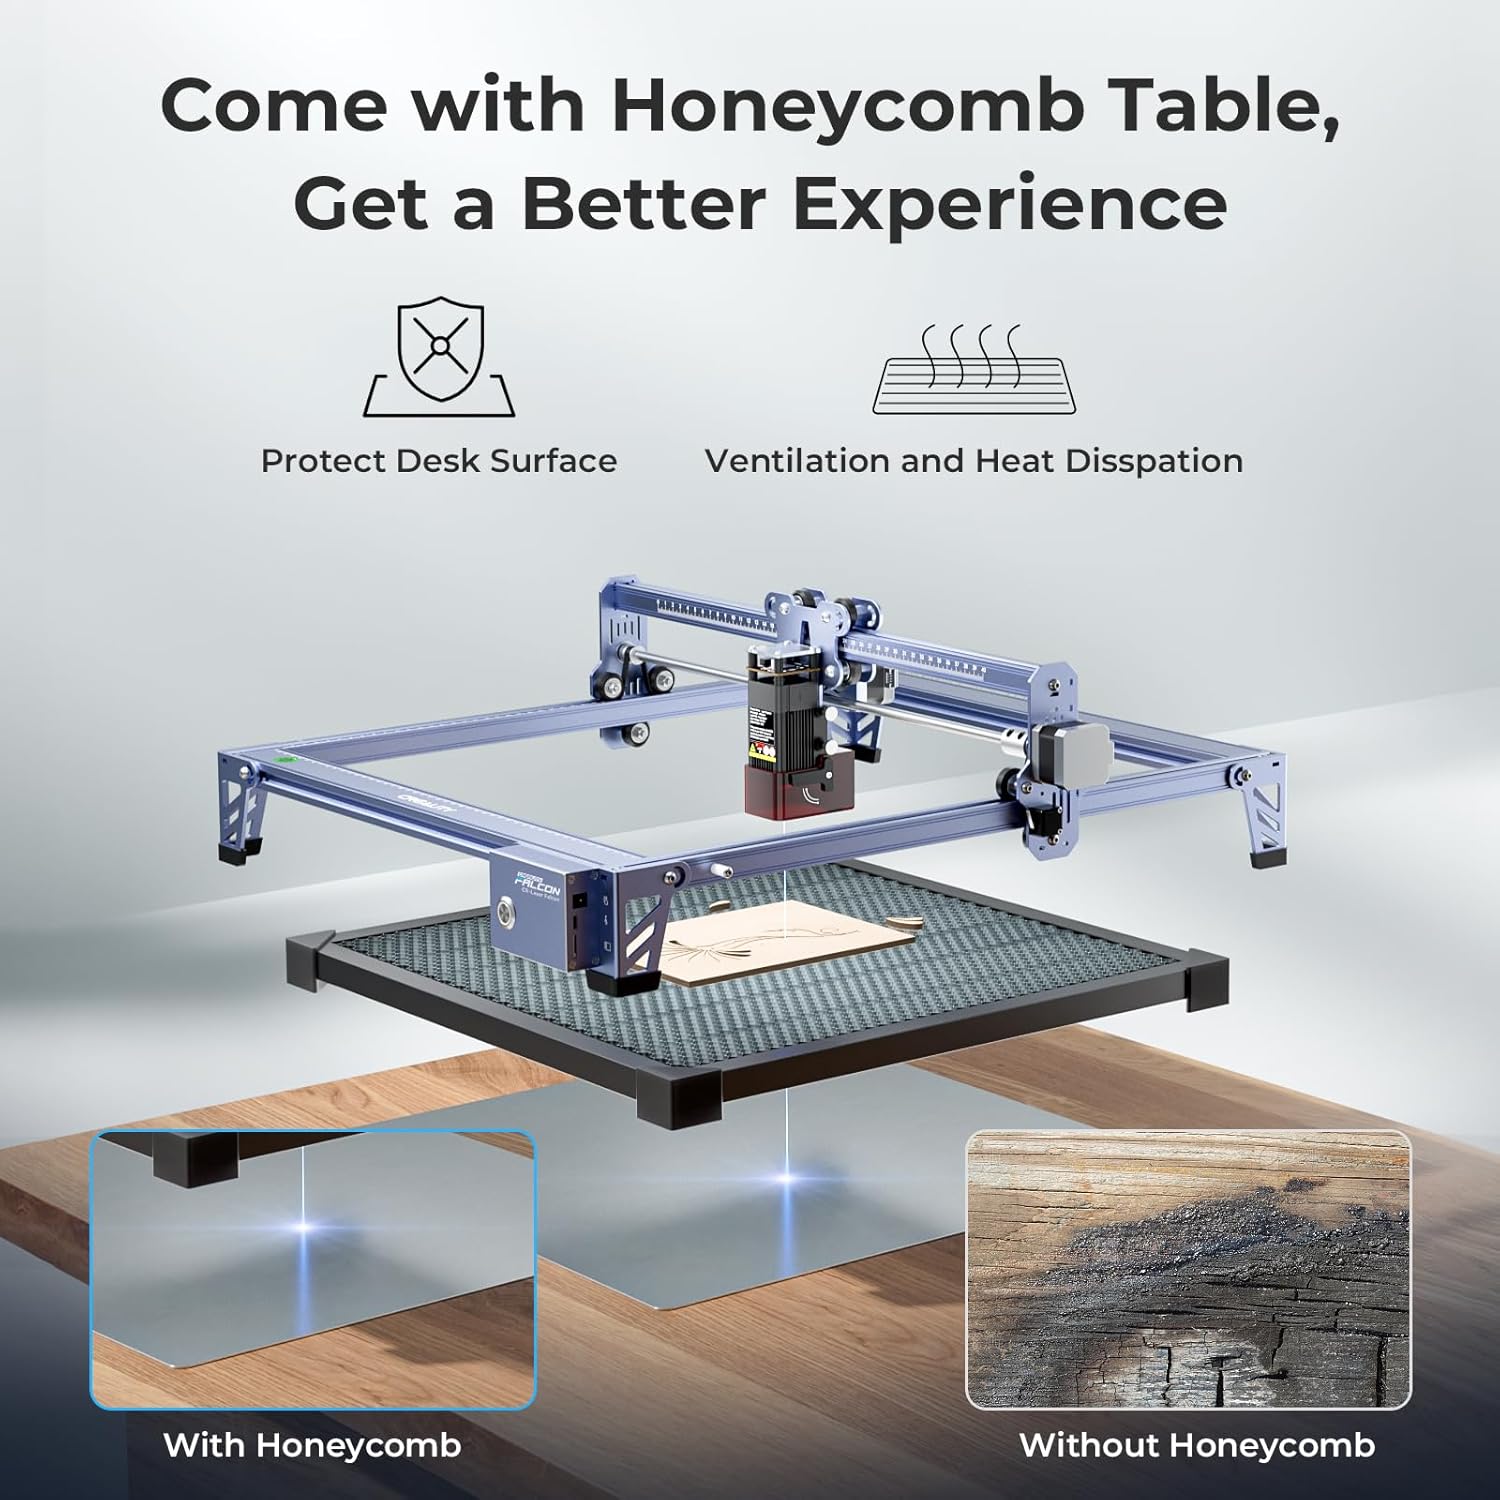
Descrición da imaxe: This image illustrates the benefits of using the honeycomb table with the laser engraver. It shows how the honeycomb structure protects the desk surface from burns and improves ventilation for better heat dissipation, leading to cleaner engravings compared to not using one.
4. Instrucións de funcionamento
4.1 Compatibilidade de software
The Creality Falcon 5W Laser Engraver is compatible with popular laser engraving software:
- LaserGRBL: An open-source software suitable for Windows users.
- LightBurn: A paid software offering advanced features, compatible with Windows and macOS. A free trial is often available.
Soportado file formats include SVG, PNG, DXF, TIF, BMP, PDF, and NG.

Descrición da imaxe: The image displays the Creality Falcon laser engraver connected to both a laptop and a desktop computer, illustrating its wide compatibility with operating systems like Windows and macOS, and software such as LaserGRBL and LightBurn. Various file format icons are also shown.
4.2 Quick Focus Adjustment
Accurate focus is crucial for optimal engraving and cutting results. Follow these steps to adjust the laser focus:
- Paso 1: Pull down the original focus lever located on the side of the laser module.
- Paso 2: Slide the laser module along the gantry until the focus lever gently touches the surface of your material.
- Paso 3: Once the lever is in contact with the material, uplift it back into its original position. The laser is now correctly focused.

Descrición da imaxe: A detailed diagram illustrates the three-step process for quick focus adjustment on the laser module. It shows pulling down a lever, sliding the module until the lever touches the material, and then uplifting the lever to set the correct focal distance.
4.3 Proceso de gravado e corte
- Preparar o material: Place your material (e.g., wood, acrylic) securely on the honeycomb working panel.
- Axustar o foco: Perform the quick focus adjustment as described in Section 4.2.
- Deseño de carga: Open your chosen software (LaserGRBL or LightBurn) and load your design file.
- Establecer parámetros: Adjust engraving or cutting parameters (speed, power, passes) according to your material and desired outcome. Refer to software documentation for detailed settings.
- Preview Área: Use the software's preview function to ensure the design is positioned correctly on your material.
- Iniciar operación: Inicia o proceso de gravado ou corte desde o software. Supervisa a máquina durante o funcionamento.
Descrición do vídeo: This video demonstrates the Creality Falcon 5W laser engraver in action, showing the laser module moving across a piece of wood to engrave a design. It highlights the precision and speed of the engraving process.

Descrición da imaxe: Esta imaxe ofrece un primeiro plano view comparing the high precision of the Creality Falcon's 0.06mm laser spot engraving with that of other lasers. The Falcon's output shows finer detail and clarity, particularly visible in the texture of engraved feathers.

Descrición da imaxe: An illustration comparing the efficiency of the Creality Falcon's 10,000mm/min working speed against a slower 6,000mm/min speed. It demonstrates that the Falcon can complete a significantly larger workload in the same amount of time, showcasing its productivity.
5. Mantemento
- Limpar a lente do láser: Regularly inspect and clean the laser lens with a soft, lint-free cloth and lens cleaning solution to ensure optimal beam quality.
- Clean the Honeycomb Bed: Remove debris and residue from the honeycomb working panel to maintain proper airflow and prevent material scorching.
- Inspeccionar correas e carrís: Periodically check the tension of the drive belts and clean the guide rails to ensure smooth and accurate movement of the laser module.
- Replace Air Filter: If your model includes an air assist system with a filter, replace it as recommended to maintain effective smoke and dust absorption.
6 Solución de problemas
| Problema | Causa posible | Solución |
|---|---|---|
| O láser non dispara ou a saída é débil | Incorrect focus, dirty lens, low power setting, loose cable. | Adjust focus, clean lens, increase power setting in software, check cable connections. |
| O gravado está borroso ou inconsistente | Incorrect focus, material not flat, loose belts, high speed. | Re-adjust focus, ensure material is flat, check belt tension, reduce engraving speed. |
| A máquina para de forma inesperada | Active stop function triggered (tilt/drop), power interruption, software error. | Check machine stability, verify power connection, restart software and machine. |
| Software not connecting to machine | Incorrect port selection, driver issues, USB cable fault. | Verify COM port in software, install/update drivers, try a different USB cable. |
7. Especificacións
| Característica | Detalle |
|---|---|
| Número de modelo | CR-Laser Falcon |
| Potencia de saída do láser | 5 W (5000 mW) |
| Área de Traballo | 15.7" × 16.3" (approximately 400mm x 414mm) |
| Tamaño do punto láser | 0.06 mm |
| Velocidade de gravado | Ata 10,000 mm/min |
| Precisión de reposicionamento | Under 0.007 inches |
| Compatibilidade de software | LaserGRBL, LightBurn |
| Sistemas operativos | Windows, macOS |
| Soportado File Formatos | SVG, PNG, DXF, TIF, BMP, PDF, NG |
| Características de seguridade | Emergency Stop Button, Active Stop Function (tilt/drop detection) |
| Peso do elemento | 24.6 libras |
| Dimensións do paquete | 27 x 24.5 x 10.6 polgadas |
8. Garantía e soporte
For warranty information, technical support, or service inquiries, please refer to the official Creality Falcon website or contact their customer service directly. Details can often be found on the product packaging or through the brand's official online store.
You can visit the official Creality Falcon store for additional resources and support: Creality Falcon Store
Documentos relacionados - CR-Laser Falcon
 |
CR-Laser Falcon User Manual - Creality 3D Laser Engraver Comprehensive user manual for the Creality CR-Laser Falcon laser engraver and cutter, detailing assembly, operation, safety precautions, specifications, and troubleshooting for optimal use. |
 |
Creality Falcon Pro 10W User Manual User manual for the Creality Falcon Pro 10W laser engraver, covering setup, operation, safety, and troubleshooting. |
 |
Creality Falcon A1 Pro Laser Engraver User Guide Comprehensive user guide for the Creality Falcon A1 Pro laser engraver, covering setup, operation, safety, maintenance, and troubleshooting. Includes detailed instructions and product specifications. |
 |
SCULPFUN H4 Honeycomb Panel for Laser Engravers A set of two SCULPFUN H4 honeycomb working panels, designed for laser engravers and cutters. Includes all necessary components for assembly, such as metal plates, screws, clamps, and a wrench, to create a stable and efficient laser cutting bed. |
 |
Manual do usuario da Creality CR-Laser Falcon User manual for the Creality CR-Laser Falcon, providing instructions for setup, operation, and maintenance of the laser engraving machine. |
 |
Manual do usuario da Creality CR-Laser Falcon User manual for the Creality CR-Laser Falcon, a laser engraving machine. This guide provides instructions on setup, operation, safety precautions, and troubleshooting. |
Ask a question about this manual
Ask about setup, troubleshooting, compatibility, parts, safety, or missing instructions. Manuals+ will review the question and use this page’s manual context to help answer it.