1. Introdución
Thank you for choosing the tectake Bathroom Cabinet Model 405366. This instruction manual provides important information for the safe assembly, proper use, and maintenance of your new cabinet. Please read this manual thoroughly before assembly and retain it for future reference.
This country house style cabinet is designed to offer practical storage solutions in your bathroom, featuring two spacious compartments, two doors with magnetic closure, and a dedicated siphon cutout with edge protection for under-sink installation.
2. Instrucións de seguridade
- Always assemble the cabinet on a clean, soft surface to prevent scratches.
- Asegúrate de que todas as pezas estean presentes e sen danos antes de comezar a montaxe. Non continúes coa montaxe se falta algunha peza ou está danada.
- Manteña as pezas pequenas e os materiais de embalaxe fóra do alcance dos nenos e das mascotas para evitar riscos de asfixia.
- Use appropriate tools as specified in the assembly instructions. Do not overtighten screws, as this may damage the material.
- For stability, ensure the cabinet is placed on a level surface.
- Do not overload the cabinet. The maximum load capacity is 35 kg.
- If wall mounting is required, ensure suitable wall fixings are used for your wall type.
3. Contido do paquete
Please check that all components are included in your package. The typical package includes:
- Paneis do armario (superior, inferior, laterais, traseiro)
- 2 Portas
- 1 Estante axustable
- Bisagras e peches magnéticos
- Tiradores das portas
- Siphon cutout edge protection
- Ferraxes de montaxe (parafusos, tarugos, etc.)
- Manual de instrucións
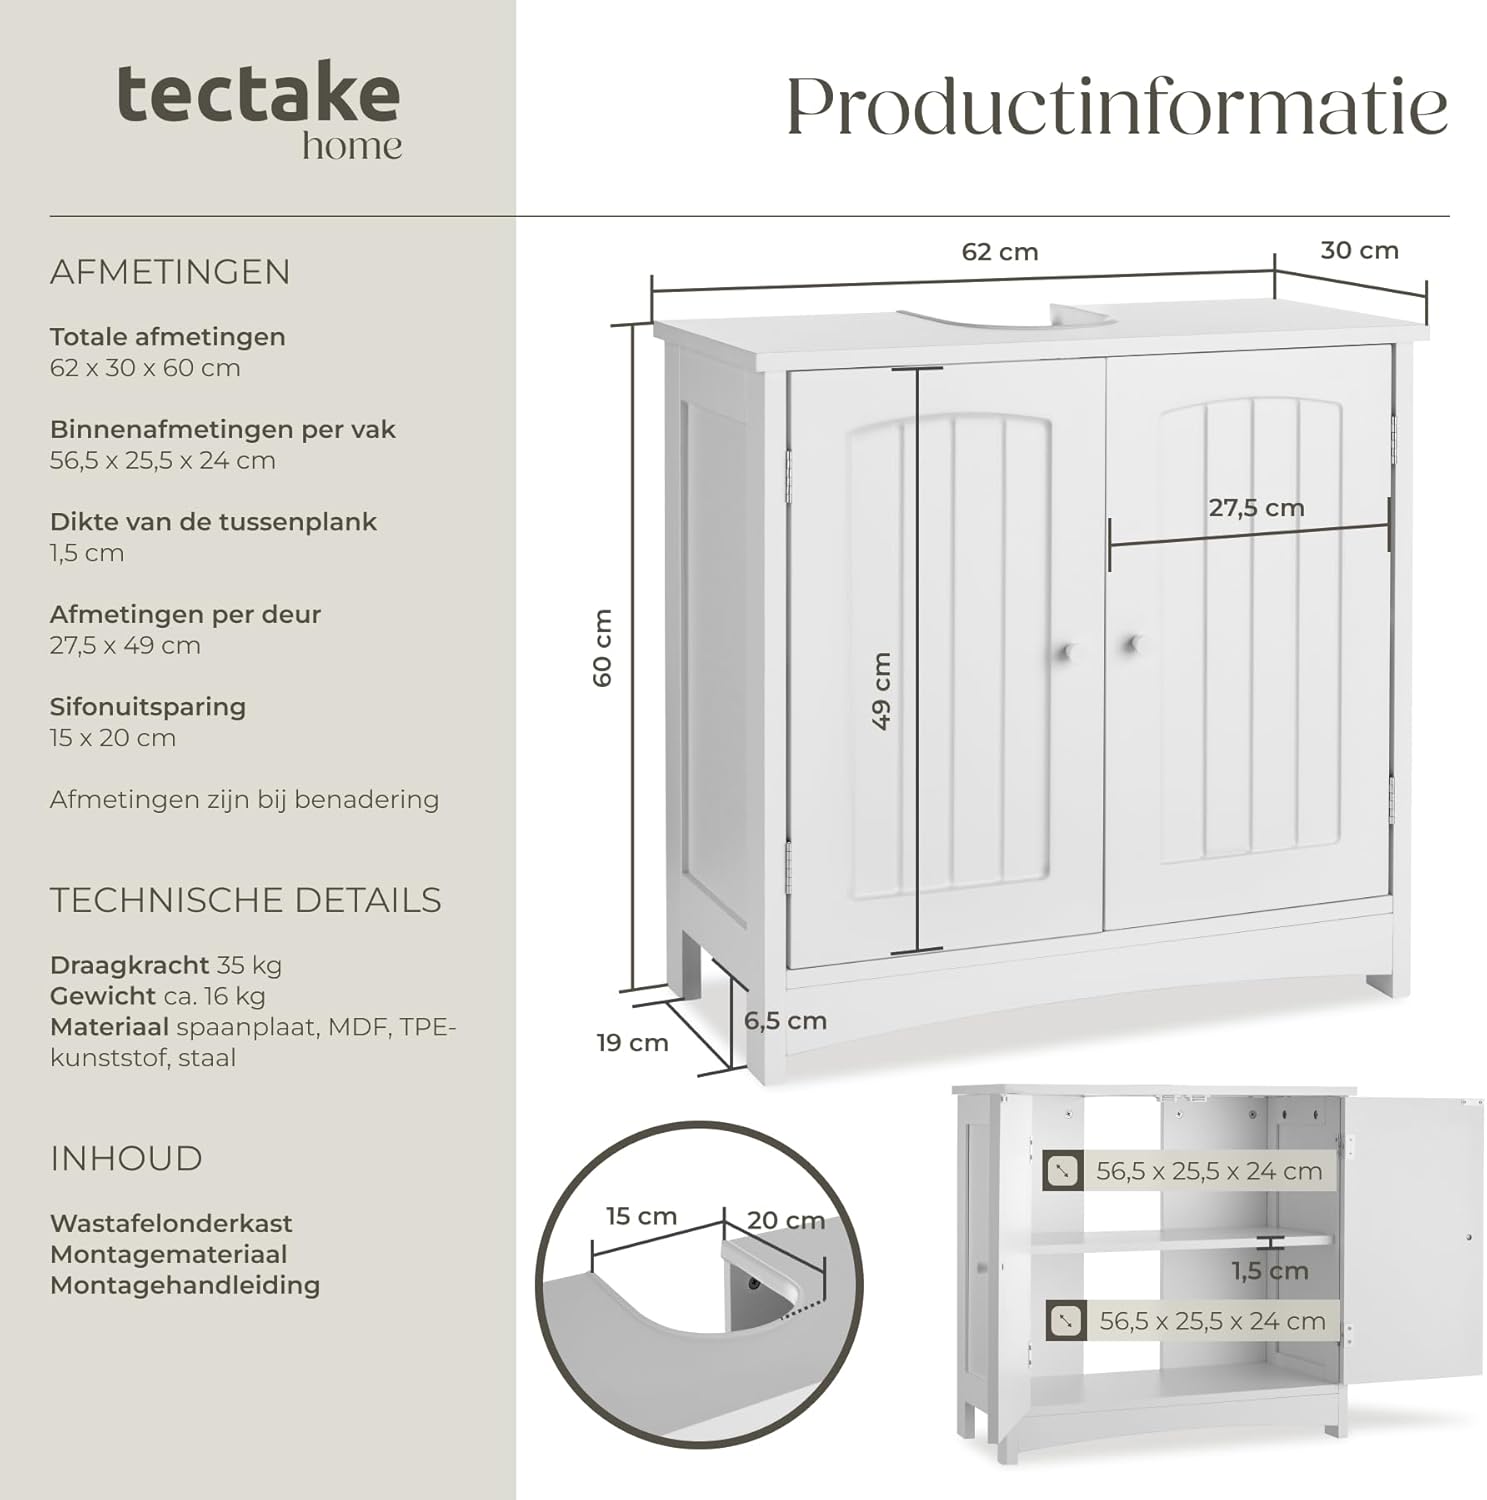
Figure 3.1: Product dimensions and internal layout. This diagram illustrates the overall dimensions of the cabinet (62 cm width, 30 cm depth, 60 cm height) and the internal compartment sizes (56.5 x 25.5 x 24 cm per section). It also shows the siphon cutout dimensions (15 x 20 cm) and the thickness of the shelf (1.5 cm).
4. Instrucións de montaxe
Siga estes pasos atentamente para un proceso de montaxe sen problemas. Recoméndase a montaxe por parte de dúas persoas.
- Preparar o espazo de traballo: Lay out all components on a soft, clean surface to prevent damage. Identify each part using the provided diagrams (if any, otherwise refer to general component names).
- Montar a estrutura do armario: Attach the side panels to the bottom panel using the provided screws and dowels. Ensure the pre-drilled holes align correctly.
- Instalar o panel traseiro: Slide or screw the back panel into place. This adds stability to the frame.
- Fixar o panel superior: Secure the top panel to the assembled frame. Ensure the siphon cutout is positioned correctly for your sink.
- Insert the Shelf: Place the adjustable shelf into the desired position using the shelf pins. The cabinet features a sturdy intermediate shelf that divides the interior space.
- Install Doors and Hinges: Attach the hinges to the doors and then to the cabinet frame. The cabinet uses 4 robust hinges for smooth operation.
- Attach Door Handles: Secure the handles to the doors.
- Install Magnetic Closures: Attach the magnetic closures to the cabinet frame and doors to ensure they remain securely shut.
- Apply Siphon Edge Protection: Insert the plastic edge protection around the siphon cutout on the top panel. This protects the wood from moisture damage.
- Verificación final: Asegúrate de que todos os parafusos estean axustados e que o armario estea estable.

Figura 4.1: Interior view with shelf. This image shows the cabinet interior with the sturdy intermediate shelf installed, dividing the space into two compartments.

Figure 4.2: Detail of door hinge. This close-up shows one of the robust hinges, designed for smooth and frequent opening and closing of the cabinet doors.

Figure 4.3: Siphon cutout protection. This image highlights the durable plastic edge protection around the siphon cutout, designed to prevent moisture damage to the cabinet.
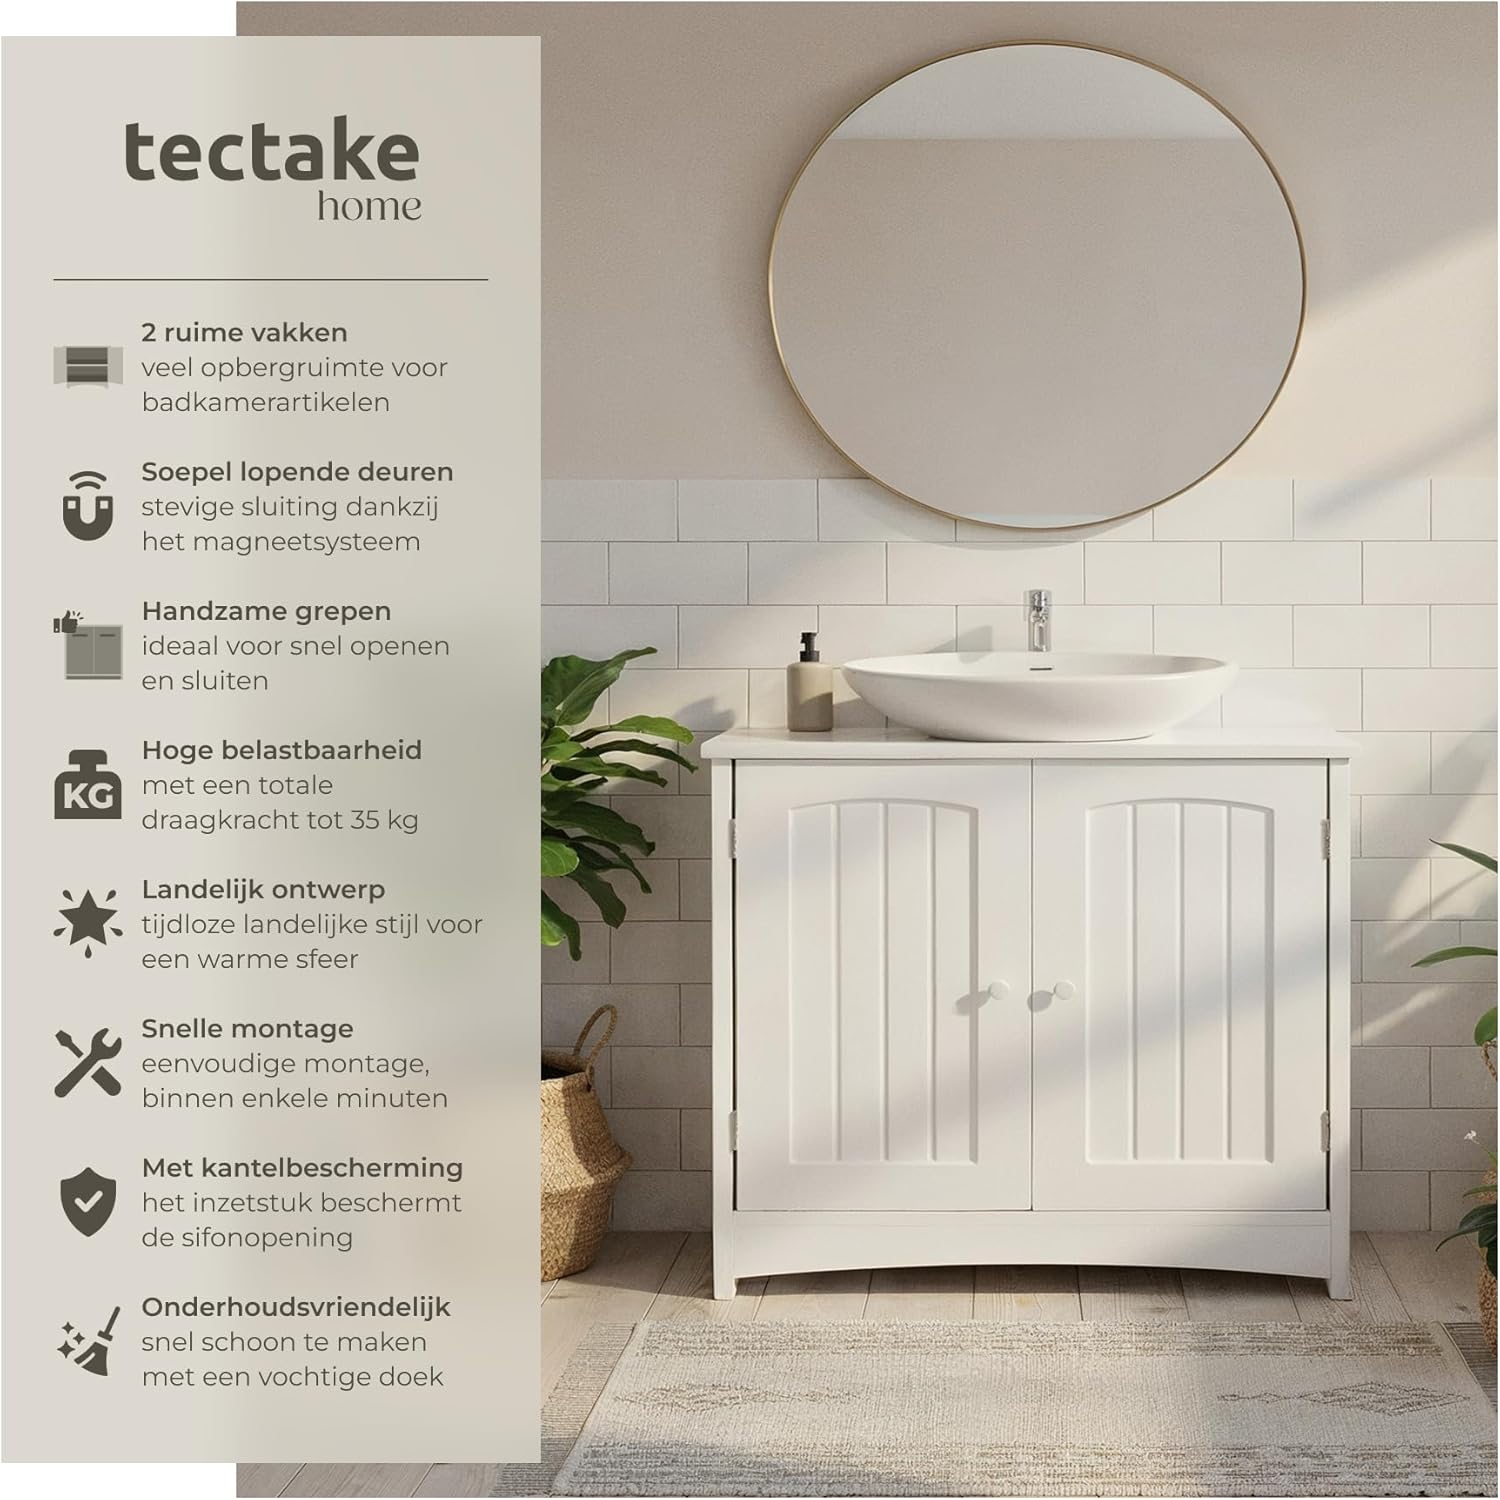
Figure 4.4: Fully assembled cabinet. This image shows the tectake bathroom cabinet fully assembled, ready for use under a sink.
5. Instrucións de funcionamento
The tectake Bathroom Cabinet is designed for convenient storage in your bathroom.
- Almacenamento: Utilize the two spacious compartments for organizing toiletries, towels, cleaning supplies, and other bathroom essentials. The adjustable shelf allows for flexible storage configurations.
- Operación da porta: The two hinged doors open smoothly, providing easy access to the contents. The magnetic closures ensure the doors stay securely shut when not in use.
- Under-Sink Placement: The integrated siphon cutout allows the cabinet to fit neatly under most standard bathroom sinks, maximizing space utilization.

Figure 5.1: Organized interior. This image demonstrates the cabinet's storage capacity, showing towels and various bathroom items neatly stored within its two compartments.
6. Mantemento
To ensure the longevity and appearance of your tectake Bathroom Cabinet, follow these simple maintenance guidelines:
- Limpeza: Limpar as superficies regularmente cun pano suave eamp cloth. For stubborn marks, a mild, non-abrasive cleaner can be used. Avoid harsh chemicals or abrasive cleaning tools, as these can damage the painted finish.
- Protección contra a humidade: Although the siphon cutout has edge protection, it is advisable to wipe away any standing water or spills immediately to prevent moisture damage to the wood material.
- Verificación de hardware: Comprobe periodicamente todos os parafusos e accesorios para asegurarse de que permanecen ben axustados. Aperte de novo se é necesario.
7 Solución de problemas
Se tes algún problema co teu armario, consulta os seguintes problemas e solucións comúns:
| Problema | Causa posible | Solución |
|---|---|---|
| As portas non pechan correctamente ou están mal aliñadas. | Loose hinges or magnetic closures. Uneven floor. | Tighten hinge screws. Adjust magnetic closures. Ensure the cabinet is on a level surface. |
| O armario parece tambaleante ou inestable. | Loose assembly screws. Uneven floor. | Check and tighten all assembly screws. Place the cabinet on a level surface. |
| Rabuñaduras ou danos durante a montaxe. | Assembly on a hard or rough surface. | Always assemble on a soft, protective surface (e.g., carpet or blanket). |
8. Especificacións
| Número de modelo | 405366 |
| Marca | tectake |
| Dimensións xerais (L x W x H) | 62 x 30 x 60 cm |
| Peso | 13.1 kg |
| Material | Engineered Wood (Particle board) |
| Cor | Branco |
| Número de compartimentos | 2 |
| Número de portas | 2 |
| Capacidade de carga máxima | 35 kg |
| Características especiais | Siphon cutout with edge protection, Magnetic door closure |
9. Garantía e soporte
tectake products are manufactured with quality and durability in mind. For information regarding warranty coverage, please refer to the purchase documentation or contact your retailer.
If you have any questions, require assistance with assembly, or need to report a missing/damaged part, please contact tectake customer support or your point of purchase. Have your model number (405366) and purchase date ready when contacting support.