
1. Información importante de seguridade
Please read and understand all instructions before assembly and installation. Failure to follow these instructions may result in injury or product damage. Keep this manual for future reference.
- Assembly and installation should be done with care to avoid injury.
- Ensure the cabinet is properly mounted to prevent tipping. An anti-toppling device is provided and should be used.
- Keep the cabinet away from direct water contact to prevent water damage and mold growth.
- Always use appropriate safety gear when handling heavy objects and tools.
- Do not overtighten screws during assembly to avoid damaging the wood or MDF.
2. Contido do paquete
Verifique que estean presentes todos os compoñentes antes de comezar a montaxe. Se falta algunha peza ou está danada, póñase en contacto co servizo de atención ao cliente.
2.1 Lista de compoñentes
- Bathroom Vanity Cabinet (Solid Wood Frame and MDF Board)
- Encimera de lavabo de cerámica
- Hardware Kit (screws, metal door hinges, handles, drawer slides, anti-toppling device)
- Manual de instrucións (este documento)
Note: Faucet and drain assembly are not included.
3. Configuración e montaxe
This bathroom vanity requires assembly. Follow the steps carefully. It is recommended to have two people for assembly and installation.
3.1 Ferramentas necesarias (non incluídas)
- Destornillador Phillips
- Chave inglesa axustable
- Nivel
- Drill (for anti-toppling device installation)
- Sealant (for sink installation)
3.2 Pasos de montaxe
- Desembalar e inspeccionar: Carefully remove all components from the packaging. Inspect for any damage or missing parts.
- Montar a estrutura do armario: Follow the diagrams provided in the separate assembly guide (if applicable) to connect the main cabinet panels using the provided screws. Ensure all connections are secure.
- Install Drawer Slides and Hinges: Attach the drawer slides to the cabinet interior and the door hinges to the cabinet doors and frame as instructed.
- Attach Doors and Drawers: Mount the cabinet doors and insert the drawers into their respective slides. Adjust hinges for proper door alignment. Note that the top two drawers are for decoration only and cannot be opened.
- Coloca o lavabo de cerámica: Carefully place the ceramic sink top onto the assembled cabinet. Apply a bead of silicone sealant around the edges where the sink meets the cabinet to secure it and prevent water infiltration.
- Install Faucet and Drain: Install your chosen 4-inch centerset faucet and drain assembly (not included) according to their respective manufacturer's instructions.
- Secure to Wall (Anti-Toppling Device): Position the vanity in its desired location. Use the provided anti-toppling device to secure the vanity to the wall, preventing accidental tipping. Mark and drill pilot holes as necessary.

Figure 1: Sink Top Dimensions. This diagram illustrates the precise measurements of the ceramic sink top, including overall length, width, faucet hole spacing, and basin dimensións.

Figure 2: Vanity Storage Layout. This image displays the interior of the vanity, highlighting the cabinet space behind the double doors and the three functional drawers on the side.
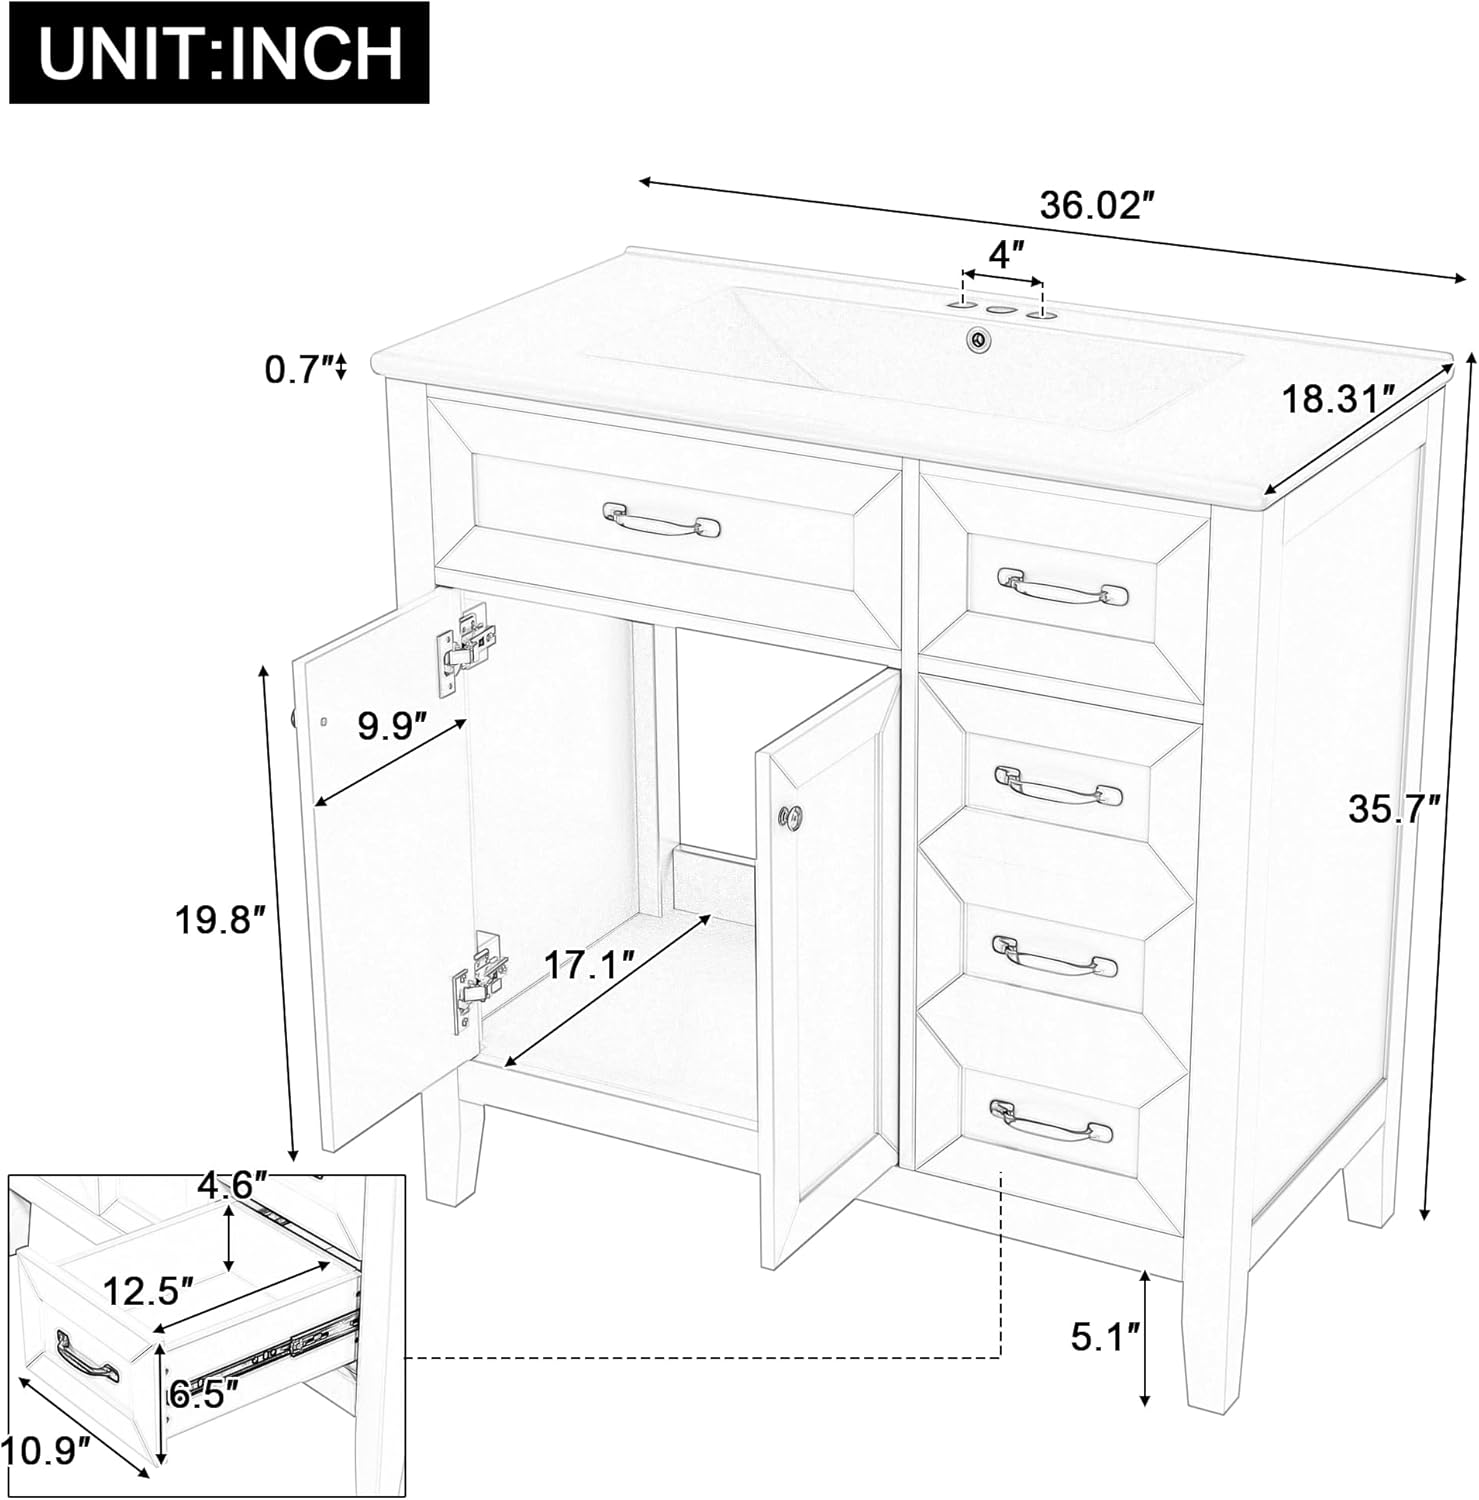
Figure 3: Overall Vanity Dimensions. This detailed diagram provides the complete measurements of the assembled vanity, including height, width, and depth.
4. Instrucións de funcionamento
The THINK 30 Bathroom Vanity is designed for practical use in a bathroom environment, offering both a functional sink and ample almacenamento.
- Uso do lavabo: The ceramic sink is designed for daily washing and hygiene. The pre-drilled three holes accommodate a 4-inch centerset faucet. The chrome-finish overflow prevents water from spilling over if the tap is accidentally left on.
- Almacenamento: Utilize the cabinet with two doors and the three drawers for organizing bathroom essentials such as soaps, towels, shampoos, and tissue paper. This helps keep items protected from dust and maintains a tidy bathroom. Note that the top two drawers are decorative and do not open.

Figure 4: Ceramic Sink Features. This image details the smooth ceramic sink, including the chrome-finish overflow and the pre-drilled holes for a 4-inch centerset faucet.
5. Mantemento e coidados
Proper care will ensure the longevity and appearance of your bathroom vanity.
- Limpeza do lavabo: The ceramic sink has a smooth, waterproof, and stain-proof finish. Clean regularly with a soft cloth and mild, non-abrasive cleaner. Rinse thoroughly and wipe dry to prevent water spots.
- Limpeza do armario: The cabinet's eco-friendly painted finish is water-proof and stain-proof. Wipe surfaces with a soft, damp cloth. Avoid harsh chemicals or abrasive cleaning pads that could damage the finish.
- Verquidos: Immediately wipe up any water spills on the cabinet surfaces to prevent water damage.
- Hardware: Periodically check and tighten any loose screws on hinges, handles, and drawer slides.
- Evitar a humidade excesiva: Ensure proper ventilation in the bathroom to minimize humidity, which can affect wood products over time.
6 Solución de problemas
If you encounter any issues with your vanity, refer to the following common problems and solutions.
| Problema | Causa posible | Solución |
|---|---|---|
| As portas dos armarios están desalinhadas. | Loose hinges or improper adjustment. | Adjust the screws on the door hinges to align the doors. Refer to hinge manufacturer's instructions for specific adjustment methods. |
| Os caixóns non esvaran con suavidade. | Obstruction in the slide mechanism or loose screws. | Check for any objects blocking the slides. Ensure all screws securing the drawer slides are tight. |
| Water spots or stains on sink/cabinet. | Hard water deposits or uncleaned spills. | Clean immediately with a soft cloth and mild cleaner. Wipe dry after each use to prevent buildup. |
| A vaidade parécese inestable. | Not properly secured to the wall or uneven floor. | Ensure the anti-toppling device is correctly installed and secured to a wall stud. Use shims under the legs if the floor is uneven. |
7. Especificacións
| Característica | Detalle |
|---|---|
| Marca | THINK 30 |
| Modelo | B0DGTSGT6T |
| Cor | Gris |
| Material | Solid Wood Frame, MDF Board |
| Material superior | Cerámica |
| Dimensións do produto (P x A x A) | 18" D x 36" W x 36" H |
| Número de portas | 2 |
| Número de caixóns | 3 (top two decorative) |
| Tipo de instalación | Autoportante, Montaxe no chan |
| Compatibilidade da billa | 4-inch centerset (faucet not included) |
| Requírese montaxe | Si |
8. Garantía e soporte
For warranty information or technical support, please contact THINK 30 customer service. Details regarding specific warranty periods and coverage may be available on the product's purchase page or by contacting the seller directly.
Fabricante: THINK 30
ASIN: B0DGTSGT6T
Para obter axuda, visite o THINK 30 Store on Amazon ou póñase en contacto co seu vendedor.