1. Introdución
This manual provides essential information for the safe and efficient operation, installation, and maintenance of your Daikin 26,000 Btu 17.7 SEER2 R-32 3-Zone Ductless Mini Split Heat Pump System. Please read this manual thoroughly before using the unit and retain it for future reference. Proper understanding and adherence to these instructions will ensure optimal performance and longevity of your system.
2. Información de seguridade
Instrucións de seguridade importantes:
- Installation and maintenance must be performed by qualified service personnel only. Improper installation can result in electric shock, fire, or water leakage.
- Do not attempt to repair, relocate, or modify the system yourself. Contact a qualified service technician for all repairs and adjustments.
- Asegúrese de desconectar a fonte de alimentación antes de realizar calquera limpeza ou mantemento.
- Non introduza os dedos nin ningún obxecto na entrada nin na saída de aire.
- Manteña a zona arredor da unidade exterior libre de obstáculos para garantir un fluxo de aire axeitado.
- Este aparello non está pensado para o seu uso por persoas (incluídos nenos) con capacidades físicas, sensoriais ou mentais reducidas, ou con falta de experiencia e coñecementos, a menos que teñan supervisión ou instrucións sobre o uso do aparello por unha persoa responsable da súa seguridade.
3. Produto rematadoview
The Daikin 3-Zone Ductless Mini Split Heat Pump System provides efficient heating and cooling for multiple areas. It consists of one outdoor unit, three indoor units, and three remote controls.

Figura 3.1: Complete Daikin 3-Zone Mini Split System. This image displays the entire system, including three white rectangular indoor units, one larger white outdoor compressor unit with a fan grille, and three white handheld remote controls.
3.1 Unidade exterior
The outdoor unit houses the compressor and condenser coil, responsible for heat exchange with the outside air.

Figura 3.2: Daikin Outdoor Unit. This image shows a close-up of the white rectangular outdoor unit, featuring a large circular fan grille on the front panel and the Daikin logo.
3.2 Unidades interiores
Each indoor unit is designed to be mounted on a wall and delivers conditioned air to a specific zone within your space.
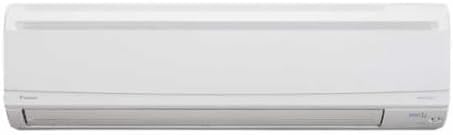
Figura 3.3: Daikin Indoor Unit. This image displays a single white, sleek, rectangular indoor unit designed for wall mounting, with an air outlet flap at the bottom.
3.3 Control remoto
The wireless remote control allows you to conveniently adjust settings for each indoor unit.
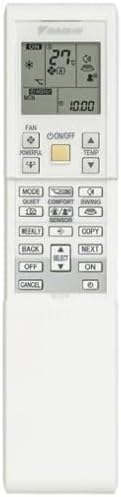
Figura 3.4: Daikin Remote Control. This image shows a white handheld remote control with an LCD screen at the top and numerous buttons for various functions like power, mode, temperature, and fan speed.
4. Configuración
4.1 Instalación
The Daikin Mini Split Heat Pump System requires professional installation. It is crucial that a certified HVAC technician performs the installation to ensure proper functioning, safety, and compliance with local codes. Attempting self-installation may void your warranty and lead to system damage or personal injury.
4.2 Encendido inicial
After professional installation, ensure the main power supply to the outdoor unit is switched on. The indoor units will typically perform an initial self-check. Refer to the installer for specific first-time startup procedures.
5. Instrucións de funcionamento
Each indoor unit is controlled independently by its dedicated remote control.
5.1 Funcións de control remoto
Familiarize yourself with the buttons on the remote control (refer to Figure 3.4). Common functions include:
- ON/OFF: Acende ou apaga a unidade.
- MODO: Selects operating mode (Cool, Heat, Fan, Dry, Auto).
- TEMP ▲/▼: Axusta a temperatura desexada.
- VENTILADOR: Changes fan speed (Auto, Low, Medium, High).
- SWING: Controls the louver's vertical airflow direction.
- TRANQUILO: Activates low noise operation.
- CONFORT: Adjusts airflow for optimal comfort.
- TEMPORIZADOR: Sets on/off timers.
5.2 Modos de funcionamento
- Modo COOL: For cooling the room. Set the desired temperature.
- HEAT Mode: For heating the room. Set the desired temperature.
- Modo FAN: Fai circular o aire sen quentar nin arrefriar.
- Modo DRY: Reduce a humidade na sala.
- Modo AUTOMÁTICO: The system automatically selects cooling or heating based on the room temperature and your set temperature.
5.3 Axuste de temperatura
Use the TEMP ▲ (up) and ▼ (down) buttons to set your desired temperature. The temperature range typically varies between 64°F (18°C) and 86°F (30°C).
5.4 Axuste da velocidade do ventilador
Press the FAN button to cycle through available fan speeds: Auto, Low, Medium, and High. Auto mode adjusts the fan speed automatically based on the room's heating or cooling needs.
6. Mantemento
Regular maintenance ensures efficient operation and extends the lifespan of your Daikin system. Always disconnect power before performing any maintenance.
6.1 Limpeza do filtro de aire
Clean the air filters in each indoor unit every two weeks, or more frequently depending on usage and air quality. Clogged filters reduce efficiency and airflow.
- Abra o panel frontal da unidade interior.
- Retire os filtros de aire.
- Clean the filters using a vacuum cleaner or wash them with lukewarm water. Allow them to dry completely before reinserting.
- Pecha o panel frontal de forma segura.
6.2 Limpeza da unidade exterior
Periodically check the outdoor unit for debris, leaves, or other obstructions that may block airflow. Gently remove any blockages. Do not spray water directly into the electrical components.
6.3 Servizo profesional
It is recommended to have your system professionally inspected and serviced by a qualified technician annually. This includes checking refrigerant levels, electrical connections, and coil cleanliness.
7 Solución de problemas
Antes de contactar co servizo técnico, volva aview os seguintes problemas e solucións comúns:
| Problema | Causa posible | Solución |
|---|---|---|
| A unidade non funciona | No power; Remote control batteries low; Timer set | Check power supply; Replace batteries; Cancel timer setting |
| Quecemento/refrixeración insuficiente | Filtros de aire sucios; Unidade exterior bloqueada; Axuste de temperatura incorrecto; Portas/fiestras abertas | Clean air filters; Clear obstructions; Adjust temperature; Close openings |
| Ruído insólito | Loose parts; Debris in fan; Refrigerant flow sound (normal) | Contact service if persistent or loud; Check for debris |
| Fuga de auga da unidade interior | Clogged drain hose; Improper installation | Contact qualified service personnel immediately |
Se o problema persiste despois de intentar estas solucións, póñase en contacto cun técnico de servizo cualificado.
8. Especificacións
Key technical specifications for the Daikin 26,000 Btu 17.7 SEER2 R-32 3-Zone Ductless Mini Split Heat Pump System:
| Especificación | Valor |
|---|---|
| Marca | DAIKIN |
| Modelo | 7K-7K-12K |
| Capacidade de refrixeración/calefacción | 26,000 BTU |
| Índice de eficiencia enerxética estacional (SEER) | 17.7 |
| Tipo de refrixerante | R-32 |
| Número de Zonas | 3-Zona |
| Wattage | 7617 vatios |
| Tipo de compresor | Rotary Scroll |
| Método de control | Mando a distancia |
| UPC | 633190238702 |
9. Garantía e soporte
For specific warranty details, please refer to the warranty card included with your product or contact Daikin customer support. Keep your proof of purchase for warranty claims.
For technical support, service inquiries, or to locate an authorized Daikin service provider, please visit the official Daikin website or contact their customer service line. Contact information can typically be found on the Daikin brand store page or in your product packaging.