
1. Produto rematadoview
This manual provides essential instructions for the safe and efficient use of your Beautiful by Drew Barrymore 2 Qt Slow Cooker Set. This set includes two individually packaged 2-quart slow cookers, ideal for preparing small meals, sauces, sides, or for keeping food warm during entertaining. Each slow cooker features three heat settings and a compact design for convenience.
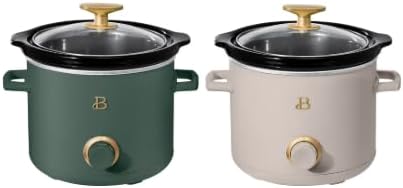
Figure 1.1: Beautiful by Drew Barrymore 2 Qt Slow Cooker Set (Porcini Taupe and Thyme Green).
This image displays both slow cookers included in the set. One is a rich Thyme Green, and the other is a soft Porcini Taupe. Both units feature a sleek matte finish, gold accents on the control knob and lid handle, and clear glass lids, showcasing their elegant design.
Características principais:
- Dual 2-Quart Capacity: Two separate slow cookers, each with a 2-quart capacity, perfect for individual dishes or entertaining.
- Tres axustes de calor: Offers Low, High, and Warm settings for versatile cooking and serving.
- Maceta de cerámica extraíble: The inner ceramic pot is removable for easy serving and cleaning.
- Construción duradeira: Long-lasting steel exterior with a matte finish.
- Asas Cool-Touch: Designed for safe and convenient transport.
- Tapa de vidro temperado: Shatter-resistant lid allows for easy monitoring of cooking progress.
- Compoñentes aptos para lavalouzas: Ceramic pot and glass lid are dishwasher safe for quick cleanup.
2. Información importante de seguridade
Please read all instructions carefully before using your slow cooker. Failure to follow these safety guidelines may result in fire, electric shock, injury, or property damage.
- Seguridade eléctrica: Always plug the slow cooker into a grounded electrical outlet. Do not immerse the base unit, cord, or plug in water or other liquids.
- Superficies quentes: The exterior surfaces of the slow cooker become hot during operation. Use oven mitts or pot holders when handling. Always use the cool-touch handles for transport.
- Manipulación de tapas: Always lift the lid away from your face to avoid steam burns.
- Nenos e animais: Keep the appliance out of reach of children and pets. Close supervision is necessary when any appliance is used near children.
- Seguridade do cable: Non deixes que o cable de alimentación colgue sobre o bordo dunha mesa ou mostrador nin toque superficies quentes.
- Danos: Non faga funcionar ningún aparello cun cable ou enchufe danados, ou despois de que o aparello funcione mal ou teña dano dalgún xeito.
- Uso previsto: Use the slow cooker only for its intended purpose, which is cooking food.
- Estabilidade: Always place the slow cooker on a stable, heat-resistant surface.
3. Configuración e primeiro uso
Desembalaxe:
- Retire coidadosamente todos os compoñentes da embalaxe.
- Retire calquera película protectora ou adhesivos do aparello.
Limpeza inicial:
- Wash the ceramic cooking pot and glass lid in warm, soapy water. Rinse thoroughly and dry completely.
- Limpar o exterior da unidade base con publicidadeamp pano. Non mergullo a unidade base na auga.
Identificación de compoñentes:

Figure 3.1: Removable Ceramic Pot and Glass Lid.
This image shows the two main removable components: the black ceramic cooking pot and the clear tempered glass lid with its distinctive gold-colored handle. These parts are designed for easy removal, cleaning, and serving.
- Unidade base: Contains the heating element and control knob.
- Ceramic Cooking Pot: The inner pot where food is cooked.
- Tapa de vidro: Covers the cooking pot to retain heat and moisture.
- Botón de control: Used to select heat settings (OFF, WARM, LOW, HIGH).
4. Instrucións de funcionamento
Funcionamento xeral:
- Place the base unit on a dry, flat, heat-resistant surface.
- Insira a pota de cociña de cerámica na unidade base.
- Add your ingredients to the ceramic pot. Do not overfill; ensure there is space between the food and the lid.
- Place the glass lid securely on the ceramic pot.
- Conecta a olla de cocción lenta a unha toma de corrente estándar de 110 V CA.
- Turn the control knob to your desired setting:
- BAIXO: For slow cooking over a longer period.
- ALTO: Para unha cocción máis rápida.
- QUENTO: To keep cooked food at a serving temperature. Do not use the WARM setting for cooking raw food.
- Once cooking is complete, turn the control knob to the 'OFF' position and unplug the appliance.
- Deixe que a cociña lenta se arrefríe completamente antes de limpala.

Figure 4.1: Thoughtfully Designed Features.
This image illustrates the thoughtful design elements of the slow cooker, including the shatter-resistant tempered glass lid, cool-touch handles for safe portability, and the three distinct heat settings (Low, High, and Warm) accessible via the front control knob.
Consellos para obter os mellores resultados:
- Avoid lifting the lid frequently during cooking, as this can extend cooking times.
- For recipes requiring browning, sear meats in a separate pan before adding to the slow cooker.
- Liquids do not evaporate as quickly in a slow cooker, so reduce liquid amounts compared to conventional recipes.

Figure 4.2: Easy Serving with Removable Pot.
This image shows a user utilizing oven mitts to safely lift the removable ceramic pot from the slow cooker's base. This highlights the convenience of the design, allowing for easy transfer of food from the cooker to the serving area.
5. Mantemento e Limpeza
Unha limpeza e un mantemento axeitados garantirán a lonxevidade e o rendemento óptimo da súa pota de cocción lenta.
Instrucións de limpeza:
- Desconecte sempre a pota de cocción lenta e déixea arrefriar completamente antes de limpala.
- The ceramic cooking pot and glass lid are dishwasher safe. Alternatively, they can be washed by hand in warm, soapy water. Avoid abrasive cleaners or scouring pads that could damage the surfaces.
- Limpe o exterior da unidade base cun pano suave eamp pano. Non use produtos químicos agresivos ou materiais abrasivos.
- Asegúrate de que todas as pezas estean completamente secas antes de gardalas ou de usalas de novo.
Almacenamento:
Store the slow cooker in a dry place. You can store the lid inverted on the ceramic pot, and then place the pot inside the base unit to save space.
6 Solución de problemas
Se tes algún problema coa túa pota de cocción lenta, consulta os seguintes problemas e solucións comúns:
- O aparello non se acende:
- Asegúrate de que o cable de alimentación estea conectado correctamente a unha toma de corrente que funcione.
- Check if the control knob is set to 'LOW', 'HIGH', or 'WARM' (not 'OFF').
- Verify that the outlet is functioning by plugging in another appliance.
- Food is not cooking properly:
- Ensure the lid is properly seated on the ceramic pot to retain heat.
- Confirm that the correct heat setting (LOW or HIGH) has been selected for your recipe.
- Avoid frequently lifting the lid, as this releases heat and extends cooking time.
- Food is sticking to the ceramic pot:
- Ensure there is sufficient liquid in the recipe.
- For easier cleanup, you may lightly grease the ceramic pot before adding ingredients.
- Soak the pot in warm, soapy water after use to loosen stuck-on food.
- Exterior of the unit is hot:
- This is normal during operation. Always use the cool-touch handles for transport and oven mitts when handling the hot lid or ceramic pot.
7. Especificacións
| Característica | Especificación |
|---|---|
| Marca | Fermosa de Drew Barrymore |
| Número de modelo | 19565 |
| Capacidade | 2 Quarts (each unit) |
| Cor | Porcini Taupe and Thyme Green |
| Material | Ceramic (pot), Steel (exterior), Tempered Glass (lid) |
| Dimensións do produto | 8.34" D x 9.68" W x 6.53" H |
| Wattage | 210 vatios |
| Voltage | 110 voltios |
| Método de control | Pomo rotativo |
| Número de configuracións | 3 (Baixo, Alto, Quente) |
| Pezas seguras para lavalouzas | Ceramic Pot and Glass Lid |
| Peso do elemento | 5 pounds (each unit) |
8. Garantía e soporte
For detailed warranty information, product registration, or customer support, please refer to the documentation included with your product packaging or visit the official Beautiful by Drew Barrymore websitio. Teña á man o número de modelo (19565) e a data de compra cando contacte co servizo de asistencia.