
1. Introdución
This manual provides comprehensive instructions for the safe and efficient operation, setup, and maintenance of your La Pavoni LPSCCB01US CELLINI CLASSIC Semi-Professional Espresso Machine. Please read this manual thoroughly before using the appliance and retain it for future reference.
The La Pavoni CELLINI CLASSIC is designed for semi-professional use, featuring a traditional design with rotary valves, cool-touch wands, and a robust AISI 304 bodywork. It incorporates an electronic automatic water level system, an anti-vacuum valve, a removable water tank, and a boiler manometer for precise control and ease of use.
2. Instrucións de seguridade importantes
Cando se utilicen aparellos eléctricos, deben seguirse sempre as precaucións básicas de seguridade para reducir o risco de incendio, descarga eléctrica e/ou lesións ás persoas, incluíndo as seguintes:
- Read all instructions before using the espresso machine.
- Non toque superficies quentes. Use asas ou botóns.
- Para protexerse contra incendios, descargas eléctricas e lesións persoais, non mergulle o cable, os enchufes nin o aparello en auga ou noutro líquido.
- É necesaria unha estreita supervisión cando calquera aparello é usado por nenos ou preto de eles.
- Desenchufe da toma cando non estea en uso e antes de limpalo. Deixar arrefriar antes de poñer ou quitar pezas e antes de limpar o aparello.
- Non faga funcionar ningún aparello cun cable ou enchufe danados ou despois de que o aparello funcione mal, ou teña danado de calquera xeito.
- O uso de accesorios non recomendados polo fabricante do aparello pode provocar incendios, descargas eléctricas ou lesións ás persoas.
- Non use ao aire libre.
- Non deixes que o cable colgue do bordo da mesa ou do mostrador nin toque superficies quentes.
- Non o coloque sobre ou preto dun queimador eléctrico ou de gas quente, nin nun forno quente.
- Conecte sempre primeiro o enchufe ao aparello e despois enchufe o cable á toma de corrente. Para desconectar, desactiva calquera control e, a continuación, retire o enchufe da toma de corrente.
- Non use o aparello para outros usos que os previstos.
- Poden producirse queimaduras se se retira a tapa do depósito de auga durante o ciclo de preparación.
3. Produto rematadoview
The La Pavoni CELLINI CLASSIC espresso machine is engineered for optimal performance and durability. Below are its key components and features:
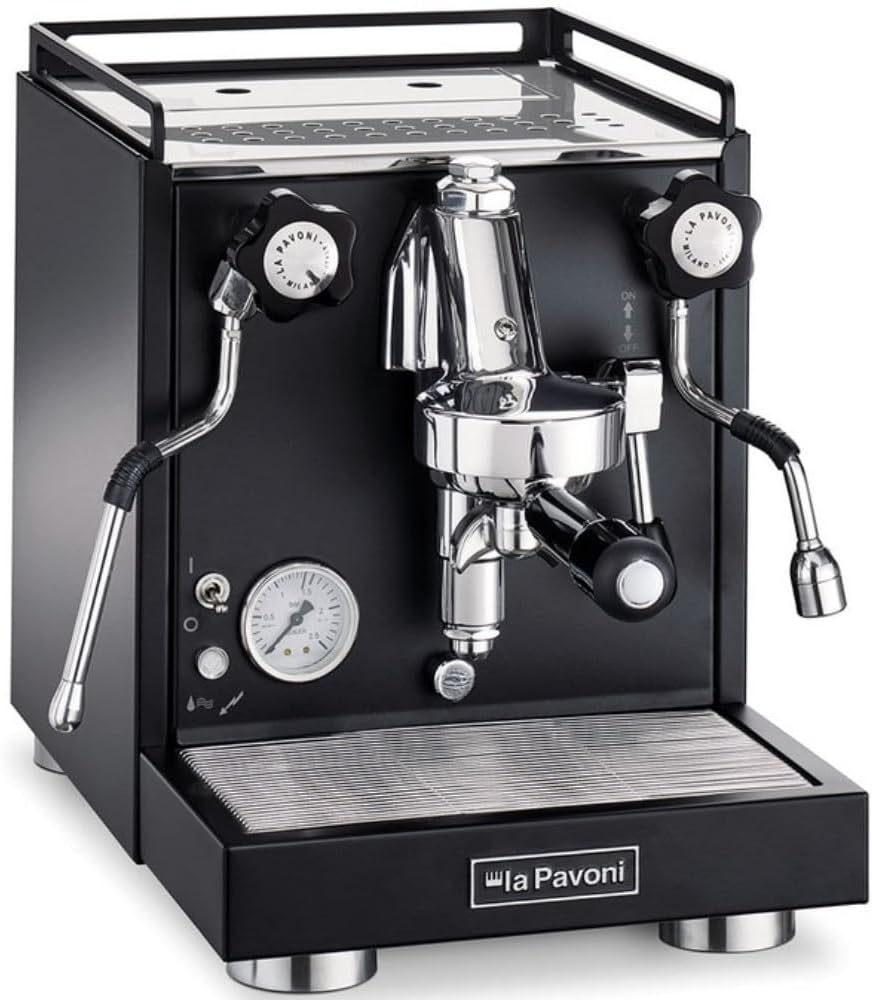
Figura 1: Fronte view of the La Pavoni CELLINI CLASSIC Espresso Machine, showcasing the group head, steam and hot water wands, pressure gauge, and control knobs.
Características principais:
- Electronic Automatic Water Level: Ensures the boiler maintains the correct water volume automatically.
- Anti-Vacuum Valve: Prevents vacuum formation inside the boiler during cooling.
- Depósito de auga extraíble: Facilitates easy refilling and cleaning, with a capacity of 2.9 liters.
- Boiler Manometer: Displays the boiler pressure for monitoring system status.
- Temperature Light Indicator: Illuminates to indicate when the machine has reached optimal brewing temperature.
- Cool Touch Wands: Both the steam and hot water wands are made of stainless steel and designed to remain cool to the touch during operation, enhancing safety.
- E61 Brewing Group: A classic, robust brass brewing group known for its temperature stability and pre-infusion capabilities.
- Copper & Brass Boiler: A durable 1.8-liter boiler constructed from copper and brass for excellent heat retention.
- Vibration Pump: Provides 15 bar of pressure for optimal espresso extraction.
- Quentador de cuncas pasivo: Located on top of the machine, it utilizes residual heat to warm espresso cups.
4. Configuración
4.1 Desembalaxe
Carefully remove the espresso machine and all accessories from the packaging. Retain packaging materials for future transport or storage.
4.2 Colocación
Place the machine on a stable, level, and heat-resistant surface. Ensure adequate clearance around the machine for ventilation and access to the water tank and power cord. Avoid placing it near heat sources or in direct sunlight.
4.3 Recheo do depósito de auga
- Retire o depósito de auga da parte traseira da máquina.
- Fill the tank with fresh, cold, filtered water up to the maximum fill line. The tank has a capacity of 2.9 liters.
- Carefully reinsert the water tank into its position, ensuring it is seated correctly.
4.4 Conexión de alimentación
Ensure the machine's power switch is in the OFF position. Plug the power cord (1.8 m length) into a grounded 120V, 60Hz electrical outlet. The machine operates at 1400W.
4.5 Arranque inicial e cebado
- Turn the main power switch to the ON position. The temperature light indicator will illuminate.
- The pump will activate briefly to fill the boiler. This is normal.
- Open the steam valve for a few seconds until water flows out, then close it. This purges air from the steam wand.
- Open the hot water valve for a few seconds until water flows out, then close it. This purges air from the hot water wand.
- Allow the machine to heat up. The boiler manometer will show increasing pressure. The temperature light indicator will turn off once the optimal temperature is reached, typically within 15-20 minutes.
5. Instrucións de funcionamento

Figura 2: Fronte view highlighting the control knobs for steam and hot water, and the brew lever.
5.1 Preparación de café expreso
- Ensure the machine is fully heated and the temperature light is off.
- Grind fresh coffee beans to an espresso-fine consistency.
- Dose the portafilter with the desired amount of ground coffee and tamp uniformemente.
- Insert the portafilter into the E61 brewing group and lock it into place.
- Coloca a(s) cunca(s) de café expreso debaixo dos bicos do portafiltro.
- Lift the brew lever fully to initiate the brewing process. The pump will activate.
- Monitor the espresso extraction. Once the desired volume is reached (typically 25-30 seconds for a double shot), lower the brew lever to stop the flow.
- Remove the portafilter, discard the spent coffee grounds, and rinse the portafilter.
5.2 Using the Steam Wand
The stainless steel cool-touch steam wand is used for frothing milk for lattes and cappuccinos.
- Ensure the machine is at steaming temperature (boiler manometer will indicate higher pressure than brewing).
- Purge any condensed water from the steam wand by briefly opening the steam rotary knob and closing it.
- Immerse the tip of the steam wand just below the surface of cold milk in a frothing pitcher.
- Slowly open the steam rotary knob to release steam.
- Once the milk reaches the desired temperature and texture, close the steam rotary knob.
- Limpe inmediatamente a lanza de vapor con adamp pano para evitar que os residuos de leite se sequen.
5.3 Using the Hot Water Wand
The stainless steel cool-touch hot water wand provides hot water for americanos, tea, or pre-warming cups.
- Coloque unha cunca debaixo da variña de auga quente.
- Open the hot water rotary knob to dispense hot water.
- Close the knob once the desired amount of hot water is dispensed.
6. Mantemento

Figura 3: Lateral view of the espresso machine, showing the removable water tank access.
6.1 Limpeza diaria
- Bandexa de goteo: Empty and clean the drip tray daily. Wash with warm, soapy water and rinse thoroughly.
- Steam and Hot Water Wands: After each use, wipe the wands with a damp cloth. Periodically, remove the tip and clean any dried milk or mineral deposits.
- Portafiltros e cestos: Enxágüe o portafiltro e as cestas do filtro despois de cada uso.
- Xefe de grupo: Perform a quick backflush with a blind filter (without coffee) to rinse the group head.
6.2 Limpeza semanal
- Group Head Backflush: Perform a thorough backflush with espresso machine cleaning detergent. Follow the detergent manufacturer's instructions.
- Depósito de auga: Remove and clean the water tank with warm, soapy water. Rinse thoroughly to prevent mold or mineral buildup.
6.3 Descalcificación
The frequency of descaling depends on your water hardness. It is recommended to descale every 2-3 months or as needed. Use a descaling solution specifically designed for espresso machines and follow the product's instructions carefully. Regular descaling prevents mineral buildup and ensures optimal machine performance.
7 Solución de problemas
This section addresses common issues you might encounter with your espresso machine. For problems not listed here, please contact customer support.
| Problema | Causa posible | Solución |
|---|---|---|
| A máquina non se acende | No power, faulty outlet, power cord not connected | Check power cord connection, try a different outlet, ensure power switch is ON. |
| Sen fluxo de auga dende o cabezal do grupo | Water tank empty, pump not primed, blockage | Refill water tank, prime the pump (see Setup), check for blockages in portafilter or group head. |
| Weak steam from wand | Wand tip clogged, machine not at steaming temperature | Clean steam wand tip, allow machine to fully heat up to steaming temperature. |
| Extraccións de café expreso demasiado rápidas/lentas | Coffee grind too coarse/fine, incorrect tamping | Adjust grind size (finer for slow, coarser for fast), ensure consistent tamppresión ing. |
| Water tank empty alarm activates | O nivel da auga é baixo | Enche o depósito de auga. |
8. Especificacións
Detailed technical specifications for the La Pavoni LPSCCB01US CELLINI CLASSIC Espresso Machine:
| Característica | Especificación |
|---|---|
| Nome do modelo | LPSCCB01US CELLINI CLASSIC |
| Marca | A Pavoni |
| Cor | Negro Mate |
| Poder | 1400 W |
| Voltage | 120 V |
| Frecuencia | 60 Hz |
| Tipo de caldeira | Single Boiler w/ Heat Exchanger |
| Material da caldeira | Cobre e latón |
| Capacidade da caldeira | 1.8 litros |
| Capacidade do depósito de auga | 2.9 litros |
| Tipo de bomba | Vibración |
| Presión da bomba | 15 bar |
| Grupo Cervexeiro | E61 (Brass, Chromed) |
| Steam Wand Material | Stainless Steel - Cool Touch |
| Water Wand Material | Stainless Steel - Cool Touch |
| Dimensións (PxWxH) | 430 x 295 x 365 mm |
| Peso neto | 23 kg (50.7 lb) |
| Lonxitude do cable de alimentación | 1.8 m |
| Características especiais | Electronic Automatic Water Level, Anti-Vacuum Valve, Removable Water Tank, Boiler Manometer, Temperature Light Indicator |
| Modo de operación | Manual |
| Feito en | Italia |
9. Garantía e soporte
For warranty information and customer support, please refer to the documentation provided with your purchase or contact the retailer. Keep your proof of purchase for any warranty claims.