
1. Introdución
This manual provides detailed instructions for the installation, operation, and maintenance of your AlienRider M2PRO-201 Motorcycle Smart System. This system integrates advanced features such as wireless CarPlay/Android Auto, a 1080P HD dashcam, rear-view streaming, and comprehensive blind spot detection to enhance your riding experience and safety. Please read this manual thoroughly before using the product to ensure proper function and to prevent damage.
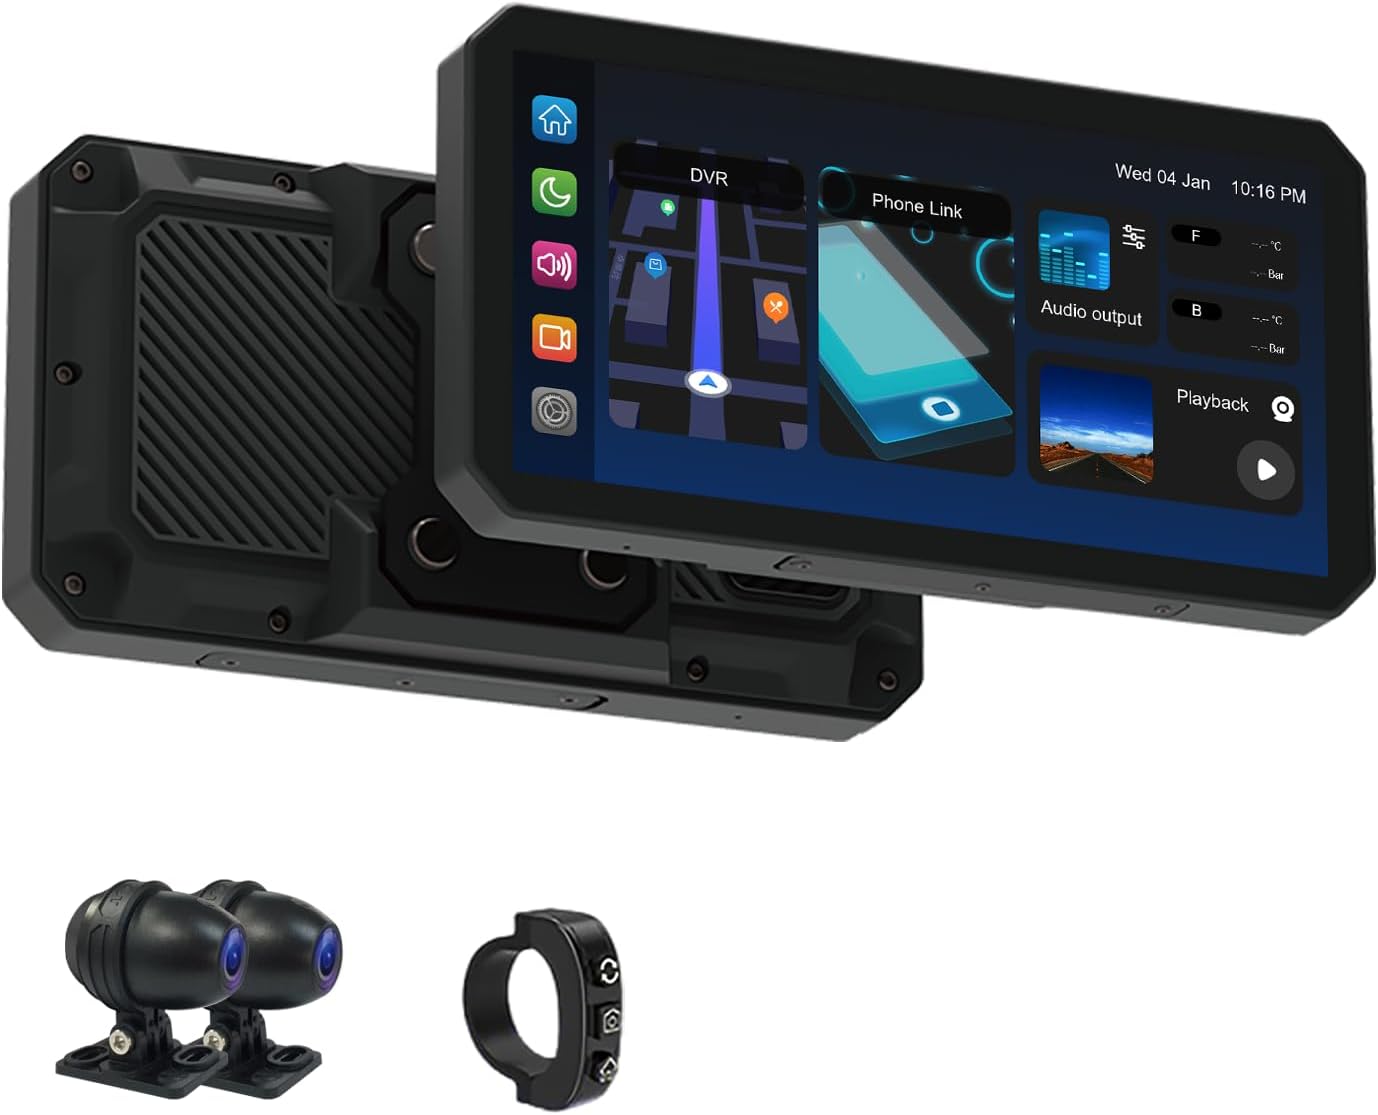
Figura 1.1: AlienRider M2PRO-201 Main Unit, Cameras, and Wired Controller. This image displays the primary components of the AlienRider M2PRO-201 system, including the central display unit, two external cameras, and a compact wired controller.
2. Información de seguridade
Always prioritize safety when installing and operating electronic devices on your motorcycle. Improper installation or use can lead to accidents or damage to the device and motorcycle.
- Asegúrate de que o dispositivo estea montado de forma segura e que non obstrua a túa view or interfere with motorcycle controls.
- All wiring should be properly routed and secured to prevent entanglement, chafing, or interference with moving parts.
- Avoid operating the device or making significant setting changes while riding. Perform adjustments only when the motorcycle is safely stopped.
- The system is IP68 waterproof; however, avoid submerging it or exposing it to high-pressure water jets.
- Consult a professional motorcycle technician if you are unsure about any installation steps.
3. Contido do paquete
Verify that all items listed below are present in your package. If any items are missing or damaged, please contact customer support.
- AlienRider M2PRO-201 Host Unit (Display)
- Front Camera (1080P HD)
- Rear Camera (1080P HD)
- Controlador por cable
- Cable de alimentación
- Camera Extension Cables
- Soportes de montaxe e hardware
- Manual de usuario
Note: Optional accessories such as TPMS sensors or radar units may be included depending on your specific package.
4. Produto rematadoview
The AlienRider M2PRO-201 is a comprehensive smart system designed for motorcycles, integrating navigation, recording, and safety features into a single unit.
4.1 Características principais
- High-Brightness IPS Touchscreen: A 1200-nit, 1440x720 resolution display ensures clear visibility even in direct sunlight.
- CarPlay sen fíos e Android Auto: Integración perfecta co teu teléfono intelixente para navegación, música e comunicación.
- 1080P HD Dual Dashcam: Front and rear cameras record high-definition video with starlight-level night vision, loop recording, and G-sensor incident detection.
- Detección de puntos cegos (BSD): Utilizes 77G mmWave radar to monitor blind spots and provide warnings for approaching vehicles.
- Lane Change Assist (LCA): Alerts you to vehicles in adjacent lanes during lane changes.
- Rear Collision Warning (RCW): Provides warnings for rapidly approaching vehicles from the rear.
- Deseño impermeable IP68: Ensures durability and performance in various weather conditions.
- Real-Time TPMS (Optional): Monitors tire pressure and temperature with alerts for abnormalities.

Figura 4.1: AlienRider M2PRO-201 System Settings Interface. This image shows the main screen of the device with various icons representing different settings and functions, such as record resolution, date and time, screen saver, language, and connection options.
5. Configuración e instalación
Proper installation is crucial for the performance and safety of the M2PRO-201 system. Follow these steps carefully.
5.1 Mounting the Host Unit
- Choose a suitable location on your motorcycle's handlebars or dashboard that provides a clear view of the screen without obstructing your riding view ou controis.
- Attach the mounting bracket to the host unit.
- Securely fasten the bracket to your chosen location using the provided hardware. Ensure it is stable and does not vibrate excessively.
5.2 Instalación de cámaras
- Cámara frontal: Mount the front camera in a position that provides an unobstructed view of the road ahead, typically near the headlight or front fender.
- Cámara traseira: Mount the rear camera to capture a clear view of the road behind, usually near the license plate or rear fender.
- Ensure both cameras are securely fastened and their lenses are clean and free from obstructions.
5.3 Connecting the Wired Controller
The wired controller allows for easy access to key functions while riding.
- Mount the wired controller on your handlebars within easy reach.
- Connect the controller cable to the designated port on the host unit.
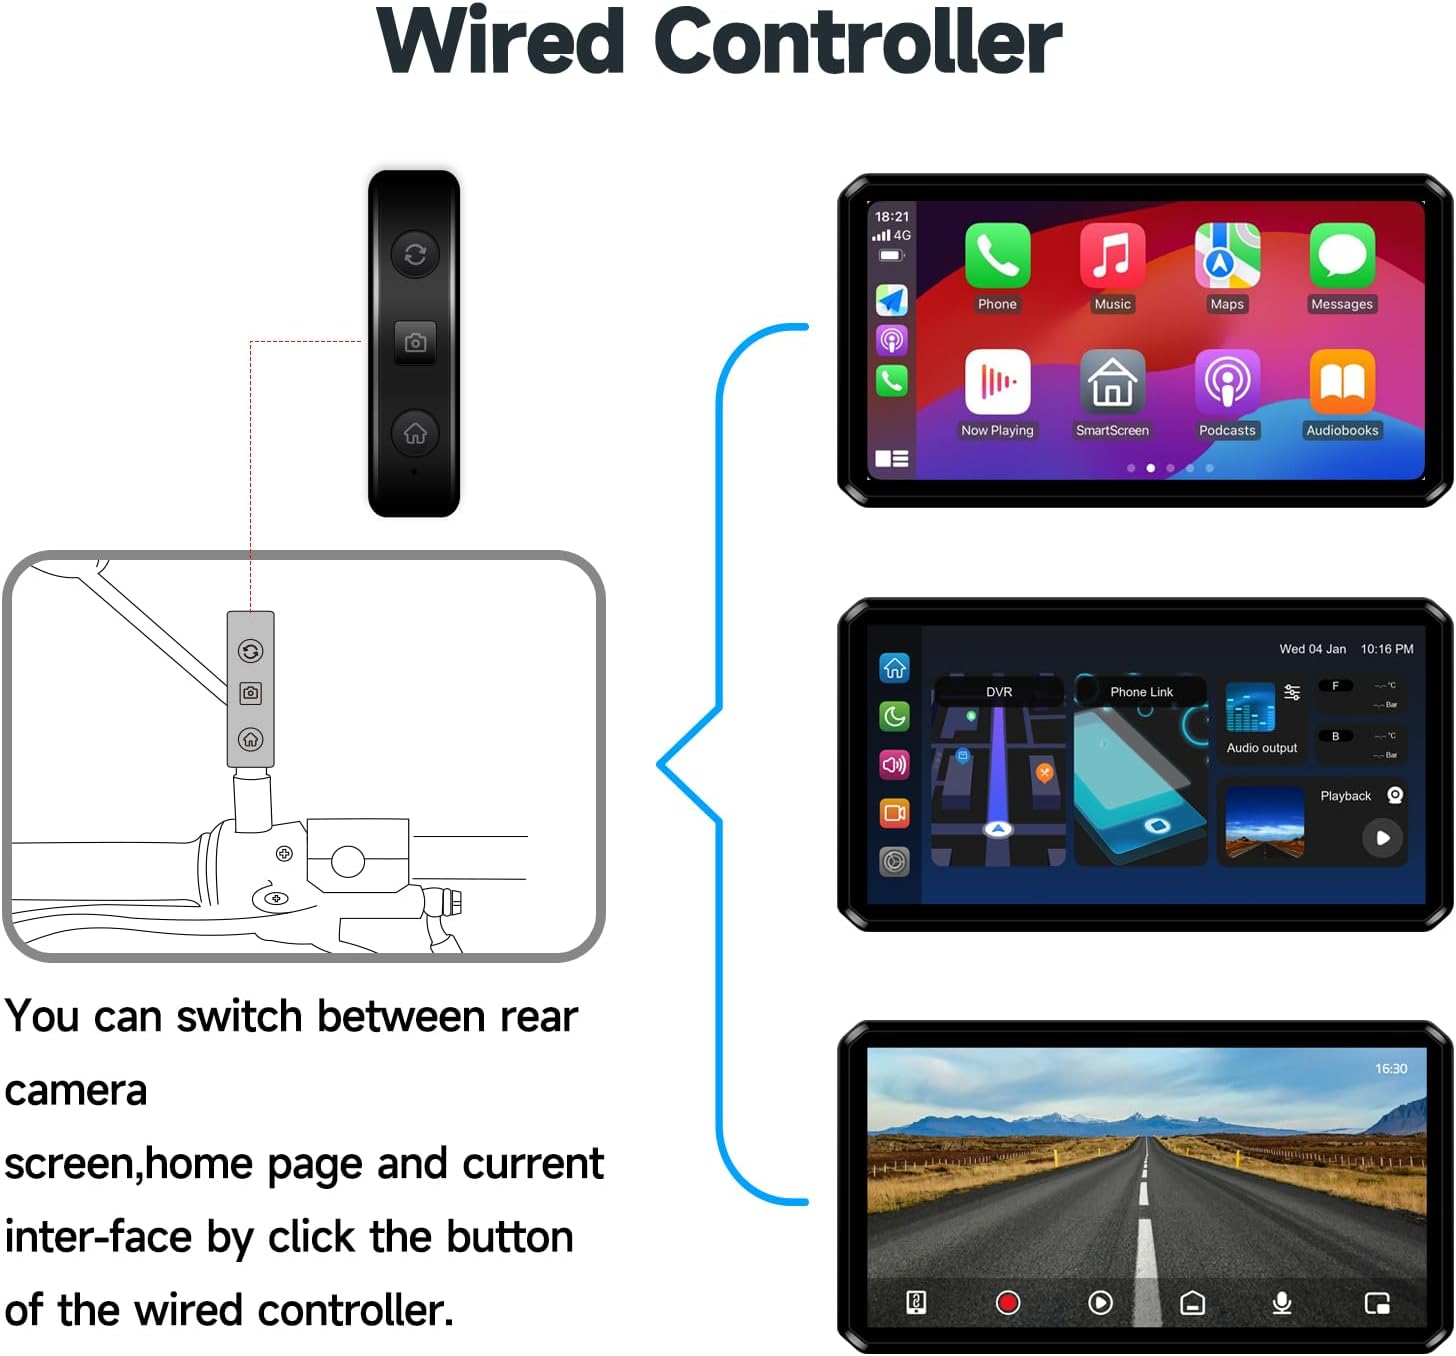
Figura 5.1: Wired Controller Functions. This diagram illustrates how the wired controller connects to the main unit and allows switching between the rear camera view, home page, and current interface with a single button click.
5.4 Diagrama de cableado
Follow the wiring diagram carefully to connect the power, cameras, and other components to the host unit. Ensure all connections are secure and waterproof.
- Conecta o ACC (vermello) wire to a switched 12V power source on your motorcycle.
- Conecta o Power Positive Pole (Yellow) wire to a constant 12V power source.
- Conecta o Negative Pole of Power Supply (Black) wire to the motorcycle's ground.
- Connect the Front Camera to the Front camera interface (4Pin).
- Connect the Rear Camera to the Rear camera interface (4Pin).
- Connect the Wired Controller to the Button interface (4Pin).
- If applicable, connect the Radar unit to its designated port.

Figura 5.2: Installation and Wiring Diagram. This detailed diagram illustrates the placement of the host unit, front and rear cameras, radar (if included), and wired controller on a motorcycle, along with the necessary electrical connections for each component.
6. Instrucións de funcionamento
6.1 Acendido/Apagado
- The system will automatically power on when the motorcycle ignition is turned on (ACC power).
- To power off, turn off the motorcycle ignition. The system will save recordings and shut down automatically.
6.2 Navegando pola interface
The M2PRO-201 features a touch-sensitive IPS display. Swipe and tap to navigate through menus and select functions. The main screen typically displays navigation, dashcam view, and connectivity options.
CarPlay sen fíos 6.3 / Android Auto
- Asegúrate de que Bluetooth e Wi-Fi estean activados no teu smartphone.
- On the M2PRO-201, select the CarPlay or Android Auto icon.
- Siga as instrucións na pantalla para emparellar o teléfono mediante Bluetooth.
- Once paired, the system will automatically establish a Wi-Fi connection for CarPlay or Android Auto functionality.
6.4 Dashcam Operation
- Gravación automática: The dashcam automatically begins recording when the system powers on.
- Gravación en bucle: Older footage is overwritten by new recordings when the storage card is full. Important videos can be locked to prevent overwriting.
- Sensor G: In the event of a sudden impact or collision, the G-sensor automatically locks the current video segment to prevent it from being overwritten.
- Reprodución: Access recorded videos through the 'Playback' or 'DVR' option on the main interface.
6.5 Blind Spot Detection (BSD) System
The 77G mmWave radar continuously monitors your blind spots and provides visual and audible warnings.
- BSD (Detección de Punto Cego): Warns of vehicles in your blind spots.
- LCA (asistente de cambio de carril): Provides an alert if a vehicle is detected in your blind spot when you signal a lane change.
- RCW (Rear Collision Warning): Alerts you to vehicles approaching rapidly from the rear.
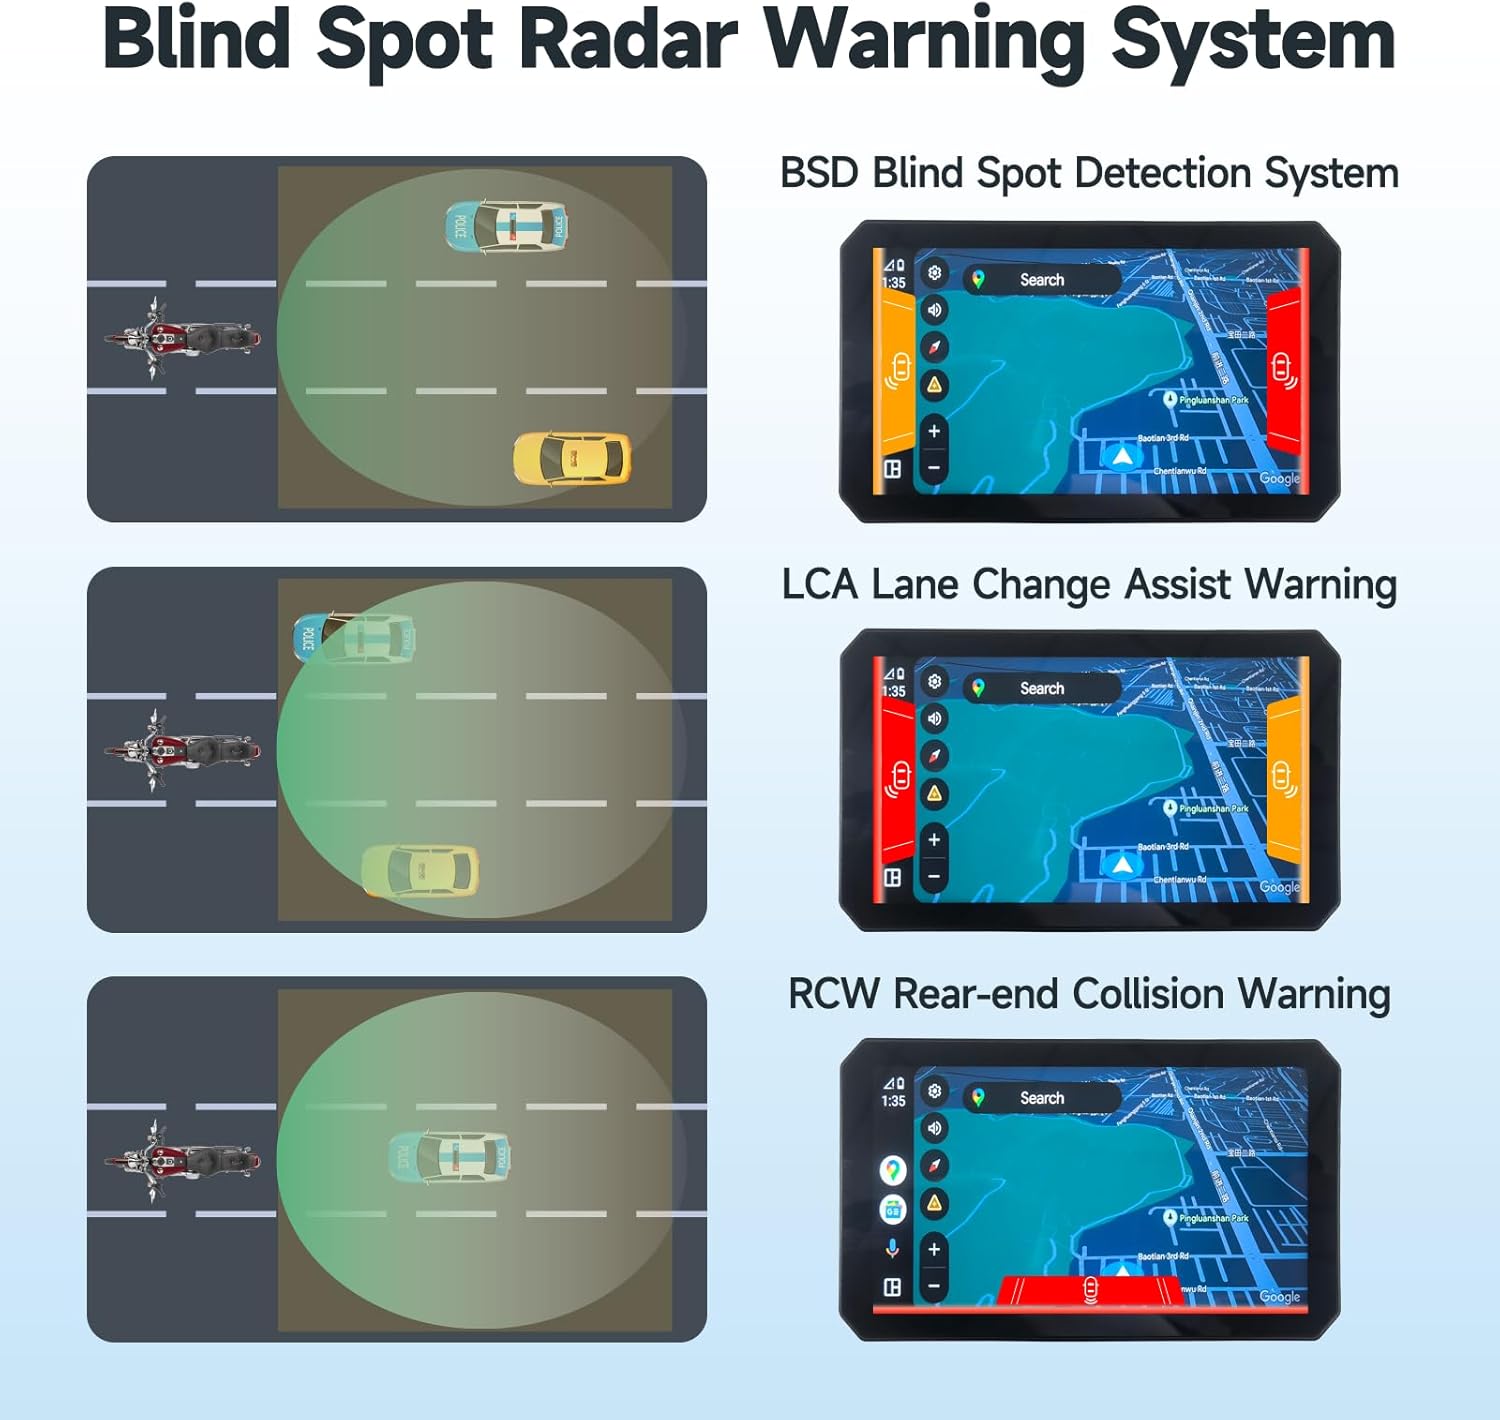
Figura 6.1: Blind Spot Radar Warning System Visuals. This image displays three scenarios: BSD (Blind Spot Detection), LCA (Lane Change Assist), and RCW (Rear-end Collision Warning), showing how the system visually alerts the rider to potential hazards on the screen.
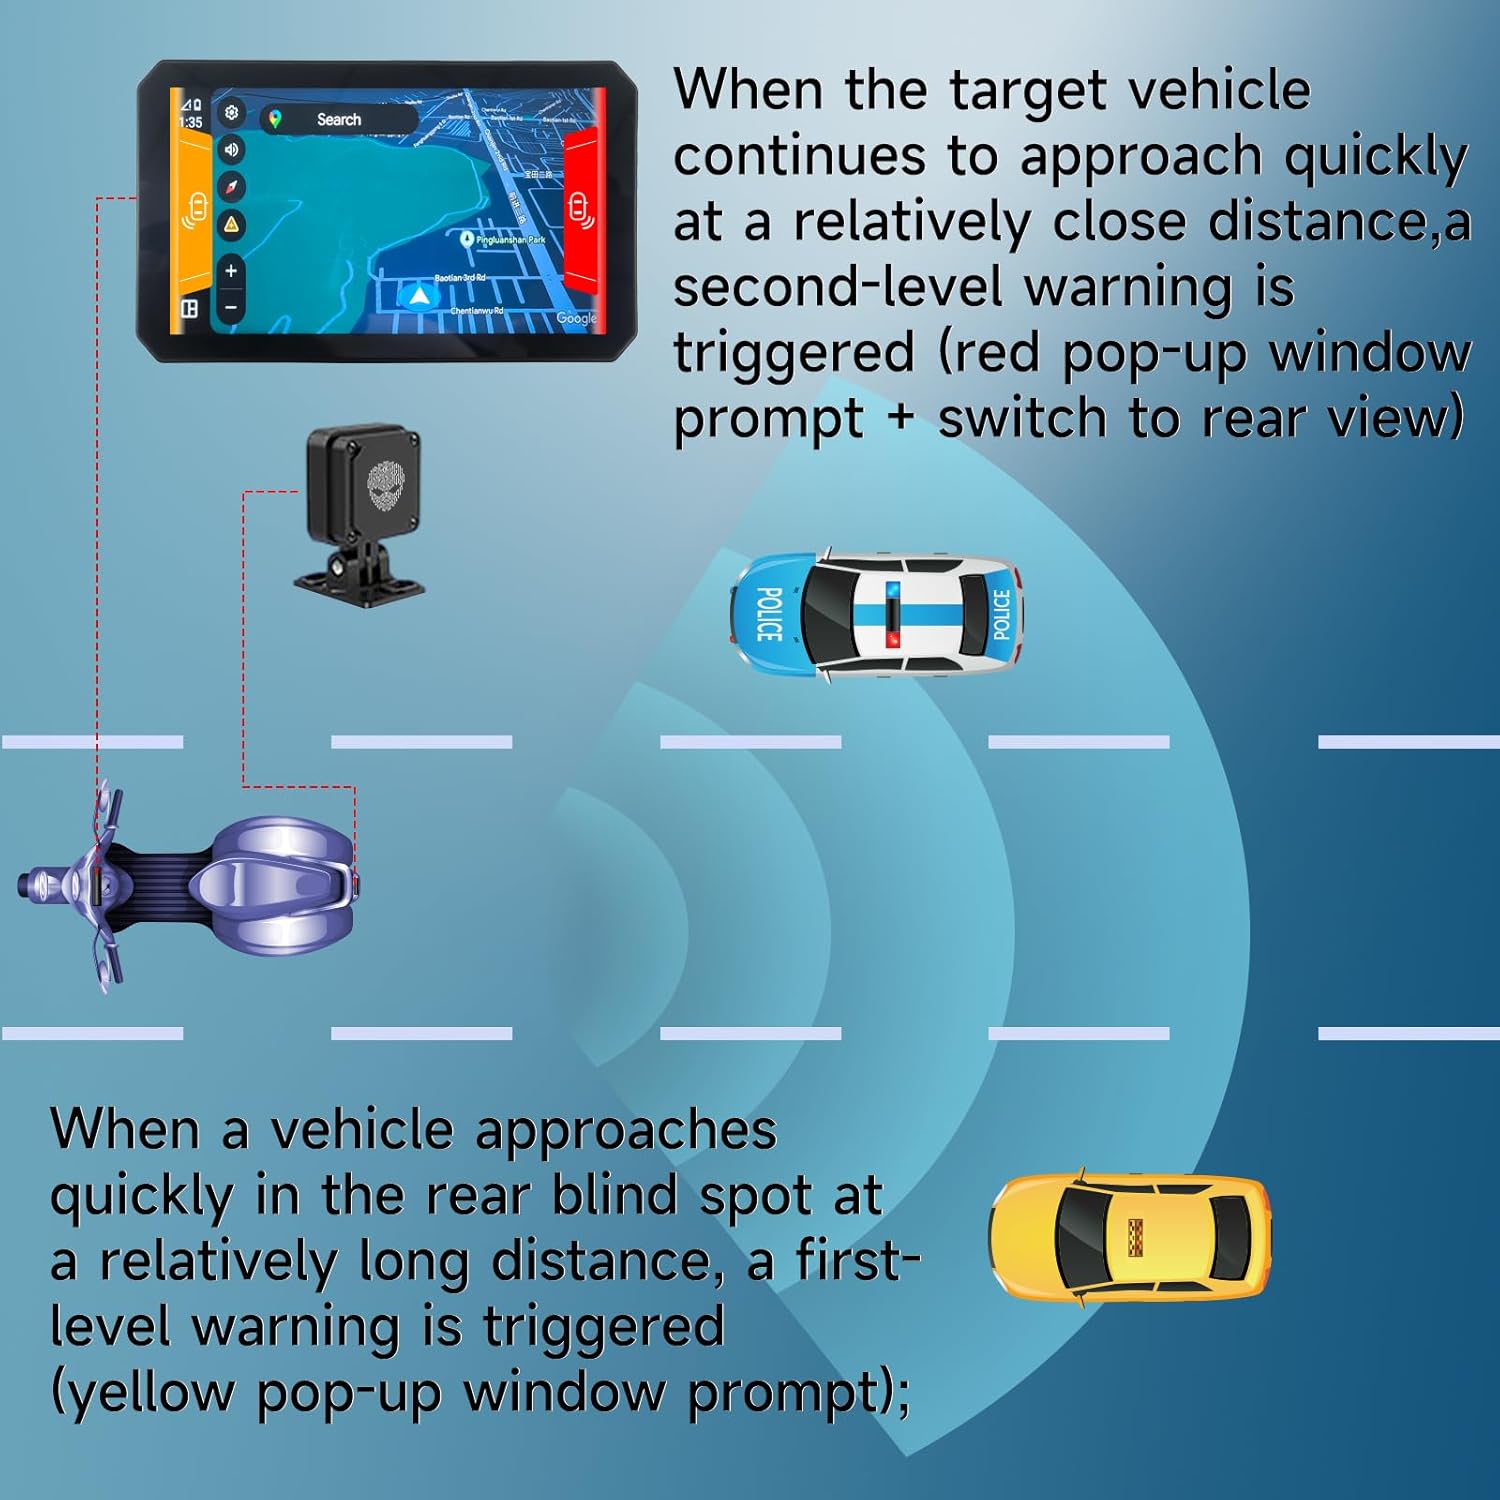
Figura 6.2: Blind Spot Warning Levels. This diagram illustrates the two levels of warnings: a first-level (yellow pop-up) for a vehicle approaching at a long distance in the rear blind spot, and a second-level (red pop-up with rear view switch) for a target vehicle approaching quickly at a close distance.
6.6 TPMS (Tire Pressure Monitoring System) - Optional
If your package includes TPMS sensors, the system will display real-time tire pressure and temperature. Alerts will be triggered if values fall outside preset safe ranges.
- Install the TPMS sensors according to their separate instructions.
- On the M2PRO-201, navigate to the TPMS section.
- Pair the sensors with the system as prompted.
- Monitor tire data and respond to any alerts promptly.
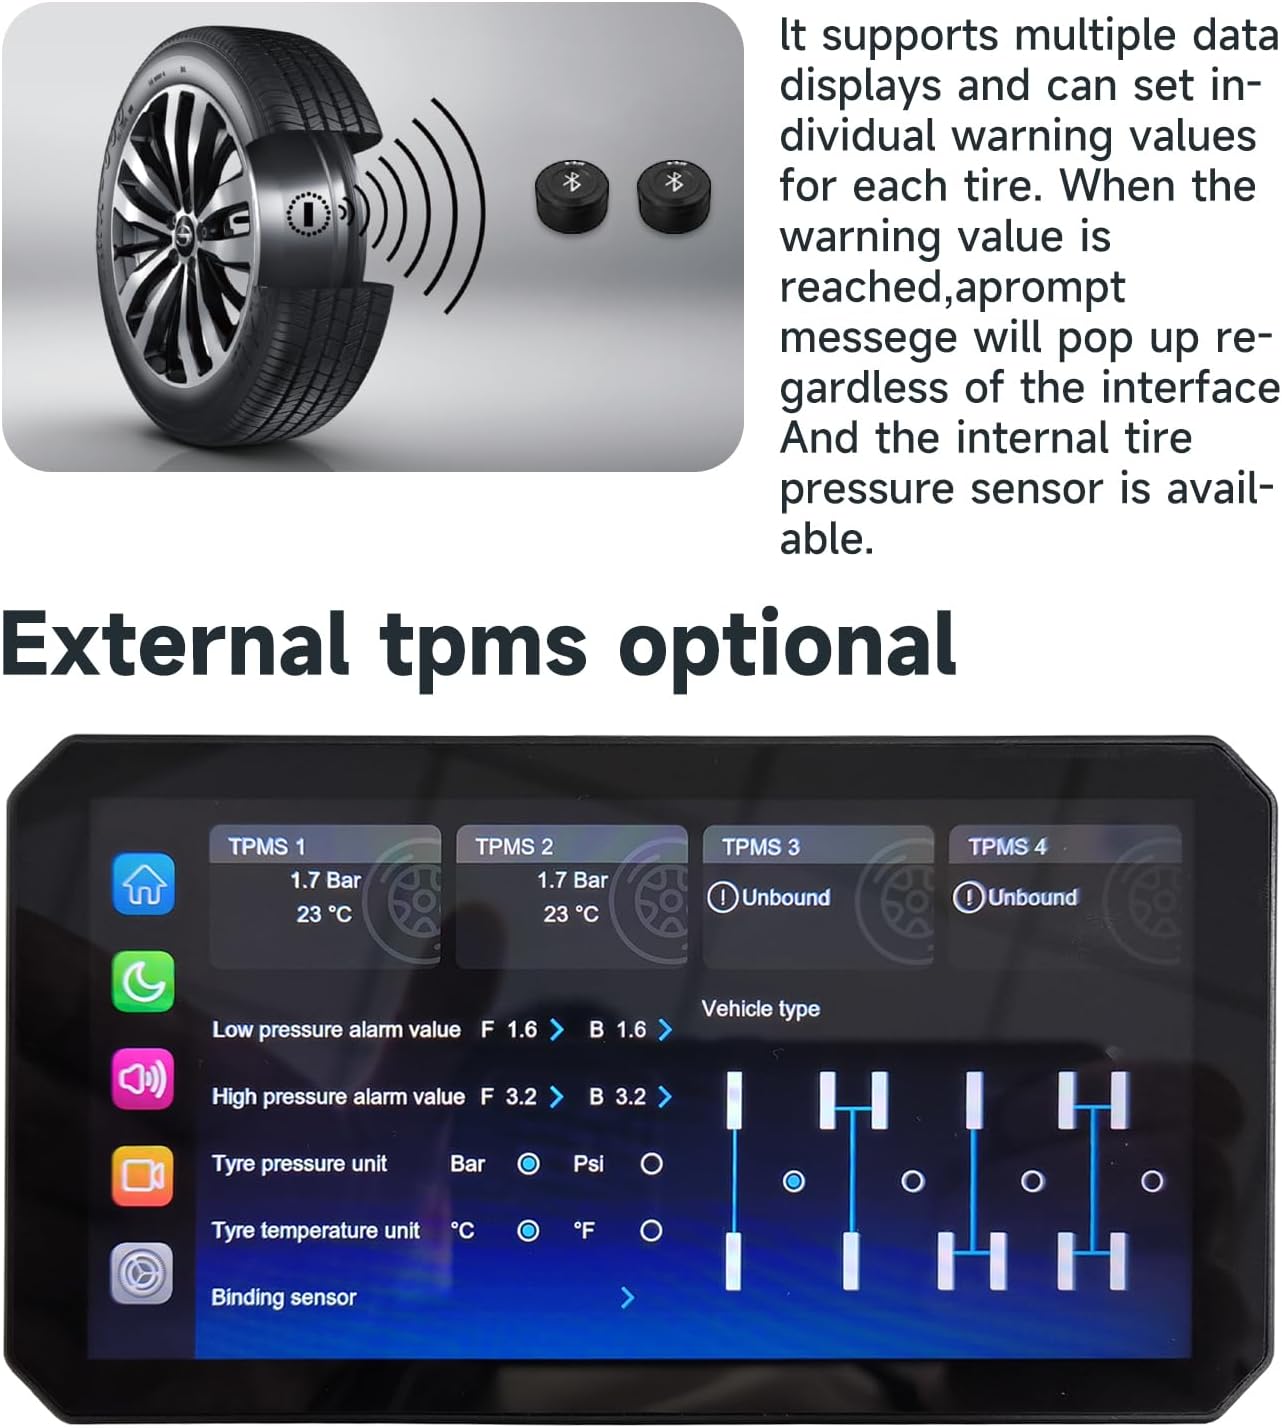
Figura 6.3: TPMS Display Interface. This image shows the system's screen displaying real-time data for up to four tires, including pressure and temperature, along with settings for alarm values and tire pressure units.
7. Mantemento
- Limpeza: Use un suave, damp cloth to clean the display and camera lenses. Avoid abrasive cleaners or solvents.
- Actualizacións de firmware: Comprobe periodicamente o fabricante websitio para actualizacións de firmware que garantan un rendemento óptimo e o acceso a novas funcións.
- Tarxeta de almacenamento: Format the storage card regularly (e.g., monthly) to maintain optimal recording performance. Back up important videos before formatting.
8 Solución de problemas
| Problema | Causa posible | Solución |
|---|---|---|
| O sistema non se acende. | Incorrect power connection; Blown fuse. | Check power wiring (ACC, positive, negative). Verify motorcycle fuse. |
| No camera display. | Camera cable loose or damaged; Camera faulty. | Ensure camera cables are securely connected. Test with another camera if available. |
| CarPlay/Android Auto non se conecta. | Bluetooth/Wi-Fi off on phone; Pairing issue. | Ensure phone's Bluetooth/Wi-Fi is on. Forget device and re-pair. Restart phone and system. |
| Poca calidade de vídeo. | Dirty camera lens; Incorrect resolution setting; Faulty SD card. | Clean camera lenses. Check video resolution settings. Format or replace SD card. |
| Blind Spot Detection not working. | Radar unit obstructed or disconnected; System setting disabled. | Check radar unit for obstructions and secure connection. Verify BSD settings in the menu. |
9. Especificacións
| Característica | Especificación |
|---|---|
| Nome do modelo | M2PRO-201 (M2PRO-Series) |
| Mostrar | 6.1 Inches IPS Touchscreen, 1200-nit brightness |
| Resolución de captura de vídeo | 1080p (Front & Rear) |
| Tecnoloxía de conectividade | Bluetooth, Wi-Fi (for CarPlay/Android Auto) |
| Característica especial | IP68 Waterproof, G-Sensor, Loop Recording, Starlight Night Vision |
| Detección de punto cego | 77G mmWave Radar (BSD, LCA, RCW) |
| Tipo de montaxe | Dashboard Mount / Handlebar Mount |
| Peso do elemento | 4.05 pounds (approximate, for Host+Cameras package) |
| Fabricante | AlienRider |
10. Garantía e soporte
The AlienRider M2PRO-201 Motorcycle Smart System comes with a standard manufacturer's warranty. Please refer to the warranty card included in your package or visit the official AlienRider websitio web para obter información detallada sobre os termos e condicións da garantía.
For technical support, troubleshooting assistance, or warranty claims, please contact AlienRider customer service through their official websitio ou a información de contacto proporcionada coa súa compra.
Conserve o comprobante de compra para efectos da garantía.