
KITCHENARM 851011
KITCHENARM 19-in-1 HANDY Bread Machine User Manual
Modelo: 851011
Introdución
This manual provides comprehensive instructions for the safe and efficient operation, maintenance, and troubleshooting of your KITCHENARM 19-in-1 HANDY Bread Machine, Model 851011. Please read this manual thoroughly before first use and retain it for future reference.

Figure 1: KITCHENARM 19-in-1 HANDY Bread Machine (Model 851011).
Contido do paquete
Verify that all items are present and in good condition upon opening the package. If any items are missing or damaged, contact customer service.
- 1 x KITCHENARM Bread Machine (Model KA8510)
- 1 x User Manual & Recipe Book
- 2 x Kneading Paddles (one for use, one spare)
- 1 x Metal Hook for paddle removal
- 1 x US Three-Prong Plug (integrated)
- 1 x Non-Stick Bread Pan (2LB Vertical Pan)
- 2 x Cup-Spoon Sets (measuring cups and spoons)
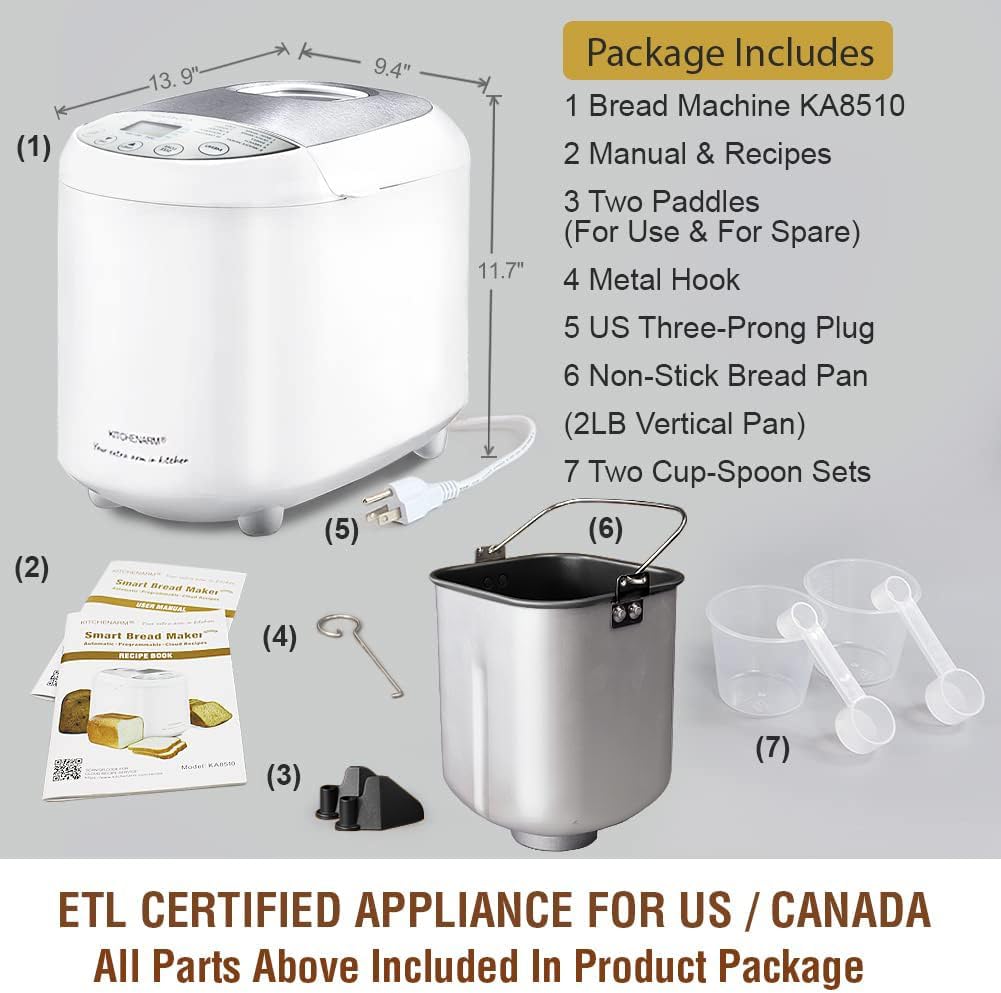
Figura 2: Accesorios e compoñentes incluídos.
Instrucións de seguridade importantes
Cando se utilicen aparellos eléctricos, sempre deben seguirse as precaucións básicas de seguridade, incluíndo as seguintes:
- Le todas as instrucións.
- Non toque superficies quentes. Use asas ou botóns.
- Para protexerse contra descargas eléctricas, non mergulle o cable, os enchufes ou o aparello en auga ou noutro líquido.
- É necesaria unha estreita supervisión cando calquera aparello é usado por nenos ou preto de eles.
- Desenchufe da toma cando non estea en uso e antes de limpalo. Deixar arrefriar antes de poñer ou quitar pezas.
- Non faga funcionar ningún aparello cun cable ou enchufe danados ou despois de que o aparello funcione mal ou teña dano dalgún xeito. Devolve o aparello ao centro de servizo autorizado máis próximo para o seu exame, reparación ou axuste.
- O uso de accesorios non recomendados polo fabricante do aparello pode causar lesións.
- Non use ao aire libre.
- Non deixes que o cable colgue do bordo da mesa ou do mostrador nin toque superficies quentes.
- Non o coloque sobre ou preto dun queimador eléctrico ou de gas quente, nin nun forno quente.
- Débese ter moito coidado ao mover un aparello que conteña aceite quente ou outros líquidos quentes.
- Para desconectar, poña calquera control na posición "off" e, a seguir, retire o enchufe da toma de corrente.
- Non use o aparello para outros usos que os previstos.
- Este aparello ten un enchufe polarizado (unha lámina é máis ancha que a outra). Para reducir o risco de descarga eléctrica, este enchufe está pensado para encaixar nunha toma polarizada só dun xeito. Se o enchufe non encaixa completamente na toma de corrente, inverte o enchufe. Se aínda non encaixa, póñase en contacto cun electricista cualificado. Non intente modificar o enchufe de ningún xeito.
GARDA ESTAS INSTRUCIÓNS.
Configuración e primeiro uso
Before First Use: Initial Burn-Off
Before using your bread machine for the first time, it is recommended to perform an initial burn-off cycle to eliminate any manufacturing odors or residues. This process takes approximately 10 minutes.
- Remove all packaging materials and accessories from the bread machine.
- Wipe the interior and exterior of the machine with a damp cloth. Ensure the bread pan and kneading paddle are clean and dry.
- Place the empty bread pan with the kneading paddle inserted into the machine. Close the lid.
- Plug the bread machine into a grounded electrical outlet.
- Select a short baking program (e.g., "Bake" or "Home Made" with a short duration if customizable, or simply run an empty cycle for 10 minutes).
- Allow the machine to run for approximately 10 minutes. A slight odor or smoke may be present; this is normal.
- Unplug the machine and allow it to cool completely for at least 2 hours before proceeding with actual bread making.
Identificación de compoñentes

Figure 3: Key components of the bread machine.
- Ventos de vapor: Release steam during baking. Do not block.
- Grande Viewxanela: Allows observation of the bread-making process.
- Tapa de aceiro inoxidable: Durable e fácil de limpar.
- Panel de control con pantalla LCD: For program selection, settings, and status display.
- Molde para pan: Non-stick pan where ingredients are mixed, kneaded, risen, and baked.
- Pala de amasar: Mixes and kneads the dough.
Instrucións de funcionamento
Basic Bread Making Steps
Follow these general steps for most bread recipes. Refer to the included recipe book for specific ingredient quantities and program recommendations.
- Inserir a pala de amasar: Place the kneading paddle onto the shaft inside the bread pan.
- Engadir ingredientes: Add ingredients to the bread pan in the order specified by your recipe (typically liquids first, then dry ingredients, with yeast added last, often in a small well on top of the flour).
- Colocar a bandexa de pan: Introduza o molde de pan na panificadora, asegurándose de que encaixe correctamente no seu lugar. Peche a tapa.
- Seleccionar programa: Plug in the machine. Use the "MENU" button to select the desired program (e.g., Basic White, French, Gluten Free).
- Selecciona o tamaño do pan e a cor da codia: Use the "LOAF SIZE" button to choose 1LB, 1.5LB, or 2LB. Use the "CRUST COLOR" button to select Light, Medium, or Dark.
- Ciclo de inicio: Press the "START/STOP" button to begin the bread-making cycle. The machine will automatically mix, knead, rise, and bake.
- Retirar o pan: Once the cycle is complete (indicated by a beep), unplug the machine. Carefully remove the hot bread pan using oven mitts. Invert the pan to release the bread onto a wire rack to cool. Use the metal hook to remove the kneading paddle from the loaf if it remains embedded.

Figure 4: Unique 1-Press Bread Making process.
Programas dispoñibles
Your KITCHENARM bread machine features 19 pre-programmed menus, including 12 bread menus and 7 non-bread menus. Each program is optimized for specific recipes.
| Non. | Nome do programa | Description / Typical Use |
|---|---|---|
| 1 | Blanco básico | Para pans brancos e mixtos. |
| 2 | Express White | Faster cycle for white bread. |
| 3 | Doce | For breads with high sugar content. |
| 4 | francés | For light breads with a crispy crust. |
| 5 | Sen glute | Specifically for gluten-free recipes. |
| 6 | Trigo Integral | For whole wheat flour breads. |
| 7 | Dark Rye | For rye bread recipes. |
| 8 | Multicereal | For breads with various grains. |
| 9 | SD Starter | For preparing sourdough starter. |
| 10 | Masa madre | For baking sourdough bread. |
| 11 | Masa | Prepares dough for manual shaping and baking. |
| 12 | Ceto | For low-carb, ketogenic bread recipes. |
| 13 | Pan rápido | For quick breads using baking powder/soda. |
| 14 | Bolo | Para cocer bolos. |
| 15 | Jam | Para facer marmeladas caseiras. |
| 16 | Iogur | For preparing yogurt. |
| 17 | Amasar | Only performs kneading cycle. |
| 18 | Ás | Only performs baking cycle. |
| 19 | Home Made | Customizable program for advanced users. |
The machine supports 3 loaf sizes (1LB, 1.5LB, 2LB) and 3 crust colors (Dark, Medium, Light). It also features a 15-Hour Delay Timer and an ADD-NUTS Alarm for adding ingredients at the appropriate time.

Figura 5: Examples of items that can be prepared with the 19 programs.
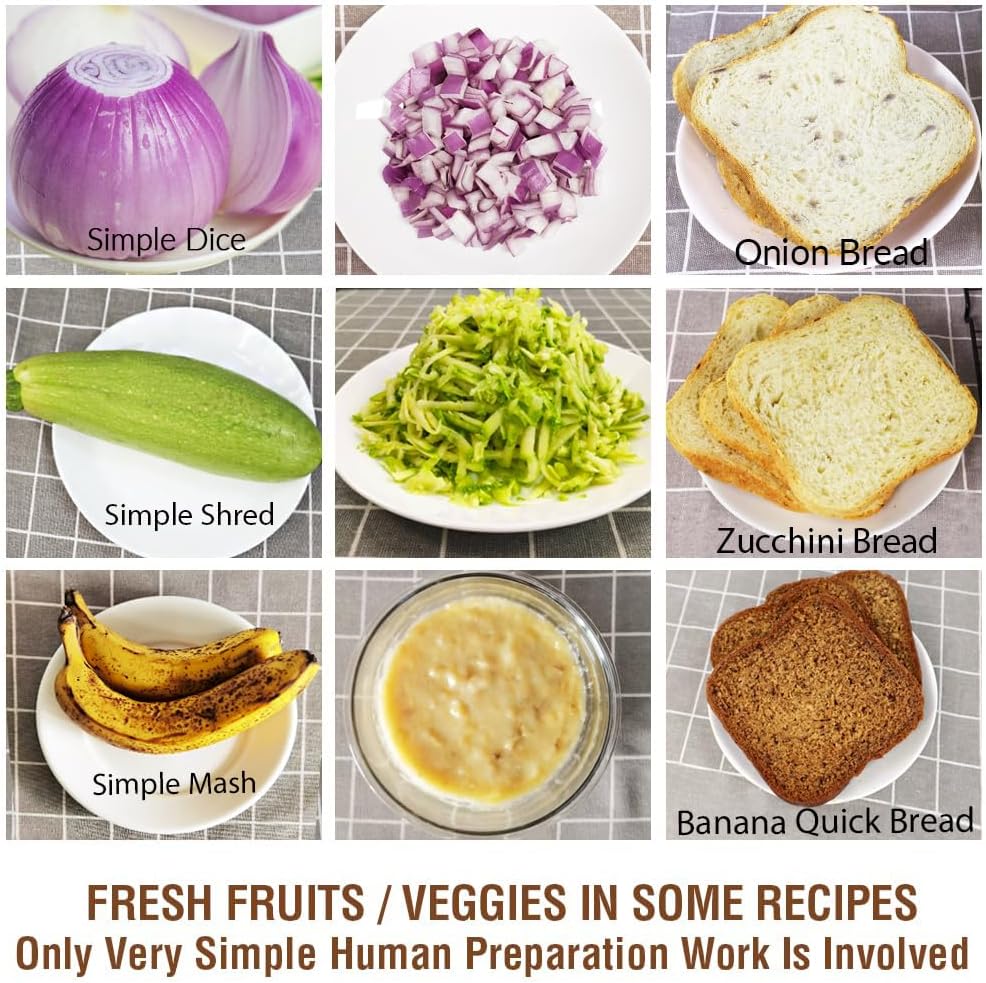
Figure 6: Preparation of fresh fruits and vegetables for recipes.
Coidados e Mantemento
Limpeza
Proper cleaning ensures the longevity and performance of your bread machine. Always unplug the machine and allow it to cool completely before cleaning.
- Molde para pan e paleta para amasar: The non-stick bread pan and kneading paddle should be hand washed only with warm, soapy water. Do not use abrasive cleaners or metal scouring pads, as this can damage the non-stick coating. Rinse thoroughly and dry completely.
- Exterior: Wipe the exterior body and control panel with a soft, damp pano. Non mergulle a unidade principal en auga nin en ningún outro líquido.
- Interior: Use un suave, damp un pano para limpar o interior da cámara de cocción. Retire calquera migalla ou residuo.
- Tapa: The stainless steel lid can be wiped clean with a damp pano. Asegúrate de que viewing window is clear.
Almacenamento
Store the bread machine in a cool, dry place when not in use. Ensure all components are clean and dry before storage.
Resolución de problemas
This section addresses common issues you might encounter. For problems not listed here, please contact customer service.
| Problema | Causa posible | Solución |
|---|---|---|
| O pan non sobe ou sobe demasiado. | Incorrect yeast amount, expired yeast, incorrect water temperature, incorrect flour type, too much or too little liquid. | Ensure yeast is fresh and active. Use correct water temperature (lukewarm for active dry yeast). Measure ingredients precisely, preferably by weight. Refer to recipe book for correct flour type. |
| O pan é demasiado denso ou pesado. | Too much flour, too little liquid, old yeast, incorrect program. | Reduce flour slightly or increase liquid. Check yeast freshness. Ensure correct program is selected for the recipe. |
| Bread has a large hole at the bottom. | Kneading paddle left in bread during baking. | Some programs allow for removal of the kneading paddle before the final rise. Consult your recipe book or manual for specific program timings. Use the metal hook to remove the paddle after baking. |
| Machine does not start or respond. | Non conectado, apagadotage, pan not properly seated, lid not closed. | Ensure the machine is securely plugged into a working outlet. Check circuit breaker. Ensure bread pan is fully inserted and lid is closed. |
| Ruído forte durante o funcionamento. | Bread pan not seated correctly, foreign object in pan, machine on uneven surface. | Ensure bread pan is securely locked in place. Check for any foreign objects. Place machine on a stable, flat surface. |
Especificacións do produto
- Marca: ARMADO DE COCIÑA
- Número de modelo: 851011
- Cor: White Body - Stainless Steel Lid & Chamber
- Dimensións do produto (P x A x A): 9.4" x 13.9" x 11.7"
- Peso do artigo: 11.97 libras
- Wattage: 550 vatios
- Número de programas: 19
- Tamaños do pan: 1 libra, 1.5 libras, 2 libras
- Cores da codia: Claro, medio, escuro
- Temporizador de demora: Ata 15 horas
- Certificacións: ETL Certified for US / Canada
- Fabricante: Kitchenarm LLC
- Coidado do produto: Hand Wash Only (for bread pan and paddle)
Garantía e Atención ao Cliente
KITCHENARM is committed to providing high-quality products and excellent customer service.
- Garantía do produto: This product comes with a 2-YEAR Product Warranty.
- Atención ao cliente: LIFETIME Customer Service is provided, including access to Cloud Recipes and Recipe Customization assistance.
- Pezas de recambio: Original replacement parts are available.
For warranty claims, technical support, or to inquire about replacement parts, please contact Kitchenarm LLC customer service through their official channels. Refer to the contact information provided in your product registration or on the official KITCHENARM websitio.

Figure 7: KITCHENARM commitment to warranty and customer service.
Ask a question about this manual
Ask about setup, troubleshooting, compatibility, parts, safety, or missing instructions. Manuals+ will review the question and use this page’s manual context to help answer it.