Introdución
This manual provides detailed instructions for the assembly, installation, operation, and maintenance of your HOOBRO BB21DBJ01 3-Tier Floating Shelf with LED Lights. Please read all instructions carefully before beginning assembly and retain this manual for future reference.
Información de seguridade
- Non exceda o límite de peso de 12.7 libras (5.7 kg) por estante. Overloading can cause the shelf to detach from the wall, resulting in injury or damage.
- Follow all provided installation instructions for safe and secure wall mounting. Improper installation can lead to instability.
- Ensure the shelf is mounted to a solid wall or into wall studs for maximum stability. Avoid mounting into drywall alone without appropriate anchors.
- Manteña as pezas pequenas e os materiais de embalaxe lonxe dos nenos para evitar riscos de asfixia.
Contido do paquete
Verifique que estean presentes todos os compoñentes antes de comezar a montaxe. Se falta algunha peza ou está danada, póñase en contacto co servizo de atención ao cliente.
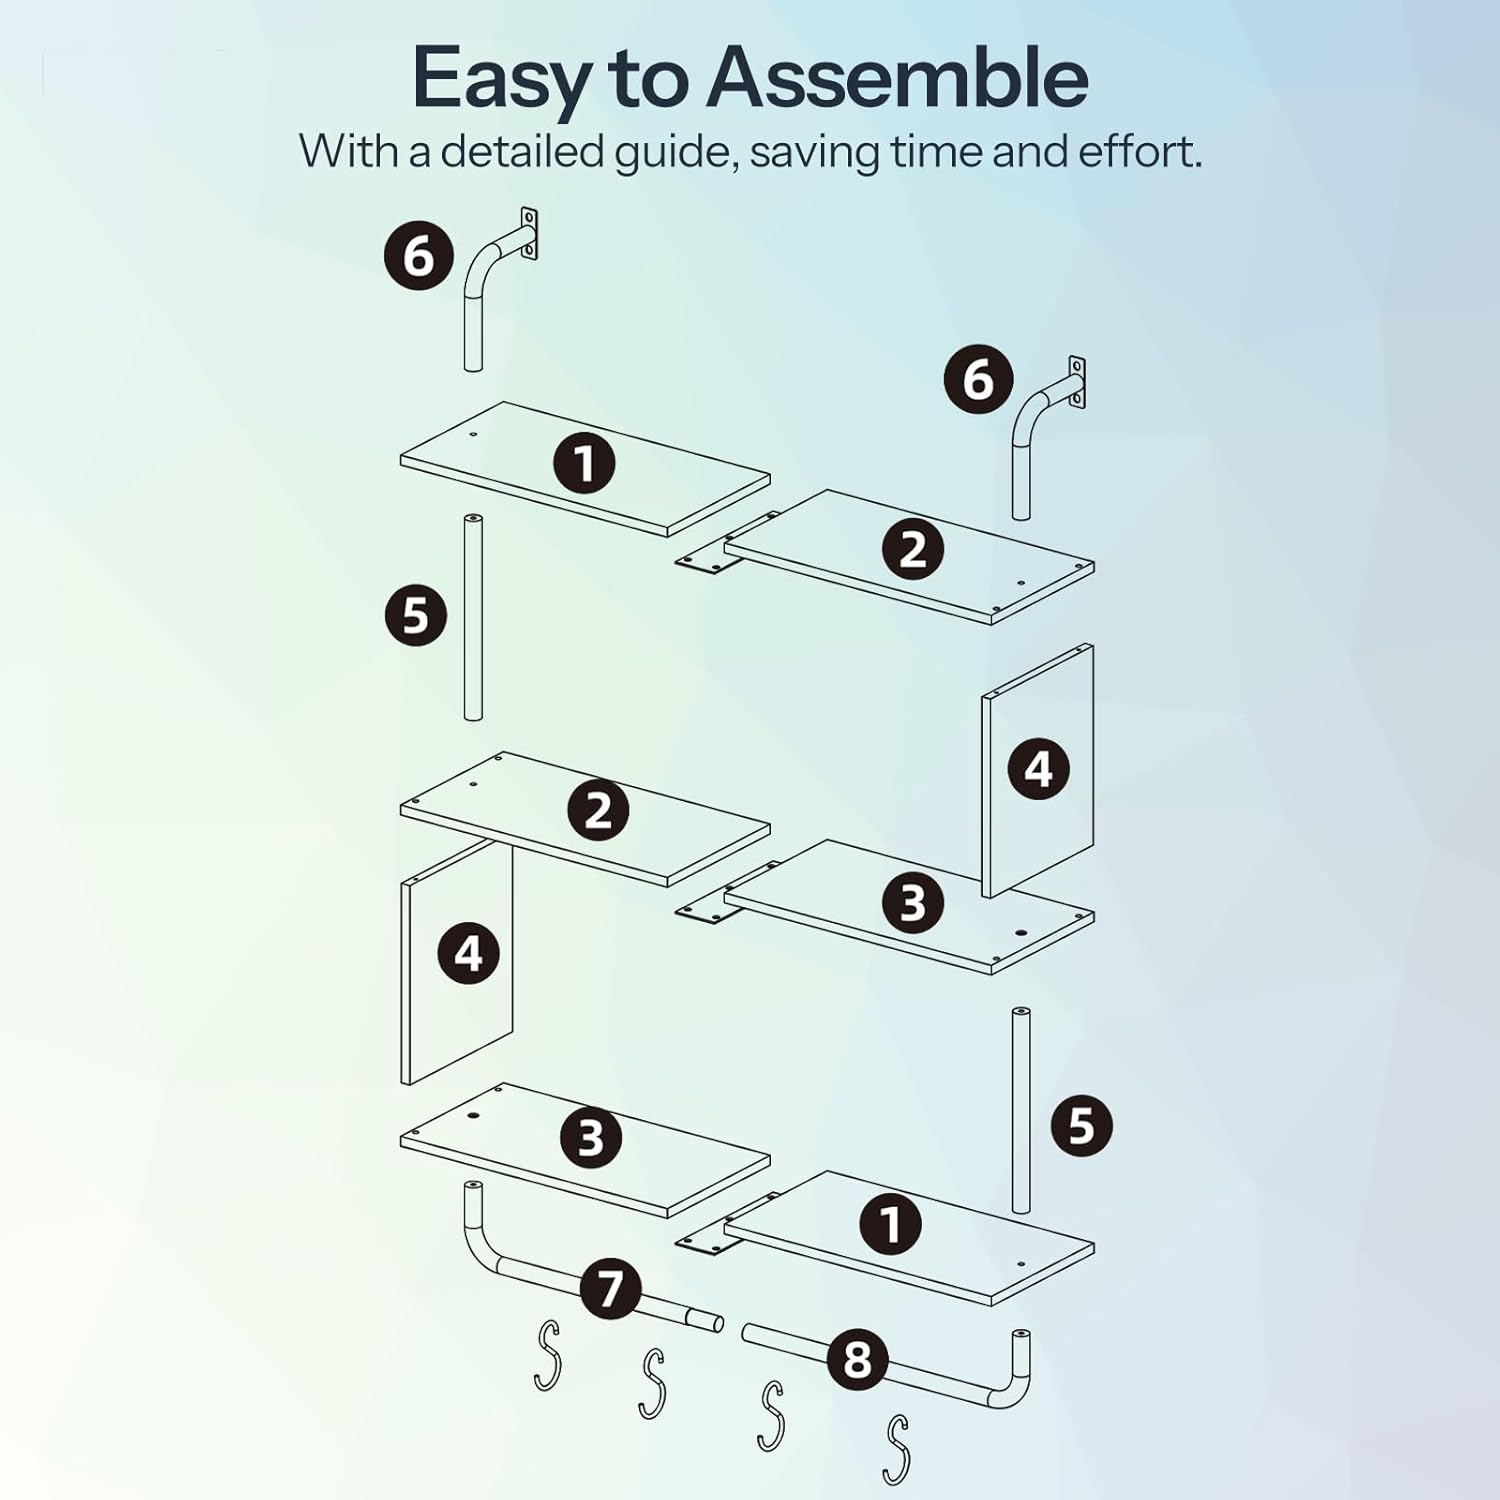
Figura 1: Explotado view of shelf components.
| Número de parte | Descrición | Cantidade |
|---|---|---|
| 1 | Top/Bottom Shelf Panel | 2 |
| 2 | Middle Shelf Panel (Left) | 1 |
| 3 | Middle Shelf Panel (Right) | 1 |
| 4 | Panel lateral | 2 |
| 5 | Vertical Pipe Support | 2 |
| 6 | Soporte de montaxe en parede | 2 |
| 7 | Vara para colgar | 1 |
| 8 | Ganchos en S | 4 |
| Tira de luces LED con control remoto | 1 Set | |
| Assembly Hardware (Screws, Anchors, Allen Key) | 1 Set |
Configuración e montaxe
Assembly is straightforward with the provided instructions and hardware. A detailed guide is included to save time and effort.
- Desempaquetar compoñentes: Retire con coidado todas as pezas da embalaxe e colóqueas sobre unha superficie limpa e suave para evitar rabuñaduras.
- Assemble Shelf Panels: Connect the top, middle, and bottom shelf panels using the designated screws and the vertical pipe supports. Ensure all connections are secure.
- Fixar os paneis laterais: Secure the side panels to the assembled shelves.
- Instalar a varilla colgante: Attach the hanging rod to the bottom of the lowest shelf.
- Preparación para o montaxe na parede: Attach the wall mount brackets to the top of the shelf unit.
- LED Light Strip Installation: Affix the LED light strip to the underside of the shelves as desired. Ensure the USB cable is accessible for power.
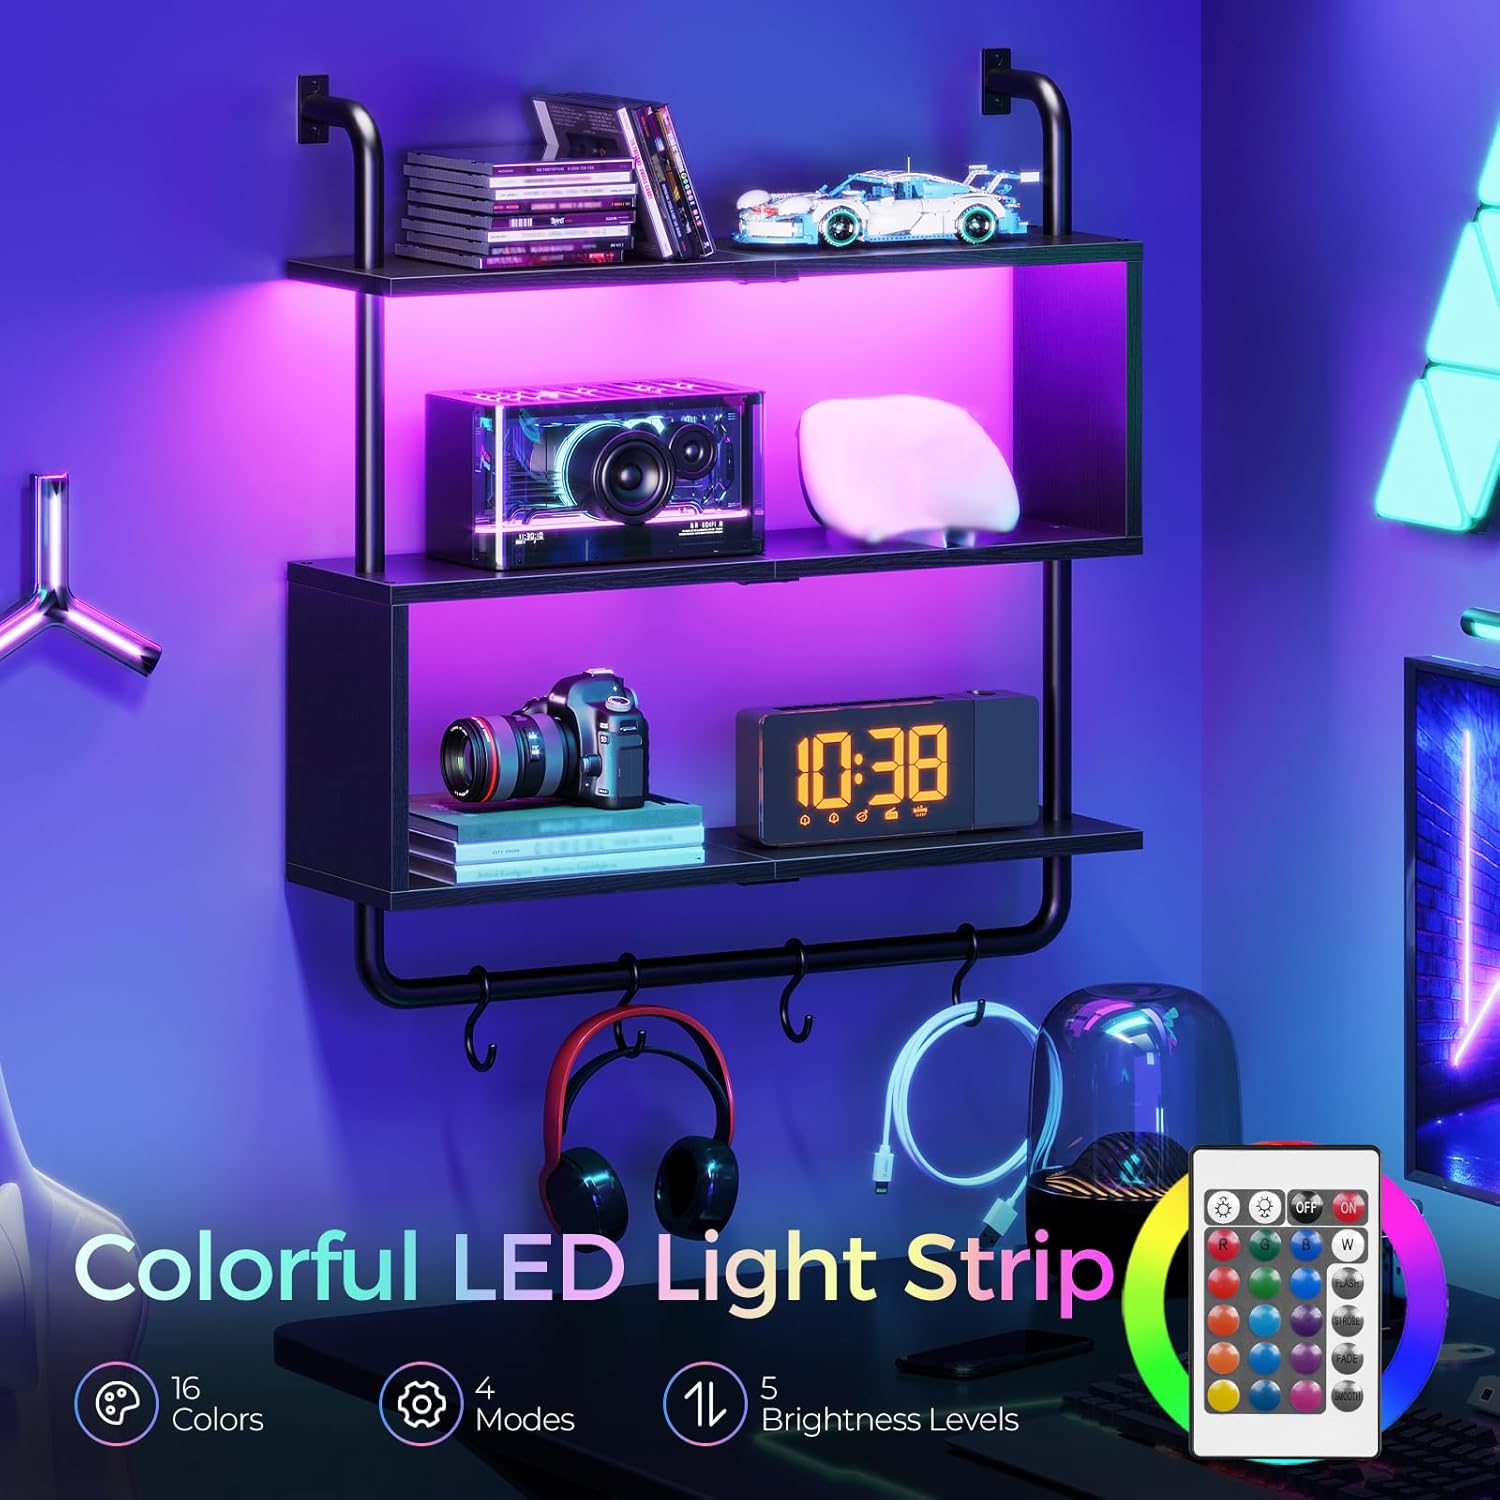
Figure 2: Fully assembled shelf unit.
Instalación
Proper wall mounting is crucial for the stability and safety of your floating shelf. This shelf is designed for wall mounting.
- Escolla localización: Select a suitable location on a solid wall. For optimal security, use a stud finder to locate wall studs and aim to mount the shelf directly into them.
- Marcar os puntos de perforación: Hold the assembled shelf against the wall at the desired height and use a pencil to mark the drilling points through the wall mount brackets.
- Perforar buratos piloto: Drill pilot holes at the marked locations. If mounting into drywall without studs, use appropriate wall anchors (consider purchasing higher quality anchors if the included ones seem insufficient).
- Fixar á parede: Align the shelf's wall mount brackets with the drilled holes and secure the shelf to the wall using the provided screws. Ensure all screws are tightened firmly.
- Colocar os ganchos en S: Place the S-hooks onto the hanging rod.

Figure 3: Details of wall mounting and hanging rod.
Operating Instructions (LED Lights)
The integrated LED lights offer customizable ambiance for your space.
- Conexión de alimentación: Connect the USB cable of the LED light strip to a compatible USB power source (e.g., wall adapter, power bank, computer USB port).
- Control remoto: Use the included remote control to operate the LED lights.
- Selección de cor: Escolle entre 16 available colors para combinar co teu estado de ánimo ou decoración.
- Selección de modo: Seleccione entre 4 modos dinámicos (e.g., flash, strobe, fade, smooth) for various lighting effects.
- Axuste de brillo: Axuste a intensidade da luz con 5 niveis de brillo.

Figure 4: Shelf with LED lights in a gaming environment.
Vídeo 1: Rematadoview of the HOOBRO Floating Shelf with LED Lights, showcasing as súas características e deseño.
Video 2: Demonstration of the HOOBRO Floating Wall Shelves with LED lights in various settings.
Mantemento
To keep your floating shelf looking its best, follow these simple maintenance guidelines:
- Limpeza: The smooth panel surfaces can be easily wiped clean with a soft, damp pano. Evite produtos de limpeza abrasivos ou produtos químicos agresivos que poidan danar o acabado.
- Desempolvado: Regularly dust the shelves and metal frame with a dry, soft cloth.
- Comproba as conexións: Periodically check all screws and wall mounts to ensure they remain tight and secure.
Resolución de problemas
If you encounter any issues with your HOOBRO floating shelf, refer to the following common solutions:
- Inestabilidade na balda: Ensure all assembly screws are tightened. Verify that the wall mounting is secure and, if possible, mounted into wall studs. Re-check wall anchors if not mounted into studs.
- As luces LED non funcionan: Check if the USB power source is connected and functioning. Ensure the remote control battery is not depleted. Verify that the LED strip connections are secure.
- Pezas que faltan: If any parts were missing upon arrival, please contact HOOBRO customer service for assistance.
Especificacións
| Característica | Detalle |
|---|---|
| Número de modelo | BB21DBJ01 |
| Material | Madeira de enxeñería, metal |
| Cor | Negro |
| Dimensións xerais (L x W x H) | 29.5" x 7.9" x 30.7" (75 cm x 20 cm x 78 cm) |
| Profundidade da balda | 7.8 polgadas (20 cm) |
| Grosor da balda | 0.5 polgadas |
| Número de estantes | 3 |
| Capacidade de peso (por estante) | 12.7 libras (5.7 kg) |
| Luces LED | 16 Colors, 4 Modes, 5 Brightness Levels |
| Tipo de montaxe | Soporte de parede |
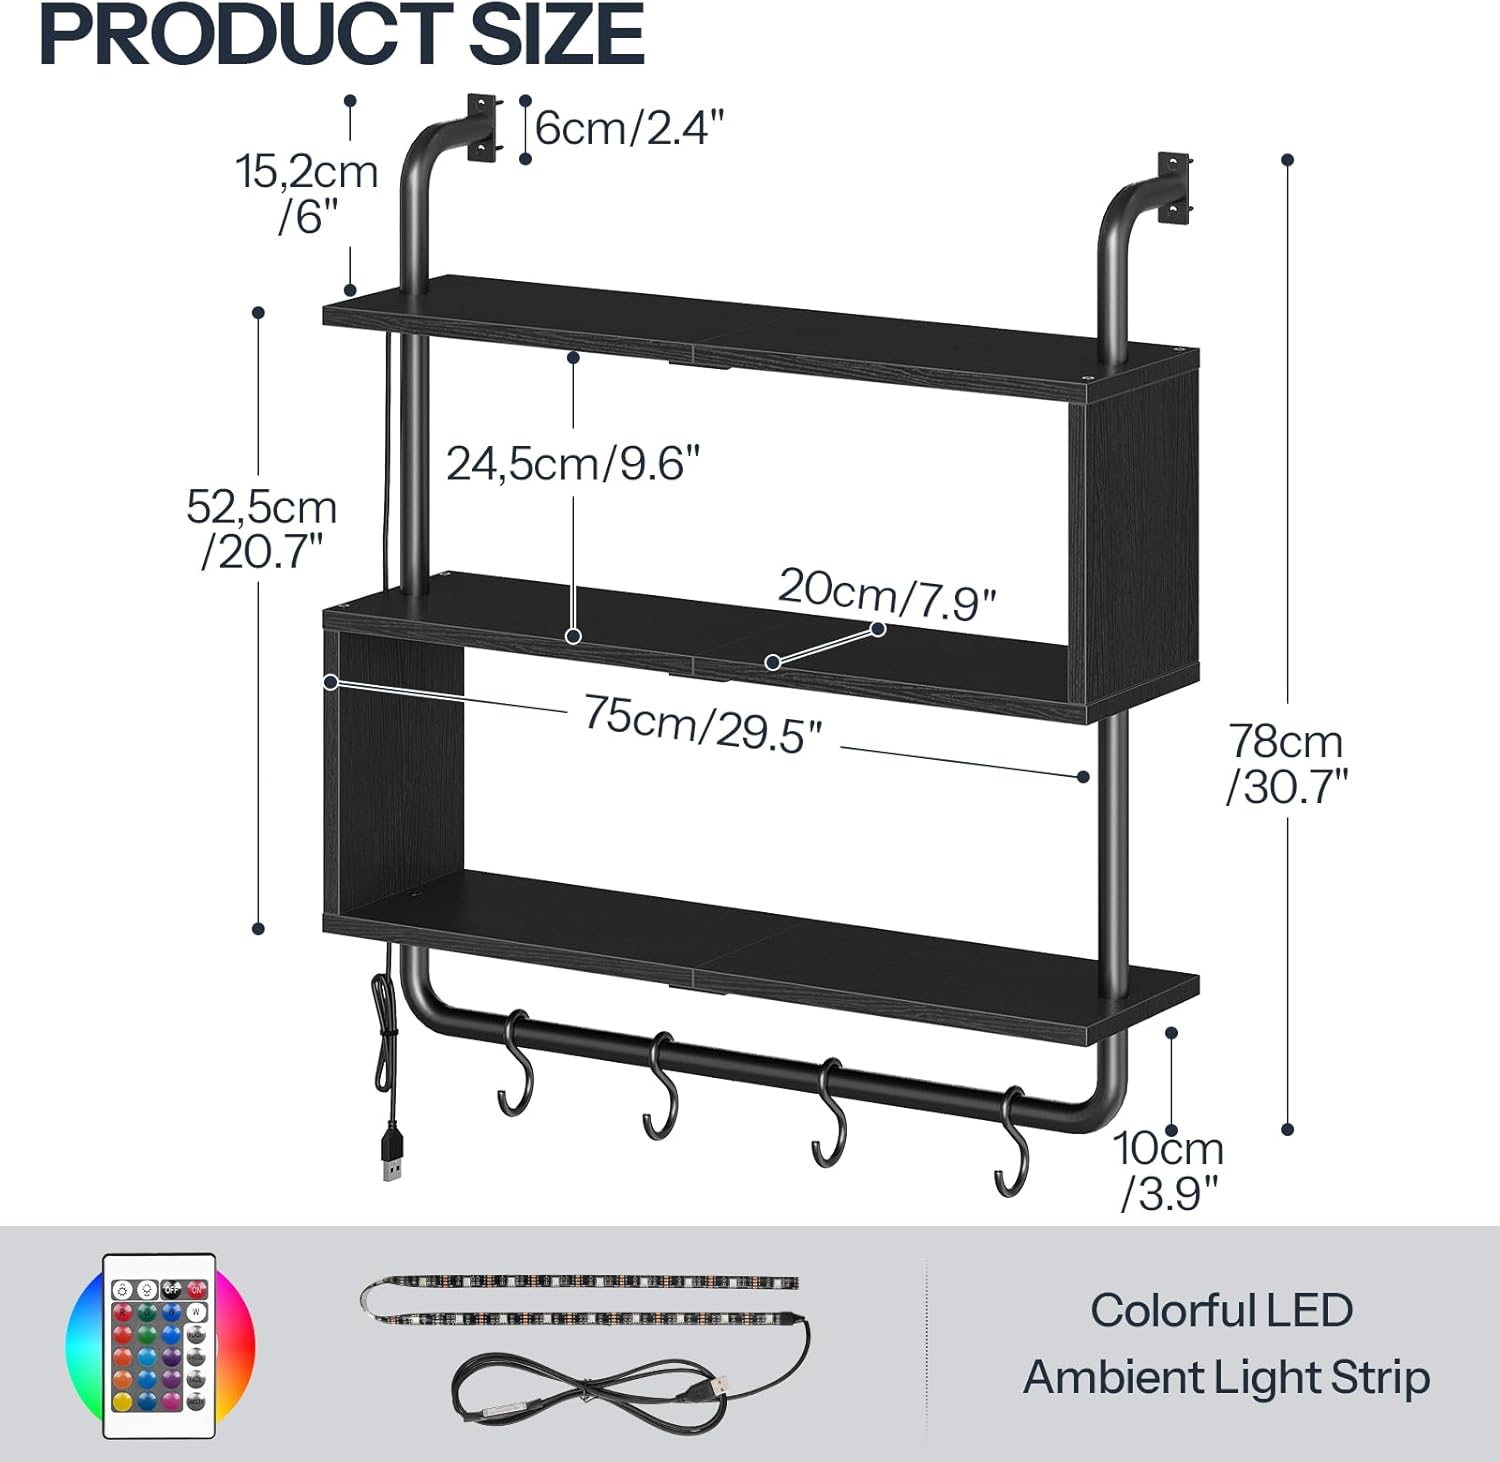
Figura 5: Dimensións detalladas do produto.
Garantía e Soporte
For warranty information, product support, or to report missing/damaged parts, please contact HOOBRO customer service directly. Refer to your purchase documentation or the HOOBRO official websitio para os detalles de contacto.