
1. Introdución
This manual provides essential information for the safe and efficient operation of your Machenike Machcreator N17A laptop. Please read this manual thoroughly before using the device and retain it for future reference.
2. Contido do paquete
Verifica que todos os elementos estean presentes no paquete:
- Machenike Machcreator N17A Laptop
- Adaptador de alimentación
- Manual de usuario (este documento)
3. Produto rematadoview
The Machenike Machcreator N17A is a 17.3-inch laptop designed for daily computing tasks. It features an Intel N100 Processor, 8GB DDR5 RAM, and a 256GB PCIe SSD for responsive performance. The 17.3" Full HD 120Hz display provides clear visuals, and the laptop runs on Windows 11 Home.
3.1. Compoñentes do portátil

Figura 3.1: Fronte view of the Machenike Machcreator N17A laptop.
This image shows the overall design of the Machenike Machcreator N17A laptop, highlighting its large 17.3-inch display and sleek chassis.

Figure 3.2: The 17.3-inch Full HD 120Hz display.
Un detallado view of the laptop's 17.3-inch Full HD display, emphasizing its narrow bezels and 120Hz refresh rate for smooth visuals.

Figure 3.3: Backlit keyboard and touchpad.
This image highlights the backlit keyboard and the spacious touchpad, designed for comfortable typing and navigation.
3.2. Portos e conectores
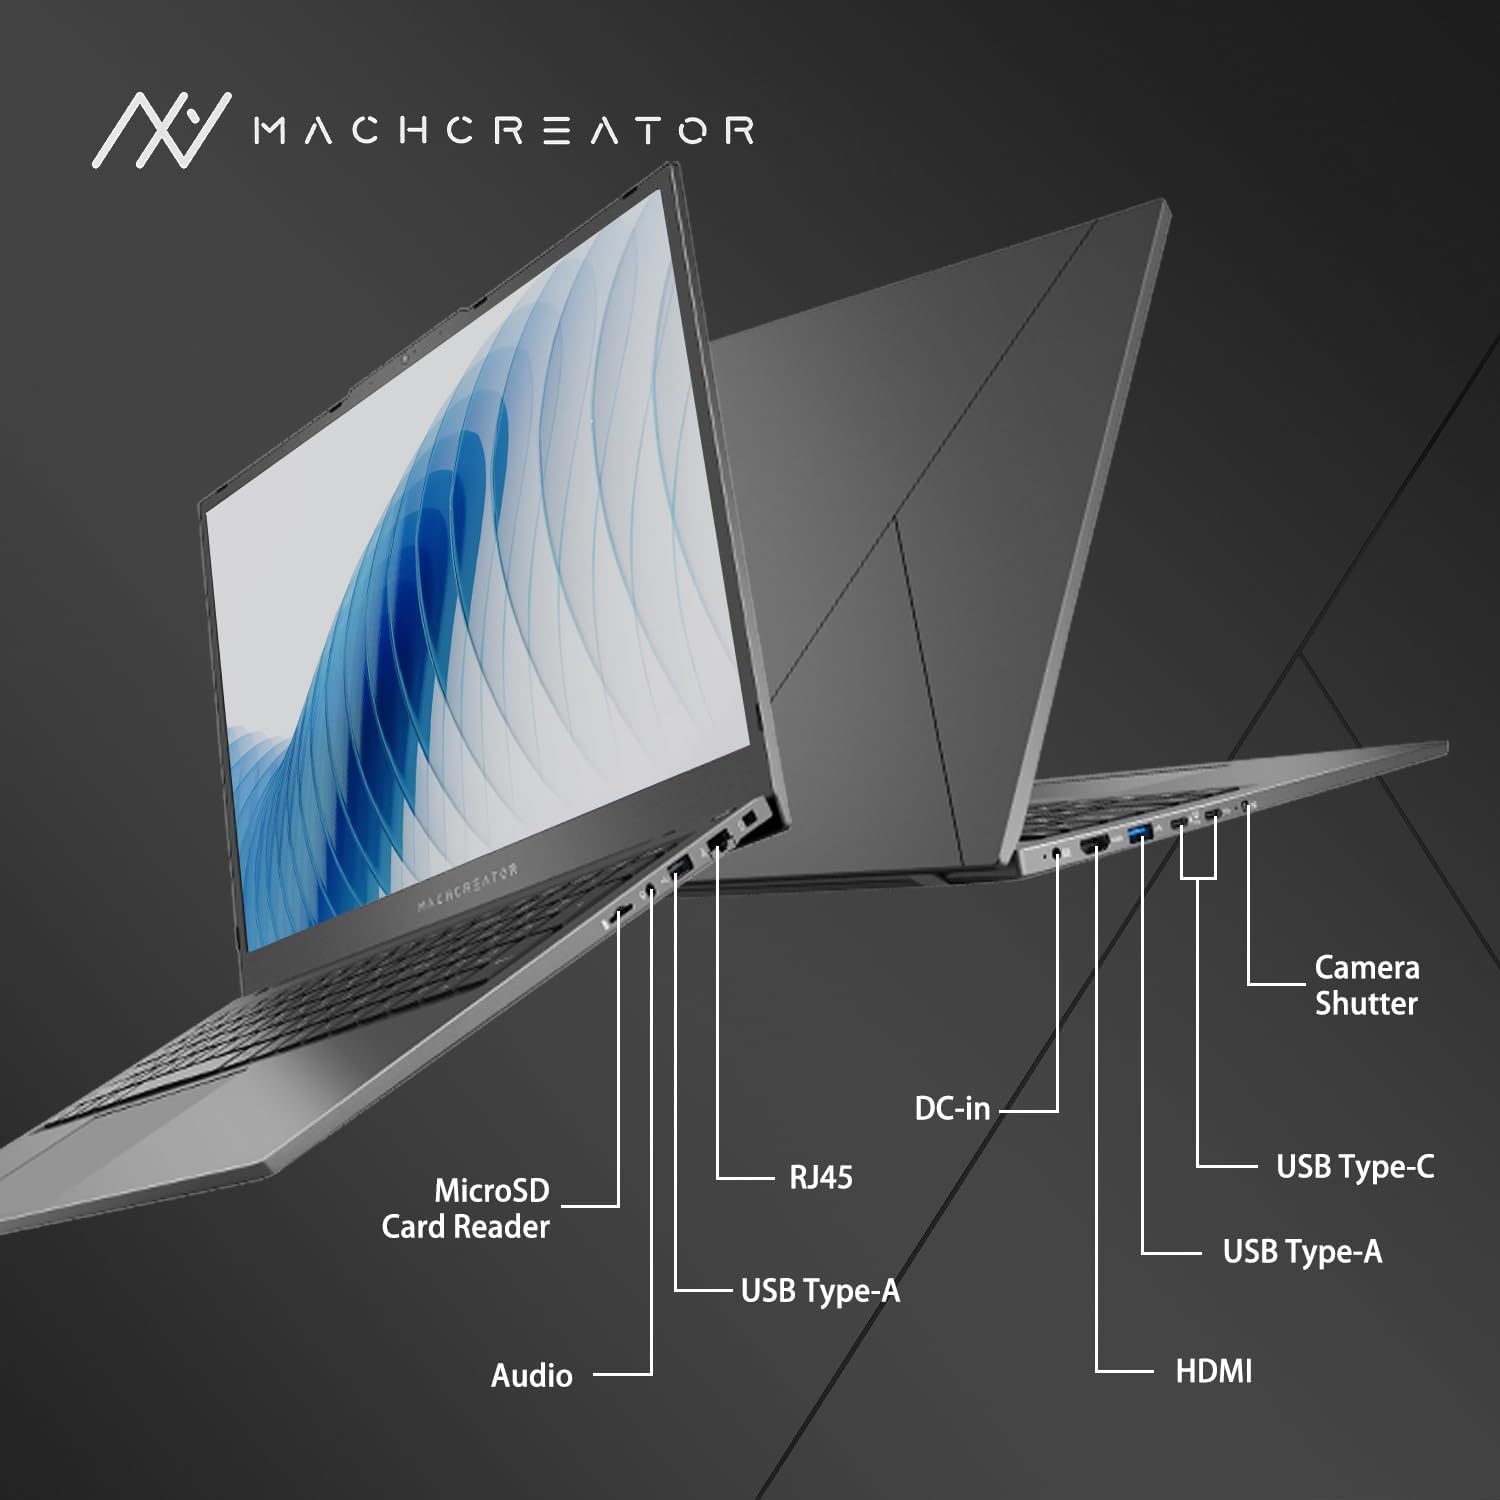
Figura 3.4: Lateral view con etiquetas de portos.
An illustration detailing the various input/output ports available on the laptop, including USB, HDMI, and the SD card reader.
- Lector de tarxetas MicroSD: For reading and writing data to MicroSD cards.
- Entrada de CC: Connect the power adapter for charging and power supply.
- Thunderbolt 4 (x2): High-speed data transfer, video output, and power delivery.
- USB 2.0 Tipo A (x2): Conecte dispositivos USB.
- HDMI: Conectar a pantallas ou proxectores externos.
- RJ45: Porto Ethernet para conexión de rede con cable.
- Conector de audio: Conecte auriculares ou altofalantes externos.
4. Configuración
4.1. Acendido inicial
- Desembala o portátil e todos os accesorios da caixa.
- Connect the power adapter to the DC-in port on the laptop and then to a power outlet.
- Abre a tapa do portátil.
- Prema o botón de acendido situado no teclado para acender o portátil.
- Sigue as instrucións en pantalla para completar o proceso de configuración de Windows 11 Home. Isto inclúe seleccionar a túa rexión e o teu idioma, así como configurar a túa conta de usuario.
4.2. Conectando a wifi
- During the Windows setup, you will be prompted to connect to a Wi-Fi network. Select your desired network from the list.
- Enter the Wi-Fi password if prompted and click "Connect".
- If you skip this step, you can connect later via Windows Settings: Go to Comeza > Configuración > Rede e internet > Wi-Fi.
5. Instrucións de funcionamento
5.1. Uso do teclado e do panel táctil
The laptop features a full-size keyboard with a numeric keypad and a large touchpad. The keyboard is backlit, which can be activated or adjusted using the function keys (e.g., Fn + F5).
Figura 5.1: Disposición do teclado e do panel táctil.
This image illustrates the keyboard and touchpad, showing the key layout and the size of the touchpad for user interaction.
5.2. Conectando Dispositivos Externos
Utiliza os portos dispoñibles para conectar dispositivos externos:
- Dispositivos USB: Plug USB drives, mice, or keyboards into the USB Type-A or Thunderbolt 4 (USB-C) ports.
- Pantalla externa: Connect an external monitor or TV using the HDMI port or one of the Thunderbolt 4 ports (with an appropriate adapter, if needed).
- Tarxetas SD: Insert a MicroSD card into the MicroSD Card Reader slot to access its contents.
- Rede con cable: Connect an Ethernet cable to the RJ45 port for a stable wired internet connection.
5.3. Adjusting the Display Angle
The laptop screen can be adjusted up to a 170-degree angle, providing flexibility for various viewing positions, presentations, or collaborative work.
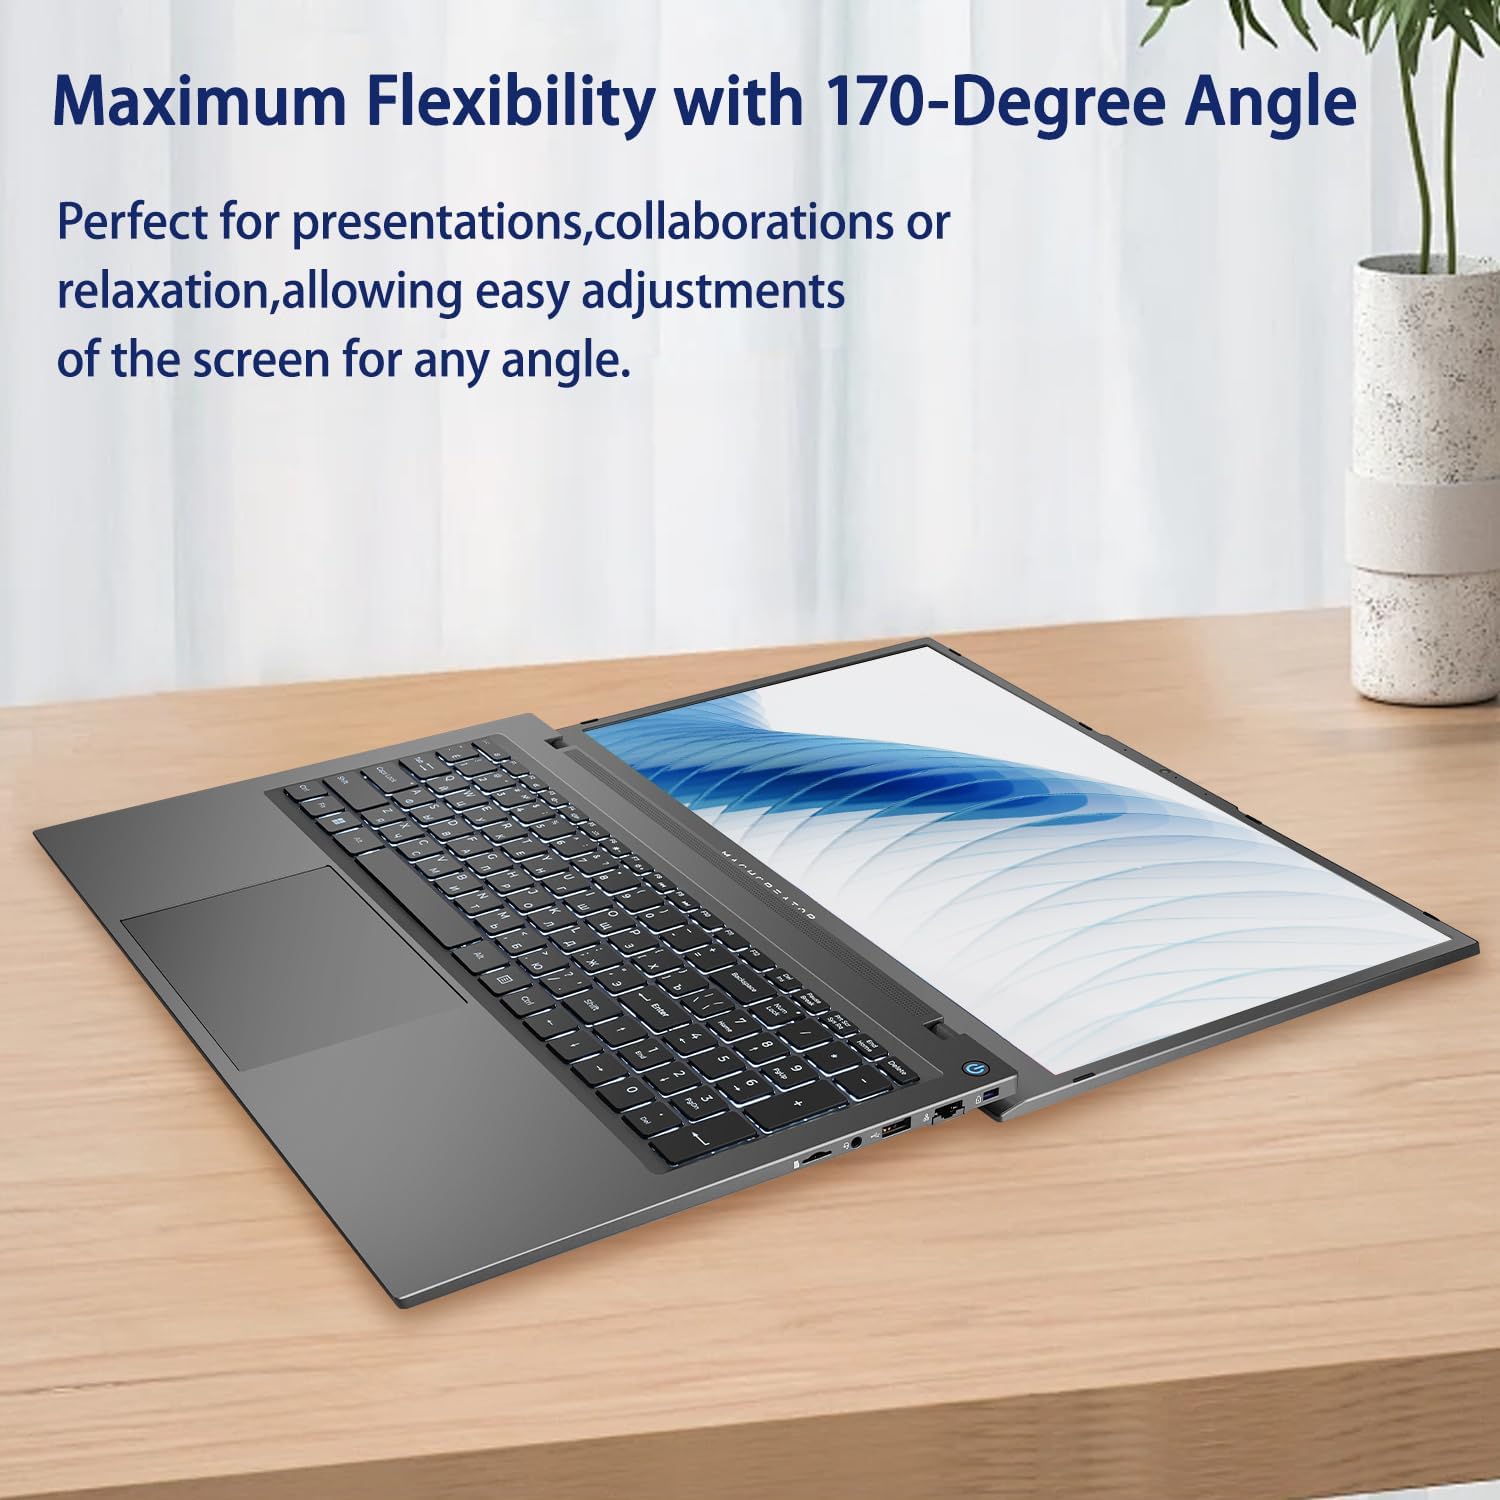
Figure 5.2: Laptop display at 170-degree angle.
This image demonstrates the laptop's ability to open its screen to a wide 170-degree angle, useful for various viewing escenarios.
5.4. Charging the Laptop
Connect the provided power adapter to the DC-in port. The laptop also supports fast charging via its USB-C (Thunderbolt 4) ports with a compatible USB-C Power Delivery charger.
6. Mantemento
6.1. Limpeza
- Usa un pano suave e sen pelusa para limpar a pantalla. Para marcas difíciles, limpa lixeiramenteampEnxágüe o pano con auga ou unha solución para limpar pantallas.
- Wipe the keyboard and chassis with a soft, dry cloth. Avoid using harsh chemicals or abrasive materials.
- Asegúrate de que o portátil estea apagado e desconectado antes de limpalo.
6.2. Coidado da batería
- Evite descargar completamente a batería con frecuencia.
- Do not expose the laptop to extreme temperatures.
- If storing the laptop for an extended period, charge the battery to approximately 50-70% before turning it off.
6.3. Actualizacións de software
Actualiza regularmente o teu sistema operativo e os controladores de Windows para garantir un rendemento e unha seguridade óptimos. Vai a Comeza > Configuración > Actualización de Windows para comprobar as actualizacións.
7 Solución de problemas
| Problema | Posible Solución |
|---|---|
| O portátil non se acende. |
|
| Non hai conexión Wi-Fi. |
|
| A pantalla está en branco ou parpadea. |
|
| A retroiluminación do teclado non funciona. |
|
8. Especificacións
| Característica | Detalle |
|---|---|
| Nome do modelo | Machenike Machcreator N17A |
| Procesador | Intel N100 (4 Cores, up to 3.4 GHz) |
| RAM | 8 GB de DDR5 (4800 MHz) |
| Almacenamento | SSD PCIe de 256 GB |
| Gráficos | Gráficos Intel UHD (integrados) |
| Mostrar | Pantalla IPS de 17.3 polgadas con resolución Full HD (1920 x 1080) e 120 Hz |
| Sistema Operativo | Windows 11 Home |
| Portos | 2x Thunderbolt 4, 2x USB 2.0 Type-A, 1x HDMI, 1x RJ45, 1x MicroSD Card Reader, 1x Audio Jack, 1x DC-in |
| Conectividade sen fíos | Wi-Fi (802.11n) |
| Características especiais | Teclado retroiluminado, teclado numérico |
| Dimensións (LxWxH) | 15.6 x 10.32 x 1.02 polgadas |
| Peso | 5.78 libras |
| Cor | Gris |
9. Garantía e soporte
For warranty information and technical support, please refer to the documentation provided with your purchase or visit the official Machenike websitio. Garda o comprobante de compra para reclamacións de garantía.
Recursos en liña:
- Oficial de Machenike Websitio: www.machenike.com (Nota: Este é un marcador de posición URL, please refer to your product's specific warranty card for the correct support contact.)
10. Vídeo de demostración do produto
Video 10.1: Machcreator N17A Laptop Overview.
Este vídeo ofrece unha visión xeralview of the Machenike Machcreator N17A laptop, showcasing its design, key features, and various ports. It demonstrates the unboxing experience, the backlit keyboard, and the available connectivity options.