
1. Introdución
Thank you for choosing the CAPXSNOB Magician1 Mini Espresso Machine. This versatile 5-in-1 coffee maker is designed to provide a premium brewing experience with its multi-pod compatibility, 19-bar pressure system, and customizable settings. Please read this manual thoroughly before initial use to ensure proper operation, maintenance, and safety.
2. Instrucións de seguridade importantes
- Lea todas as instrucións antes de facer funcionar o aparello.
- Non mergulle o aparello, o cable de alimentación nin o enchufe en auga ou outros líquidos.
- Asegurar o voltagA tensión especificada no electrodoméstico coincide coa súa subministración eléctrica local.
- Manteña o aparello fóra do alcance dos nenos.
- Desenchufe da toma cando non estea en uso e antes de limpalo.
- Non faga funcionar ningún aparello cun cable ou enchufe danados, ou despois de que o aparello funcione mal ou teña dano dalgún xeito.
- Use só accesorios recomendados polo fabricante.
- Evita o contacto con superficies quentes. Usa asas ou pomos.
- Non o coloque sobre ou preto dun queimador eléctrico ou de gas quente, nin nun forno quente.
- Always ensure the water reservoir is filled to the appropriate level before brewing.
- Exercise extreme caution when dispensing hot beverages.
3. Compoñentes do produto
Familiarize yourself with the parts of your Magician1 Mini Espresso Machine:
- Water Reservoir (21oz capacity)
- Control Panel with LED Display (Time, Temperature, Brew Size indicators)
- Brewing Handle
- Cámara de elaboración
- Bandexa de goteo e reixa
- Botón de encendido
- Brew Size Selection Buttons (Small, Medium, Large)
- Adapter for Nespresso Original capsules
- Adaptador para cápsulas Dolce Gusto
- Adapter for Lavazza Blue capsules
- Adapter for ESE Pods
- Adapter for Ground Coffee
- Pin de limpeza
- Coffee Dosing Funnel (for ground coffee)
- Scoop & Tamper (for ground coffee)

Imaxe: Máis deview of the Magician1 Mini Espresso Machine and its compatible coffee types.
4. Configuración inicial
4.1 Unpacking and First Use
- Retire todos os materiais de embalaxe e os adhesivos da máquina.
- Clean the water reservoir, drip tray, and all adapters with warm, soapy water. Rinse thoroughly and dry.
- Fill the water reservoir with fresh, clean water up to the 'MAX' line.
- Coloque o depósito de auga de novo na máquina.
- Plug the machine into a grounded electrical outlet. The LED display will illuminate.
- Perform a cleaning cycle: Without any coffee pod or ground coffee in an adapter, insert an empty adapter into the brewing chamber. Place a large cup under the dispenser. Press the largest cup size button to run a full cycle of hot water through the machine. Repeat this process 2-3 times to flush the system.
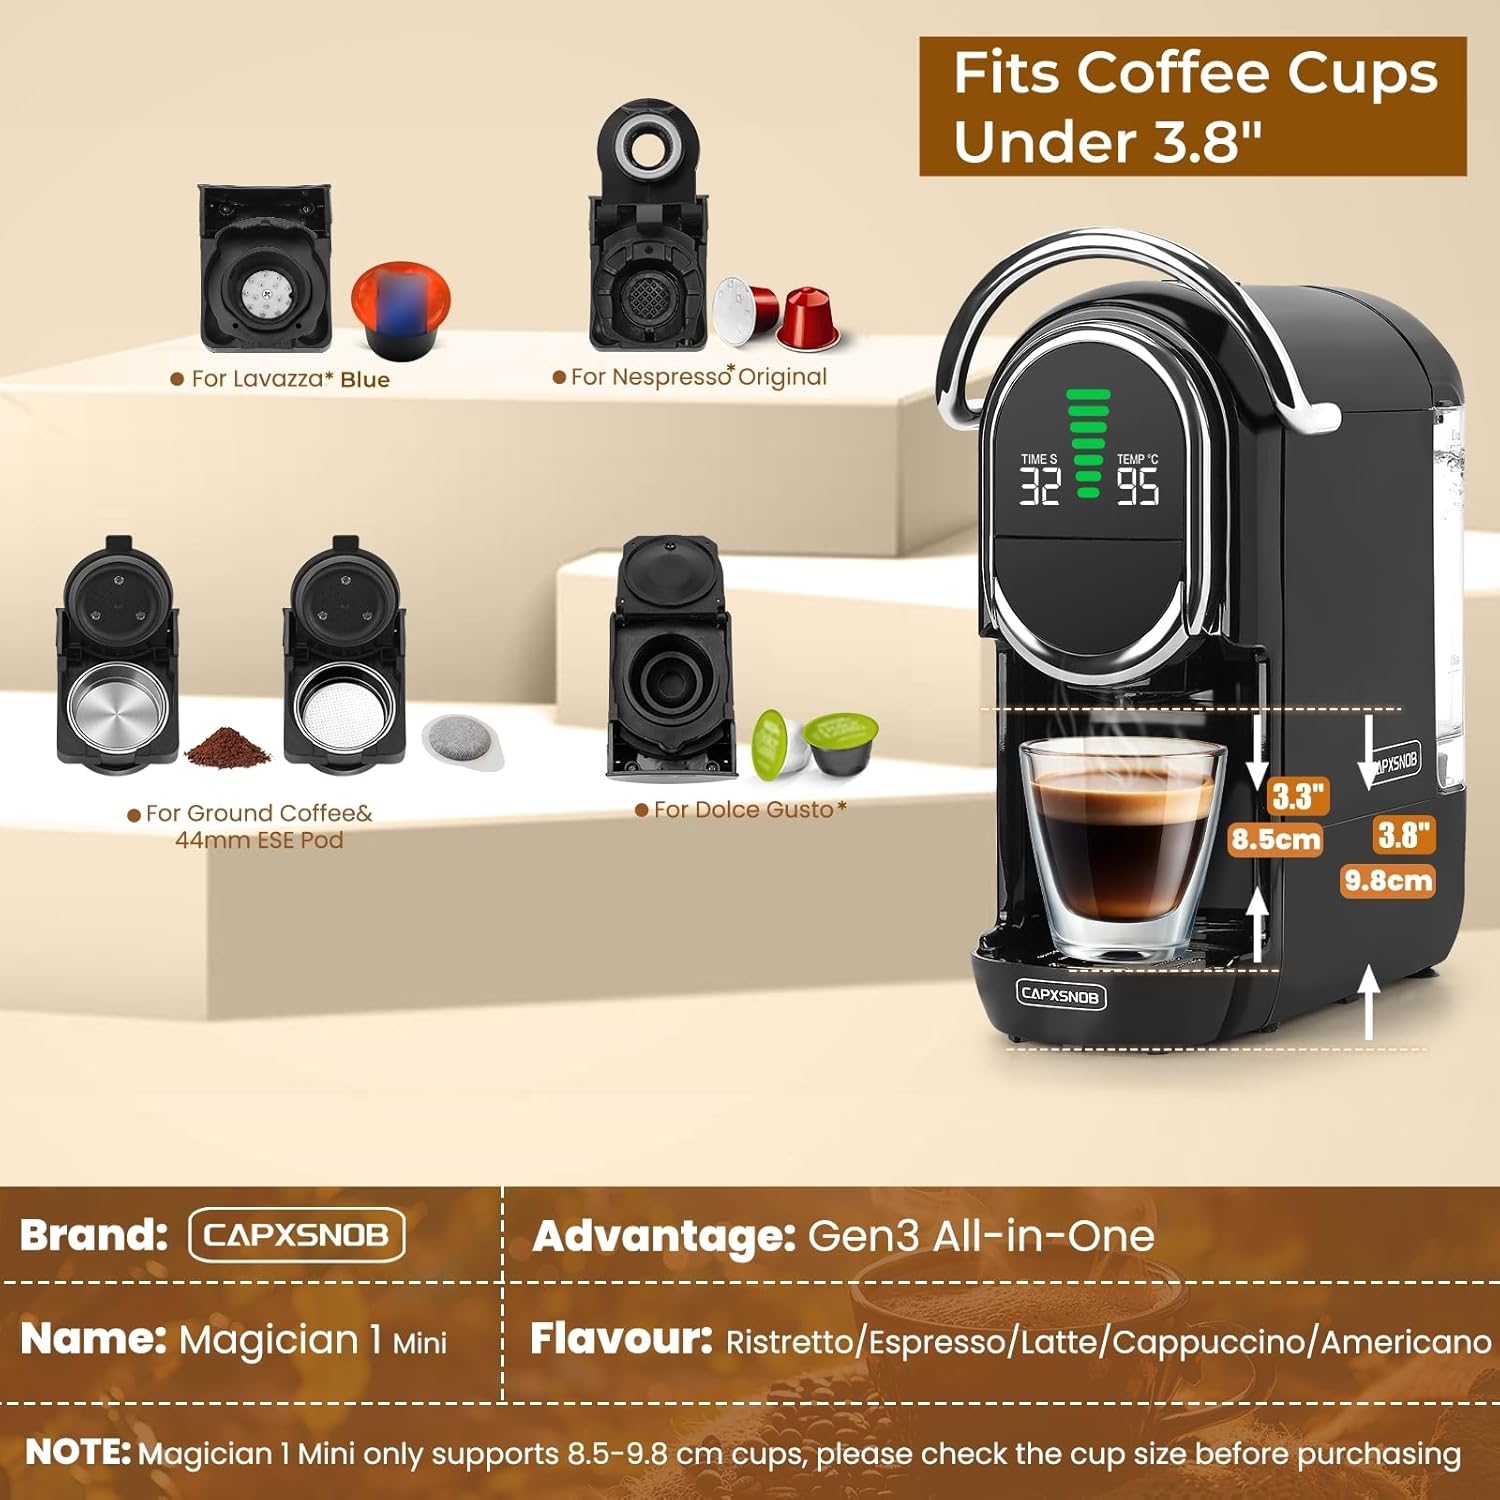
Image: Visual guide for the brewing process, including water filling and adapter insertion.
5. Instrucións de funcionamento
5.1 Brewing Coffee (General Steps)
- Asegúrate de que o depósito de auga estea cheo de auga fresca.
- Select the appropriate adapter for your chosen coffee type (Nespresso Original, Dolce Gusto, Lavazza Blue, ESE Pod, or Ground Coffee).
- Insert your coffee pod or ground coffee into the selected adapter.
- Place the filled adapter into the brewing chamber and firmly push down the handle to lock it in place.
- Place a cup (under 3.8 inches in height) on the drip tray beneath the dispenser.
- The machine will preheat (approx. 20-25 seconds). The LED display will show the current temperature.
- Select your desired brew size by pressing one of the three brew size buttons.
- The machine will begin brewing. Once complete, the flow will stop automatically.
- Carefully remove your cup and enjoy. Lift the handle to eject the used pod/grounds into the internal waste bin.

Image: The Gen3 All-in-One system illustrating compatibility with various coffee capsule types and ground coffee.
5.2 Hot & Cold Brew Options
The machine supports both hot and cold brewing modes.
- Modo de cocción en quente: This is the default mode. The power button light will be red.
- Modo de preparación en frío: In standby mode, press and hold the power button for 5 seconds until the light turns blue. The display will show 'CO'. This mode uses room-temperature water.

Image: Instructions for activating hot and cold brew modes, with visual examples de café preparado.
5.3 Adjustable Temperature
Customize your coffee temperature between 85°C and 97°C.
- Hold the brew button for 5 seconds; the temperature value on the LED display will start flashing.
- Press the volume buttons (small, medium, large cup icons) to adjust the temperature up or down.
- The setting will auto-save after 3 seconds of inactivity.

Image: Detailed steps for adjusting the brewing temperature on the machine's display.
5.4 Brew Sizes
The machine offers seven customizable brew sizes. Press the corresponding button for your desired volume.

Image: Chart detailing the seven available brew sizes, from Ristretto to Americano, with approximate brewing times.
5.5 Official Product Video: Main Functions and Operation Guide
Video: This video demonstrates the main functions and operational steps of the CAPXSNOB Magician1 Mini Espresso Machine, including water filling, adapter insertion, and brewing various coffee types.
6. Mantemento e Limpeza
6.1 Limpeza diaria
- Ciclo de autolimpeza: Insert an empty adapter (without a coffee pod) into the brewing chamber. Place a large cup under the dispenser and select the largest cup size. This flushes the internal water path and brewing chamber.
- Bandexa de goteo: Baleirar e enxaugar a bandexa de goteo e a grella diariamente.
- Encoro de auga: Enxágüe o depósito de auga diariamente e encha con auga fresca.
- Used Pod Bin: Empty the internal waste bin after each use or when full.
6.2 Ground Coffee Adapter Maintenance
Regular cleaning of the ground coffee adapter is crucial to prevent clogging.
- After use, disassemble the ground coffee adapter.
- Enxágüe todas as pezas baixo auga corrente.
- Use the provided cleaning pin to clear any coffee grounds from the plastic filter holes and stainless steel filters.
- Asegúrese de que todas as pezas estean secas antes de volver a montar.

Image: Visual instructions for the correct brewing guide, maintenance tips, and disassembly/assembly of the ground coffee adapter.
6.3 Descalcificación
Depending on water hardness, descaling should be performed every 3-6 months. Refer to the full descaling instructions in the comprehensive user manual (if provided separately) or contact customer support for guidance.
7 Solución de problemas
| Problema | Causa posible | Solución |
|---|---|---|
| No water coming out after long inactivity | Bloque de aire no sistema | Use the inflator (if included) to inject water into the tank inlet. Refer to Section 3.2 of the manual for detailed instructions. |
| Leaking during brewing | Damaged or unsupported pod; grounds too fine or overfilled (max 15g); handle not fully locked. | Ensure pod is compatible and undamaged. Do not overfill ground coffee. Verify the handle is fully locked. |
| Cup size doesn't seem right | Minor variation is normal due to pod type, water temperature, and pressure. | This is expected behavior. Adjust brew size manually if needed. |
| Handle won't lift | High pressure from some pods or too fine ground coffee. | Wait until the pressure fully releases before attempting to lift the handle. |
| No coffee with Dolce Gusto adapter | Outlet needle on the adapter is clogged. | Use the cleaning pin to clear the outlet needle on the adapter. |

Image: A summary of friendly reminders and tips for troubleshooting common issues.
8. Especificacións
- Marca: CAPXSNOB
- Nome do modelo: Magician1 Mini
- Número de modelo do artigo: ST-542S
- Cor: Negro
- Dimensións do produto: 10.7" D x 5.6" W x 11.2" H
- Capacidade do depósito de auga: 21 oz
- Presión: 19 Bar Italian Pump
- Tempo de prequentamento: Approximately 20-25 seconds
- Rango de temperatura axustable: 85°C – 97°C
- Tamaños de infusión: 7 customizable options
- Compatibilidade: Nespresso Original, Dolce Gusto, Lavazza Blue/A Modo Mio, ESE Pod, Ground Coffee (A Modo Mio, Caffitaly adapters sold separately)
- Características: Hot & Cold Brew, LED Display, Adjustable Brew Strength, Adjustable Temperature & Cup Size, Multiple modular capsule adapters.
- Fonte de enerxía: adaptador de CA
- Peso do artigo: 9.13 libras
9. Garantía e atención ao cliente
Your CAPXSNOB Magician1 Mini Espresso Machine comes with a 60-day return policy and a 2-year limited warranty. To receive an extended 2-year replacement service and a complimentary starter set of coffee pods, please register your product on the official CAPXSNOB websitio.
For any questions, troubleshooting assistance, or warranty claims, please contact CAPXSNOB customer support through the official websitio web ou a túa plataforma de compra.


