
1. Introdución
This manual provides essential information for the safe and effective operation of your GEPRC MARK5 O4 Pro DC FPV Drone. Please read this manual thoroughly before operating the drone to ensure proper setup, usage, and maintenance. Retain this manual for future reference.
2. Pautas de seguridade
Operating FPV drones requires adherence to safety protocols. Failure to follow these guidelines may result in injury, damage to property, or legal consequences.
- Comprobación previa ao voo: Always inspect the drone for any damage, loose components, or obstructions before each flight.
- Ambiente: Voa en zonas abertas, lonxe de persoas, animais, edificios e liñas eléctricas. Evita voar con ventos fortes ou condicións meteorolóxicas adversas.
- Seguridade da batería: Use only recommended batteries. Ensure batteries are fully charged and properly secured. Never overcharge or puncture batteries.
- Seguridade da hélice: Keep hands and face clear of propellers when the drone is powered on. Propellers can cause serious injury.
- Liña de visión: Maintain visual line of sight with the drone at all times, even when using FPV goggles.
- Normativa local: Be aware of and comply with all local aviation laws and regulations regarding drone operation.
3. Contido do paquete
Verifique que todos os elementos que se indican a continuación estean incluídos no seu paquete:
- 1 x Dron GEPRC MARK5 O4 Pro FPV
- 1 x Gemfan 5136 Propellers (2CW, 2CCW)
- 1 correa para batería de 15*250 mm
- 2 correas para batería de 20*250 mm
- 2 almofadas antideslizantes para batería
- 1 paquete de impresións 3D
- 1 x Spare Screw Pack (Includes M5 Flange Nylon Knurled Nut, M2 Stainless Steel Press-fit Nuts, M5*25 Stainless Steel Button Head Hex Screw, M3*10 Button Head Hex Screws, M3*8 Button Head Hex Screws, M3*8 Countersunk Hex Screws, M3*5 Countersunk Hex Screws)
- 1 destornillador en forma de L de 1.5 mm
- 1 destornillador en forma de L de 2 mm
- 1 destornillador en forma de L de 3 mm
- 1 chave inglesa M8
4. Produto rematadoview
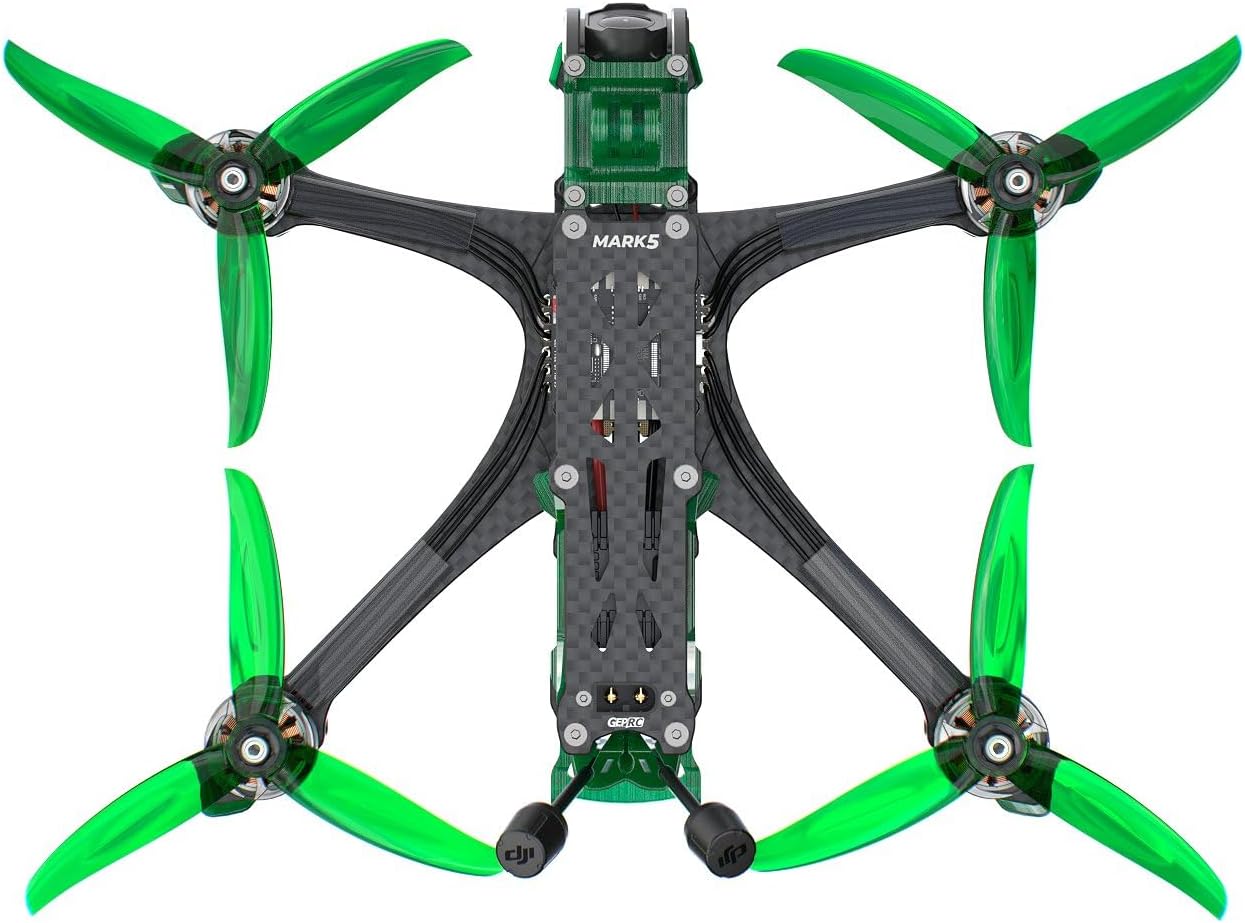
The GEPRC MARK5 O4 Pro DC FPV Drone is a high-performance quadcopter designed for FPV flight. It features an integrated O4 Air Unit Pro for video transmission and recording, a robust frame, and powerful motors.

Compoñentes clave:
- O4 Air Unit Pro VTX Module: Integrated video transmission system.
- O4 Air Unit Pro Camera Module: High-resolution camera for recording and FPV feed.
- SPEEDX2 2107.5 1960KV Motors: High-performance brushless motors.
- GEP-F722-BT-HD V3 Flight Controller: Central processing unit for flight control, with Bluetooth connectivity.
- GEP-BL32 50A 96K 4IN1 ESC: Electronic Speed Controller for motor management.
- Optional GEP-M10 GPS: For enhanced navigation and return-to-home features.

5. Configuración
5.1 Instalación da hélice
Install the propellers according to the rotation direction of each motor. Ensure the correct propeller (CW or CCW) is mounted on the corresponding motor. The drone comes with Gemfan 5136 propellers.
- Identify the CW (Clockwise) and CCW (Counter-Clockwise) propellers.
- Match the propellers to the motor shafts, ensuring they sit flush.
- Secure each propeller with the provided M5 flange nylon knurled nut, tightening firmly but without excessive force.

5.2 Conexión da batería
The drone uses a 6S LiPo battery (recommended 1050mAh-1550mAh) with an XT60EW-M power connector.
- Attach the battery anti-slip pads to the bottom of the drone frame where the battery will rest.
- Place the battery on the anti-slip pads.
- Secure the battery firmly using the provided battery straps (15*250mm or 20*250mm).
- Connect the battery's XT60 connector to the drone's XT60EW-M power connector. Ensure a secure connection.
5.3 Flight Controller Configuration (BetaFlight)
The GEP-F722-BT-HD V3 Flight Controller runs BetaFlight firmware. For initial setup, calibration, and advanced tuning, connect the drone to a computer via USB and use the BetaFlight Configurator software. Bluetooth connectivity is also available for mobile app tuning.
- Download and install the latest BetaFlight Configurator from the official BetaFlight websitio.
- Connect the drone to your computer using a USB cable.
- Follow the on-screen instructions in BetaFlight Configurator for initial setup, sensor calibration, and mode configuration.
- Ensure your receiver (PNP / ELRS 2.4G / TBS NanoRX) is properly bound to your remote control. Refer to your receiver and remote control manuals for binding procedures.
5.4 GPS Module (Optional)
If your drone includes the optional GEP-M10 GPS module, ensure it is securely mounted and connected to the flight controller. Configure the GPS settings within BetaFlight Configurator for proper functionality.
6. En funcionamento
6.1 Comprobacións previas ao voo
Antes de cada voo, realice as seguintes comprobacións:
- Verify battery is fully charged and securely attached.
- Ensure propellers are correctly installed and tightened.
- Check for any loose wires or components.
- Confirm your remote control is powered on and bound to the drone.
- Check FPV goggles/monitor for clear video feed.
- Ensure GPS has a sufficient satellite lock (if applicable).
6.2 Armado e desarmado
Ao activar o dron, os motores actívanse, o que permite o voo. Ao desactivalo, apáganse.
- Armado: Typically performed by moving the throttle stick to the lowest position and the yaw stick to the right (or left, depending on BetaFlight configuration). Refer to your BetaFlight setup for the exact arming sequence.
- Desarmado: Performed by moving the throttle stick to the lowest position and the yaw stick to the left (or right). The motors will stop spinning.
- Always arm and disarm in a safe, clear area.
6.3 Operación de voo
Control the drone using your remote control. Familiarize yourself with the flight modes configured in BetaFlight (e.g., Acro, Angle, Horizon). Start with gentle movements and gradually increase your control as you gain experience.
6.4 O4 Air Unit Pro Camera and Recording
The integrated O4 Air Unit Pro features a 1/1.3-inch sensor for crisp 4K/120fps recording and real-time 1080P/100fps transmission. It is optimized for sharp visuals and improved performance in dim lighting.

Refer to the O4 Air Unit Pro manual for detailed instructions on video recording, settings adjustment, and file Transferir.
7. Mantemento
Un mantemento regular garante a lonxevidade e o rendemento óptimo do teu dron.
- Limpeza: After each flight, gently clean the drone to remove dust, dirt, and debris. Use a soft brush or compressed air. Avoid using liquids directly on electronic components.
- Inspección da hélice: Regularly check propellers for cracks, bends, or nicks. Replace damaged propellers immediately.
- Apertura do parafuso: Periodically check all screws and nuts for tightness. Use the provided screwdrivers and wrench.
- Actualizacións de firmware: Consulta o GEPRC website or BetaFlight official channels for firmware updates. Keeping your flight controller and O4 Air Unit Pro firmware updated can improve performance and add new features.
- Almacenamento: Store the drone in a cool, dry place, away from direct sunlight and extreme temperatures. Remove the battery for long-term storage.
8 Solución de problemas
Esta sección aborda problemas comúns cos que podes atoparte.
| Problema | Causa posible | Solución |
|---|---|---|
| O dron non se arma | Throttle not at lowest position; Arming switch not activated; Safety features preventing arming (e.g., low battery, no receiver signal) | Ensure throttle is at zero. Check arming switch. Verify battery voltage and receiver connection. Check BetaFlight OSD for error messages. |
| Sen feed de vídeo | O4 Air Unit Pro not powered; Antenna disconnected; Incorrect VTX channel/band; FPV goggles not powered or on wrong channel | Check power to O4 Air Unit Pro. Ensure antenna is securely connected. Verify VTX channel/band matches FPV goggles. Recharge FPV goggles. |
| Voo inestable | Damaged propeller; Loose motor; Incorrect PID tuning; Flight controller not calibrated | Inspect and replace damaged propellers. Check motor mounts. Review PID settings in BetaFlight. Recalibrate accelerometer in BetaFlight. |
| O GPS non se bloquea | Poor satellite visibility; GPS module not connected; Incorrect BetaFlight configuration | Móvete a unha zona aberta con ceo despexado view. Check GPS module connection. Verify GPS settings in BetaFlight. |
For further assistance, please refer to the GEPRC official support channels or online communities.
9. Especificacións
Especificacións técnicas detalladas do dron GEPRC MARK5 O4 Pro DC FPV:
- Modelo: MARK5 O4 Pro CC FPV
- Distancia entre eixes: 230 mm
- VTX: Módulo O4 Air Unit Pro VTX
- Cámara: O4 Air Unit Pro camera module (1/1.3-inch sensor, 4K/120fps recording, 1080P/100fps transmission)
- Antena: Antena Pro da unidade de aire O4
- Motor: SPEEDX2 2107.5 1960KV
- Hélice: Gemfan 5136
- Flight Controller (FC): GEP-F722-BT-HD V3
- MCU: STM32F722
- IMU: ICM42688-P(SPI)
- OSD: OSD BetaFlight con chip AT7456E
- ESC: ESC GEP-BL32 50A 96K 4 en 1
- Conector de alimentación: XT60EW-M
- GPS opcional: GPS GEP-M10
- Opcións do receptor: PNP / ELRS 2.4G / TBS NanoRX
- Batería recomendada: LiPo 6S 1050mAh-1550mAh
- Cor: Verde Esmeralda
- Peso: 433.4 g ± 5 g
- Tempo de voo: 6-8 minutes (Based on slow cruising tests; actual times may vary)
- Material: Aluminio
- Dimensións do produto: 5 cm de longo x 5 cm de ancho x 5 cm de alto (aproximado)
10. Garantía e soporte
GEPRC products are designed and manufactured to high-quality standards. For warranty information, please refer to the official GEPRC website or contact your retailer. If you encounter any issues or require technical support, please visit the GEPRC support page or contact their customer service. Ensure you have your product model and purchase details available when seeking support.
No official product videos were found that meet the specified embedding criteria (creator_type: Seller, m3u8 format, or relevant 7-second preview videos).