Introdución
These Side Window Deflectors are custom-fit, in-window-channel rain and debris guards designed specifically for the BAIC X55 Plus MK1 2022-2025. They allow fresh air to circulate within the vehicle even when it's raining or snowing, by enabling you to keep your windows slightly open. Beyond ventilation, these deflectors help reduce wind noise and prevent interior heat buildup when the vehicle is parked.
The package includes a set of four window visors, one for each side window of your vehicle.

Image: The complete set of four window visors shown with the compatible BAIC X55 Plus MK1 vehicle.
Características do produto
- Enhanced Vehicle Appearance: Designed to complement and improve the overall styling of your vehicle.
- Reduced Wind Noise: Helps to minimize wind noise when windows are slightly open.
- Protección meteorolóxica: Keeps rain, snow, and debris out while allowing fresh air to circulate.
- Heat Buildup Prevention: Allows interior heat to escape, preventing excessive heat buildup in parked vehicles.
- Construción duradeira: Made from hard, impact-resistant PC material for long-term use and resistance to deformation.
- Fácil instalación: Features pre-applied automotive double-sided tape for a straightforward installation process.
- Visibilidade clara: Excellent transparency ensures a clear view even with the visors installed.

Image: Demonstrates the visor's ability to shield against rain, snow, sun glare, and allow for smoke ventilation.

Image: Illustrates the flexibility and robust nature of the visor material.
Guía de instalación
The side window deflectors are designed for easy installation using pre-applied double-sided tape. Follow these steps carefully for optimal adhesion and fitment.
- Comprobe o axuste: Before beginning, hold each visor up to its intended window to ensure it matches the contour and size. This helps prevent incorrect orientation.
- Limpar a superficie: Thoroughly clean the mounting area on your vehicle's window frame using alcohol or a suitable degreaser. Ensure the surface is completely dry and free of dust, dirt, wax, or grease.
- Prepare Adhesive: Gently peel back a small portion of the red backing from the double-sided tape at one end of the visor. Do not remove the entire backing yet.
- Heat the Tape (Recommended): Use a hairdryer or heat gun on a low setting to gently warm the exposed double-sided tape. This significantly enhances the adhesive's bonding strength.
- Posicionar e aliñar: Carefully align the visor with the window frame. Once aligned, press the exposed portion of the tape firmly onto the surface.
- Gradual Adhesion: While applying gentle pressure, slowly peel off the remaining red backing from the double-sided tape, pressing the visor firmly along its entire length as you go.
- Asegurar firmemente: After the entire visor is in place, apply firm and even pressure along the entire length of the visor, especially over the taped areas. You can use a soft cloth or roller to ensure maximum contact.
- Tempo de curado: Do not wash your vehicle or expose the installed visors to water for at least 48 hours after installation. This allows the adhesive to fully cure and bond securely.

Image: Visual guide for the installation process, from cleaning to final adhesion.

Image: Shows the visual difference on a car window before and after the visor installation.
Uso e coidado
En funcionamento
Once installed, the window visors function passively. They allow you to crack your windows slightly during adverse weather conditions (rain, snow) without water entering the cabin. They also help to reduce wind noise and glare from the sun. The design ensures that the normal opening and closing of your windows are not affected.
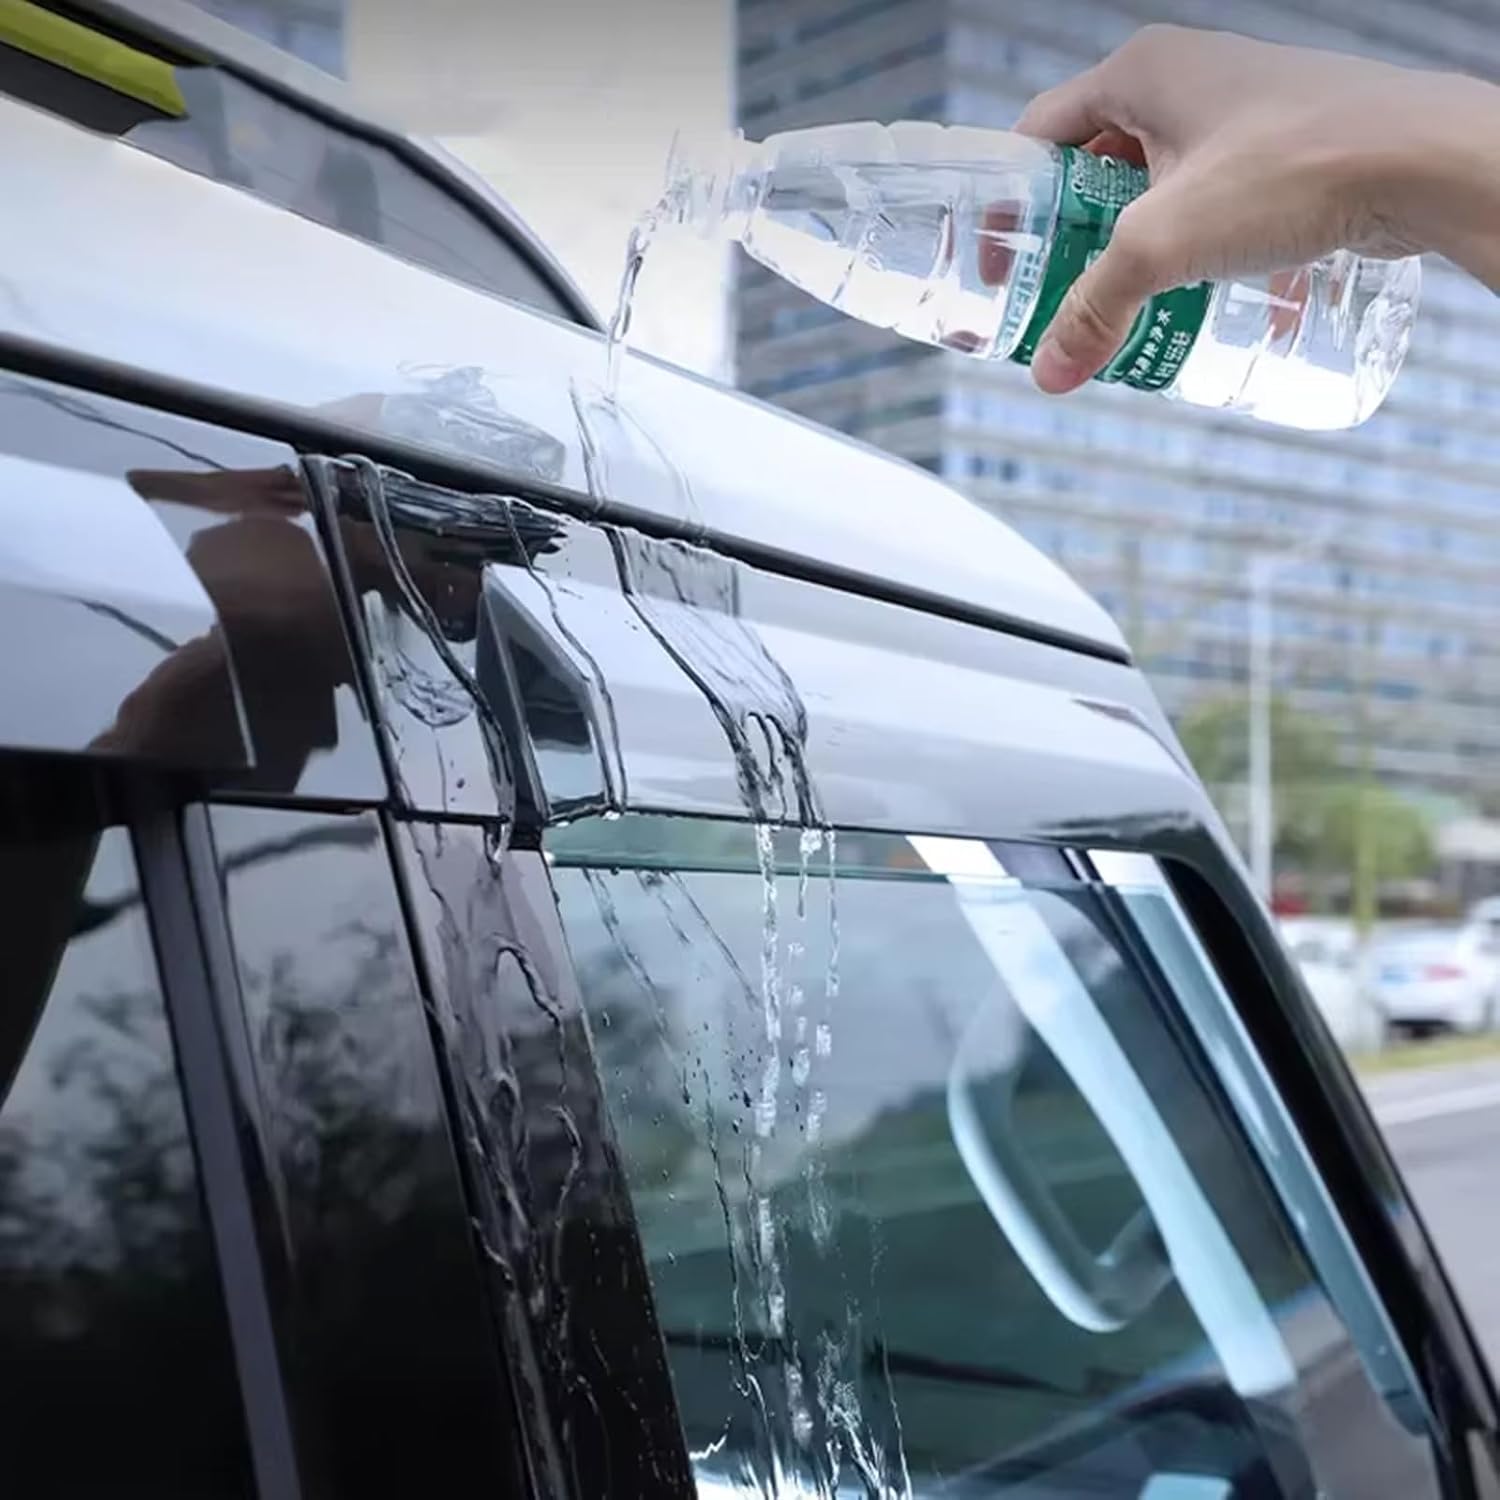
Image: Demonstrates how the visor deflects water, keeping the interior dry.
Mantemento
To maintain the appearance and longevity of your window visors, follow these simple care instructions:
- Limpeza regular: Clean the visors regularly with mild soap and water. Avoid abrasive cleaners or harsh chemicals that could damage the acrylic material.
- Pano suave: Use a soft cloth or sponge for cleaning to prevent scratching the surface.
- Enxágüe ben: Enxágüe ben con auga limpa para eliminar todos os residuos de xabón.
- Avoid High-Pressure Washes: While durable, prolonged exposure to direct high-pressure water jets from car washes might affect the adhesive over time. Hand washing is recommended.
Resolución de problemas
If you encounter any issues with your window visors, consider the following:
- Visor Not Sticking Properly:
- Ensure the surface was thoroughly cleaned and dry before installation.
- Verify that the ambient temperature was suitable for adhesive application (ideally above 50°F / 10°C).
- Re-apply pressure along the entire length of the visor to ensure maximum contact with the adhesive.
- If possible, gently heat the area with a hairdryer to reactivate the adhesive and press firmly again.
- Wind Noise After Installation:
- Check if the visors are securely attached and there are no gaps between the visor and the window frame.
- Ensure windows are fully closed when not intentionally cracked open.
- Water Leaking In:
- Confirm the visors are correctly positioned and fully adhered.
- Ensure windows are only slightly cracked open, as the visors are designed for partial opening, not full exposure.
Especificacións
| Nome do produto | Deflectores de fiestras laterais |
| Material | Acrylic (Hard, Impact-Resistant PC Material) |
| Colocación no vehículo | Exterior, Front, Rear, Left, Right, Driver Side, Passenger Side |
| Tipo de instalación | Tape-on / External / Outside Mount (with pre-applied double-sided tape) |
| Contido do paquete | 1x Set of Window Visors (4 PCS) |
| Dimensións do produto | 0.39 x 0.39 x 0.39 polgadas (aproximado) |
| Peso do elemento | 11 libras |
| Fabricante | YGCNMO |
Notas importantes
- Always carefully check the fitment for your specific vehicle model and year before purchasing e instalación.
- While installation is designed to be straightforward, professional installation is always recommended for best results.
- This package does not include additional installation tools or detailed printed instructions beyond what is provided here.


