1. Introdución
Thank you for choosing the Redkey W15 Cordless Wet Dry Vacuum Cleaner. This manual provides essential information for safe and efficient use of your appliance. Please read it thoroughly before first use and keep it for future reference.

Imaxe 1.1: Redkey W15 Cordless Wet Dry Vacuum Cleaner with included accessories. This image displays the main unit, charging base, power adapter, roller brush, and cleaning brush.
2. Instrucións de seguridade importantes
Siga sempre as precaucións de seguridade básicas ao usar electrodomésticos para reducir o risco de incendio, descarga eléctrica ou lesións.
- Le todas as instrucións antes de usar.
- Non mergullo o aparello en auga ou outros líquidos.
- Manteña o cabelo, a roupa solta, os dedos e todas as partes do corpo lonxe das aberturas e das partes móbiles.
- Use só como se describe neste manual. Empregue só os accesorios recomendados polo fabricante.
- Non o empregue cun cable ou enchufe danados. Se o aparello non funciona como debería, se deixou caer, se danou, se deixou no exterior ou caeu na auga, devólvao a un centro de servizo.
- Non manipule o enchufe ou o aparello coas mans molladas.
- Non colle líquidos inflamables ou combustibles, como gasolina, nin o use en zonas onde poidan estar presentes.
- Non coller nada que arde ou fume, como cigarros, mistos ou cinzas quentes.
- Teña moito coidado ao limpar as escaleiras.
- Non use sen filtros colocados.
- Garde o aparello en lugares cerrados.
- Este aparello non está pensado para o seu uso por persoas (incluídos nenos) con capacidades físicas, sensoriais ou mentais reducidas, ou con falta de experiencia e coñecementos, a menos que teñan supervisión ou instrucións sobre o uso do aparello por unha persoa responsable da súa seguridade.
3. Compoñentes do produto
3.1. Contido do paquete
- Redkey W15 Main Unit
- Montaxe de asa
- Base de carga
- Adaptador de alimentación
- Cepillo de rodillo
- Filtro HEPA
- Cepillo de limpeza
3.2. Diagrama da unidade principal
Refer to the image below for a visual representation of the main components of your Redkey W15.
Imaxe 3.1: Acabadoview of the Redkey W15 Cordless Wet Dry Vacuum Cleaner and its accessories. Key components include the clean water tank, dirty water tank, LED display, handle, and brush head.
4. Configuración e montaxe
4.1. Instalación da asa
- Insert the handle assembly into the main unit until it clicks securely into place.
- Ensure the handle is firmly attached before use.
4.2. Carga do aparello
- Coloque a unidade principal na base de carga.
- Conecta o adaptador de corrente á base de carga e despois a unha toma de corrente.
- A pantalla LED indicará o estado de carga.

Imaxe 4.1: The Redkey W15 vacuum cleaner placed on its charging station. The image highlights the long battery life of up to 35 minutes and a cleaning area of 150 square meters.
4.3. Encher o depósito de auga limpa
- Retire o depósito de auga limpa da unidade principal.
- Open the tank cap and fill with clean tap water. You may add a small amount of non-foaming floor cleaning solution if desired. Do not exceed the MAX fill line.
- Close the cap securely and reattach the tank to the main unit.
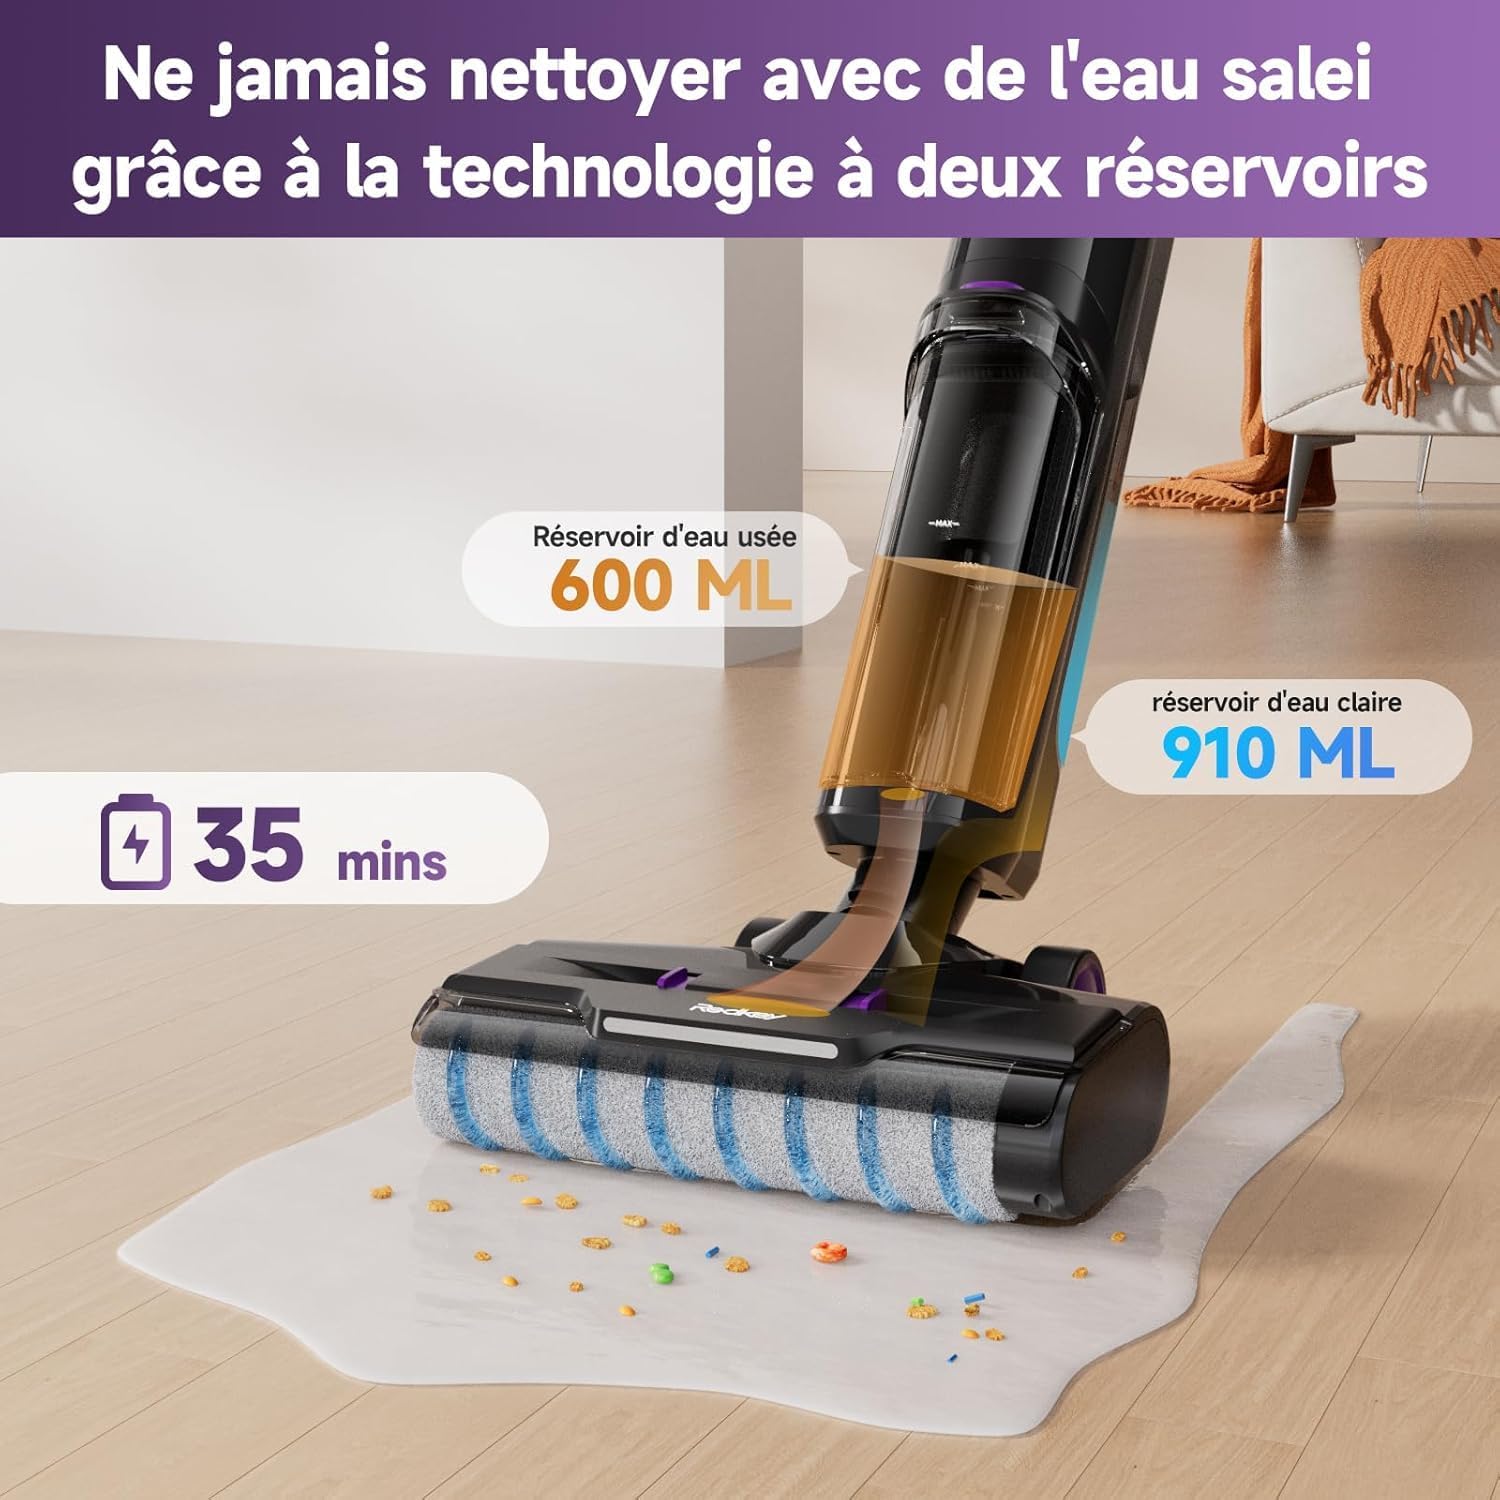
Imaxe 4.2: Illustration of the Redkey W15's dual-tank system, showing the 910 ml clean water tank and the 600 ml dirty water tank. This design ensures cleaning is always done with fresh water.
5. Instrucións de funcionamento
5.1. Acendido/apagado
Press the power button on the handle to turn the appliance on or off.
5.2. Selecting Cleaning Modes
The Redkey W15 offers three adjustable cleaning modes: Standard, Wash, and Strong Suction. Use the mode selection button on the handle to cycle through these options.
- Modo estándar: For general cleaning of light dirt and dust.
- Modo de lavado: For wet cleaning and mopping hard floors.
- Strong Suction Mode: For stubborn dirt, spills, and heavy debris.

Imaxe 5.1: The Redkey W15's LED display, illustrating different operational modes. The display shows battery level, current mode (e.g., Smart/Dry in blue, Powerful in red), and other status indicators.
5.3. Cleaning Hard Floors
The Redkey W15 is designed for effective cleaning of various hard floor types, including marble, laminate, parquet, and tile.
- Asegúrate de que o depósito de auga limpa estea cheo e que o depósito de auga sucia estea baleiro.
- Select the appropriate cleaning mode for your task.
- Move the vacuum cleaner slowly and steadily across the floor. The self-propelled system assists in movement.
- For wet cleaning, the appliance will dispense water and scrub the floor simultaneously, then vacuum up the dirty water.
- For dry vacuuming, ensure the wash mode is off.

Imaxe 5.2: The Redkey W15 demonstrating its wet and dry cleaning capabilities on various hard floor surfaces like parquet, marble, and tile, effectively handling different types of debris and spills.
5.4. Limpeza de arestas
The Redkey W15 features a specialized design for cleaning close to edges and baseboards, reaching within 5mm of walls.
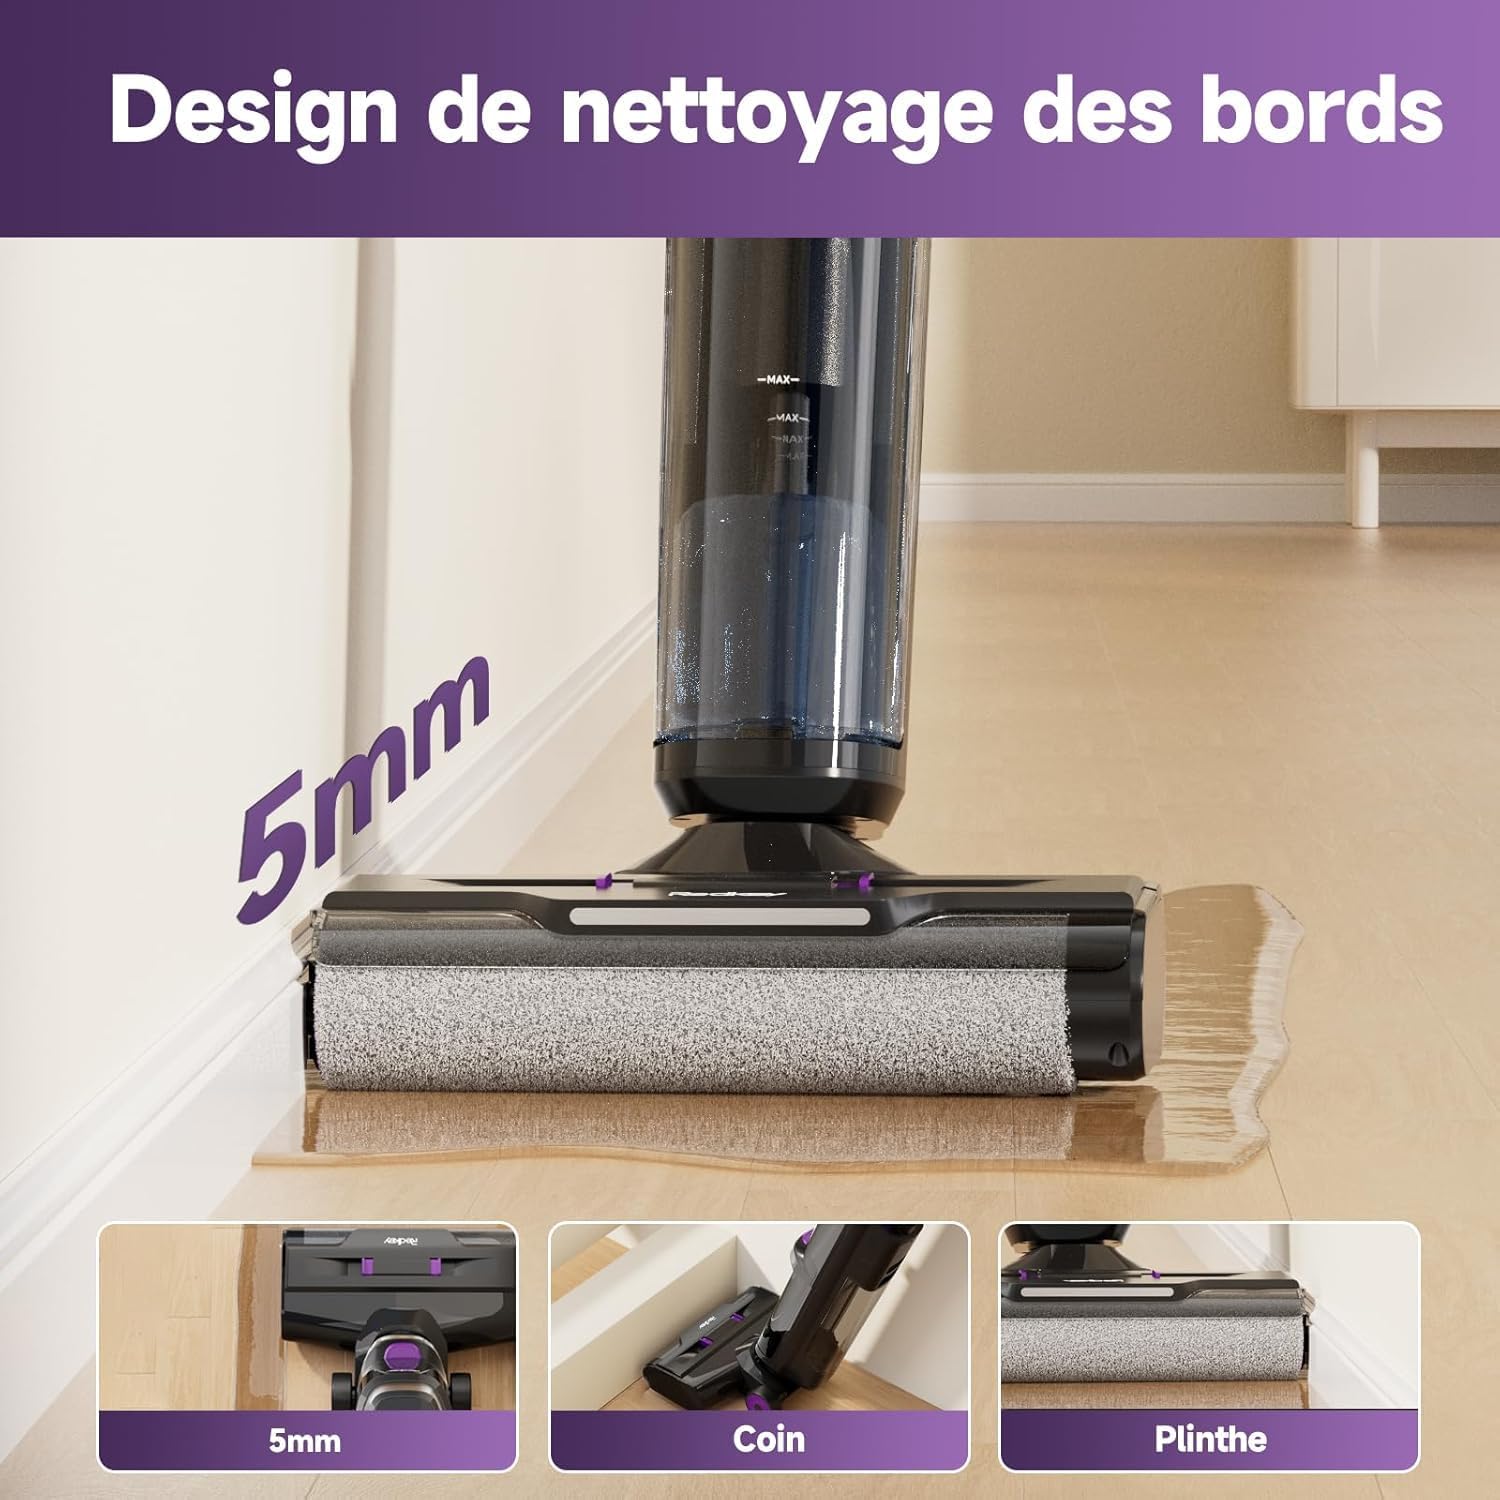
Imaxe 5.3: The Redkey W15 showcasing its 5mm edge cleaning design, allowing it to clean effectively along walls, corners, and baseboards without leaving uncleaned areas.
6. Mantemento e coidados
Regular maintenance ensures optimal performance and extends the lifespan of your Redkey W15.
6.1. Función de autolimpeza
- Despois de cada uso, coloque o aspirador na súa base de carga.
- Press the dedicated self-cleaning button (usually indicated on the handle or base).
- The appliance will automatically clean the roller brush and internal tubing. Ensure the dirty water tank is empty before starting self-cleaning and the clean water tank has sufficient water.
- Once complete, empty the dirty water tank.
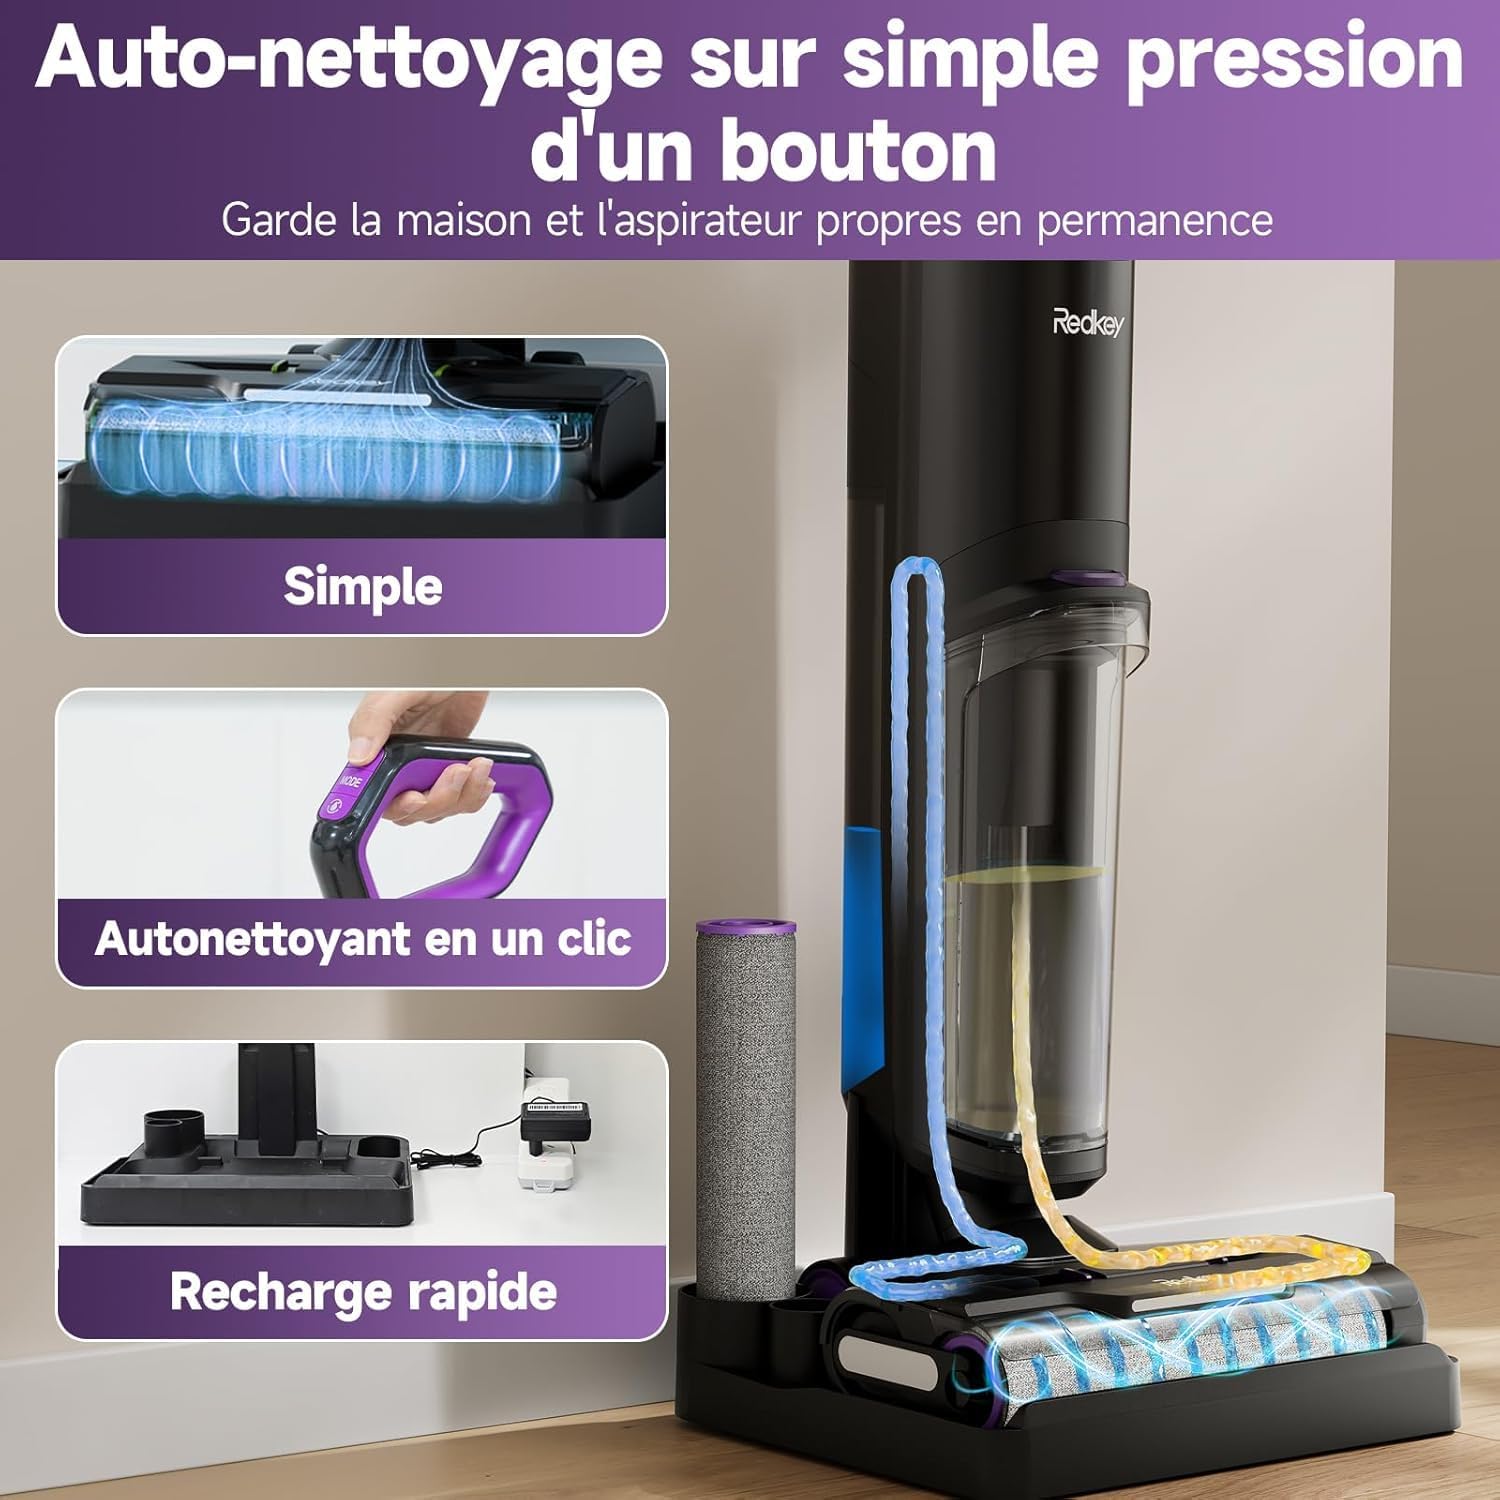
Imaxe 6.1: The Redkey W15's one-touch self-cleaning feature. This image illustrates the internal cleaning process of the roller brush and tubes, ensuring the device remains hygienic and ready for next use.
6.2. Baleirar o depósito de auga sucia
- Retire o depósito de auga sucia da unidade principal.
- Open the tank and dispose of the dirty water.
- Enxágüe o tanque ben con auga limpa.
- Reattach the tank securely.
6.3. Limpeza do cepillo de rolos
While the self-cleaning function is effective, occasional manual cleaning of the roller brush may be necessary.
- Apague e desenchufe o aparello.
- Remove the roller brush cover and then the roller brush.
- Use o cepillo de limpeza incluído para eliminar calquera pelo enredado ou residuos.
- Rinse the roller brush under running water. Allow it to air dry completely before reinstallation.
6.4. Cleaning/Replacing the HEPA Filter
The HEPA filter should be cleaned regularly and replaced periodically to maintain suction performance.
- Remove the HEPA filter from its housing (usually located within the dirty water tank assembly).
- Golpee suavemente o filtro para eliminar o po solto.
- Rinse the filter under cool running water. Do not use detergent.
- Allow the filter to air dry completely for at least 24 hours before reinstallation. Do not use a wet filter.
- Substitúa o filtro HEPA cada 3-6 meses, dependendo do uso.

Imaxe 6.2: Instructions for easy maintenance, specifically recommending regular cleaning of the HEPA filter by rinsing it under water.
7 Solución de problemas
Antes de contactar co servizo de atención ao cliente, consulta a seguinte guía de resolución de problemas para coñecer os problemas máis habituais.
| Problema | Causa posible | Solución |
|---|---|---|
| O aparello non se acende. | A batería está esgotada. | Cargue o aparello completamente. |
| Sen succión ou succión débil. | O depósito de auga sucia está cheo. O depósito de auga limpa está baleiro. O filtro está obstruído. O cepillo de rolos está bloqueado. | Baleirar o depósito de auga sucia. Enche o depósito de auga limpa. Limpar ou substituír o filtro HEPA. Limpar o cepillo do rolo. |
| Fuga de auga. | Water tanks not properly installed. Tank caps not securely closed. | Ensure both clean and dirty water tanks are correctly seated. Check that all tank caps are tightly closed. |
| Error Code E3 (Roller brush issue). | Roller brush is jammed or obstructed. | Turn off the appliance, remove the roller brush, and clear any obstructions. Reinstall the brush and restart. |
| Voice assistant not in desired language. | É preciso axustar a configuración do idioma. | Refer to the product's quick start guide or contact support for instructions on changing voice assistant language settings. |
8. Especificacións técnicas
| Característica | Especificación |
|---|---|
| Marca | Redkey |
| Número de modelo | W15 |
| Cor | Violet-01 |
| Capacidade do depósito de auga limpa | 910 mililitros |
| Capacidade do depósito de auga sucia | 600 mililitros |
| Número de velocidades | 3 |
| Tempo de execución | Ata 35 minutos |
| Características especiais | Wet/Dry Cleaning, Self-Cleaning, LED Display, Edge Cleaning (5mm) |
| Peso do elemento | 6.67 Kilograms (Package Weight) / Approx. 4 kg (Operating Weight) |
| Tipo de filtro | Foam, Fabric (HEPA) |
| Uso recomendado | Pisos duros |
| Dimensións do produto (L x W x H) | 64.3 x 66.5 x 113.2 cm |
9. Información da garantía
The Redkey W15 Cordless Wet Dry Vacuum Cleaner comes with a 2 ano de garantía gratuíta desde a data de compra. Esta garantía cobre defectos de fabricación e avarías en condicións de uso normais.
Please retain your proof of purchase for warranty claims. The warranty does not cover damage caused by misuse, neglect, unauthorized repairs, or normal wear and tear.
10. Atención ao cliente
For any questions, concerns, or technical assistance regarding your Redkey W15, please contact our customer support team.
- Soporte en liña: 24-hour online service is available.
- Soporte rápido: Expect a response within 12 hours.
- Protección do produto: 2 years of product protection.
Para contactar co servizo de asistencia a través de Amazon:
- Go to your Amazon account.
- Vaia a "Os seus pedidos".
- Find your order for the Redkey W15.
- Select "Get product support" or "Ask a question" for the seller (WHSJ-EU).

Imaxe 10.1: Redkey customer support details, indicating 12-hour quick support and a 2-year product protection plan. Instructions for contacting support via Amazon are also provided.