1. Introdución
This manual provides detailed instructions for setting up, operating, and maintaining your KPKUE Smart WiFi Digital Picture Frame (Model DP-10A). Please read this manual thoroughly before using the device to ensure optimal performance and longevity.
The KPKUE DP-10A is a 15.6-inch Full HD touchscreen digital picture frame designed to display photos and videos, share memories via the Frameo app, and offer additional features like time and weather widgets. It includes 64GB of internal storage and supports external USB and SD cards.
2. Configuración
2.1 Desembalaxe e compoñentes
Ao abrir o paquete, asegúrese de que estean presentes todos os compoñentes:
- KPKUE Smart WiFi Digital Picture Frame (DP-10A)
- Power Adapter (Length 5 feet)
- Removable Frame Stand
- Manual de usuario
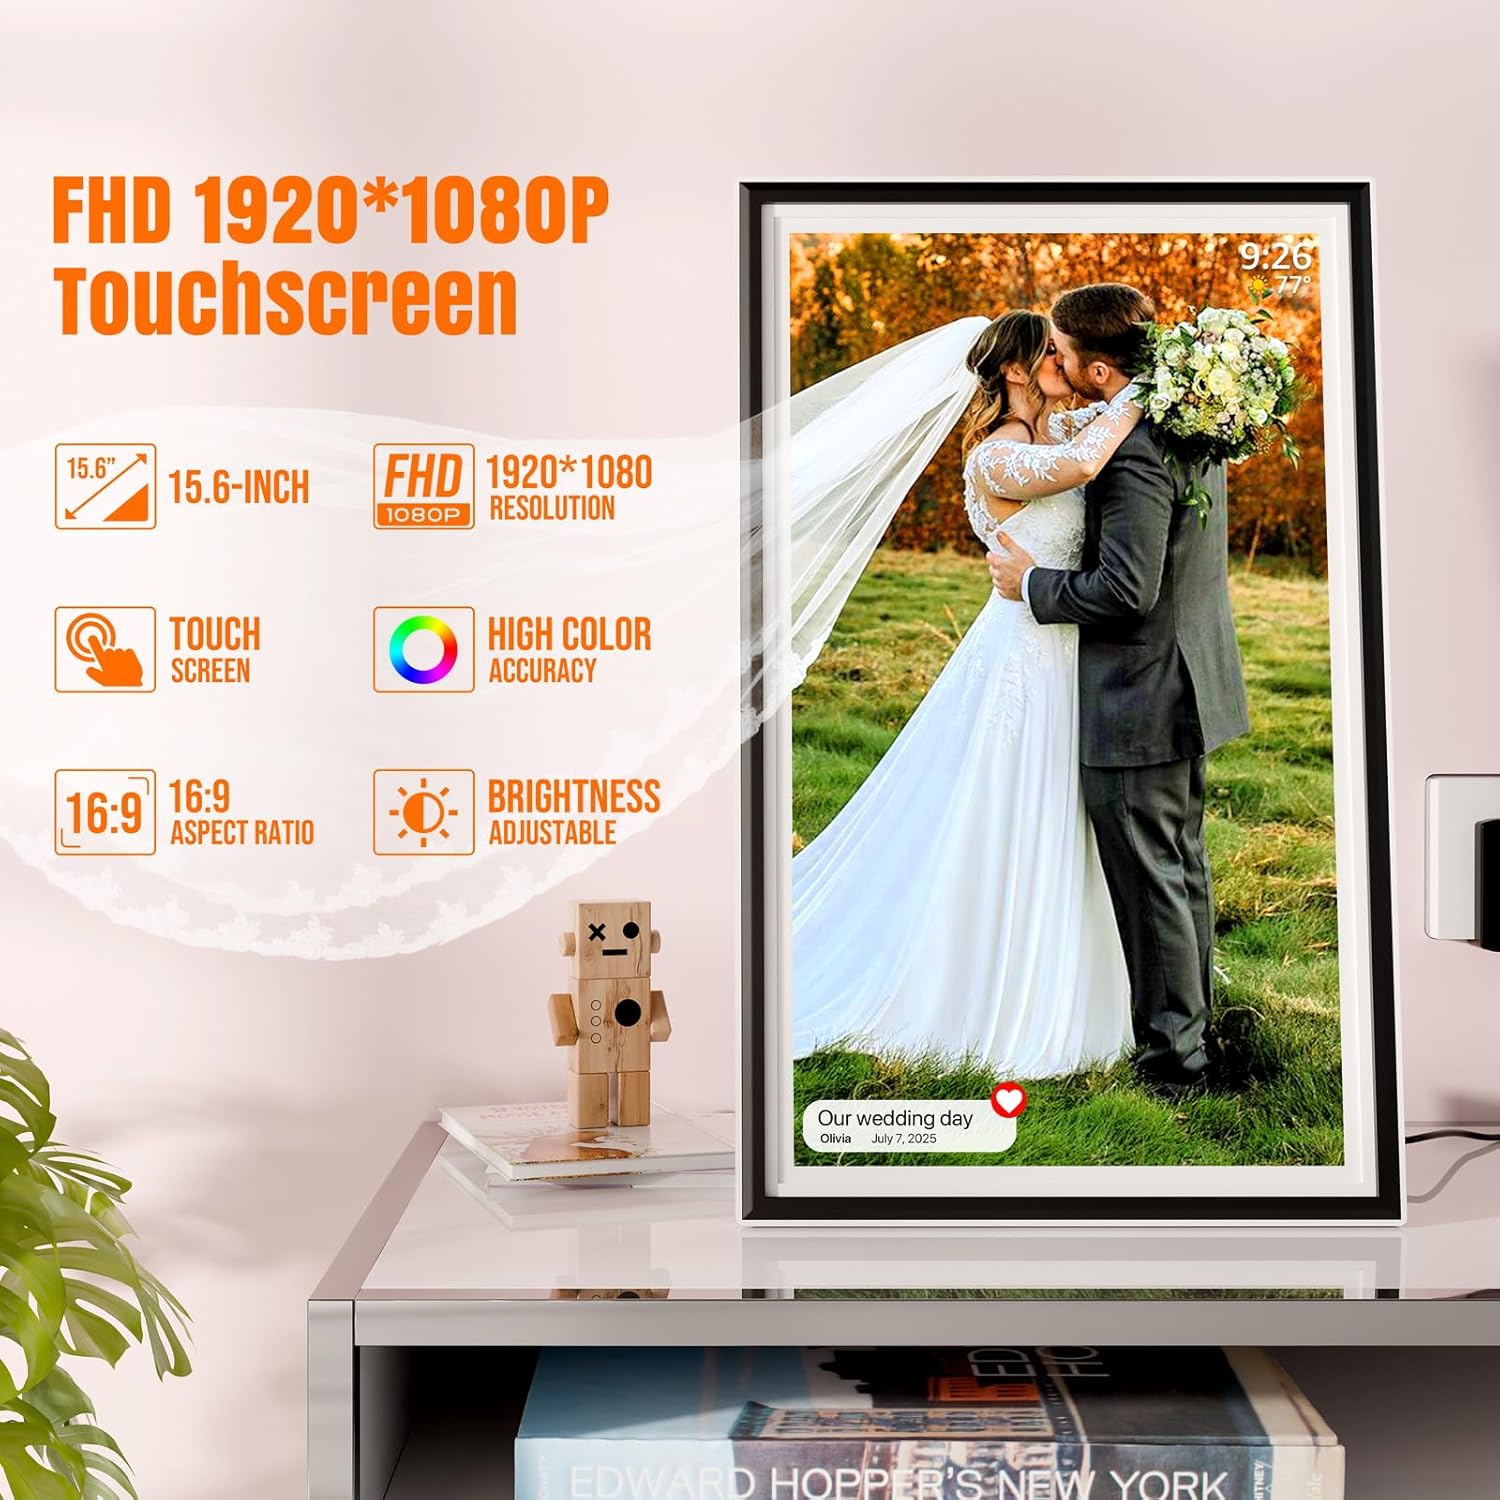
Image: The 15.6-inch Full HD touchscreen digital picture frame, highlighting its display features.
2.2 Colocación física
The frame can be placed on a flat surface using the included removable stand or mounted on a wall. The frame features two hanging holes and four anchor points for wall mounting.
- Using the Stand: Insert the removable stand into the designated slot on the back of the frame. Ensure it is securely in place.
- Montaxe na parede: Use appropriate wall anchors and screws (not included) for the two hanging holes on the back of the frame. Ensure the wall can support the frame's weight (approximately 3.4 pounds).

Image: The digital picture frame demonstrating its auto-rotation and wall-mounting capabilities.
2.3 Conexión de alimentación
Connect the secure power adapter to the DC barrel jack on the back of the frame and plug it into a standard electrical outlet. The frame will power on automatically.

Imaxe: Traseira view of the frame, detailing the SD card slot, 3.5mm headphone jack, USB-A data port, Type-C data port, and 4.0mm DC barrel jack.
2.4 Initial Configuration (Wi-Fi & Frameo App)
Siga as instrucións na pantalla para completar a configuración inicial:
- Selección do idioma: Escolle o teu idioma preferido.
- Conexión Wi-Fi: Connect the frame to a 2.4GHz Wi-Fi network.
- Time Zone & Date: Configura a zona horaria e a data correctas.
- Aplicación Frameo: Download the Frameo app on your smartphone (available on iOS & Android).
- Generate Code: On the frame, navigate to 'Add Friend' to generate a unique code.
- Aplicación de conexión: In the Frameo app, enter the generated code to link your smartphone to the frame.
Video: A demonstration of the digital picture frame's functions and initial setup process, including connecting to Wi-Fi and linking with the Frameo app.
Video: This video illustrates the setup process and various features of the smart frame, including how to connect and begin sharing memories.
3. Instrucións de funcionamento
Navegación con pantalla táctil 3.1
The 15.6-inch IPS LCD touchscreen allows for intuitive navigation. Swipe left or right to browse photos, tap to access menus, and pinch to zoom. The responsive touchscreen ensures smooth interaction.
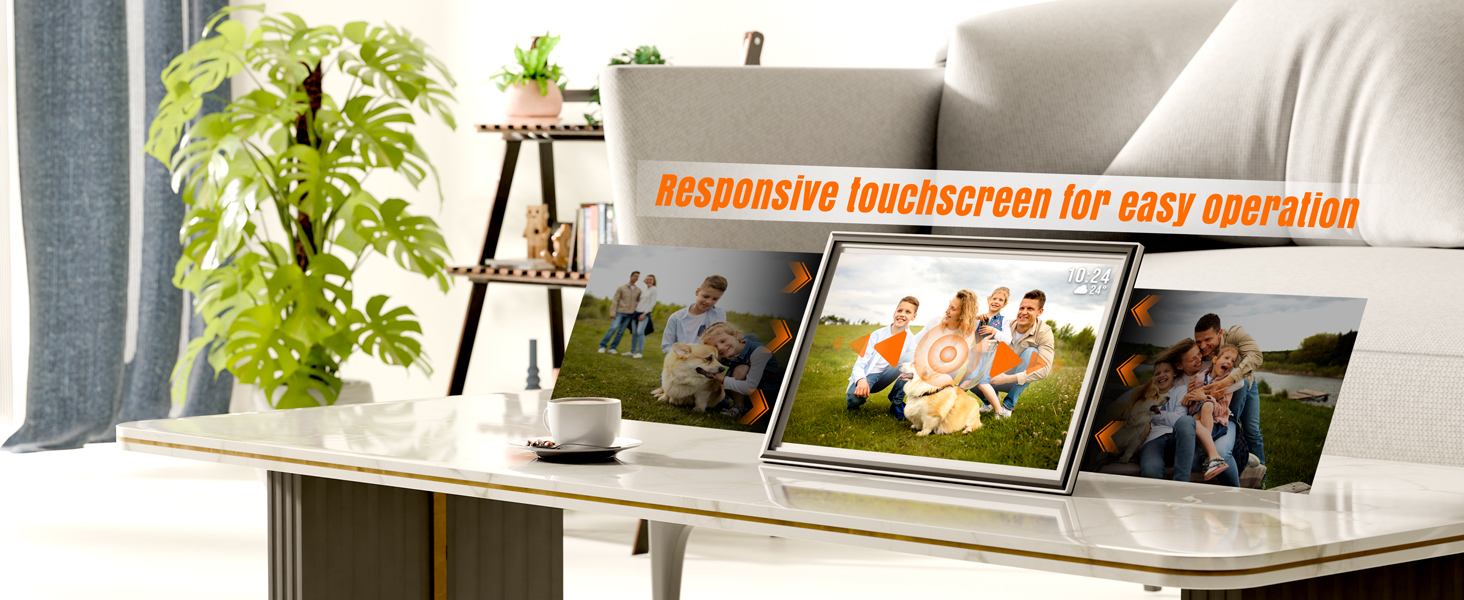
Image: The responsive touchscreen interface, demonstrating ease of operation for browsing photos.
3.2 Engadir fotos e vídeos
There are multiple ways to transfer photos and micro-videos to your frame:
- Aplicación Frameo: Use the encrypted Frameo app on your smartphone to send photos and micro-videos directly to the frame from anywhere. You can add friends to share photos with your frame.
- Unidade USB: Insert a USB flash drive (up to 128GB) into the USB-A port to import or export photos and videos.
- Tarxeta SD: Insert an SD card (up to 128GB) into the SD card slot to import or export photos and videos.
- Computer Transfer: Connect the frame to a computer via USB cable to transfer files.

Image: Visual representation of the four methods for adding photos to the frame: USB, computer, Frameo app, and SD card.

Image: Illustrates the long-distance photo transmission capability using the Frameo app.
3.3 Xestión de álbums
Organize your photos and videos into custom albums. You can create personalized slideshows by category or hide specific photos. The frame also supports auto-collages from photos and videos.
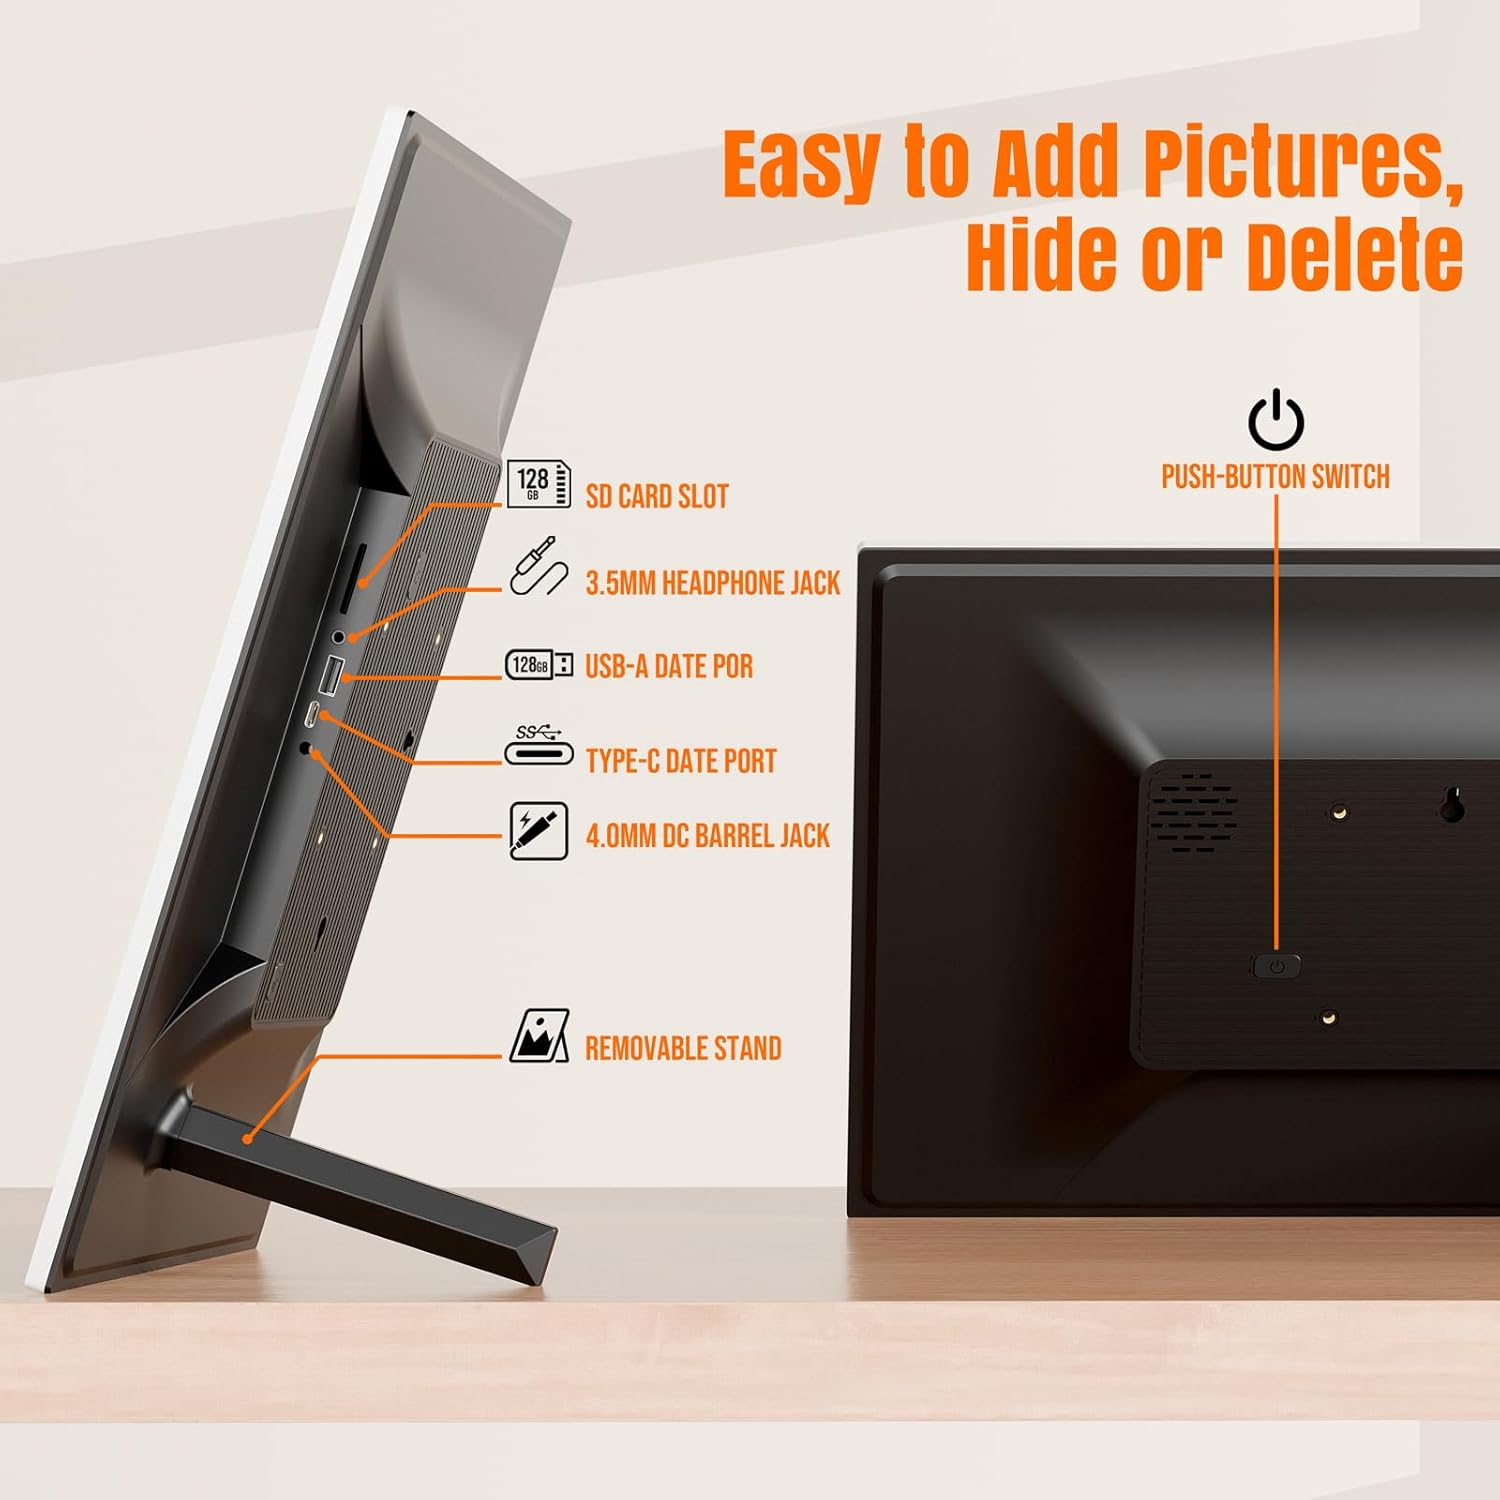
Image: The frame's interface showing options for personalized management and image playback.

Image: The Album Management screen, allowing users to select and create new albums for their photos.
3.4 Configuración da presentación de diapositivas
Adjust the duration each photo is displayed in the slideshow, choose transition effects, and enable or disable auto-rotate for photos based on frame orientation.
3.5 Widgets (Time & Weather)
Enable live widgets such as time, weather, and temperature via Wi-Fi to display useful information alongside your photos.

Image: The frame showing integrated time and weather widgets on the display.
3.6 Modo de suspensión
Set specific hours for Sleep Mode to save energy. The frame will intelligently rest during these periods but will still receive photos. It will auto-wake during non-sleep periods to resume slideshows.

Image: The frame illustrating its auto-wake feature during non-sleep periods and the settings for Sleep Mode.
4. Mantemento
4.1 Limpeza da pantalla
To clean the scratch-resistant 1080p FHD screen, gently wipe it with a soft, lint-free cloth. For stubborn smudges, use a screen-cleaning solution specifically designed for electronic displays. Avoid abrasive materials or harsh chemicals.
4.2 Actualizacións de software
The frame may receive periodic software updates to improve performance and add new features. Ensure your frame is connected to Wi-Fi to receive these updates. You will be notified on-screen when an update is available.
4.3 Copia de seguranza e restauración
Regularly back up your photos and videos to an external SD card or USB drive to prevent data loss. The frame's settings menu provides options for backup and restore functionality.
5 Solución de problemas
If you encounter any issues with your KPKUE Smart WiFi Digital Picture Frame, refer to the following common solutions:
| Problema | Solución |
|---|---|
| Frame not powering on | Asegúrate de que o adaptador de corrente estea conectado correctamente tanto á estrutura como a unha toma de corrente que funcione. Proba cunha toma de corrente diferente. |
| Non se puido conectar á wifi | Verify your Wi-Fi password. Ensure the frame is within range of a 2.4GHz Wi-Fi network. Restart your router and the frame. |
| As fotos non se mostran | Check if photos have been successfully uploaded via the Frameo app or external storage. Ensure the slideshow is enabled in settings. |
| A pantalla táctil non responde | Restart the frame by holding down the power button. Ensure the screen is clean and free of debris. |
Para obter máis axuda, póñase en contacto co servizo de atención ao cliente.
6. Especificacións
- Número de modelo: DP-10A
- Tamaño da pantalla: 15.6 polgadas
- Resolución: 1920 x 1080 (Full HD)
- Almacenamento interno: 64GB (7GB system-used)
- Almacenamento ampliable: Supports USB/SD cards up to 128GB
- Conectividade: Wi-Fi de 2.4 GHz
- Portos: SD Card Slot, 3.5mm Headphone Jack, USB-A Data Port, Type-C Data Port, 4.0mm DC Barrel Jack
- Dimensións do produto: 15.67 x 9.84 x 0.99 polgadas
- Peso do artigo: 3.4 libras
- Material: Impact-resistant ABS frame
7. Garantía e soporte
Your KPKUE Smart WiFi Digital Picture Frame (Model DP-10A) includes 365-day support from the manufacturer. For specific warranty details, please refer to the product packaging or contact KPKUE customer service directly.
For technical assistance, troubleshooting, or any questions regarding your product, please visit the KPKUE Store on Amazon or contact their customer support channels.