1. Introdución
Thank you for choosing the HYPERLITE 8 Foot LED Linear Strip Light Fixture. This manual provides essential information for the safe installation, operation, and maintenance of your new lighting fixture. Please read these instructions thoroughly before installation and retain them for future reference.

Imaxe 1.1: Acabadoview of the HYPERLITE 8 Foot LED Linear Strip Light Fixture.
2. Información de seguridade
WARNING: Risk of electric shock. Disconnect power before installation or servicing.
- Installation should be performed by a qualified electrician in accordance with national and local electrical codes.
- Asegurar a subministración voltage is compatible with the fixture's requirements (120-277V).
- Do not handle the fixture with wet hands or when standing on wet surfaces.
- Do not modify the fixture in any way. Unauthorized modifications may void the warranty and create safety hazards.
- Asegúrese de que todas as conexións estean seguras e debidamente illadas.
- Este dispositivo está deseñado só para uso en interiores.
3. Contido do paquete
Comprobe que todos os compoñentes estean presentes antes de comezar a instalación:
- HYPERLITE 8 Foot LED Linear Strip Light Fixture (Quantity as per pack size)
- Manual de instrucións (este documento)
- J-box adapters (x2)
- Safety Ropes (x2)
- Screws (x6 total for mounting)
- Áncoras (x4)
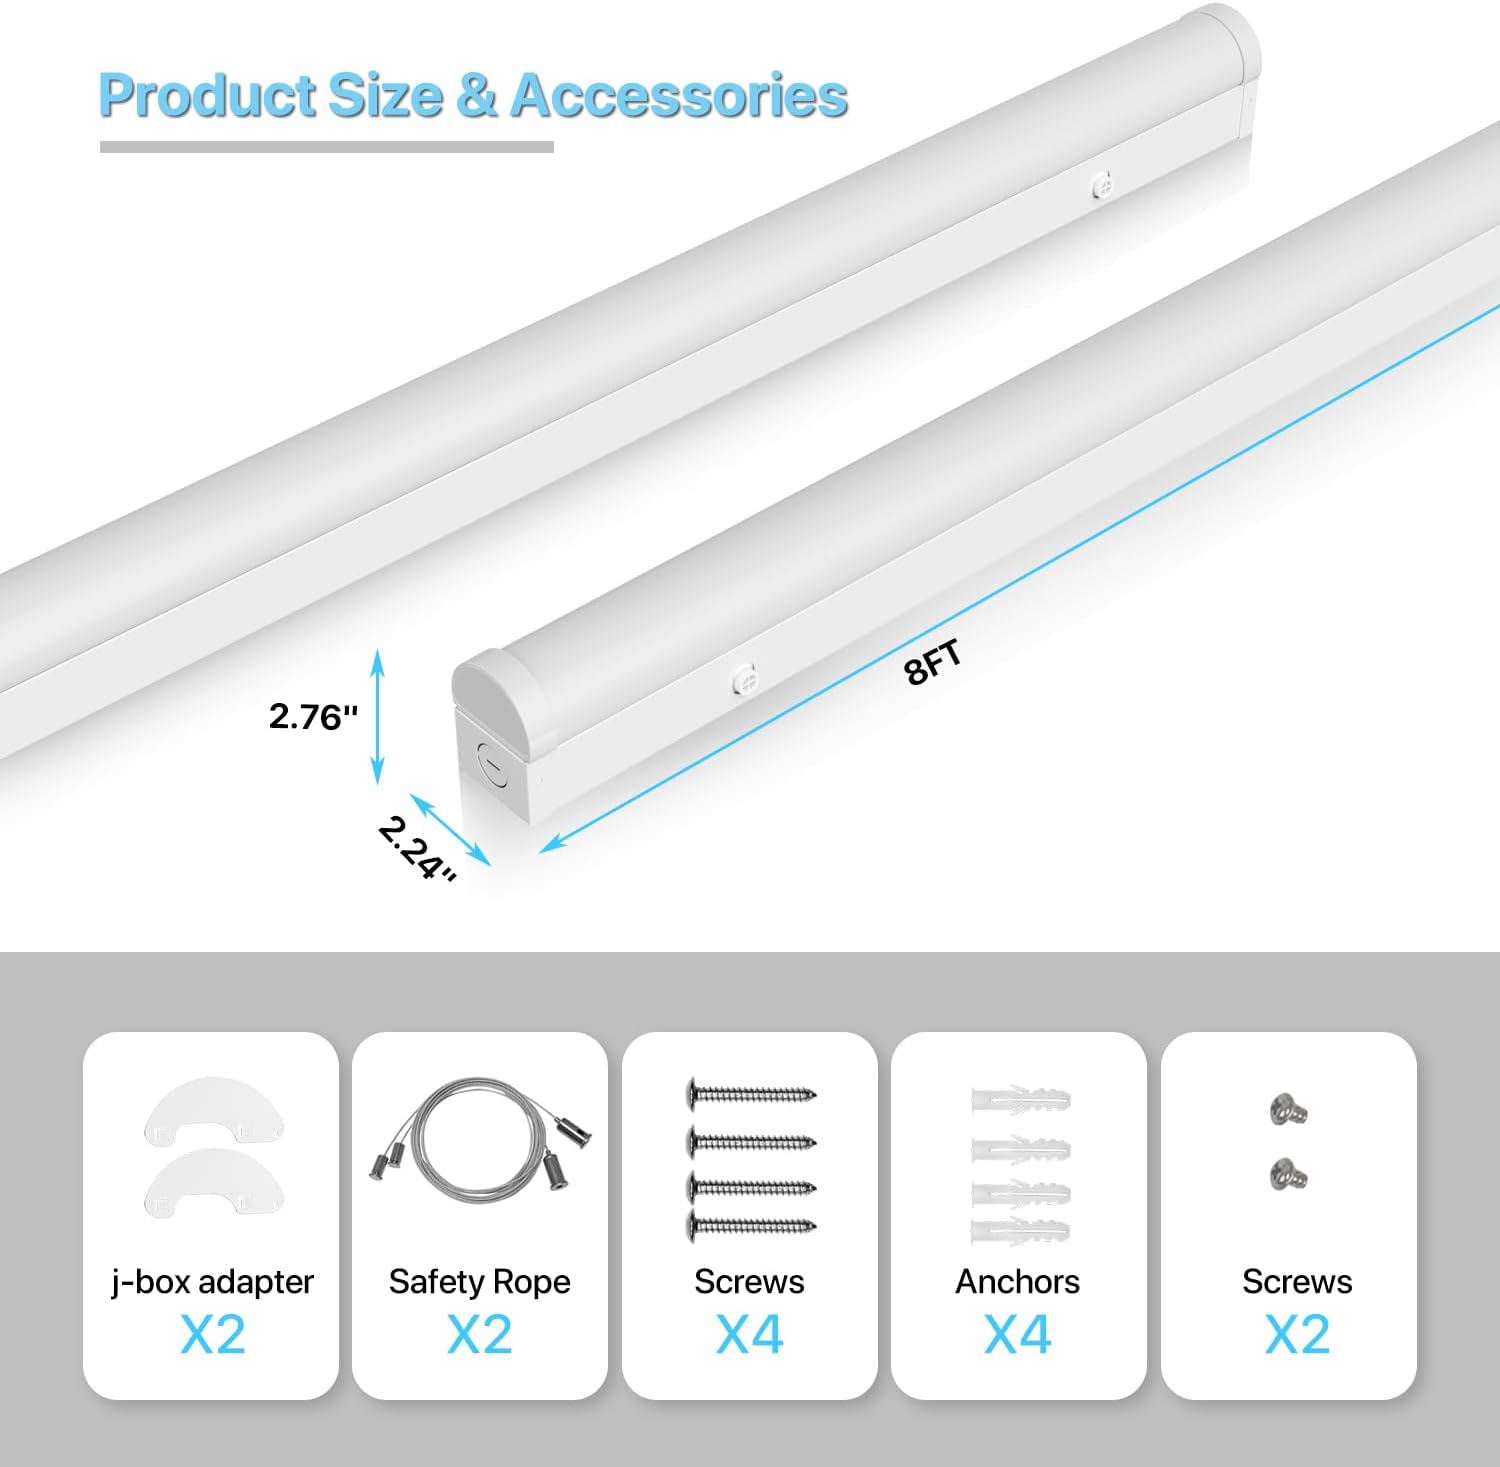
Image 3.1: Included accessories and fixture dimensions.
4. Características do produto
- Potencia axustabletage: Select between 60W, 70W, or 80W to optimize energy consumption and light output.
- Temperatura de cor seleccionable (CCT): Choose from 3500K (Warm White), 4000K (Cool White), or 5000K (Daylight) to suit your environment.
- Alta eficiencia: Delivers up to 10400 lumens with an efficiency of 130 lumens per watt.
- Regulable de 1-10 V: Compatible with 1-10V dimmers for adjustable brightness from 10% to 100%.
- Longa vida útil: Rated for 50,000 hours of operation, reducing maintenance and replacement costs.
- Construción duradeira: Made from aluminum for robust performance.
- Certificado UL: Meets high safety and performance standards.
- Instalación versátil: Supports both surface mount and suspended mount methods.
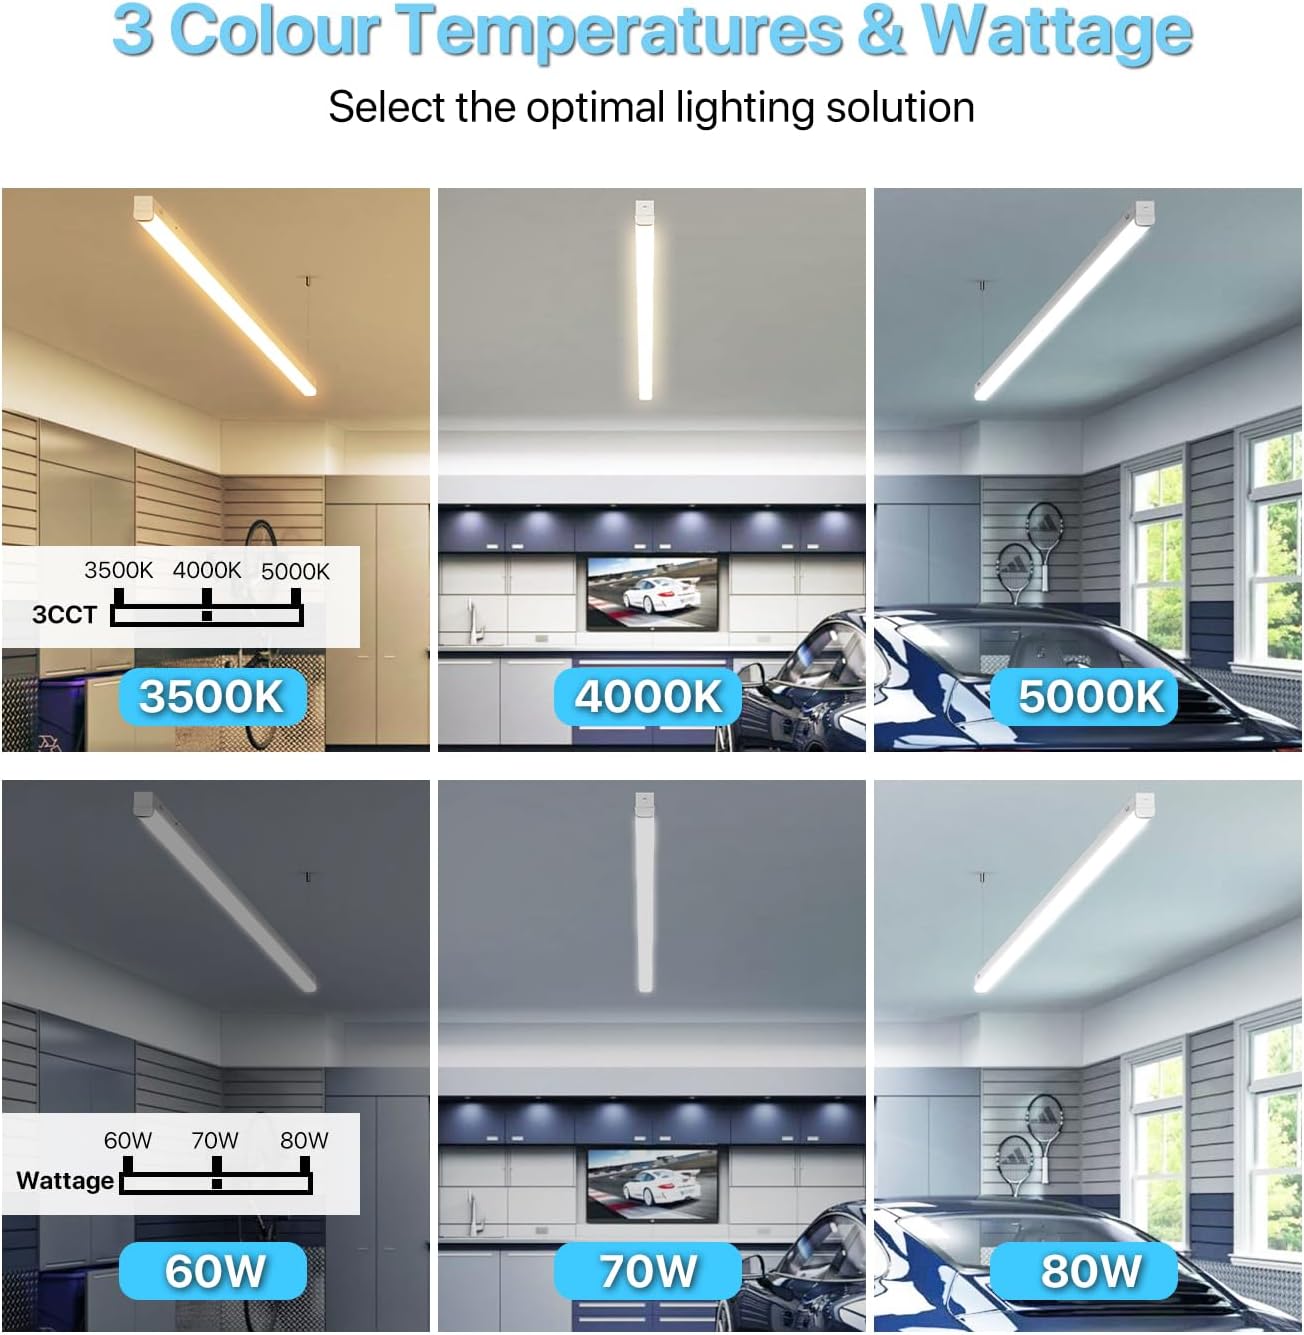
Image 4.1: Visual representation of selectable color temperatures and wattage configuracións.

Image 4.2: Details on the screw-lock mechanism for stable suspension and the unique button/buckle design for easy cover removal.
5. Instrucións de instalación
Before installation, ensure the power supply is turned off at the circuit breaker.
5.1. Instalación en superficie
- Prepare a superficie de montaxe: Identify the desired location for the fixture. Mark the drilling points for the mounting screws.
- Perforación: Drill pilot holes at the marked locations. Insert anchors if mounting into drywall or other soft materials.
- Attach J-box Adapters: Secure the J-box adapters to the ceiling or wall using the provided screws.
- Conecte o dispositivo: Connect the fixture's electrical wires to the building's wiring (Live to Live, Neutral to Neutral, Ground to Ground). Ensure all connections are secure and insulated.
- Montar o aparello: Align the fixture with the J-box adapters and secure it in place with the remaining screws.
5.2. Suspended Mount Installation
- Prepare a superficie de montaxe: Identify the desired location for the fixture. Mark the drilling points for the suspension hardware.
- Install Suspension Hardware: Secure the ceiling hooks or other suspension hardware (not included, but compatible with safety ropes) into the ceiling structure.
- Attach Safety Ropes: Connect the safety ropes to the fixture's designated attachment points. The screw-lock mechanism ensures stable suspension.
- Axustar a altura: Adjust the length of the safety ropes to achieve the desired hanging height.
- Conecte o dispositivo: Connect the fixture's electrical wires to the building's wiring (Live to Live, Neutral to Neutral, Ground to Ground). Ensure all connections are secure and insulated.

Image 5.1: Illustration of the two available installation methods: Surface Mount and Suspended Mount.
6. Instrucións de funcionamento
The HYPERLITE LED Linear Strip Light Fixture features external switches for adjusting wattage and color temperature (CCT).
6.1. Axuste da augatage e Temperatura da cor
The CCT and wattage switches are located on the fixture's housing. These can be adjusted without disassembling the fixture.
- Locate Switches: Identify the small toggle switches on the side of the fixture. One switch controls wattage (60W, 70W, 80W) and the other controls CCT (3500K, 4000K, 5000K).
- Select Desired Setting: Use a small tool (e.g., a screwdriver) to slide the switches to your preferred wattage e a temperatura da cor.
- Encendido: Restore power to the fixture to see the changes.
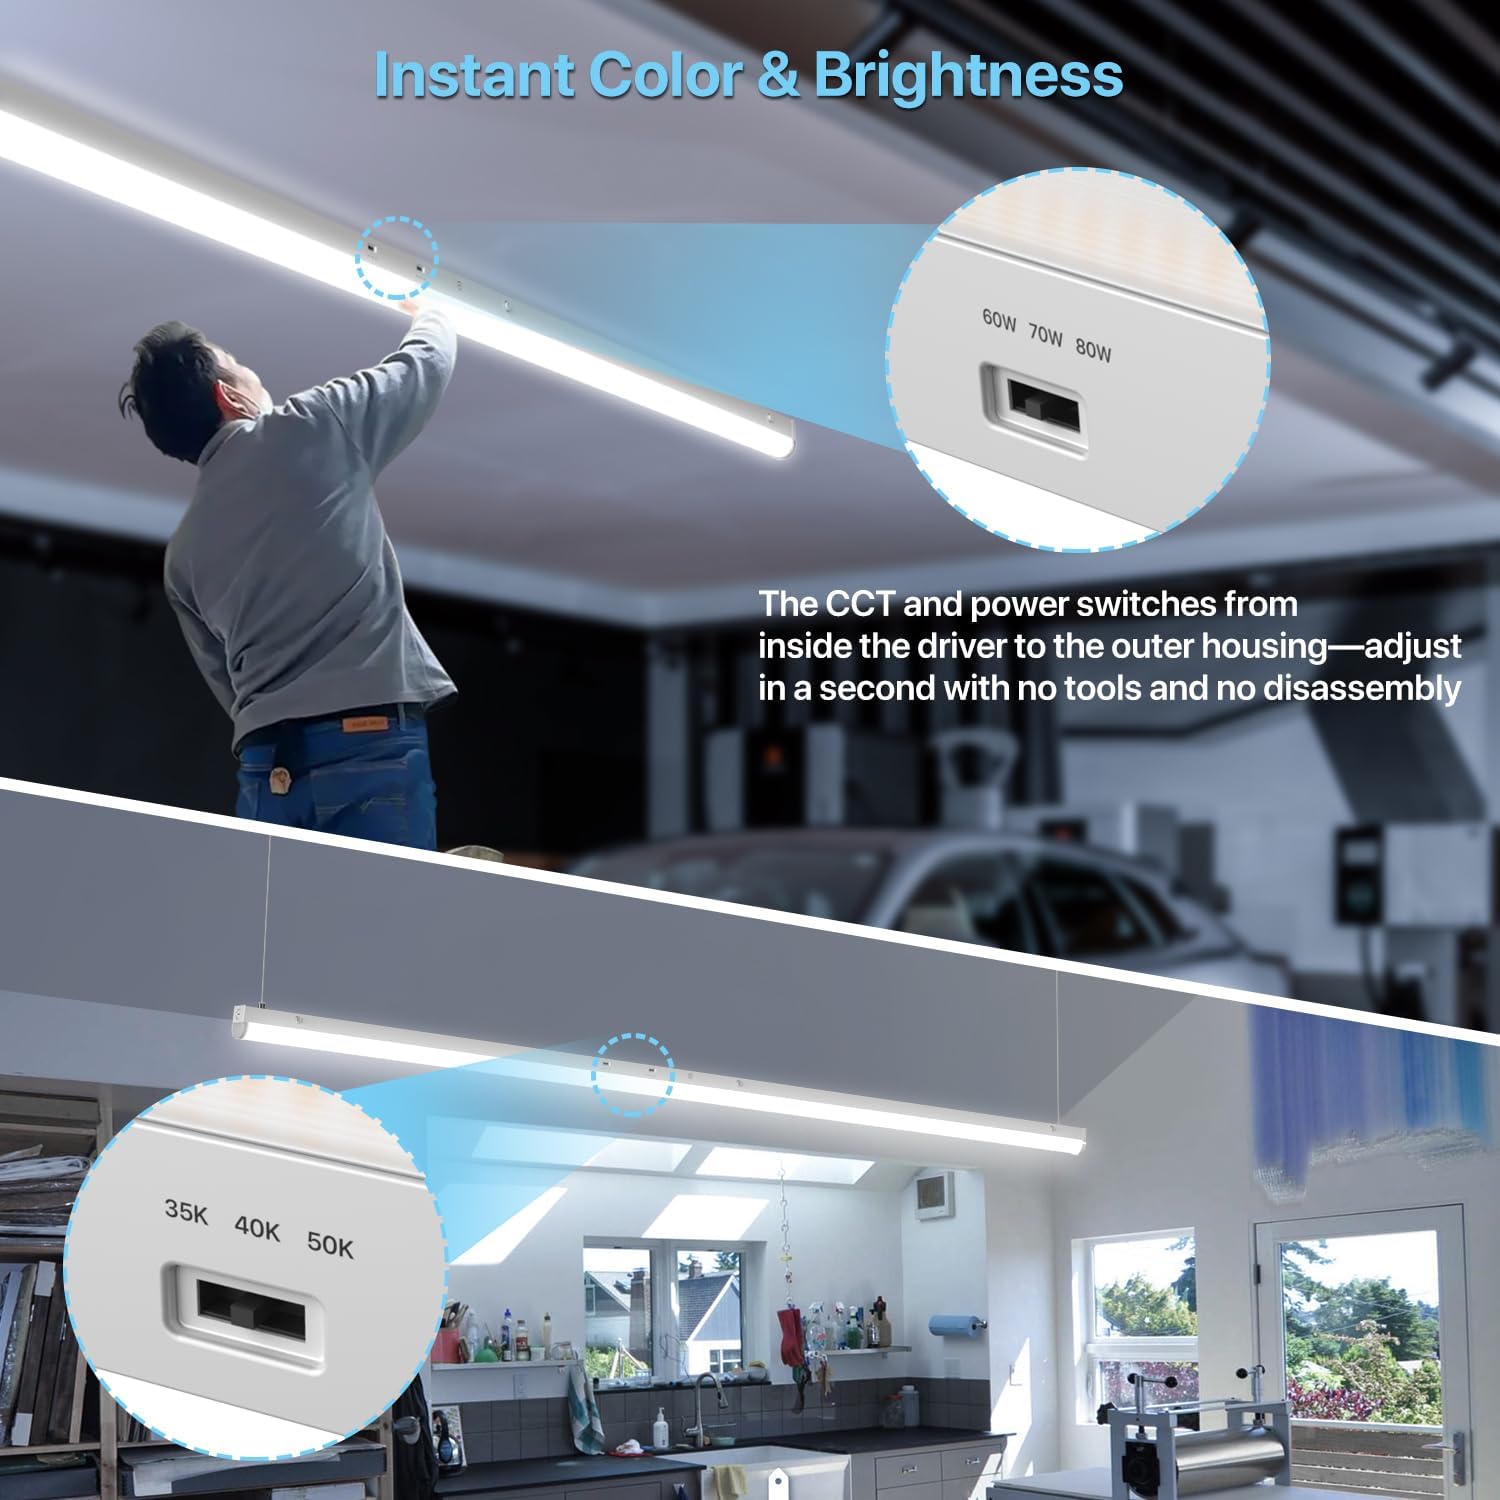
Image 6.1: Location and operation of the CCT and wattage interruptores de selección.
6.2. Dimming Function (1-10V)
This fixture supports 1-10V dimming. To utilize this feature, you will need a compatible 1-10V dimmer switch (not included) wired into your electrical system.
- Install 1-10V Dimmer: Have a qualified electrician install a 1-10V dimmer switch according to its instructions and local electrical codes.
- Connect Dimming Wires: Connect the fixture's dimming wires to the corresponding wires from the 1-10V dimmer.
- Axustar o brillo: Use the 1-10V dimmer to adjust the light output from 10% to 100%.

Image 6.2: Visual demonstration of the 1-10V dimming range from 10% to 100% brightness.
7. Mantemento
The HYPERLITE LED Linear Strip Light Fixture requires minimal maintenance.
- Limpeza: Asegúrese de que a electricidade estea desconectada antes de limpala. Limpe a luminaria cun pano suave, seco ou lixeiramente húmido.amp pano. Non empregue produtos químicos agresivos, produtos de limpeza abrasivos nin disolventes.
- Inspección: Periodically inspect the fixture for any signs of damage, loose connections, or wear. If any issues are found, disconnect power and contact a qualified electrician or HYPERLITE support.
- LED: The LEDs are integrated and not user-replaceable. The long lifespan of the LEDs means replacement should not be necessary under normal operating conditions.
8 Solución de problemas
Se tes problemas co teu dispositivo, consulta os seguintes problemas e solucións comúns:
| Problema | Causa posible | Solución |
|---|---|---|
| O dispositivo non se ilumina | Sen fonte de alimentación Conexión de cableado solta Instalación defectuosa | Comprobe o disxuntor e o interruptor de parede. Verifique que todas as conexións dos cables estean seguras (asegúrese primeiro de que a alimentación estea desconectada). Contact HYPERLITE support if power is confirmed and connections are good. |
| Light output is too dim or too bright | Wat incorrectotagconfiguración Dimmer setting too low/high | Axustar o wattage switch on the fixture. Adjust the 1-10V dimmer to the desired brightness level. |
| A temperatura da cor non é a esperada | Incorrect CCT setting | Adjust the CCT switch on the fixture to 3500K, 4000K, or 5000K. |
| Luz parpadeante | Dimmer incompatible Cableado solto Voltage flutuacións | Ensure a 1-10V dimmer is used. If not, replace with a compatible dimmer. Check all wiring connections (with power off). Consulte cun electricista para comprobar a estabilidade da subministración eléctrica. |
9. Especificacións
| Característica | Especificación |
|---|---|
| Número de modelo | HP-SP-BF02 |
| Dimensións (L x W x H) | 96" x 2.09" x 2.59" |
| Wattage | 60W / 70W / 80W (Selectable) |
| Saída de lumens | Ata 10400 lúmenes (a 80 W) |
| Eficacia | 130 lm/W |
| Temperatura de cor (CCT) | 3500K / 4000K / 5000K (Selectable) |
| Regulabilidade | 1-10V Dimming (10%-100%) |
| Vol. De entradatage | 120-277V AC |
| Vida útil | 50,000 horas |
| Material | Aluminio |
| Certificacións | Listado UL |
| Uso interior/exterior | Só para uso en interiores |
| Peso do artigo (paquete de 8) | 49.9 libras |
10. Garantía e soporte
10.1. Información da garantía
This HYPERLITE LED Linear Strip Light Fixture is covered by a 5 ano de garantía from the date of purchase. This warranty covers defects in materials and workmanship under normal use. It does not cover damage caused by improper installation, misuse, abuse, accidents, or unauthorized modifications.
Conserve o comprobante de compra para reclamacións de garantía.
10.2. Atención ao cliente
For technical assistance, warranty claims, or any questions regarding your HYPERLITE product, please contact our customer support team. Refer to the contact information provided with your purchase or visit the official HYPERLITE websitio.
When contacting support, please have your model number (HP-SP-BF02) and purchase date ready.