
Introdución
The VANPO 1/2-Inch Digital Torque Wrench provides precise torque control for various mechanical applications. This manual outlines the proper setup, operation, maintenance, and troubleshooting to ensure optimal performance and longevity of your tool.
Características principais:
- Precise Accuracy: Delivers reliable torque control with ±2% accuracy, reducing over-tightening and fastener damage.
- Clear Torque Feedback: Features a large backlit LCD display, audible alerts, LED indicators, and vibration feedback for clear confirmation when preset torque is reached.
- Durable & Bidirectional: Built for repeated use in automotive environments, supporting both clockwise and counterclockwise operation.
- Easy & Efficient Operation: Supports Peak and Track modes, with preset torque values, and a tool-free, quick-access battery compartment.
- Aplicación ampla: Suitable for vehicle maintenance, home repair, workshop projects, and industrial machinery.
Configuración
1. Instalación da batería
The torque wrench requires two AA batteries (included). To install:
- Unscrew the battery cap at the end of the handle.
- Insert two AA batteries, ensuring correct polarity (negative side down, positive side up).
- Replace the battery cap and tighten securely.
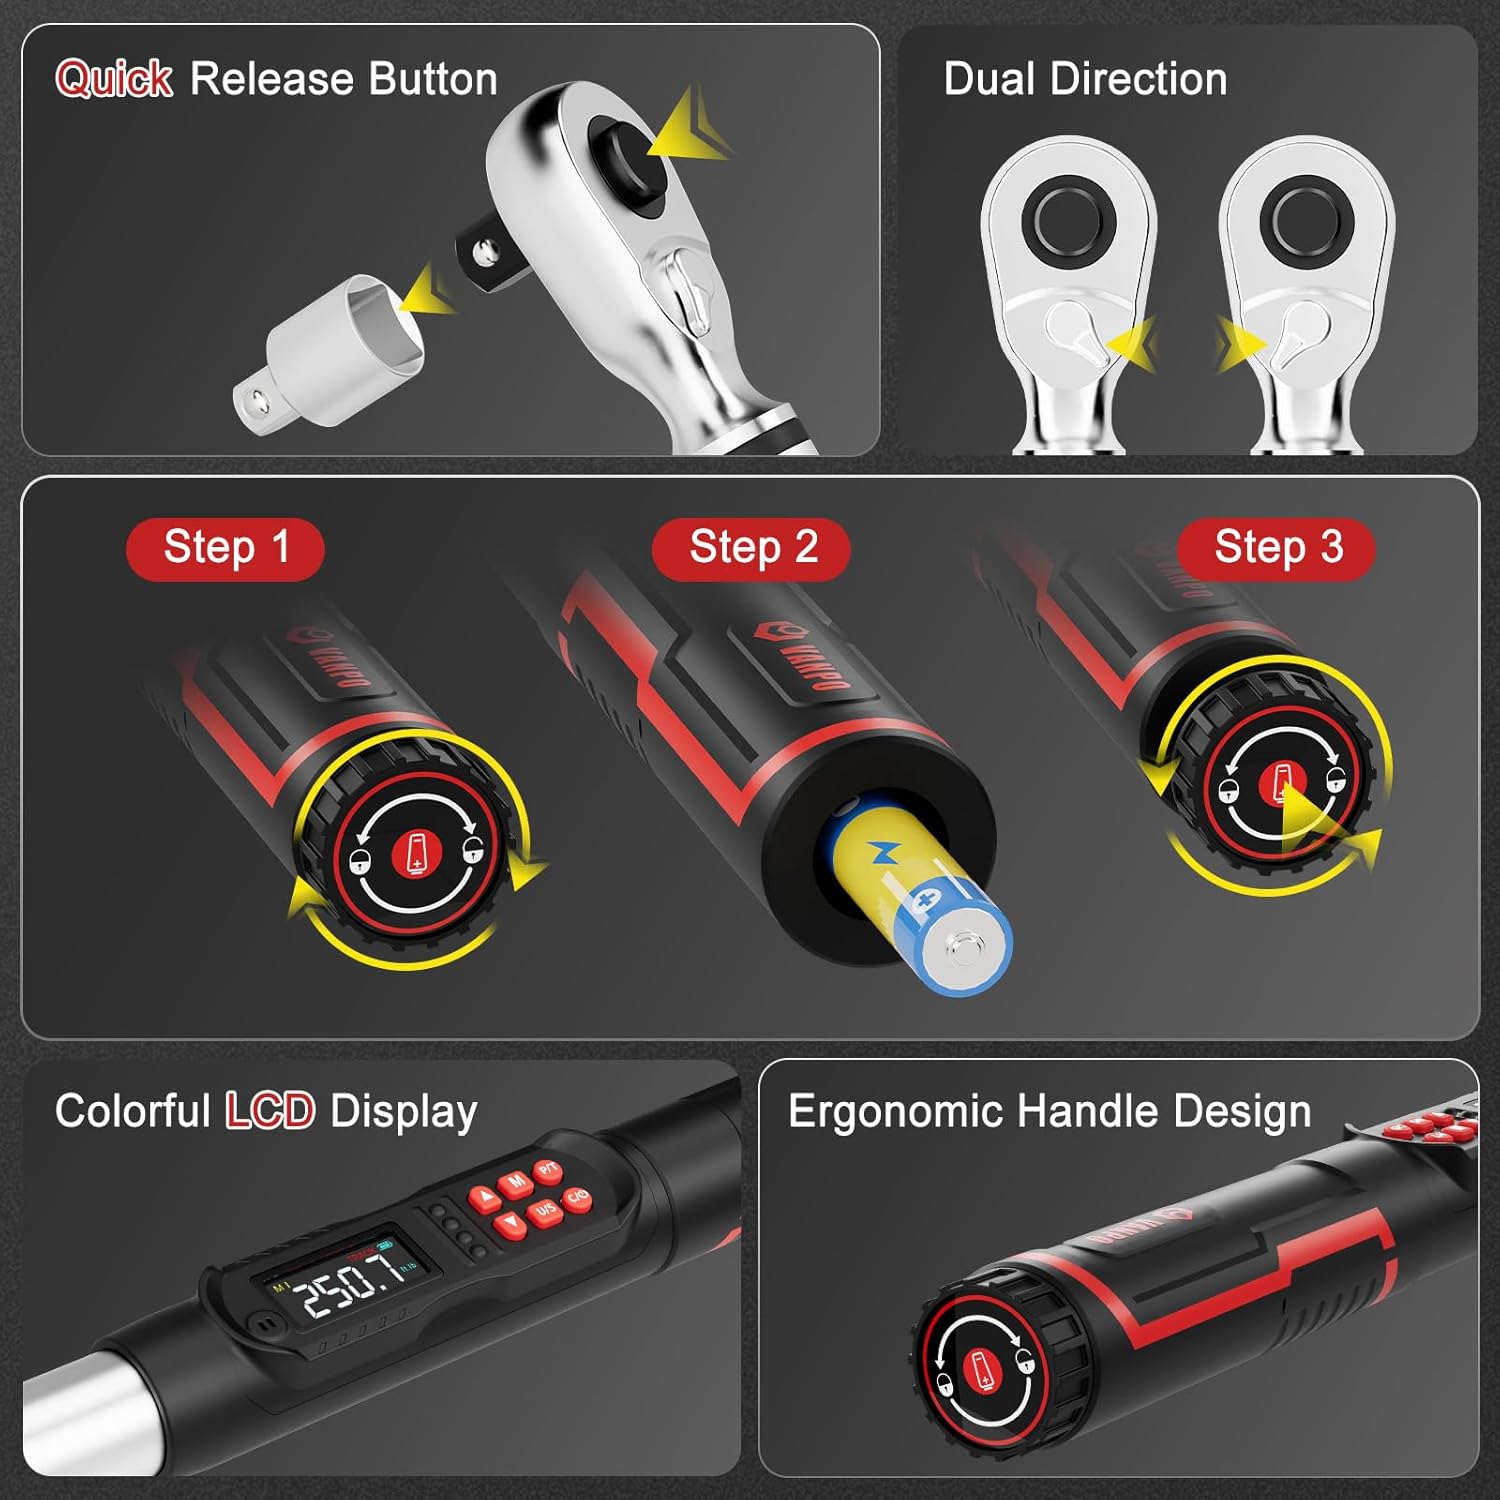
Figure 1: Battery installation and ergonomic handle design.
2. Colocación de accesorios
The wrench comes with a 125mm extension bar and a 1/2" to 3/8" adapter.
- To attach an extension or adapter, press the quick-release button on the ratchet head and insert the accessory.
- Ensure the accessory is securely locked in place before use.
Figure 2: Quick-release button for attaching sockets and accessories.
Instrucións de funcionamento
1. Power On/Off and Unit Selection
- Preme o ON/OFF button to power on the wrench.
- Preme o EE.UU button to cycle through measurement units: ft-lb, in-lb, Nm, kg-cm.

Figure 3: LCD display showing selectable measurement units.
2. Axuste do valor de par obxectivo
- Usa o Up e Abaixo arrow buttons to adjust the target torque value.
- The LCD will display the current setting.
3. Operating Modes (Peak & Track)
Preme o P/T button to switch between Peak and Track modes.
- Modo de pista: Displays real-time torque values as force is applied.
- Modo pico: Captures and displays the maximum torque value achieved during the tightening process.

Figure 4: Explanation of Track Mode and Peak Mode.
4. Aplicación do par de torsión
Apply force to the wrench. As you approach the preset torque value, the wrench will provide triple feedback:
- Alerta sonora: A buzzer will sound.
- Indicadores LED: Lights on the handle will illuminate (green for 85-90% of target, red for 100%).
- Feedback de vibración: The handle will vibrate.

Figure 5: Triple feedback system for reaching target torque.
5. Función de memoria
The wrench can store multiple preset torque values. Use the M button to access and save memory settings.
6. Función de bloqueo de pantalla
Mantén presionado M button for 3 seconds to lock the screen and buttons, preventing accidental changes during operation. Long press M de novo para desbloquear.
Mantemento
- Limpeza: Limpa a chave inglesa cun pano limpo e seco despois de cada uso. Non empregues produtos de limpeza abrasivos nin solventes.
- Almacenamento: Store the torque wrench in its protective case in a dry, cool place away from direct sunlight and extreme temperatures.
- Substitución da batería: Substitúa as pilas cando apareza o indicador de batería baixa na pantalla LCD.
- Calibración: For optimal accuracy, it is recommended to have the torque wrench calibrated periodically by a certified service center.
Resolución de problemas
| Problema | Causa posible | Solución |
|---|---|---|
| A chave inglesa non se acende. | Baterías gastadas ou instaladas incorrectamente. | Comprobe a polaridade das pilas ou substitúaas por pilas AA novas. |
| Lecturas de par inexactas. | A chave inglesa precisa calibración ou foi usada incorrectamente. | Ensure proper technique. Consider professional recalibration. |
| No audible/vibration feedback. | Feedback settings disabled or malfunction. | Check user manual for enabling feedback. Contact support if issue persists. |
Especificacións
| Característica | Detalle |
|---|---|
| Número de modelo | VP18-340-01 |
| Tamaño da unidade | 1/2 polgada |
| Alcance do par | 12.5–250.8 ft-lb / 17–340 Nm |
| Precisión | ± 2 % |
| Unidades de medida | ft-lb, in-lb, Nm, kg-cm |
| Comentarios | Audible, LED, Vibration |
| Modos de operación | Pico, Pista |
| Fonte de enerxía | 2 pilas AA (incluídas) |
| Material | 40 CR, Chrome Molybdenum Steel, Chrome Vanadium Steel |
| Peso do elemento | 5.29 libras |
| Compoñentes incluídos | 1* digital torque wrench, 1*1/2 to 3/8" Adapter, 1*1/2'' 125mm Extension Bar |
Garantía e soporte
This VANPO Digital Torque Wrench is backed by a 36-month manufacturer warranty. For warranty claims, technical support, or service inquiries, please refer to the contact information provided with your product packaging or visit the official VANPO websitio.
A Certificate of Calibration Report is included with your product, detailing the device's accuracy at the time of manufacture.
Vídeos de produtos
Funcións principaisview
Vídeo: Un overview of the key features and functionalities of the VANPO Digital Torque Wrench.
Detailed Features Demonstration
Video: A demonstration of the various features of the VANPO Digital Torque Wrench, including display and controls.