1. Introdución
The SVBONY SV241 Pro Astronomical Telescope Power Management Box is designed to centralize power distribution and data connectivity for various astronomy equipment. It features multiple DC outputs, USB ports, and PWM channels, along with intelligent dew point control, to streamline astrophotography and observation setups. This manual provides detailed instructions for the proper setup, operation, and maintenance of your SV241 Pro.
2. Información de seguridade
- Hot-Swapping Warning: Do not hot-swap devices. Only plug or unplug devices after the power is completely turned off. This prevents voltage fluctuations that could damage the product or connected equipment.
- Entrada de enerxía: Ensure the power input matches the specified voltage (12 voltios) e ampépoca (10 Amps máximo).
- Protección de circuítos: The device includes overvoltage, subvoltage, reverse polarity, short-circuit, electrophoresis, and electrostatic discharge protection. However, always handle connections carefully.
- Condicións ambientais: Operate the device within the specified temperature range (-10°C to 50°C) and humidity (5% to 85% RH).
3. Contido do paquete
Verifique que todos os elementos que se indican a continuación estean incluídos no seu paquete:
- 1X SV241 Astro Management Power Hub
- 1X Dovetail Mounting Base
- 1X DC5.5×2.1 [1m, 20AWG, Right-Angle] power cable
- 2X DC 5.5×2.1 [0.5m, 20AWG, Right-Angle] power cables
- 1X USB Type-B to USB Type-A cable (1m)
- 1X DC 5.5*2.5 Cigarette lighter power adapter cable
- 1X Temperature and humidity sensor
- 1X Temperature probe
- 2X M4x4 Hexagon socket screws
- 1X M2.5 L-shaped wrench

Image: All components included in the SVBONY SV241 Pro package.
4. Produto rematadoview
The SV241 Pro is a compact and durable power management solution for astrophotography. It integrates various ports and features to simplify your setup.
4.1 Introdución á interface

Imaxe: Lateral view illustrating the DC power input, 5V & 12V indicators, temperature/humidity sensor ports, PWM outputs, regulated DC output, and USB 3.0-B PC interface.

Imaxe: Arriba e dianteira view detailing the M4 and UNC1/4-20 mounting holes, switchable DC 5.5*2.1 outputs, always-on DC output, USB 3.0 Type-A ports, and 5V 2.5A Max Type-C interface.
- DC 5.5*2.5 Power Input Interface: Main power input (12V 10A Max).
- 5V & 12V Power Indicator: LEDs indicate power status.
- 2.5 Temp & 2.5 T+H Ports: Connect temperature and temperature/humidity sensors.
- PWM1-2 RCA Interface: Pulse Width Modulation channels for dew heaters.
- DC 5.5*2.1 Regulated Interface (0-15V 3A): Adjustable DC output.
- USB 3.0-B PC Interface: Connects the hub to your computer.
- M4 & UNC1/4-20 Holes: For mounting the device.
- DC 5.5*2.1 Switch 1-5 Interface: Five switchable DC outputs.
- DC 5.5*2.1 Always on Interface: One always-on DC output.
- USB 3.0 Type-A Interface: Dous portos USB 3.0 para transferencia de datos de alta velocidade.
- USB 2.0 Type-A Interface: Three USB 2.0 ports.
- 5V 2.5A MAX Type-C Interface: One Type-C port for power and data.
4.2 Protección de circuítos
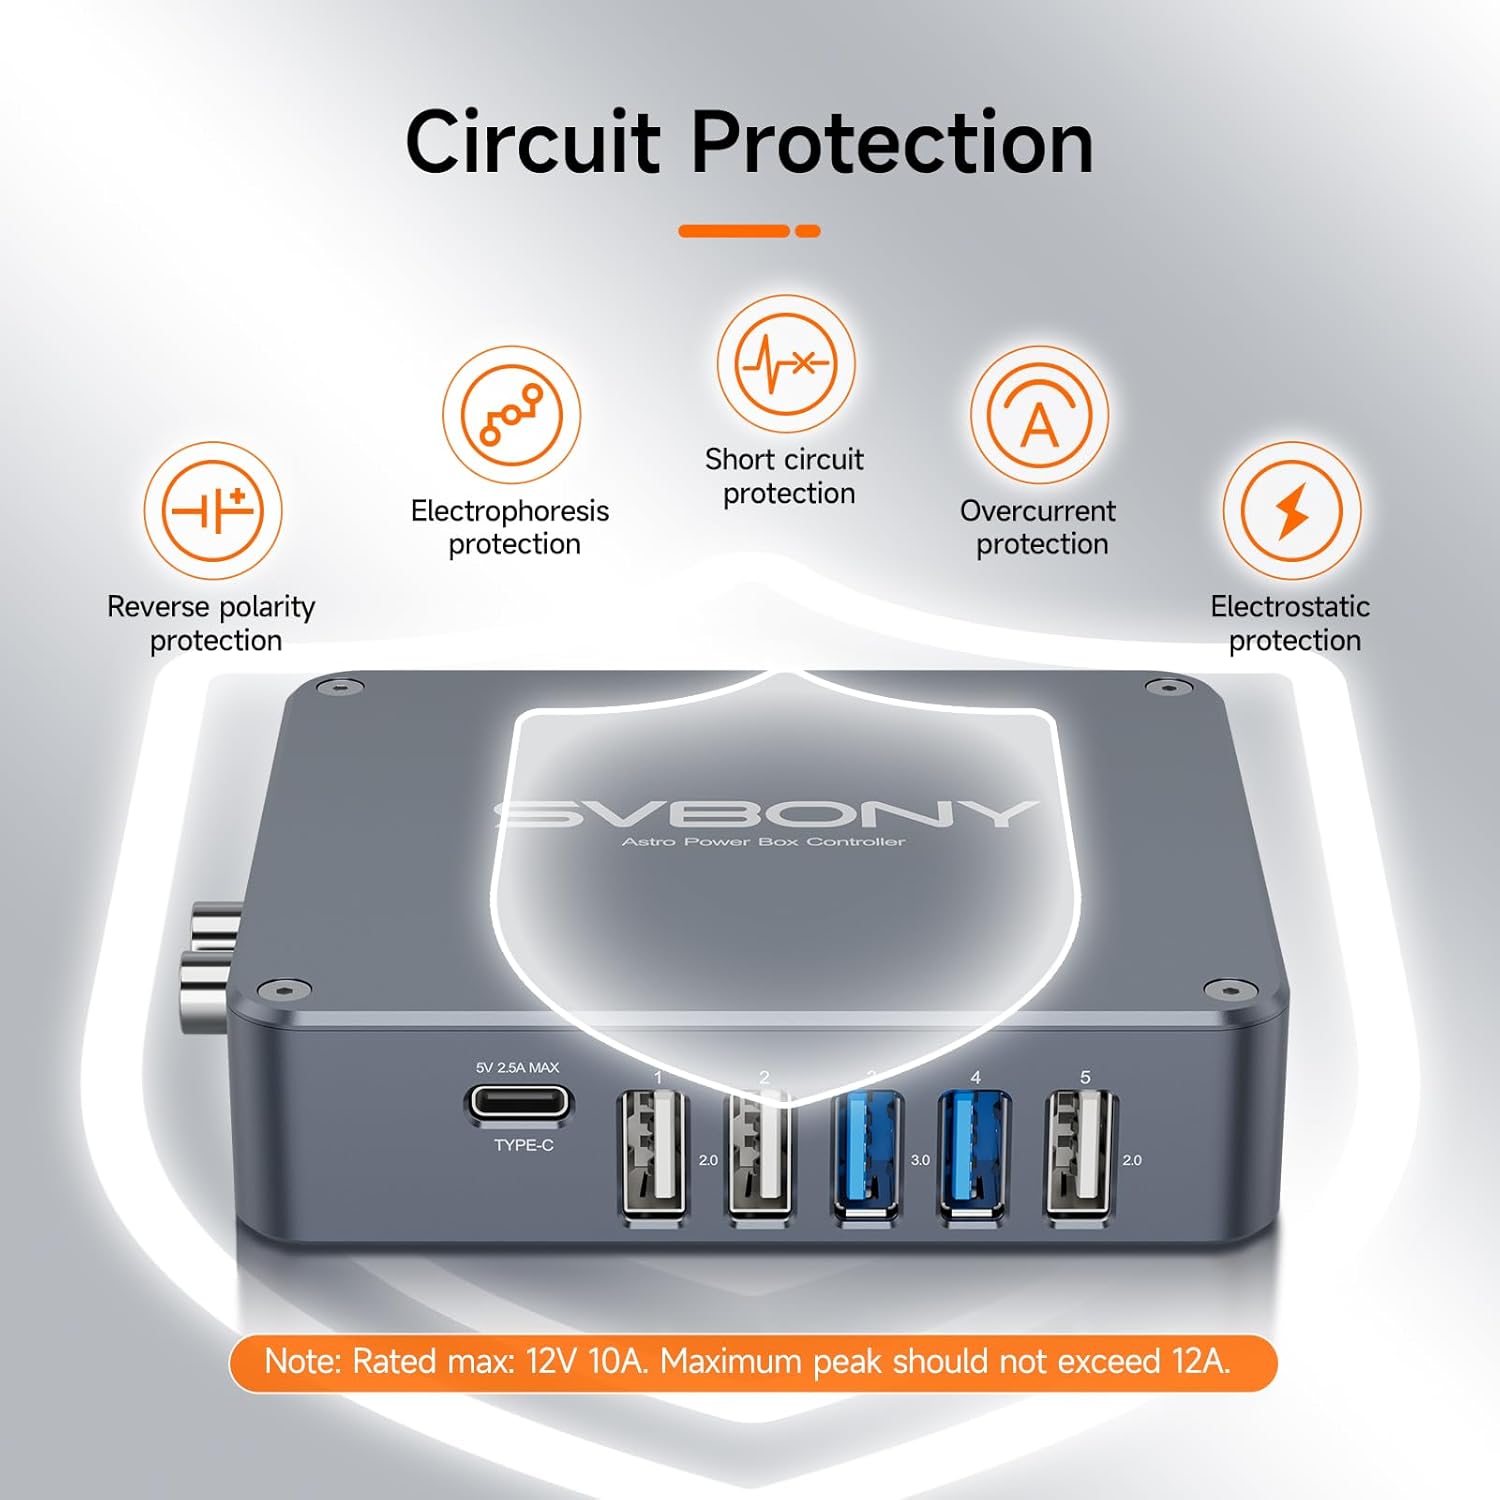
Image: Visual representation of the comprehensive safety features, including reverse polarity, electrophoresis, short circuit, overcurrent, and electrostatic protection.
The SV241 Pro is equipped with multiple protection mechanisms:
- Valor de protección contra sobrecorriente: 15 A
- SobrevoltagValor de protección: 15V
- UndervoltagValor de protección: 9.5V
- Reverse polarity & reverse current protection
- 15KV electrostatic discharge protection
5. Configuración
5.1 Montaxe do dispositivo
Use the included Dovetail Mounting Base and M4x4 Hexagon socket screws to attach the SV241 Pro to your telescope setup. The device also features UNC1/4-20 holes for alternative mounting options.

Imaxe: Un example setup showing the SV241 Pro integrated with other astrophotography equipment, demonstrating cable management.
5.2 Conexión de enerxía
- Connect the main power source to the DC 5.5*2.5 Power Input Interface using the provided cigarette lighter power adapter cable or a compatible 12V 10A power supply.
- Observe the 5V & 12V Power Indicators. They should glow steadily when the device is operating normally.
5.3 Conectar dispositivos USB
- Connect the SV241 Pro to your computer using the USB Type-B to USB Type-A cable. This enables remote control and data transfer.
- Plug your astronomy camera, guide camera, or other USB-powered accessories into the available USB 3.0 Type-A, USB 2.0 Type-A, or 5V 2.5A MAX Type-C interfaces.
5.4 Connecting Dew Heaters and Sensors
- Connect your dew heating belts to the PWM1-2 RCA Interfaces. These channels allow for automatic control based on environmental data.
- Attach the Temperature and humidity sensor to the 2.5 T+H port and the Temperature probe to the 2.5 Temp port. These sensors provide data for intelligent dew point control.
6. Instrucións de funcionamento
6.1 Control de potencia
The SV241 Pro allows for remote power control of connected devices. The DC 5.5*2.1 Switch 1-5 interfaces can be individually controlled via software. The 'Always on' interface provides continuous power.
6.2 Compatibilidade de software
The SV241 Pro is fully compatible with NINA (Nighttime Imaging 'N' Astronomy) software. This allows for seamless integration into mainstream astrophotography workflows for direct power control and status monitoring. Firmware has been upgraded to V1.2, adding Power-off Memory functionality.

Image: Screenshot of the NINA software interface, demonstrating remote power control and dew point smart control features of the SV241 Pro.
6.3 Dew Point Intelligent Control
The T+H interface collects humidity data and calculates the dew point. This information is used to automatically control the heating belts connected to the PWM channels, preventing dew formation on optics. The Temp interface monitors the heating belt temperature for precise control.

Image: Close-up of the NTC Thermistor, showing the temperature sensor and temperature + humidity sensor, used for environmental monitoring.
6.4 USB Hub Functionality
Each USB port on the SV241 Pro outputs 5V 2.5A with 2.75A over-current protection. The 5V line features reverse current, short-circuit protection, independent MLCC filtering, and 15KV electrostatic discharge protection, ensuring stable and safe power delivery to your USB devices.
6.5 Relevant Video Demonstrations
How to use SV305C Pro Telescope Camera?
Video: This video demonstrates the setup and usage of the SV305C Pro Telescope Camera, which can be connected and powered via the SV241 Pro Power Management Box's USB hub.
MK127 Real imaging of planets by Heavenly Backyard Astronomy
Video: This video showcases real planetary imaging results using a telescope, illustrating the type of advanced astrophotography setups that benefit from centralized power management.
How to use the SV165 guide scope with electronic eyepiece
Video: This video explains how to use the SV165 guide scope with an electronic eyepiece, another common piece of astronomy equipment that can be powered and managed by the SV241 Pro.
7. Mantemento
- Limpeza: Use a soft, dry cloth to clean the exterior of the power management box. Avoid using abrasive cleaners or solvents.
- Almacenamento: Garde o dispositivo nun ambiente seco e libre de po cando non o use.
- Xestión de cables Ensure all cables are properly routed and secured to prevent strain or damage.
- Actualizacións de firmware: Check the SVBONY official webperiodicamente para ver se hai actualizacións de firmware dispoñibles para garantir un rendemento óptimo e o acceso a novas funcións.
8 Solución de problemas
- Sen enerxía: Ensure the main power cable is securely connected to the DC 5.5*2.5 input and the power source is active. Check the 5V & 12V Power Indicators. If they are off, verify the power supply.
- Device Not Recognized by PC: Ensure the USB 3.0-B cable is securely connected to both the SV241 Pro and your computer. Verify that the necessary drivers are installed (refer to SVBONY support for driver downloads).
- USB Device Disconnections: Ensure all USB connections are secure. Check for any loose cables or damaged ports. If using multiple high-power USB devices, ensure your main power supply is sufficient.
- Dew Heater Malfunction: Verify that dew heaters are correctly connected to the PWM RCA interfaces. Check the temperature and humidity sensors for proper connection and functionality. Ensure the dew point control settings in your software (e.g., NINA) are configured correctly.
- Voltage Flutuacións: Always power off the SV241 Pro before connecting or disconnecting any devices to prevent voltage picos.
9. Especificacións
| Característica | Especificación |
|---|---|
| Dimensións do produto | 3.44 x 3.96 x 0.96 polgadas |
| Peso do elemento | 7.4 onzas |
| Número de modelo do artigo | FW9193B |
| Marca | SVBONY |
| Tipo de conector | DC 5.5*2.5 (Input) |
| Dispositivos compatibles | Astronomy camera, Computer, Lens Heater Warmer |
| Vol. De entradatage | 12 voltios |
| Ampera | 10 Amps |
| Total de portos USB | 5 (2x USB 3.0, 3x USB 2.0, 1x Type-C) |
| Característica especial | Sobrevoltage, subvoltage, and reverse polarity safeguards, Remote control, dew point intelligent control |
| Cor | Gray silver |
10. Garantía e soporte
For warranty information and technical support, please refer to the official SVBONY websitio web ou póñase en contacto directamente co servizo de atención ao cliente. Garde o recibo da compra como proba de compra para calquera reclamación de garantía.


