
1. Introdución
The Bikevee GPS Cycling Computer BKV300B is designed to provide cyclists with essential ride data. It features a clear 2.4-inch LCD display with automatic backlight, GPS tracking, and an auto start/stop function for convenience. Its waterproof design ensures reliable performance in various weather conditions.

Image 1.1: The Bikevee GPS Cycling Computer BKV300B.
Características clave
- Batería de longa duración: Up to 28 hours of continuous use with a 650mAh rechargeable battery.
- Clear 2.4" LCD Display: Easy-to-read screen with automatic backlight for day and night visibility.
- Auto Start/Stop: Automatically records ride data when cycling begins and pauses when stopped.
- Accurate Odometer: Tracks current speed, average speed, maximum speed, total distance, and trip time.
- Impermeable IPX7: Deseñado para soportar diversas condicións climáticas.
- Deseño lixeiro: Weighs approximately 50g (0.11lb) for minimal impact on your bike.

Image 1.2: The Bikevee GPS Cycling Computer BKV300B is lightweight and portable.
2. Que está incluído
Verifique que todos os compoñentes estean presentes no paquete antes de continuar coa instalación.
- Bike Computer (Main Unit)
- Cable de carga USB-C
- Standard Bike Out Front Mount
- Parafuso hexagonal
- Chave hexagonal
- Sponge (for mounting)
- Manual de usuario

Image 2.1: Package contents including the bike computer, charging cable, mount, and tools.
3. Configuración
3.1. Montaxe do dispositivo
The Bikevee GPS Cycling Computer BKV300B is designed for easy, wireless installation on your bicycle handlebars.
- Place the Mount: Position the standard bike out front mount horizontally on your handlebar. Use the provided sponge for a secure fit.
- Asegurar a montura: Use the hexagon socket screw and wrench to firmly attach the mount to your handlebar.
- Attach the Computer: Place the bike computer onto the mount.
- Lock the Computer: Turn the bike computer clockwise by 90 degrees until it clicks securely into place.

Image 3.1: Step-by-step guide for mounting the cycling computer.
3.2. Initial GPS Connection
For the first use, ensure you are in an open area. The device will take approximately 30 to 90 seconds to receive the satellite signal and calibrate the time. Subsequent connections will be significantly faster.

Image 3.2: The device utilizes five satellite positioning systems for accurate tracking.
3.3. Setting Time Zone and Units
To adjust settings, long press the right button (gear icon) to enter the settings page. Navigate through the settings using the right button and adjust values with the left button (power/play icon).
- Zona horaria: Find the time zone setting. Press the left button to change to your country's time zone.
- Unidades: Find the unit settings. Press the left button to switch between kilometers (KM/H) and miles (MPH). When switching to miles, the temperature display will automatically change to Fahrenheit.

Image 3.3: Setting the time zone on the device.

Image 3.4: Adjusting speed units (KM/H or MPH).
4. Instrucións de funcionamento
4.1. Funcións dos botóns
The device has three main buttons for control:
- Left Button (Power/Play/Pause):
- Mantén premido durante dous segundos para acender ou apagar.
- Click to display cycling data (play icon) or not display cycling data (pause icon).
- Middle Button (Settings):
- Long press to enter the settings page.
- Right Button (Next Page):
- Click to move to the next data page.

Imaxe 4.1: Acabadoview of button functions and display indicators.
4.2. Data Display
The device supports the display of 14 types of cycling data, organized across multiple screens. Use the right button to cycle through these screens.
| Tipo de datos | Descrición |
|---|---|
| Tempo de paseo | Duración da viaxe actual. |
| Ride Distance | Distancia percorrida na viaxe actual. |
| Velocidade media | Velocidade media durante a viaxe actual. |
| Velocidade máxima | Velocidade máis alta rexistrada durante a viaxe actual. |
| Distancia total | Cumulative distance recorded by the device. |
| Reloxo | Hora actual. |
| Temperatura | Temperatura ambiente actual. |
| Subida | Total elevation gain during the ride. |
| Degradado | Current incline/decline percentage. |
| Altitude | Altitude actual. |
| Average Gradient | Average incline/decline percentage. |
| Tempo total | Total accumulated time the device has been active. |
| Gradiente máximo | Steepest incline/decline recorded. |
| Altitude máxima | Highest altitude reached. |
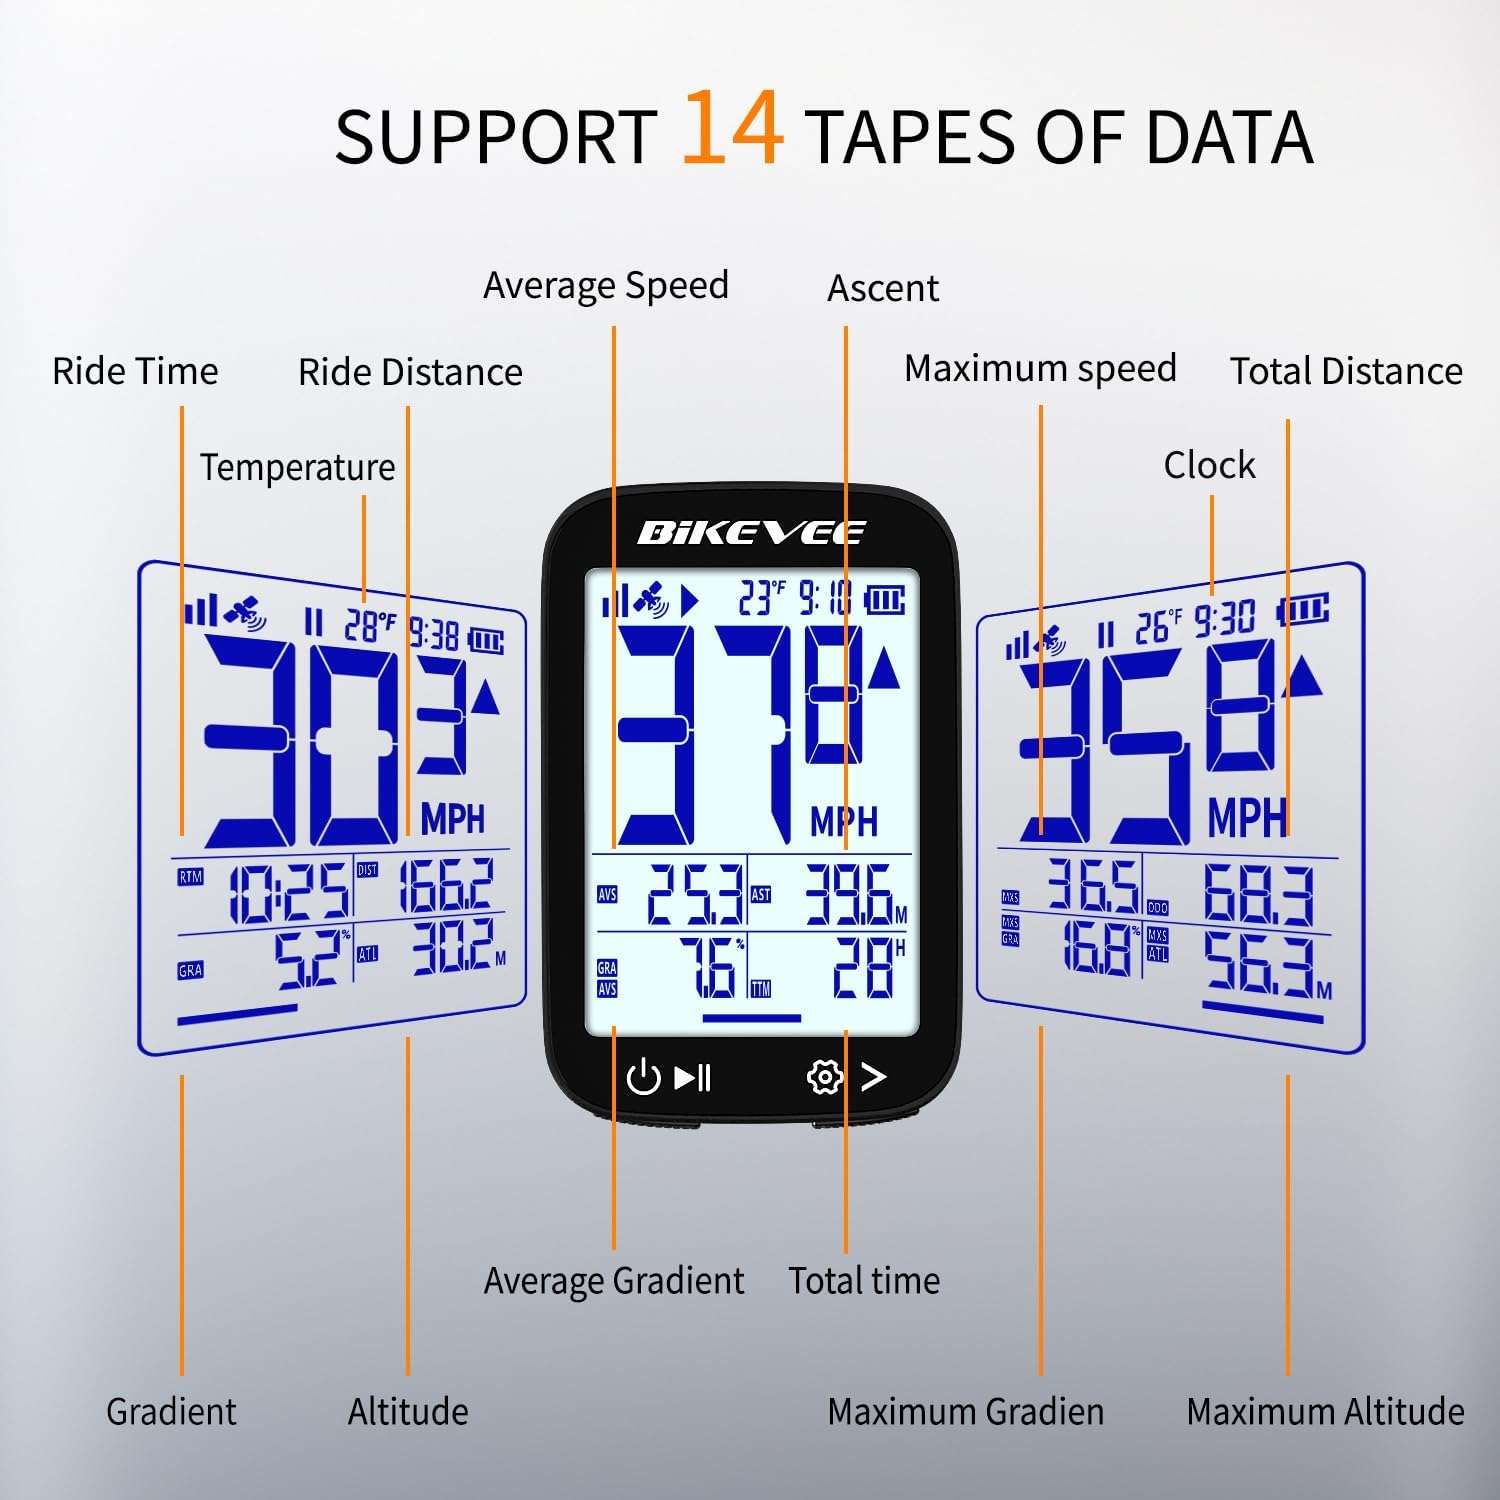
Imaxe 4.2: Ex.amples of data displayed on the cycling computer screen.
4.3. Auto Start/Stop and Backlight
- The device automatically begins recording when movement is detected and pauses when you stop, resuming when you start cycling again.
- The automatic backlight adjusts to ambient light conditions, ensuring visibility day or night.
5. Mantemento
5.1. Impermeabilización
The Bikevee GPS Cycling Computer BKV300B features an IPX7 waterproof rating. This means it is protected against temporary immersion in water (up to 1 meter for 30 minutes). It is suitable for use in rain and wet conditions.
Importante: Do not immerse the device in water for extended periods or use it for underwater activities. Ensure the USB-C charging port cover is securely closed to maintain water resistance.

Image 5.1: The device is IPX7 waterproof, suitable for rainy conditions.
5.2. Limpeza e coidado
- Limpe o dispositivo cun suave, damp cloth to remove dirt or sweat.
- Avoid using abrasive cleaners or solvents, as these can damage the screen or casing.
- Garda o dispositivo nun lugar fresco e seco cando non estea en uso.
6 Solución de problemas
If you encounter issues with your Bikevee GPS Cycling Computer BKV300B, refer to the following common problems and solutions:
- O dispositivo non se acende:
- Asegúrate de que a batería estea cargada. Conecta o dispositivo a unha fonte de alimentación mediante o cable USB-C.
- Manteña premido o botón de acendido durante polo menos 2 segundos.
- GPS signal loss or inaccurate readings:
- Asegúrate de estar nunha zona aberta con clara view of the sky. Dense tree cover or tall buildings can obstruct the signal.
- For first-time use or after a long period of inactivity, allow more time (30-90 seconds) for initial satellite acquisition.
- If issues persist, try restarting the device.
- A pantalla é difícil de ler:
- Check if the automatic backlight is functioning correctly. Ensure the screen is clean and free from smudges.
- Some data fields may appear smaller. Focus on the primary speed display for quick readings.
- Mount does not fit securely:
- Ensure the correct sponge or rubber pad is used with the mount to match your handlebar diameter.
- Tighten the hexagon socket screw firmly, but do not overtighten.
- Auto Start/Stop not working:
- Ensure the device is securely mounted and has a clear GPS signal.
- Movement detection requires a certain level of activity to trigger.
7. Especificacións
| Característica | Detalle |
|---|---|
| Número de modelo | BKV300B |
| Marca | Bikevee |
| Tipo de visualización | LCD |
| Tamaño da pantalla | 2.4 polgadas |
| Dimensións (L x W x H) | 70 x 45 x 16 mm (2.76 x 1.77 x 0.63 polgadas) |
| Peso do elemento | 50 gramos |
| Tipo de batería | Ion de litio |
| Capacidade da batería | 650 mAh |
| Duración da batería | Ata 28 horas |
| Tipo de sensor | GPS Sensor (supports GPS, BDS, QZSS, Glonass, Galileo) |
| Clasificación impermeable | IPX7 |
| Entrada da interface humana | Botóns |
| Tipo de montaxe | Soporte para manillar |
| Porto de carga | USB-C |
8. Garantía e soporte
8.1. Información da garantía
The Bikevee GPS Cycling Computer BKV300B comes with a two-year warranty from the date of purchase. This warranty covers manufacturing defects and malfunctions under normal use. It does not cover damage caused by misuse, accidents, unauthorized modifications, or improper installation.
Conserve o comprobante de compra para reclamacións de garantía.
8.2. Atención ao cliente
For technical assistance, troubleshooting, or warranty inquiries, please contact Bikevee customer support through the retailer where the product was purchased or visit the official Bikevee websitio para información de contacto.


